The printable version is no longer supported and may have rendering errors. Please update your browser bookmarks and please use the default browser print function instead.
|
The following article or section contains guides.
The strategies shown are just suggestions.
|
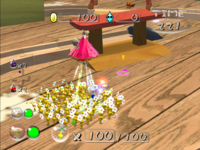
The Lost Toy Box is the third level in Pikmin 2's Challenge Mode and is automatically unlocked with the mode. Olimar and Louie will have the most Pikmin they will ever get in Challenge Mode, being a full squad of 100 Yellow Pikmin. It has two sublevels, both using the brightly lit toybox layout, which is where the name comes from.
Sublevel 1
- Theme: Toybox
- Music: Toy
- Time: 100 (200 seconds)
- Starting Pikmin:
- Treasures:
- Enemies:
- Obstacles:
- Vegetation:
- Others:
The background in this sublevel looks much like one of the sublevels from the Glutton's Kitchen. And, it's best to take out all the Dwarf Bulborbs first. Some may spawn very close to the adult Bulborb, so extra care should be taken not to wake it up accidentally during an attack; reloading the map for a better layout is possible. A spray of each kind will make it much less a threat, and there is usually only the need for one more on the next sublevel. This Bulborb will also drop the key.
Generate sample map →
| Technical sublevel information
|
| Internal cave name
|
ch_NARI_03toy
|
| "Main" object maximum (?)
|
7
|
| "Treasure" object maximum (?)
|
4
|
| "Gate" object maximum (?)
|
0
|
| Dead end unit probability (?)
|
0
|
| Number of rooms (?)
|
1
|
| Corridor-to-room ratio (?)
|
0
|
| Escape geyser (?)
|
No
|
| Clogged hole (?)
|
No
|
| Cave units file (?)
|
1_NARI_hit6x6_toy.txt
|
| Lighting file (?)
|
toy_light_cha.ini
|
| Background (?)
|
flooring ( wooden floor) wooden floor)
|
| Cave units (?)
|
|
|
|
|
|
|
| Dead end |
Three-way crossing |
Four-way crossing |
Turning corridor |
Corridor |
Long corridor
|
|
|
| Room with wooden box
|
- For details on how objects are spawned, and how some may fail to spawn, see here.
Sublevel 2
The second sublevel of the Lost Toy Box.
- Theme: Toybox
- Music: Toy Railroad
- Time: +150 (+300 seconds)
- Treasures:
- Enemies:
- Obstacles:
- Vegetation:
- Others:
The Dwarf Orange Bulborbs will usually be in the way of the Pikmin carrying the key back, so it's best to take them out first. The larger Orange Bulborb carries the key. Orange Bulborbs wake up faster than Red Bulborbs, so it's best to use the spare sprays here. The treasures are spread widely across the map, even on top of the train tracks, making some scavenging necessary. The geyser will appear once the key is brought back. The geyser must be opened by the Pikmin either by swarming it or throwing Pikmin at it.
Generate sample map →
| Technical sublevel information
|
| Internal cave name
|
ch_NARI_03toy
|
| "Main" object maximum (?)
|
7
|
| "Treasure" object maximum (?)
|
6
|
| "Gate" object maximum (?)
|
0
|
| Dead end unit probability (?)
|
0
|
| Number of rooms (?)
|
1
|
| Corridor-to-room ratio (?)
|
0
|
| Escape geyser (?)
|
Yes
|
| Clogged hole (?)
|
No
|
| Cave units file (?)
|
1_units_large_toy.txt
|
| Lighting file (?)
|
toy_light_cha.ini
|
| Background (?)
|
flooring ( wooden floor)
|
| Cave units (?)
|
|
|
|
|
|
|
| Dead end |
Three-way crossing |
Four-way crossing |
Turning corridor |
Corridor |
Long corridor
|
|
|
| Room with toy train track
|
- For details on how objects are spawned, and how some may fail to spawn, see here.
Trivia
Names in other languages
| Language
|
Name
|
Meaning
|
Notes
|
 Japanese Japanese |
神々のおもちゃ箱? |
Holy Toy Box |
|
 French (NoA) French (NoA) |
Coffre à jouets |
Toy chest |
|
 French (NoE) French (NoE) |
Coffre à jouets |
Toy chest |
|
 German German |
Spielzeugnostalgie |
Toy Nostalgia |
|
 Italian Italian |
Oggetti smarriti |
Lost and found |
|
 Spanish (NoA) Spanish (NoA) |
Caja del Juguete Perdido |
Lost Toy's Box |
Given the ambiguity of the English title, it could either be a box that belongs to a lost toy, or a toy box that is lost. The Nintendo of America localization team went with the former.
|

 Yellow Pikmin × 100 (flower)
 Boss Stone × 1 (inside Dwarf Red Bulborb)
 Crystallized Clairvoyance × 1
 Crystallized Telekinesis × 1
 Crystallized Telepathy × 1
 Harmonic Synthesizer × 1
 Implement of Toil × 1 (inside Dwarf Red Bulborb)
 Lustrous Element × 1 (inside Dwarf Red Bulborb)
 Manual Honer × 1 (inside Dwarf Red Bulborb)
 Mirrored Element × 1 (inside Dwarf Red Bulborb)
 Strife Monolith × 1 (inside Dwarf Red Bulborb)
 The Key × 1 (inside Red Bulborb)
 Dwarf Red Bulborb × 6
 Red Bulborb × 1


 Chance Totem × 1 (inside Dwarf Orange Bulborb)
 Decorative Goo × 1
 Essence of Desire × 1 (inside Dwarf Orange Bulborb)
 Essence of Despair × 1 (inside Dwarf Orange Bulborb)
 Frosty Bauble (US/Europe) /
  Ultimate Spinner (Japan) × 1
 Gemstar Wife × 1 (inside Dwarf Orange Bulborb)
 Joyless Jewel × 1
 Master's Instrument × 1
 Petrified Heart × 1
 Tear Stone × 1
 Dwarf Orange Bulborb × 6
 Orange Bulborb × 1