Industrial Maze: Difference between revisions
(Added maps of the sublevels.) |
Chazmatron (talk | contribs) (→Sublevel 2: guide) |
||
| (26 intermediate revisions by 9 users not shown) | |||
| Line 9: | Line 9: | ||
|treasures = 5 | |treasures = 5 | ||
|onions = 0 | |onions = 0 | ||
| | |suggested = {{icon|Red Pikmin|v=P4 HUD}} {{icon|Yellow Pikmin|v=P4 HUD}} | ||
| | |||
}} | }} | ||
The '''Industrial Maze''' is a [[cave]] in [[Sun-Speckled Terrace]] in {{p4}}. It has two sublevels where 15 [[Yellow Pikmin]] can be found. While there are no enemies inside apart from some [[Honeywisps]], there are [[pits]] Pikmin can easily fall into if the player is not careful. This cave also helps introduce the concept of working together with [[Oatchi]] and switching between him. This cave has {{sparklium|p4|490}} worth of treasure. | The '''Industrial Maze''' is a [[cave]] in [[Sun-Speckled Terrace]] in {{p4}}. It has two sublevels where 15 [[Yellow Pikmin]] can be found. While there are no enemies inside apart from some [[Honeywisps]], there are [[pits]] Pikmin can easily fall into if the player is not careful. This cave also helps introduce the concept of working together with [[Oatchi]] and switching between him, as well as introducing [[moving walkway]]s, as noted in Olimar's voyage log for this place. This cave has {{sparklium|p4|490}} worth of treasure. | ||
== How to reach == | == How to reach == | ||
| Line 29: | Line 28: | ||
* '''Enemies''': | * '''Enemies''': | ||
** None | ** None | ||
* '''Tools''': | |||
** {{icon|Moving walkway|y|v=P4}} × 4 | |||
** {{icon|Switch|y|v=P4}} × 1 (switches direction of moving walkways) | |||
** {{icon|Geyser|v=P4|y}} × 1 | |||
* '''Obstacles''': | * '''Obstacles''': | ||
** {{icon| | ** {{icon|Breakable pot|y|v=P4}} × 1 (group of 3) | ||
** {{icon|Dirt wall|y}} × 1 | ** {{icon|Dirt wall|y|v=P4}} × 1 | ||
** {{icon| | ** {{icon|Iron fence|y|v=P4}} × 2 | ||
* '''Wild Pikmin''': | * '''Wild Pikmin''': | ||
** {{icon|Yellow Pikmin|v=P4|y}} × 5 (sprouts) | ** {{icon|Yellow Pikmin|v=P4|y}} × 5 (sprouts) | ||
* '''Others''': | * '''Others''': | ||
** {{icon| | **{{icon|Candypop Bud|v=P4 yellow|y}} (Yellow) × 1 (If 100 Pikmin are brought in) | ||
** {{icon|Raw material| | ** {{icon|Raw material pile|l=raw material|y|v=P4}} × 1 (20 pieces) | ||
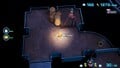
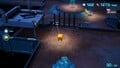
This sublevel is unique as you and Oatchi don't land together. You land where the [[S.S. Beagle]] stays whereas Oatchi on the ledge in front, behind the iron fence (as seen with the map image). | |||
To start, cross the moving walkway until you get to the middle and have Oatchi cross the one on his side. Then have him jump on the switch to reverse the directions of all the moving platforms allowing you to cross to the other side with the breakable pots. Have Oatchi come to where the pots are so he can smash them (revealing some raw material) and have your Pikmin collect them and the Memory Fragment (Top Right). Have both you and Oatchi return to where the switch is and pluck the 5 Yellow Pikmin sprouts and cross the moving platform Oatchi crossed at the start. Throw those 5 Yellow Pikmin at the Personal-Injury Plank (or have Oatchi rush it) and place any remaining Pikmin on the dirt wall. Have Oatchi return to the switch to press it when needed and enter the next sublevel. | |||
{{clear}} | {{clear}} | ||
== Sublevel 2 == | == Sublevel 2 == | ||
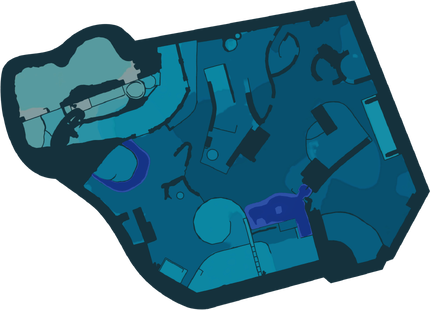
[[File:P4 Map Industrial Maze 2.png|thumb|300px|Map of the sublevel.]] | [[File:P4 Map Industrial Maze 2.png|thumb|300px|Map of the sublevel.]] | ||
| Line 47: | Line 52: | ||
** {{icon|Unlimited Locomotive|v=P4|y}} | ** {{icon|Unlimited Locomotive|v=P4|y}} | ||
** {{icon|Detective's Truth Seeker|v=P4|y}} | ** {{icon|Detective's Truth Seeker|v=P4|y}} | ||
** {{icon|Stately Rubber Cutie|v=P4|y}} | ** {{icon|Stately Rubber Cutie|v=P4|y}} | ||
* '''Enemies''': | * '''Enemies''': | ||
** {{icon|Honeywisp|v=P4|y}} × | ** {{icon|Honeywisp|v=P4|y}} × 3 | ||
* '''Obstacles''': | * '''Obstacles''': | ||
** {{icon| | ** {{icon|Breakable pot|y|v=P4}} × 5 (1 group of 3, 1 group of 2) | ||
** {{icon|Electric gate|y|v=P4}} × 1 | ** {{icon|Electric gate|y|v=P4}} × 1 | ||
** {{icon| | ** {{icon|Iron fence|y|v=P4}} × 2 | ||
** {{icon|Iron fence|y|v=P4 switch}} × 2 (lowered by button press) | |||
** {{icon|Paper bag|v=P4|y}} × 1 | ** {{icon|Paper bag|v=P4|y}} × 1 | ||
* '''Tools''' | |||
** {{icon|Floating platform|y|v=P4}} × 2 | |||
** {{icon|Geyser|v=P4|y}} × 1 | |||
** {{icon|Base|v=P4|y}} × 1 | |||
* '''Wild Pikmin''': | * '''Wild Pikmin''': | ||
** {{icon|Yellow Pikmin|v=P4|y}} × 5 (sprouts) | ** {{icon|Yellow Pikmin|v=P4|y}} × 5 (sprouts) | ||
** {{icon|Yellow Pikmin|v=P4|y}} × 5 (inside | ** {{icon|Yellow Pikmin|v=P4|y}} × 5 (inside breakable pot) | ||
* '''Others''': | * '''Others''': | ||
** {{icon|Candypop Bud|v=P4 yellow|y}} (Yellow) × 1 (If 100 Pikmin are brought in) | |||
** {{icon| | ** {{icon|Castaway|v=P4|y}} × 1 (on floating platform) | ||
** {{icon| | ** {{icon|Button|y|v=P4}} × 1 (lowers iron fences) | ||
** {{icon| | ** {{icon|Raw material pile|l=raw material|y|v=P4}} × 1 (15 pieces) | ||
** {{icon|Raw material| | |||
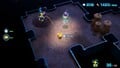
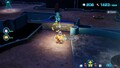
Head up the platforms where the breakable pots are and have Oatchi smash them, revealing the Stately Rubber Cutie. Have Oatchi carry it back and turn left. Turn left again at the fan and push down the paper bag, allowing for the Detective's Truth Seeker to be carried back. Head back to the fan and throw any Yellow Pikmin at the electric gate ahead. Return to where the breakable pots were and jump down the ledge where the pile of 15 raw material is located. Collect them, pluck the 5 Yellow Pikmin sprouts and head to the geyser. Once back up top, ride the floating platform across and press the button. Backtrack to the electric gate and enter the next segment. Call the S.S. Beagle over and have Oatchi smash the adjacent breakable pots (which house 5 additional Yellow Pikmin). Throw 3 of these new Pikmin at the stationary floating platform ahead to carry the castaway and have any remaining Pikmin dig up and retrieve the Unlimited Locomotive right next to the new base. Once all is collected, head to the fan and leave the cave. | |||
{{clear}} | {{clear}} | ||
== Gallery == | == Gallery == | ||
{{ | <gallery> | ||
P4 Memory Fragment (Top Right) location.jpg|The Memory Fragment (Top Right) on sublevel 1. | |||
P4 Personal-Injury Plank location.jpg|The Personal-Injury Plank on sublevel 1. | |||
P4 Unlimited Locomotive location.jpg|The Unlimited Locomotive on sublevel 2. | |||
P4 Detective's Truth Seeker location.jpg|The Detective's Truth Seeker on sublevel 2. | |||
P4 Stately Rubber Cutie Industrial Maze location.jpg|The Stately Rubber Cutie on sublevel 2. | |||
</gallery> | |||
{{images}} | |||
== Names in other languages == | == Names in other languages == | ||
{{foreignname | {{foreignname | ||
|Jap=手分けファクトリー | |Jap = 手分けファクトリー | ||
|JapR=Tewake Fakutorī | |JapR = Tewake Fakutorī | ||
|JapM=Factory | |JapM = Labor Division Factory | ||
|ChiTrad= 合作工廠 | |ChiTrad = 合作工廠 | ||
|ChiTradR= Hézuò | |ChiTradR = Hézuò Gōngchǎng | ||
|ChiTradM= Factory | |ChiTradM = Cooperation Factory | ||
|ChiSimp= 合作工厂 | |ChiSimp = 合作工厂 | ||
|ChiSimpR= Hézuò | |ChiSimpR = Hézuò Gōngchǎng | ||
|ChiSimpM= Factory of Cooperation | |ChiSimpM = Factory of Cooperation | ||
|Dut= | |Dut = Industrieel labyrintcomplex | ||
|DutM= | |DutM = Industrial labyrinth complex | ||
|Fra=Dédale industriel | |Fra = Dédale industriel | ||
|FraM=Industrial maze | |FraM = Industrial maze | ||
|Ger= | |Ger = Fabriklabyrinth | ||
|GerM= | |GerM = Factory Labyrinth | ||
|Ita= | |Ita = Labirinto industriale | ||
|ItaM= | |ItaM = Industrial labyrinth | ||
|Kor= | |Kor = 분업 공장 | ||
|KorR= | |KorR = Buneop Gongjang | ||
|KorM= | |KorM = Labor Division Factory | ||
| | |Spa = Laberinto industrial | ||
| | |SpaM = Industrial labyrinth | ||
| | |Por = Labirinto industrial | ||
| | |PorM = Industrial labyrinth | ||
}} | }} | ||
==See also== | |||
*[[Sun-Speckled Terrace]] | |||
*[[Crackling Cauldron]] | |||
*[[Drafty Gallery]] | |||
{{Sun-Speckled Terrace}} | |||
{{p4 caves}} | {{p4 caves}} | ||
[[Category: | [[Category:Industrial Maze| ]] | ||
Latest revision as of 17:15, May 5, 2024
| Industrial Maze | |
|---|---|

| |
| Location | Sun-Speckled Terrace |
| Sublevels | 2 |
| Rescues | 1 |
| Treasures | 5 |
| Onions | 0 |
| Suggested Pikmin | |
The Industrial Maze is a cave in Sun-Speckled Terrace in Pikmin 4. It has two sublevels where 15 Yellow Pikmin can be found. While there are no enemies inside apart from some Honeywisps, there are pits Pikmin can easily fall into if the player is not careful. This cave also helps introduce the concept of working together with Oatchi and switching between him, as well as introducing moving walkways, as noted in Olimar's voyage log for this place. This cave has ![]() × 490 worth of treasure.
× 490 worth of treasure.
How to reach[edit]
This cave is visible from the area's second base, Rugged Scaffold, near the direction of the Last-Frost Cavern. However, due to it being on a high ledge, the player cannot get to it without Oatchi's ability to jump. Once unlocked, the cave can be accessed without trouble.
Notes[edit]
Olimar's Voyage Log[edit]
Sublevel 1[edit]

- Treasures:
- Enemies:
- None
- Tools:
 Moving walkway × 4
 Switch × 1 (switches direction of moving walkways)
 Geyser × 1
- Obstacles:
 Breakable pot × 1 (group of 3)
 Dirt wall × 1
 Iron fence × 2
- Wild Pikmin:
 Yellow Pikmin × 5 (sprouts)
- Others:
 Candypop Bud (Yellow) × 1 (If 100 Pikmin are brought in)
 Raw material pile × 1 (20 pieces)
This sublevel is unique as you and Oatchi don't land together. You land where the S.S. Beagle stays whereas Oatchi on the ledge in front, behind the iron fence (as seen with the map image). To start, cross the moving walkway until you get to the middle and have Oatchi cross the one on his side. Then have him jump on the switch to reverse the directions of all the moving platforms allowing you to cross to the other side with the breakable pots. Have Oatchi come to where the pots are so he can smash them (revealing some raw material) and have your Pikmin collect them and the Memory Fragment (Top Right). Have both you and Oatchi return to where the switch is and pluck the 5 Yellow Pikmin sprouts and cross the moving platform Oatchi crossed at the start. Throw those 5 Yellow Pikmin at the Personal-Injury Plank (or have Oatchi rush it) and place any remaining Pikmin on the dirt wall. Have Oatchi return to the switch to press it when needed and enter the next sublevel.
Sublevel 2[edit]

- Treasures:
- Enemies:
 Honeywisp × 3
- Obstacles:
- Breakable pot × 5 (1 group of 3, 1 group of 2)
 Electric gate × 1
- Iron fence × 2
 Iron fence × 2 (lowered by button press)
 Paper bag × 1
- Tools
 Floating platform × 2
- Geyser × 1
- [icon] Base × 1
- Wild Pikmin:
- Yellow Pikmin × 5 (sprouts)
- Yellow Pikmin × 5 (inside breakable pot)
- Others:
- Candypop Bud (Yellow) × 1 (If 100 Pikmin are brought in)
 Castaway × 1 (on floating platform)
 Button × 1 (lowers iron fences)
- Raw material pile × 1 (15 pieces)
Head up the platforms where the breakable pots are and have Oatchi smash them, revealing the Stately Rubber Cutie. Have Oatchi carry it back and turn left. Turn left again at the fan and push down the paper bag, allowing for the Detective's Truth Seeker to be carried back. Head back to the fan and throw any Yellow Pikmin at the electric gate ahead. Return to where the breakable pots were and jump down the ledge where the pile of 15 raw material is located. Collect them, pluck the 5 Yellow Pikmin sprouts and head to the geyser. Once back up top, ride the floating platform across and press the button. Backtrack to the electric gate and enter the next segment. Call the S.S. Beagle over and have Oatchi smash the adjacent breakable pots (which house 5 additional Yellow Pikmin). Throw 3 of these new Pikmin at the stationary floating platform ahead to carry the castaway and have any remaining Pikmin dig up and retrieve the Unlimited Locomotive right next to the new base. Once all is collected, head to the fan and leave the cave.
Gallery[edit]
The Memory Fragment (Top Right) on sublevel 1.
The Personal-Injury Plank on sublevel 1.
The Unlimited Locomotive on sublevel 2.
The Detective's Truth Seeker on sublevel 2.
The Stately Rubber Cutie on sublevel 2.
_location.jpg)


|
This article or section is in need of more images. |
Names in other languages[edit]
| Language | Name | Meaning |
|---|---|---|
| 手分けファクトリー? Tewake Fakutorī |
Labor Division Factory | |
(traditional) |
合作工廠 Hézuò Gōngchǎng |
Cooperation Factory |
(simplified) |
合作工厂 Hézuò Gōngchǎng |
Factory of Cooperation |
| Industrieel labyrintcomplex | Industrial labyrinth complex | |
| Dédale industriel | Industrial maze | |
| Fabriklabyrinth | Factory Labyrinth | |
| Labirinto industriale | Industrial labyrinth | |
| 분업 공장 Buneop Gongjang |
Labor Division Factory | |
| Labirinto industrial | Industrial labyrinth | |
| Laberinto industrial | Industrial labyrinth |
See also[edit]
![[icon]](/index.php?title=Special:Upload&wpDestFile=Base_P4_icon.png)
| Caves in Pikmin 4 | |
|---|---|
| Rescue Command Post | Burrow of Beginnings |
| Sun-Speckled Terrace | Last-Frost Cavern • Crackling Cauldron • Aquiferous Summit • Industrial Maze • Hectic Hollows |
| Blossoming Arcadia | Drafty Gallery • Secluded Courtyard • Sightless Passage • Kingdom of Beasts |
| Serene Shores | Seafloor Resort • Subzero Sauna • Below-Grade Discotheque • Engulfed Castle |
| Hero's Hideaway | Doppelgänger's Den • Frozen Inferno • Plunder Palace |
| Giant's Hearth | Ultimate Testing Range • Dream Home • Cradle of the Beast |
| Primordial Thicket | The Mud Pit • Subterranean Swarm • Cavern for a King |
| Dandori Challenges | Dandori Day Care • Hotshock Canyon • Rockaway Cellars • Test Tubs • Ice-Cross Course • Hefty Haulway • Aerial Incinerator • Strategic Freezeway • Planning Pools • Toggle Training • Cliff-Hanger's Hold • Oasis of Order • Trial of the Sage Leaf |
| Dandori Battles | Trial Run • Battle in a Box • Dandori Castle • Leafy Showdown • Hot Sandy Duel • Final Battle |