Barriers of Flame
| Barriers of Flame Sector 6 – Area D | |
|---|---|

| |
| Treasures | 3 |
| Pikmin available | Yellow Pikmin, Rock Pikmin |
| Requirements | Complete Terror Trench |
| Next area | Blazing Winds |
| Music | Sweltering Parchlands area Sweltering Parchlands area - back side |
Barriers of Flame (たちふさがる ほのお?) is the fourth main area in the Sweltering Parchlands. In this area, there are several open flames, as well as several fire-related enemies, like Fiery Blowlets. However, the player is not given Red Pikmin in this area. Instead, they must find other ways to get rid of the flames, like smothering them with iron blocks, or putting them out with sacs of water hanging from the ceiling. The iron blocks being pushed also allow access to different parts of the area.
|
The following article or section is in need of assistance from someone who plays Hey! Pikmin. |
Description
This area is filled with patches of fire, however, the player can only use Yellow Pikmin and Rock Pikmin in this area, which aren't protected against fire. Thus, Olimar must be very careful with those Pikmin. In order to make progress in this level, the player has to use the many iron blocks that stand in the area to smother the patches of fire. There are also some sacks of water, which have the same function. The first treasure of the area, the Flysmacker, can be found in a small nook, behind a Fiery Blowlet. The Enduring Partnership can be found above a Fiery Dwarf Bulblax, which cannot be killed. The last treasure, the Creativity Stimulator, can be reached only with the use of the jetpack. After that, Olimar can go to the exit of the area.
Some players experience trouble with throwing the Yellow Pikmin at the vine with a stick, after the Fiery Dwarf Bulblax is crushed – even by tapping at the highest point of the touch screen, the Yellow Pikmin will not reach.[1][2]. The reason for this is not known, but it might be possible to resolve it by recalibrating the touch screen in the console's settings.
Cutscenes
| Cutscene | Screenshot | Trigger | Description |
|---|---|---|---|
| Dirt block | 
|
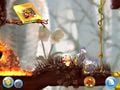
The player destroys the first dirt block and advances forward a bit. | Three Rock Pikmin are walking in line, on top of a dirt block. A fourth Rock Pikmin runs to catch up with them, and jumps right behind the group. However, with this jump, it ends up landing on the dirt block, making it crumble. That Pikmin falls right away, but the remaining three continue to walk on air. After a bit, the front one looks down, realizes the floor is gone, and all three fall down. |
| Blade of grass | 
|
The player enters the doorway hidden behind a dirt block and walks a bit forward. | Two Yellow Pikmin notice something up ahead. Right at the ledge of the plain they're on, there is a long blade of grass and a Sparklium Seed hanging in the air near the tip of the blade of grass. In the valley down below, there is a sleeping Mockiwi. The Pikmin walk up to the grass, one of them jumps on it and begins climbing up. The grass starts to bend with the Pikmin's weight, making it get closer to the seed. At the tip, the Pikmin stretches out the reach the Sparklium Seed, but the grass ends up bending all the way down, resulting in the Pikmin hanging upside-down from it, and becoming face-to-face with the still-sleeping Mockiwi. After some seconds of silence, the Pikmin starts panicking, which wakes the Mockiwi up. Just as it shrieks, the Pikmin races back up the blade of grass, joins its friend, and the two race back to Olimar's side. Meanwhile, the Mockiwi turns around and walks away. |
| Wall run | 
|
The player pushes the iron block on the second level all the way to the left, climbs up the vine, and approaches the Sparklium flower. | Four Yellow Pikmin jump out from behind a pile of leafs. They get close to a Sparklium Flower hanging on the ceiling, and stare at it. Since the flower is next to the wall, and the wall in this room is a bit curved near the floor, the Pikmin at the front takes a running start, runs up the wall, gets close to the flower, but ends up falling back down and tumbling down the wall. It ends up next to the other three Pikmin, gets up, and shakes its head. Excited, the last one in the line tries to do the same, and just as it runs off, the other three decide to follow suit. All four, once again, get close, but just end up tumbling back down. Once again, they get up, and shake their heads. |
Pikmin locations
|
The following article or section is in need of assistance from someone who plays Hey! Pikmin. |
| Spot | Location | Pikmin | Requirements | Notes |
|---|---|---|---|---|
Objects
Treasures
Enemies
 Crumbug × 4
 Fiery Blowlet × 2
 Fiery Dwarf Bulblax × 4
 Mockiwi × 1
 Red Bubblimp × 4
Obstacles
|
The following article or section is in need of assistance from someone who plays Hey! Pikmin. |
Others
 Sparklium Seed × 54
 Sparklium flower × 2
 Heart × 4
Guide
|
The following article or section contains guides. |
|
The following article or section is in need of assistance from someone who plays Hey! Pikmin. |
Gallery
One of the iron blocks that need to be pushed from the other side.
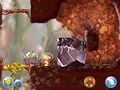
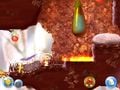
Location of the Flysmacker.
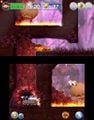
The caged Fiery Dwarf Bulblaxes.
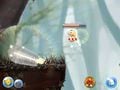
Location of the Enduring Partnership.
A water sac.
Location of the Creativity Stimulator.


Names in other languages
| Language | Name | Meaning |
|---|---|---|
| たちふさがる ほのお? Tachifusagaru ho no o |
||
| Een muur van vuur | A wall of fire | |
| Sentier enflammé | Burning path | |
| Ein Weg durch die Flammen | A Path through the Flames | |
| Fiamme roventi | Red-hot flames | |
| Barreras llameantes | Flaming barriers | |
| Barreras Llameantes | Flaming Barriers |
References
- ^ Video comment on YouTube
- ^ Thread on reddit, published on July 11th, 2019, retrieved on August 7th, 2019
| Sector 6: Sweltering Parchlands | |
|---|---|
| Normal areas | 6-A: Scorched Earth • 6-B: Lights in the Darkness • 6-C: Terror Trench • 6-D: Barriers of Flame • 6-E: Blazing Winds |
| Extra areas | 6-X: Sizzling Precipice • Secret Spot 21 • Secret Spot 22 • Secret Spot 23 • Secret Spot 24 • Sparklium Springs |