Seesaw block: Difference between revisions
Greenpickle (talk | contribs) mNo edit summary |
Greenpickle (talk | contribs) m (→Use: - minor addition) |
||
| Line 14: | Line 14: | ||
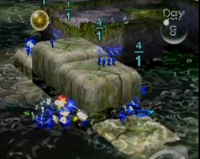
[[Image:Scales Four.png|thumb|The set of four blocks in Perplexing Pool.]] | [[Image:Scales Four.png|thumb|The set of four blocks in Perplexing Pool.]] | ||
You want to get onto block 1 and raise it. So, begin by leaving all of the Pikmin with one Captain and getting to block 1 with the other. The only block low enough for a Captain to walk onto from the floor is block 4, as it is the lowest at its low position. So, you need to lower the block by throwing 1 Pikmin on it: you will notice that its pair, block 2, will be the one to rise. Walk onto block 4. Next, you need to raise block 4 to be able to walk onto block 3, which is done by throwing 2 Pikmin onto its pair, block 2 (to weigh more than the one on block 4 already). | You want to get onto block 1 and raise it. So, begin by leaving all of the Pikmin with one Captain and getting to block 1 with the other. The only block low enough for a Captain to walk onto from the floor is block 4, as it is the lowest at its low position. So, you need to lower the block by throwing 1 Pikmin on it: you will notice that its pair, block 2, will be the one to rise. Walk onto block 4. Next, you need to raise block 4 to be able to walk onto block 3, which is done by throwing 2 Pikmin onto its pair, block 2 (to weigh more than the one on block 4 already). | ||
To get onto block 2, you must raise block 3, by throwing one Pikmin onto its pair, block 1. Finally, to get onto the final block, block 1, you must raise block 2, by whistling the 2 Pikmin on it to you, thereby leaving the 1 on block 4 to outweigh the 0 on block 2 and so cause it to rise. | |||
Now you have a Captain on the ledge, you can throw enough enough Pikmin to carry the treasure up to him, on the left of the highest block. | |||
==Locations== | ==Locations== | ||
Revision as of 12:50, April 27, 2008
|
Since this subject has no official name, the name "Seesaw block" is conjectural. |
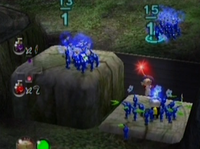
Scales are found in pairs or, in one case, a set of four, only in Pikmin 2 and only above ground. They are found one low enough to walk onto, the other higher but still low enough that Pikmin can be thrown onto them, and their purpose is to provide access to higher ground. To manipulate them, throw Pikmin onto the higher of the two. On whichever block the weight of Pikmin (displayed above the block) is greater, that falls to become the lower block.
Use
To use the scales, stand on the lower one and throw one more than half of all your Pikmin onto the higher block, at which point the Captain and Pikmin left with him will raise up, allowing them to walk onto the ledge above. The Pikmin Captains apparently weigh nothing, or at least have negligible weight. Unfortunately, this means some Pikmin must be left behind, leaving you with fewer up the top and the chance of forgetting where the others are.
Fortunately, there are a number of ways to get around this. With two Captains, have one remain at the bottom and take the other to the top by outweighing him with one Pikmin. Next, throw all the Pikmin from the lower Captain to the higher one. The drawback is that this allows only one Captain to get to the top. Alternatively, you can throw all Pikmin up onto the target ledge except one, then use that one to outweigh both Captains (on the lower block) and raise them to the higher position where the other Pikmin are. This, however, leaves one Pikmin down below.
Another, harder method allows you to get all Pikmin and captains up. Throw all but one Pikmin on the target platform (preferably make this a White Pikmin). Throw it onto the higher scale, then quickly call it back and throw it on the target platform. You should have all Pikmin on the target platform and your captains on the higher scale.
The set of four blocks in Perplexing Pool are more complicatedly linked. Each block is connected to the one two away from it along the line, one up, one down, like the pairs of blocks. Another twist is that each block along the line is a little higher, from the furthest to the nearest to the ledge. This means that the Captain can only walk onto the the end block. The following is a simple way to make the scales work and requires that they be numbered from 1 to 4, from the ledge to the furthest from it. Remember that you need Blue Pikmin.
You want to get onto block 1 and raise it. So, begin by leaving all of the Pikmin with one Captain and getting to block 1 with the other. The only block low enough for a Captain to walk onto from the floor is block 4, as it is the lowest at its low position. So, you need to lower the block by throwing 1 Pikmin on it: you will notice that its pair, block 2, will be the one to rise. Walk onto block 4. Next, you need to raise block 4 to be able to walk onto block 3, which is done by throwing 2 Pikmin onto its pair, block 2 (to weigh more than the one on block 4 already).
To get onto block 2, you must raise block 3, by throwing one Pikmin onto its pair, block 1. Finally, to get onto the final block, block 1, you must raise block 2, by whistling the 2 Pikmin on it to you, thereby leaving the 1 on block 4 to outweigh the 0 on block 2 and so cause it to rise.
Now you have a Captain on the ledge, you can throw enough enough Pikmin to carry the treasure up to him, on the left of the highest block.
Locations
- 2 pairs in Awakening Wood.
- 1 pair in Perplexing Pool.
- 1 set of four in Perplexing Pool.

