The Forest of Hope: Difference between revisions
| Line 1: | Line 1: | ||
{{infobox area | |||
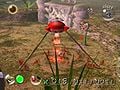
'''The Forest of Hope''' is the second playable area in '' | |image = PIK ForestofHope.jpg | ||
|parts = 8 | |||
|hazards = {{waterbody}} {{r}} | |||
|obstacles = {{wgate}} {{bgate}} {{wrockgate}} {{brockgate}} | |||
|pikmin = [[Yellow Pikmin|Yellow]] | |||
|requirements = [[Main Engine]] | |||
}} | |||
'''The Forest of Hope''' is the second playable area in ''Pikmin''. On the area select map it is the center of the vast forest in the game, and has eight pieces scattered all over the area. [[Yellow Pikmin]] are first found in this area. This area would become the [[Awakening Wood]] in ''[[Pikmin 2]]''. | |||
{{listen|filename=Forest of Hope.ogg|title=Forest of Hope Music}} | {{listen|filename=Forest of Hope.ogg|title=Forest of Hope Music}} | ||
==General | ==General layout== | ||
Most of this area consists of vast plains with some gates and high walls that block the way. There is a small lake near the main plain. | Most of this area consists of vast plains with some gates and high walls that block the way. There is a small lake near the main plain. The most common enemies here are [[Red Bulborb]]s and [[Dwarf Red Bulborb]]s. To the north is the arena where the [[Armored Cannon Beetle]] is fought and to the southwest is the ledge where the [[Burrowing Snagret]]s are. | ||
The [[ | The [[bomb-rock]]s in this area are located inside tin cans. The first one is near the great plain with [[Red Bulborb]]s, another one is near the place where the [[Yellow Onion]] is originally found. The last can is in the place where the [[Nova Blaster]] is found. On the first day the area is visited, some are found out of the cans. | ||
Although water defends access to the [[Geiger Counter]], the [[Radiation Canopy]] and the [[Sagittarius]], it is possible to collect these parts with yellow Pikmin; thus, the area can be completed uniquely with them. | Although water defends access to the [[Geiger Counter]], the [[Radiation Canopy]] and the [[Sagittarius]], it is possible to collect these parts with yellow Pikmin; thus, the area can be completed uniquely with them. | ||
In Challenge Mode there are a lot more Bulborbs, and Spotty Bulbears can also be found where the Armored Cannon Beetle (along with a [[Pearly Clamclamp]]) and Burrowing Snagrets are found in story mode. | In Challenge Mode there are a lot more Bulborbs, and Spotty Bulbears can also be found where the Armored Cannon Beetle (along with a [[Pearly Clamclamp]]) and Burrowing Snagrets are found in story mode. | ||
==Enemies== | ==Enemies== | ||
*[[Dwarf Red Bulborb]] | *[[Dwarf Red Bulborb]] | ||
*[[Red Bulborb]] | *[[Red Bulborb]] | ||
*[[Iridescent Flint Beetle]] | *[[Iridescent Flint Beetle]] | ||
*[[Honeywisp]] | *[[Honeywisp]] | ||
*[[Female Sheargrub]] | *[[Female Sheargrub]] | ||
*[[Male Sheargrub]] | *[[Male Sheargrub]] | ||
*[[Wogpole]] | *[[Wogpole]] | ||
*[[Armored Cannon Beetle]] | *1 [[Armored Cannon Beetle]] | ||
*[[Burrowing Snagret]]s | *3 [[Burrowing Snagret]]s | ||
*[[Swooping Snitchbug]] (Day 15-30) | *1 [[Swooping Snitchbug]] (Day 15-30) | ||
{{clear}} | {{clear}} | ||
==Challenge Mode | ==Challenge Mode enemies== | ||
*[[Dwarf Red Bulborb]] | *[[Dwarf Red Bulborb]] | ||
*[[Dwarf Bulbear]] | *[[Dwarf Bulbear]] | ||
| Line 33: | Line 41: | ||
*[[Pearly Clamclamp]] | *[[Pearly Clamclamp]] | ||
== | ==Ship parts== | ||
*[[Eternal Fuel Dynamo]] | *[[Eternal Fuel Dynamo]] | ||
*[[Whimsical Radar]] | *[[Whimsical Radar]] | ||
| Line 47: | Line 55: | ||
Image:Pikmin1 1.jpg|Red Pikmin at the landing site. | Image:Pikmin1 1.jpg|Red Pikmin at the landing site. | ||
Image:DSC00460.JPG|A group of Pikmin near a Yellow Onion and some pellets in [[Challenge Mode (Pikmin 1)|Challenge Mode]]. | Image:DSC00460.JPG|A group of Pikmin near a Yellow Onion and some pellets in [[Challenge Mode (Pikmin 1)|Challenge Mode]]. | ||
Image:Forest_Of_Hope.png|Forest Of Hope(Look at [[The Impact Site]] for Map Key. | Image:Forest_Of_Hope.png|Forest Of Hope ( Look at [[The Impact Site]] for Map Key. | ||
FoH texture.png|The radar pattern for The Forest of Hope. | File:FoH texture.png|The radar pattern for The Forest of Hope. | ||
</gallery> | </gallery> | ||
==Trivia== | |||
*It is possible to complete this area in one day. It requires going back to the Impact Site on day 2 and growing 80+ red pikmin there. | |||
{{Areas|e0ffe0|005500|005500|000|fff}} | {{Areas|e0ffe0|005500|005500|000|fff}} | ||
Revision as of 12:19, November 27, 2011
| The Forest of Hope | |
|---|---|
| File:PIK ForestofHope.jpg | |
| Ship parts | 8 |
| Pikmin available | Yellow |
| Requirements | Main Engine |
| Music | {{{music}}} |
The Forest of Hope is the second playable area in Pikmin. On the area select map it is the center of the vast forest in the game, and has eight pieces scattered all over the area. Yellow Pikmin are first found in this area. This area would become the Awakening Wood in Pikmin 2.
General layout
Most of this area consists of vast plains with some gates and high walls that block the way. There is a small lake near the main plain. The most common enemies here are Red Bulborbs and Dwarf Red Bulborbs. To the north is the arena where the Armored Cannon Beetle is fought and to the southwest is the ledge where the Burrowing Snagrets are.
The bomb-rocks in this area are located inside tin cans. The first one is near the great plain with Red Bulborbs, another one is near the place where the Yellow Onion is originally found. The last can is in the place where the Nova Blaster is found. On the first day the area is visited, some are found out of the cans.
Although water defends access to the Geiger Counter, the Radiation Canopy and the Sagittarius, it is possible to collect these parts with yellow Pikmin; thus, the area can be completed uniquely with them.
In Challenge Mode there are a lot more Bulborbs, and Spotty Bulbears can also be found where the Armored Cannon Beetle (along with a Pearly Clamclamp) and Burrowing Snagrets are found in story mode.
Enemies
- Dwarf Red Bulborb
- Red Bulborb
- Iridescent Flint Beetle
- Honeywisp
- Female Sheargrub
- Male Sheargrub
- Wogpole
- 1 Armored Cannon Beetle
- 3 Burrowing Snagrets
- 1 Swooping Snitchbug (Day 15-30)
Challenge Mode enemies
Ship parts
- Eternal Fuel Dynamo
- Whimsical Radar
- Extraordinary Bolt
- Nova Blaster
- Shock Absorber
- Radiation Canopy
- Geiger Counter
- Sagittarius
Gallery
Red Pikmin at the landing site.
- DSC00460.JPG
A group of Pikmin near a Yellow Onion and some pellets in Challenge Mode.
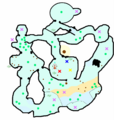
Forest Of Hope ( Look at The Impact Site for Map Key.
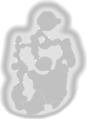
The radar pattern for The Forest of Hope.


Trivia
- It is possible to complete this area in one day. It requires going back to the Impact Site on day 2 and growing 80+ red pikmin there.