Wistful Wild: Difference between revisions
m (minor fix) |
No edit summary |
||
| (161 intermediate revisions by 74 users not shown) | |||
| Line 1: | Line 1: | ||
{{game icons|p2=y}} | |||
'' | {{infobox area | ||
|map = Wistful Wild HD.jpg | |||
|screenshot = 04 Site Wistful Wild.png | |||
|treasures = 5 | |||
|caves = 3 | |||
|obstacles = {{white bramble gate}} {{poison black bramble gate}} {{electric gate P2}} {{water body}} {{clog}} {{bridge P1}} {{purples required}} | |||
|requirements = Repay the debt | |||
|music = ''[[Music in Pikmin 2#Wistful Wild|Wistful Wild]]'' | |||
}} | |||
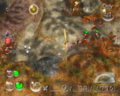
{{ | The '''Wistful Wild''' ({{j|のぞみの大地|Nozomi no Daichi|Land of Wishes}}) is the fourth and final [[area]] in {{p2}}, set in an autumn forest. It contains three [[cave]]s, and five overground [[treasure]]s worth {{pokos|3175}} in total. It is unlocked when [[Hocotate Freight]]'s debt of {{pokos|10000}} is fully repaid. Its terrain is a combination of [[The Impact Site]] and [[The Final Trial]] from {{p1}}. It is the hardest area in the game, filled with many extremely dangerous creatures and containing some of the lengthiest and most difficult caves. | ||
The [[Perplexing Pool]] must be unlocked for this area to open. If the debt is repaid before the [[Geographic Projection]] is collected, the Wistful Wild will not open until it is collected, at which point it will open up alongside the Perplexing Pool. | |||
==Layout== | |||
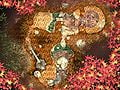
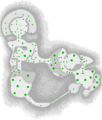
{{location map | width = 272 | height = 319 | image = WW texture.png | bg = #111 | caption = Map of all treasure and caves, along with the location of the ship, in the Wistful Wild. | icons = | |||
{{map icon | Hocotate ship | 58 | 63 | bg=none}} | |||
{{map icon | cave | 50 | 129 | l=Cavern of Chaos}} | |||
{{map icon | cave | 196 | 234 | l=Hole of Heroes}} | |||
== | {{map icon | cave | 238 | 160 | l=Dream Den}} | ||
{{map icon | Doomsday Apparatus | 26 | 118 | bg = rgba(0,0,128,0.5)}} | |||
{{map icon | Seed of Greed | 211 | 165 | bg = rgba(0,0,128,0.5)}} | |||
{{map icon | Anti-hiccup Fungus | 219 | 150 | bg = rgba(0,0,128,0.5)}} | |||
{{map icon | Armored Nut | 231 | 222 | bg = rgba(0,0,128,0.5)}} | |||
{{map icon | Conifer Spire | 124 | 277 | bg = rgba(0,0,128,0.5)}} | |||
}} | |||
The Wistful Wild contains a variety of [[terrain]] types, such as dirt, wood, and metal. Some contents of the region include two large lakes, one of which can be [[clog|drained]] and the other a [[bridge]] built over; a clearing with three [[Randomness|random]]-typed [[Burgeoning Spiderwort]]s; and decorating it are rusted metal structures, tree stumps, [[Foxtail]]s and a half-visible yield sign where the Onions land. | |||
{{Clear}} | |||
==Caves== | ==Caves== | ||
| Line 22: | Line 33: | ||
*[[Hole of Heroes]] | *[[Hole of Heroes]] | ||
*[[Dream Den]] | *[[Dream Den]] | ||
== | == Objects == | ||
* | ===Treasures=== | ||
*[[ | {{columns|2| | ||
* | *{{icon|Doomsday Apparatus|y}} | ||
* | *{{icon|Seed of Greed|y}} (inside an Orange Bulborb) | ||
*[[ | *{{icon|Anti-hiccup Fungus|y}} | ||
* | *{{icon|Armored Nut|y}} (inside a Creeping Chrysanthemum) | ||
*[[ | *{{icon|Conifer Spire|y}} | ||
}} | |||
===Enemies=== | |||
[[File:Gatling Groink Wistful Wild.png|thumb|A Gatling Groink in the Wistful Wild.]] | |||
*[[ | {{columns|2| | ||
*{{icon|Armored Cannon Larva|y|n=Armored Cannon Beetle Larva}} × 1 | |||
* | *{{icon|Cloaking Burrow-nit|y}} × 1 | ||
* | *{{icon|Creeping Chrysanthemum|y}} × 3 | ||
*[[ | *{{icon|Decorated Cannon Beetle|y}} × 1 | ||
*{{icon|Dwarf Bulborb|y|n=Dwarf Red Bulborb}} × 5 | |||
*{{icon|Fiery Blowhog|y}} × 2 | |||
*{{icon|Gatling Groink|y}} × 1 | |||
*{{icon|Hermit Crawmad|y}} × 1 | |||
*{{icon|Mitite|y}} (randomly come out of [[egg]]s) | |||
*{{icon|Orange Bulborb|y}} × 2 | |||
*{{icon|Ravenous Whiskerpillar|y}} × 2 | |||
*{{icon|Shearwig|y}} × 3 | |||
*{{icon|Swooping Snitchbug|y}} × 1 | |||
*{{icon|Ujadani|y}} (appear every 30 days from day 1) | |||
*{{icon|Watery Blowhog|y}} × 1 | |||
*{{icon|Withering Blowhog|y}} × 3 | |||
*{{icon|Yellow Wollywog|y}} × 1 | |||
}} | |||
===Vegetation=== | |||
{{columns|2| | |||
*{{icon|Burgeoning Spiderwort|y|v=mixed}} × 3 | |||
*{{icon|Foxtail|y}} × 14 | |||
*{{icon|Figwort|y}} (small) × 5 (autumn) | |||
*{{icon|Figwort|y}} (large) × 16 (autumn) | |||
}} | |||
===Obstacles=== | |||
{{columns|2| | |||
*{{icon|Burgeoning Spiderwort mold|y}} × 3 (one grows at each Spiderwort) | |||
*{{icon|Clog|y}} × 1 | |||
*{{icon|Electric gate|y|v=P2}} × 1 | |||
*{{icon|Poison black bramble gate|y}} × 2 | |||
*{{icon|White bramble gate|y}} × 1 | |||
}} | |||
===Tools=== | |||
*{{icon|Bridge|y|v=P1}} × 1 | |||
===Other=== | |||
*{{icon|Egg|y}} × 10 | |||
*[[Rubble]] × 2 | |||
==Piklopedia and Treasure Hoard== | |||
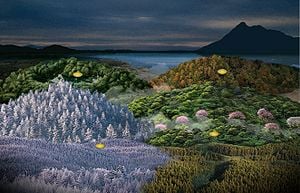
[[File:WistfulWildComparison.png|thumb|Comparison between the two visible level models. Note the slight differences in shape.]] | |||
When the [[Hocotate ship]]'s icon is placed on top of the Wistful Wild and the [[Piklopedia (Pikmin 2)|Piklopedia]] or the [[Treasure Hoard]] are entered, the archives will be seen on the Wistful Wild. Like the other areas, the model for this location is different from the in-game area model, but unlike the other areas, the level layout is identical, and the differences are very minor. | |||
The most obvious difference between the in-game Wistful Wild and the Piklopedia version is a change in background theme; while the Wistful Wild version takes place in an autumn-themed forest plain with some stumps, the version used in both the Piklopedia and Treasure Hoard is situated between a dense bamboo forest and an actual autumn forest with actual, modeled, trees. The following differences can also be noticed: | |||
* A lone leaf on a stump at the pathway separating the section with the [[Anti-hiccup Fungus]] and the section with the [[Creeping Chrysanthemum]]s is positioned slightly differently, over the poisonous black gate that would be present in the in-game area. | |||
* The red leaves seen during the landing cutscene are absent. | |||
* The stump containing the Hole of Heroes in the in-game area has parts of its surrounding rock walls slightly lower, making its walls look sharper. | |||
* The two stumps that have walkable ramps and a slide have the walls slightly lower. They also both have different texture mapping; the right stump in particular, has incorrect bark mapping and a single vertex on the inside that has its vertex color completely brown. | |||
* The wall to the right of the exit leading out of the landing site has its terrain a bit lower. One of the leaves on top of that terrain has been moved as a result. | |||
* Minor scenery and minor texture mapping differences. These differences can be seen on background flora, the walls in the section that contains the [[Conifer Spire]], and the crack left by the clog. | |||
==Gallery== | ==Gallery== | ||
<gallery | <gallery> | ||
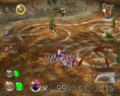
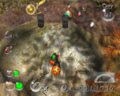
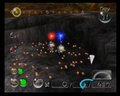
04 Site Wistful Wild.png|The landing site. | |||
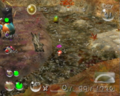
WW start.png|An alternate view of the landing site. | |||
Makeup of Wistful Wild.JPG|The patterns for | WW chaos.png|The entrance to the [[Cavern of Chaos]]. | ||
WW connection.png|The shortest of the two paths that connect the two sections of the Wistful Wild. | |||
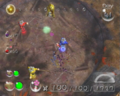
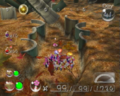
WW spiderworts.png|The area with [[Burgeoning Spiderwort]]s. | |||
WW bamboo.png|The corridor of bamboo. | |||
WW TIS.png|The zone after the bamboo cane. | |||
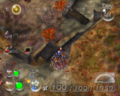
WW stump.png|The large tree stump on the second section. | |||
WW pond.png|The pond on the second section. | |||
</gallery> | |||
===Other images=== | |||
<gallery> | |||
Nozomi snap.jpg|Official overhead map. | |||
Wistful Wild HD.jpg|High definition overhead map, taken with in-game screenshots. | |||
WW paths.png|[[Carrying]] paths on the Wistful Wild. | |||
Pikmin 2 wistful wild.gif|A map of the Wistful Wild showing treasure locations. | |||
Pikmin2Bugs.png|The [[Ujadani]]. | |||
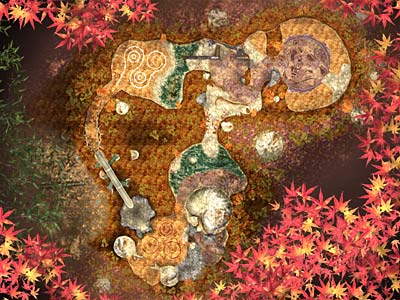
Makeup of Wistful Wild.JPG|The patterns for The Impact Site and The Final Trial compared with a map of Wistful Wild. | |||
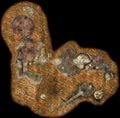
WW texture.png|The texture used for the [[radar]] pattern. | |||
</gallery> | </gallery> | ||
{{featured| | ==Trivia== | ||
*It is possible for a [[leader]] to get up onto the wall borders of the map via several enemies, including the [[Decorated Cannon Beetle]] and [[Watery Blowhog]]. [http://www.youtube.com/watch?v=E62Ku-Q-it0&feature=related This video] shows how much of the area can be explored there. | |||
*The YIELD sign that makes up the starting arena is actually a Stop sign in the Japanese version, likely to spend less time remodeling the sign since stop signs in Japan are triangular in shape.{{cite web|http://tcrf.net/Pikmin_2/Version_Differences#Yield_Sign|Pikmin 2/Version Differences|The Cutting Room Floor}} | |||
*The "start" and "end" of the area are the same as the locations of the final and first [[ship part]]s in ''[[Pikmin (game)|Pikmin]]'', respectively. | |||
*The Wistful Wild is the only area in ''Pikmin 2'' to not have an above-ground [[boss]] fight of any kind. | |||
*The Wistful Wild contains every enemy in the game except for three: the [[Giant Breadbug]], the [[Waterwraith]], and the [[Toady Bloyster]]. | |||
*The Wistful Wild was originally going to be called the "Land of Promise", as seen in the early English script left inside the game.{{cite web|https://tcrf.net/Pikmin_2/Early_English_Script#Names|Pikmin 2/Early English Script|The Cutting Room Floor|retrieved={{date|31|July|2017}}}} It is possible that it was changed due to the religious connotation. This name is retained in all other language versions, however (see [[#Names in other languages|here]]). | |||
*In the ''[[New Play Control!]]'' port, it is possible to destroy the water [[clog]] before taking down the bramble gate. This can be achieved by throwing Pikmin to the edge north of the clog, then using the [[group move]] function to guide them to the lake. Then, they can be guided to the northwest of the clog using some more group moving commands, and finally, they can be dismissed, remotely whistled, and guided east by a leader standing near the gate looking at the gate. They can then be dismissed on the clog.{{cite youtube|KVHNcZalKRc|showing how to destroy the clog without breaking the gate in ''New Play Control! Pikmin 2''}} | |||
*The object around the landing site of the area, which was formerly the Emperor Bulblax's arena at [[The Final Trial]], is a sideways tire rim as evident by the filename of its texture: <code>last_wheel_s3tc</code>. | |||
*While walking through the area, cicada calls, duck quacks and {{w|American robin}} calls can be heard. | |||
==Names in other languages== | |||
{{Foreignname | |||
|Jap=のぞみの大地 | |||
|JapR=Nozomi no Daichi | |||
|JapM=Land of Wishes | |||
|Ger=Land der Verheißung | |||
|GerM=Land of Promise | |||
|Spa=Tierra de Promisión | |||
|SpaM=Land of Promise | |||
|FraE=Terre des Promesses | |||
|FraEM=Land of Promises | |||
|FraA=Terre des promesses | |||
|FraAM=Land of promises | |||
|Ita=Terra di promesse | |||
|ItaM=Land of promises | |||
|ChiTrad=願望大地 | |||
|ChiTradM=Land of Wishes | |||
}} | |||
==See also== | |||
*[[The Impact Site]] | |||
*[[The Final Trial]] | |||
*[[Dream Den]] | |||
*[[Primordial Thicket]] | |||
==References== | |||
{{refs}} | |||
{{featured|{{date|18|June}}|{{date|18|August|2009}}}} | |||
{{ | {{Wistful Wild}} | ||
[[ | {{P2 areas|ffeecc|772200|772200}} | ||
[[Category:Wistful Wild| ]] | |||
Latest revision as of 10:19, March 3, 2024
| Wistful Wild | |
|---|---|
| |
| Treasures | 5 |
| Caves | 3 |
| Requirements | Repay the debt |
| Music | Wistful Wild |


The Wistful Wild (のぞみの大地?, lit.: "Land of Wishes") is the fourth and final area in Pikmin 2, set in an autumn forest. It contains three caves, and five overground treasures worth ![]() × 3175 in total. It is unlocked when Hocotate Freight's debt of
× 3175 in total. It is unlocked when Hocotate Freight's debt of ![]() × 10000 is fully repaid. Its terrain is a combination of The Impact Site and The Final Trial from Pikmin. It is the hardest area in the game, filled with many extremely dangerous creatures and containing some of the lengthiest and most difficult caves.
× 10000 is fully repaid. Its terrain is a combination of The Impact Site and The Final Trial from Pikmin. It is the hardest area in the game, filled with many extremely dangerous creatures and containing some of the lengthiest and most difficult caves.
The Perplexing Pool must be unlocked for this area to open. If the debt is repaid before the Geographic Projection is collected, the Wistful Wild will not open until it is collected, at which point it will open up alongside the Perplexing Pool.
Layout[edit]
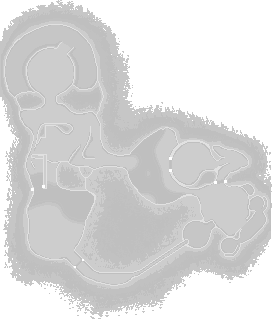
The Wistful Wild contains a variety of terrain types, such as dirt, wood, and metal. Some contents of the region include two large lakes, one of which can be drained and the other a bridge built over; a clearing with three random-typed Burgeoning Spiderworts; and decorating it are rusted metal structures, tree stumps, Foxtails and a half-visible yield sign where the Onions land.
Caves[edit]
Objects[edit]
Treasures[edit]
 Doomsday Apparatus
 Seed of Greed (inside an Orange Bulborb)
 Anti-hiccup Fungus
 Armored Nut (inside a Creeping Chrysanthemum)
 Conifer Spire
Enemies[edit]

 Armored Cannon Beetle Larva × 1
 Cloaking Burrow-nit × 1
 Creeping Chrysanthemum × 3
 Decorated Cannon Beetle × 1
 Dwarf Red Bulborb × 5
 Fiery Blowhog × 2
 Gatling Groink × 1
 Hermit Crawmad × 1
 Mitite (randomly come out of eggs)
 Orange Bulborb × 2
 Ravenous Whiskerpillar × 2
 Shearwig × 3
 Swooping Snitchbug × 1
 Ujadani (appear every 30 days from day 1)
 Watery Blowhog × 1
 Withering Blowhog × 3
 Yellow Wollywog × 1
Vegetation[edit]
 Burgeoning Spiderwort × 3
 Foxtail × 14
 Figwort (small) × 5 (autumn)
- Figwort (large) × 16 (autumn)
Obstacles[edit]
 Burgeoning Spiderwort mold × 3 (one grows at each Spiderwort)
 Clog × 1
 Electric gate × 1
 Poison black bramble gate × 2
 White bramble gate × 1
Tools[edit]
 Bridge × 1
Other[edit]
Piklopedia and Treasure Hoard[edit]

When the Hocotate ship's icon is placed on top of the Wistful Wild and the Piklopedia or the Treasure Hoard are entered, the archives will be seen on the Wistful Wild. Like the other areas, the model for this location is different from the in-game area model, but unlike the other areas, the level layout is identical, and the differences are very minor.
The most obvious difference between the in-game Wistful Wild and the Piklopedia version is a change in background theme; while the Wistful Wild version takes place in an autumn-themed forest plain with some stumps, the version used in both the Piklopedia and Treasure Hoard is situated between a dense bamboo forest and an actual autumn forest with actual, modeled, trees. The following differences can also be noticed:
- A lone leaf on a stump at the pathway separating the section with the Anti-hiccup Fungus and the section with the Creeping Chrysanthemums is positioned slightly differently, over the poisonous black gate that would be present in the in-game area.
- The red leaves seen during the landing cutscene are absent.
- The stump containing the Hole of Heroes in the in-game area has parts of its surrounding rock walls slightly lower, making its walls look sharper.
- The two stumps that have walkable ramps and a slide have the walls slightly lower. They also both have different texture mapping; the right stump in particular, has incorrect bark mapping and a single vertex on the inside that has its vertex color completely brown.
- The wall to the right of the exit leading out of the landing site has its terrain a bit lower. One of the leaves on top of that terrain has been moved as a result.
- Minor scenery and minor texture mapping differences. These differences can be seen on background flora, the walls in the section that contains the Conifer Spire, and the crack left by the clog.
Gallery[edit]
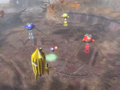
The landing site.
An alternate view of the landing site.
The entrance to the Cavern of Chaos.
The shortest of the two paths that connect the two sections of the Wistful Wild.
The area with Burgeoning Spiderworts.
The corridor of bamboo.
The zone after the bamboo cane.
The large tree stump on the second section.
The pond on the second section.


Other images[edit]
Official overhead map.
High definition overhead map, taken with in-game screenshots.
Carrying paths on the Wistful Wild.
A map of the Wistful Wild showing treasure locations.
The Ujadani.
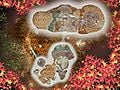
The patterns for The Impact Site and The Final Trial compared with a map of Wistful Wild.
The texture used for the radar pattern.


Trivia[edit]
- It is possible for a leader to get up onto the wall borders of the map via several enemies, including the Decorated Cannon Beetle and Watery Blowhog. This video shows how much of the area can be explored there.
- The YIELD sign that makes up the starting arena is actually a Stop sign in the Japanese version, likely to spend less time remodeling the sign since stop signs in Japan are triangular in shape.[1]
- The "start" and "end" of the area are the same as the locations of the final and first ship parts in Pikmin, respectively.
- The Wistful Wild is the only area in Pikmin 2 to not have an above-ground boss fight of any kind.
- The Wistful Wild contains every enemy in the game except for three: the Giant Breadbug, the Waterwraith, and the Toady Bloyster.
- The Wistful Wild was originally going to be called the "Land of Promise", as seen in the early English script left inside the game.[2] It is possible that it was changed due to the religious connotation. This name is retained in all other language versions, however (see here).
- In the New Play Control! port, it is possible to destroy the water clog before taking down the bramble gate. This can be achieved by throwing Pikmin to the edge north of the clog, then using the group move function to guide them to the lake. Then, they can be guided to the northwest of the clog using some more group moving commands, and finally, they can be dismissed, remotely whistled, and guided east by a leader standing near the gate looking at the gate. They can then be dismissed on the clog.[3]
- The object around the landing site of the area, which was formerly the Emperor Bulblax's arena at The Final Trial, is a sideways tire rim as evident by the filename of its texture:
last_wheel_s3tc. - While walking through the area, cicada calls, duck quacks and American robin calls can be heard.
Names in other languages[edit]
| Language | Name | Meaning |
|---|---|---|
| のぞみの大地? Nozomi no Daichi |
Land of Wishes | |
(traditional) |
願望大地 | Land of Wishes |
| Terre des promesses | Land of promises | |
| Terre des Promesses | Land of Promises | |
| Land der Verheißung | Land of Promise | |
| Terra di promesse | Land of promises | |
| Tierra de Promisión | Land of Promise |
See also[edit]
References[edit]
- ^ Pikmin 2/Version Differences on The Cutting Room Floor
- ^ Pikmin 2/Early English Script on The Cutting Room Floor, retrieved on July 31st, 2017
- ^ YouTube video showing how to destroy the clog without breaking the gate in New Play Control! Pikmin 2
| Wistful Wild | |||||||||
|---|---|---|---|---|---|---|---|---|---|
|
Click an object |
| ||||||||
| Pikmin 2 areas |
|---|
 Click an area on the image
Valley of Repose • Awakening Wood • Perplexing Pool • Wistful Wild |