Below-Grade Discotheque: Difference between revisions
(Improved object lists for the last three sublevels.) |
Phineas81707 (talk | contribs) |
||
| (18 intermediate revisions by 6 users not shown) | |||
| Line 1: | Line 1: | ||
{{game icons|p4=y}} | {{game icons|p4=y}} | ||
{{infobox cave | {{infobox cave | ||
|image = | |image = P4 Voyage Log Olimar 51.png | ||
|size = | |size = 256px | ||
|caption = | |caption = | ||
|location = Serene Shores | |location = Serene Shores | ||
| Line 13: | Line 13: | ||
}} | }} | ||
{{guide}} | {{guide}} | ||
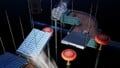
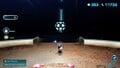
The '''Below-Grade Discotheque''' is a [[cave]] in {{p4}}, located in the [[Serene Shores]]. It is a metal-themed cave with dark lighting, so the [[Headlamp]] upgrade is recommended. Various electronic objects are found in its sublevels. Its name alludes to the [[boss]] within the final sublevel: the [[Groovy Long Legs]]. This cave has {{sparklium|p4|1,375}} worth of treasure. | |||
The '''Below-Grade Discotheque''' is a [[cave]] in the [[Serene Shores]] | |||
If the player does not have a Headlamp equipped, the lighting in the cave will periodically change randomly, between various stages of brightness. | |||
== How to reach == | == How to reach == | ||
The Below-Grade Discotheque is located near The Sand Keep base at the top of the sandcastle. Southeast of this base there is a branching path; while one path goes up towards a small pool, the other path heads down to this cave's entrance. | The Below-Grade Discotheque is located near The Sand Keep [[base]], at the top of the sandcastle. Southeast of this base there is a branching path; while one path goes up towards a small pool, the other path heads down to this cave's entrance. | ||
== Notes == | == Notes == | ||
=== Olimar's Voyage Log === | === Olimar's Voyage Log === | ||
[[File:P4 Voyage Log Olimar 51.png| | [[File:P4 Voyage Log Olimar 51.png|left|200px]] | ||
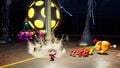
{{transcript|While traversing the darkness, I came upon a delightful yet nostalgic object of mystery! Powerful streams of light, nonstop beats that assault the senses, a haze of smoke and music, and dancing Pikmin! It's like being back in the discotheques of my youth!|block=y}} | {{transcript|While traversing the darkness, I came upon a delightful yet nostalgic object of mystery! Powerful streams of light, nonstop beats that assault the senses, a haze of smoke and music, and dancing Pikmin! It's like being back in the discotheques of my youth!|block=y}} | ||
{{clear}} | {{clear}} | ||
== Sublevel 1 == | == Sublevel 1 == | ||
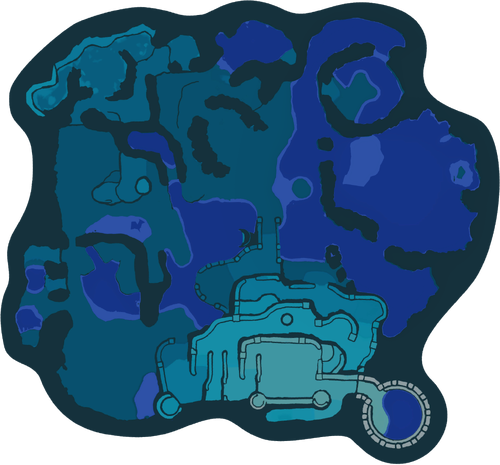
[[File:P4 Map Below-Grade Discotheque 1.png|thumb|300px|Map of sublevel 1.]] | [[File:P4 Map Below-Grade Discotheque 1.png|thumb|300px|Map of sublevel 1.]] | ||
| Line 35: | Line 37: | ||
** {{icon|Tusked Blowhog|v=P4|y}} × 3 | ** {{icon|Tusked Blowhog|v=P4|y}} × 3 | ||
* '''Obstacles''': | * '''Obstacles''': | ||
** None | |||
* '''Tools''': | |||
** {{icon|Clay mound|v=P4|y}} × 1 (requires 15 pieces of raw material) | ** {{icon|Clay mound|v=P4|y}} × 1 (requires 15 pieces of raw material) | ||
** {{icon|Dirt-mound|v=P4|y}} × 1 (contains the Sphere of Vitality) | ** {{icon|Dirt-mound|v=P4|y}} × 1 (contains the Sphere of Vitality) | ||
* '''Wild Pikmin''': | * '''Wild Pikmin''': | ||
| Line 42: | Line 45: | ||
* '''Others''': | * '''Others''': | ||
** {{icon|Raw material pile|v=P4|y|l=Raw material}} × 1 (15 pieces) | ** {{icon|Raw material pile|v=P4|y|l=Raw material}} × 1 (15 pieces) | ||
The first sublevel is fairly small. Make your way around it, defeating the Tusked | |||
The first sublevel is fairly small. Make your way around it, defeating the [[Tusked Blowhog]]s, building the clay mound, and collecting the treasures and raw material. | |||
{{clear}} | {{clear}} | ||
== Sublevel 2 == | == Sublevel 2 == | ||
[[File:P4 Map Below-Grade Discotheque 2.png|thumb|300px|Map of sublevel 2.]] | [[File:P4 Map Below-Grade Discotheque 2.png|thumb|300px|Map of sublevel 2.]] | ||
| Line 56: | Line 61: | ||
* '''Obstacles''': | * '''Obstacles''': | ||
** {{icon|Electric gate|v=P4|y}} × 1 | ** {{icon|Electric gate|v=P4|y}} × 1 | ||
** {{icon|Fire | ** {{icon|Fire geyser|v=P4|y}} × 3 | ||
** {{icon|Iron fence|v=P4 switch|y}} × 4 (lowered by pressing the button) | ** {{icon|Iron fence|v=P4 switch|y}} × 4 (lowered by pressing the button) | ||
* '''Tools''': | * '''Tools''': | ||
| Line 65: | Line 70: | ||
* '''Others''': | * '''Others''': | ||
** {{icon|Raw material pile|v=P4|y|l=Raw material}} × 1 (15 pieces) | ** {{icon|Raw material pile|v=P4|y|l=Raw material}} × 1 (15 pieces) | ||
This sublevel is themed around riding floating platforms. To collect the Olfactory Sculpture, jump to the floating platform in the west with Oatchi and throw 10 Pikmin over to the treasure, being careful to not throw them off the edge or at its hazardous flame. To collect the Soul Reverberator, walk past the iron fences without Oatchi, carefully walk onto the floating platform, and throw a Pikmin at the white button, which will lower the iron fences. Make sure to defeat the Shearfleas and Bearded Amprats, and destroy the fire geysers. | |||
This sublevel is themed around riding floating platforms. To collect the [[Olfactory Sculpture]], jump to the floating platform in the west with Oatchi and throw 10 Pikmin over to the treasure, being careful to not throw them off the edge or at its hazardous flame. To collect the [[Soul Reverberator]], walk past the iron fences without Oatchi, carefully walk onto the floating platform, and throw a Pikmin at the white button, which will lower the iron fences. Make sure to defeat the Shearfleas and Bearded Amprats, and destroy the fire geysers. | |||
{{clear}} | {{clear}} | ||
== Sublevel 3 == | == Sublevel 3 == | ||
[[File:P4 Map Below-Grade Discotheque 3.png|thumb|300px|Map of sublevel 3.]] | [[File:P4 Map Below-Grade Discotheque 3.png|thumb|300px|Map of sublevel 3.]] | ||
* '''Treasures''': | * '''Treasures''': | ||
** {{icon|Gold Nugget|v=P4|y}} × 10 | ** {{icon|Gold Nugget|v=P4|y}} × 10 | ||
| Line 77: | Line 83: | ||
** None | ** None | ||
* '''Obstacles''': | * '''Obstacles''': | ||
** {{icon| | ** {{icon|Box|v=P4|y}} × 1 | ||
** {{icon|Tunnel|v=P4|y}} × 1 | ** {{icon|Tunnel|v=P4|y}} × 1 | ||
* '''Tools''': | * '''Tools''': | ||
| Line 84: | Line 90: | ||
** {{icon|Moving walkway|v=P4|y}} × 3 | ** {{icon|Moving walkway|v=P4|y}} × 3 | ||
** {{icon|Slide rail|v=P4|y}} × 1 | ** {{icon|Slide rail|v=P4|y}} × 1 | ||
** {{icon|Switch|v=P4|y}} × 1 | ** {{icon|Switch|v=P4|y}} × 1 (blue and red, switches the direction of the moving walkways) | ||
* '''Wild Pikmin''': | * '''Wild Pikmin''': | ||
** None | ** None | ||
* '''Others''': | * '''Others''': | ||
** {{icon|Candypop Bud|y|v=P4 winged}} (Winged) × 1 | ** {{icon|Candypop Bud|y|v=P4 winged}} (Winged) × 1 | ||
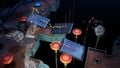
This sublevel has a complex layout featuring many moving walkways, Bouncy Mushrooms, and fans, but the things that need to be done to complete it are actually fairly simple. To start, head to the lower level and jump onto the fan on the ground to reach a higher level. Dig up the tunnel and enter it to reach another island where the 15 Gold Nuggets can be collected. Returning to the previous level, make sure that the blue button is pressed down, then throw Pikmin onto the Bouncy Mushroom that the arrows on the ground are pointing towards. They will land on a moving walkway and begin going around a circuit. The next step requires timing: when at least 10 Pikmin are on the leftmost of the three moving walkways, press the red button to switch their direction. They will land on a Bouncy Mushroom and slide down a rail to push a cardboard box off a ledge. You can then cross this box and collect the [[Turn-of-Events Track]]. To access the Winged Candypop Bud, jump from the box to the Bouncy Mushroom next to it, which will lead to a fan that will take you to the high platform with the Candypop Bud. To access the hole to the next sublevel, jump on the fan next to the treasure's location, which will take you to another platform with the hole. | |||
{{clear}} | {{clear}} | ||
| Line 94: | Line 102: | ||
== Sublevel 4 == | == Sublevel 4 == | ||
[[File:P4 Map Below-Grade Discotheque 4.png|thumb|300px|Map of sublevel 4.]] | [[File:P4 Map Below-Grade Discotheque 4.png|thumb|300px|Map of sublevel 4.]] | ||
* '''Treasures''': | * '''Treasures''': | ||
** {{icon|Gold Nugget|v=P4|y}} × 15 | ** {{icon|Gold Nugget|v=P4|y}} × 15 | ||
** {{icon|Relentless Spear|v=P4|y}} (inside the Tusked Blowhog) | ** {{icon|Relentless Spear|v=P4|y}} (inside the Tusked Blowhog) | ||
** {{icon|Sphere of Beginnings|v=P4|y}} | ** {{icon|Sphere of Beginnings|v=P4|y}} (partially buried) | ||
* '''Enemies''': | * '''Enemies''': | ||
** {{icon|Fiery Blowhog|v=P4|y}} × 2 | ** {{icon|Fiery Blowhog|v=P4|y}} × 2 | ||
| Line 105: | Line 112: | ||
** {{icon|Tusked Blowhog|v=P4|y}} × 1 | ** {{icon|Tusked Blowhog|v=P4|y}} × 1 | ||
* '''Obstacles''': | * '''Obstacles''': | ||
** {{icon|Bubble | ** {{icon|Bubble blower|v=P4|y}} × 3 | ||
** {{icon|Clipboard|v=P4 high|y}} (high) × 1 (requires 10 Yellow Pikmin or Winged Pikmin) | |||
** {{icon|Clipboard|v=P4 high|y}} (high) × 1 (requires 10 Yellow Pikmin) | |||
** {{icon|Dirt wall|v=P4|y}} × 1 | ** {{icon|Dirt wall|v=P4|y}} × 1 | ||
** {{icon|Iron fence|v=P4 switch|y}} × 2 (lowered by pressing the button) | ** {{icon|Iron fence|v=P4 switch|y}} × 2 (lowered by pressing the button) | ||
** {{icon|Sizzling floor|v=P4|y}} × 2 (one extinguished by defeating the Pyroclasmic Slooches, one extinguished by activating the sprinkler) | ** {{icon|Sizzling floor|v=P4|y}} × 2 (one extinguished by defeating the Pyroclasmic Slooches, one extinguished by activating the sprinkler) | ||
** {{icon|Sprinkler|v=P4|y}} × 1 (extinguishes the sizzling floor when activated, and then automatically deactivates) | ** {{icon|Sprinkler|v=P4|y}} × 1 (extinguishes the sizzling floor it's on when activated, and then automatically deactivates) | ||
* '''Tools''': | * '''Tools''': | ||
** {{icon|Button|v=P4|y}} × 1 | ** {{icon|Button|v=P4|y}} × 1 (lowers iron fences) | ||
** {{icon|Geyser|v=P4|y}} × 1 | ** {{icon|Clay valve|v=P4|y}} × 1 (inside sizzling floor, requires 16 pieces of raw material) | ||
** {{icon|Geyser|v=P4|y}} × 1 (plugged) | |||
** {{icon|Pup tunnel|v=P4|y}} × 1 | ** {{icon|Pup tunnel|v=P4|y}} × 1 | ||
* '''Wild Pikmin''': | * '''Wild Pikmin''': | ||
| Line 122: | Line 129: | ||
**{{icon|Candypop Bud|y|v=P4 red}} (Red) × 1 (if player has 5 or fewer Red Pikmin) | **{{icon|Candypop Bud|y|v=P4 red}} (Red) × 1 (if player has 5 or fewer Red Pikmin) | ||
**{{icon|Candypop Bud|y|v=P4 yellow}} (Yellow) × 1 (if player has 5 or fewer Yellow Pikmin) | **{{icon|Candypop Bud|y|v=P4 yellow}} (Yellow) × 1 (if player has 5 or fewer Yellow Pikmin) | ||
This sublevel is themed around sizzling floors. To start, destroy the dirt wall and defeat the Tusked Blowhog to collect the [[Relentless Spear]]. Attack the nearby geyser to gain access to a high platform with a Winged Candypop Bud. Then head down to the area with the sizzling floors, leaving your Yellow Pikmin and Winged Pikmin behind. Defeat the Pyroclasmic Slooches and Fiery Blowhogs, and build the clay valve. Collecting the Gold Nuggets at the same time can increase the efficiency of this step. Once the valve is built, rotating it will activate a sprinkler that will extinguish the sizzling floor, and then the sprinkler will automatically deactivate itself. This allows the items around the sizzling floor to be collected, since items cannot be carried over a lit sizzling floor. Finally, send Oatchi into the pup tunnel, throw 10 Yellow Pikmin up the ledge, switch to Oatchi to throw those Pikmin at the clipboard, and press the white button, which will lower the iron fences. To reach the hole to the next sublevel, return to the S.S. Beagle and walk across the narrow metal bridge with Oatchi, jumping over the gap in the middle. | |||
{{clear}} | {{clear}} | ||
| Line 127: | Line 136: | ||
== Sublevel 5 == | == Sublevel 5 == | ||
[[File:P4 Map Below-Grade Discotheque 5.png|thumb|250px|Map of sublevel 5.]] | [[File:P4 Map Below-Grade Discotheque 5.png|thumb|250px|Map of sublevel 5.]] | ||
* '''Treasures''': | * '''Treasures''': | ||
** {{icon|Amplified Amplifier|v=P4|y}} (inside the Groovy Long Legs) | ** {{icon|Amplified Amplifier|v=P4|y}} (inside the Groovy Long Legs) | ||
| Line 141: | Line 149: | ||
** {{icon|Castaway|v=P4|y}} × 1 | ** {{icon|Castaway|v=P4|y}} × 1 | ||
** {{icon|Egg|v=P4|y}} × 2 | ** {{icon|Egg|v=P4|y}} × 2 | ||
{{see also|Groovy Long Legs#Strategy}} | |||
This sublevel contains the [[boss]] of the cave: the Groovy Long Legs. After defeating it, carry back the treasure it drops and the castaway behind the numbered gate. | |||
{{clear}} | {{clear}} | ||
== Gallery == | == Gallery == | ||
<gallery> | <gallery> | ||
P4 Below-Grade Discotheque 3 Mechanical Devices.jpg|Various moving walkways, Bouncy Mushrooms, and fans in sublevel 3. | |||
P4 Below-Grade Discotheque 3 Pikmin Circuit.jpg|Pikmin moving around on a circuit in sublevel 3. | |||
P4 Below-Grade Discotheque 4 Sizzling Floor Extinguishing.jpg|A sizzling floor in sublevel 4 about to be extinguished by the sprinkler. | |||
P4 Below-Grade Discotheque 4 Sizzling Floor Extinguished.jpg|A sizzling floor in sublevel 4 that has been extinguished by the sprinkler. | |||
Groovy Long Legs in cavern.jpg|The Groovy Long Legs hanging in sublevel 5. | |||
Pikmin 4 arachnorb.jpg|Fighting the Groovy Long Legs in sublevel 5. | |||
</gallery> | </gallery> | ||
| Line 177: | Line 195: | ||
== See also == | == See also == | ||
*[[Serene Shores]] | |||
*[[Drafty Gallery]] | *[[Drafty Gallery]] | ||
*[[Groovy Long Legs]] | *[[Groovy Long Legs]] | ||
{{featured|{{date|1|December|2023}}|{{date|1|February|2024}}}} | |||
{{Serene Shores}} | |||
{{p4 caves}} | {{p4 caves}} | ||
[[Category:Serene Shores]] | [[Category:Serene Shores]] | ||
[[Category:Below-Grade Discotheque| ]] | |||
Latest revision as of 07:07, March 16, 2024
| Below-Grade Discotheque | |
|---|---|

| |
| Location | Serene Shores |
| Sublevels | 5 |
| Rescues | 1 |
| Treasures | 11 |
| Onions | 0 |
| Suggested Pikmin | |
| Wild Pikmin | |
|
The following article or section contains guides. |
The Below-Grade Discotheque is a cave in Pikmin 4, located in the Serene Shores. It is a metal-themed cave with dark lighting, so the Headlamp upgrade is recommended. Various electronic objects are found in its sublevels. Its name alludes to the boss within the final sublevel: the Groovy Long Legs. This cave has ![]() × 1,375 worth of treasure.
× 1,375 worth of treasure.
If the player does not have a Headlamp equipped, the lighting in the cave will periodically change randomly, between various stages of brightness.
How to reach[edit]
The Below-Grade Discotheque is located near The Sand Keep base, at the top of the sandcastle. Southeast of this base there is a branching path; while one path goes up towards a small pool, the other path heads down to this cave's entrance.
Notes[edit]
Olimar's Voyage Log[edit]
Sublevel 1[edit]

- Treasures:
 Sphere of Truth
 Sphere of Vitality (inside the dirt-mound)
 Thrill-Ride Track
- Enemies:
 Honeywisp × 2
 Tusked Blowhog × 3
- Obstacles:
- None
- Tools:
 Clay mound × 1 (requires 15 pieces of raw material)
 Dirt-mound × 1 (contains the Sphere of Vitality)
- Wild Pikmin:
 Red Pikmin × 5 (sprouts)
- Others:
 Raw material pile × 1 (15 pieces)
The first sublevel is fairly small. Make your way around it, defeating the Tusked Blowhogs, building the clay mound, and collecting the treasures and raw material.
Sublevel 2[edit]

- Treasures:
- Enemies:
 Bearded Amprat × 2
- Honeywisp × 1
 Shearflea × 2
- Obstacles:
 Electric gate × 1
 Fire geyser × 3
 Iron fence × 4 (lowered by pressing the button)
- Tools:
 Floating platform × 2
 Button × 1
- Wild Pikmin:
 Yellow Pikmin × 5 (fighting a Bearded Amprat)
- Others:
- Raw material pile × 1 (15 pieces)
This sublevel is themed around riding floating platforms. To collect the Olfactory Sculpture, jump to the floating platform in the west with Oatchi and throw 10 Pikmin over to the treasure, being careful to not throw them off the edge or at its hazardous flame. To collect the Soul Reverberator, walk past the iron fences without Oatchi, carefully walk onto the floating platform, and throw a Pikmin at the white button, which will lower the iron fences. Make sure to defeat the Shearfleas and Bearded Amprats, and destroy the fire geysers.
Sublevel 3[edit]

- Treasures:
- Enemies:
- None
- Obstacles:
- Tools:
 Bouncy Mushroom × 6
 Fan × 5
 Moving walkway × 3
 Slide rail × 1
 Switch × 1 (blue and red, switches the direction of the moving walkways)
- Wild Pikmin:
- None
- Others:
 Candypop Bud (Winged) × 1
This sublevel has a complex layout featuring many moving walkways, Bouncy Mushrooms, and fans, but the things that need to be done to complete it are actually fairly simple. To start, head to the lower level and jump onto the fan on the ground to reach a higher level. Dig up the tunnel and enter it to reach another island where the 15 Gold Nuggets can be collected. Returning to the previous level, make sure that the blue button is pressed down, then throw Pikmin onto the Bouncy Mushroom that the arrows on the ground are pointing towards. They will land on a moving walkway and begin going around a circuit. The next step requires timing: when at least 10 Pikmin are on the leftmost of the three moving walkways, press the red button to switch their direction. They will land on a Bouncy Mushroom and slide down a rail to push a cardboard box off a ledge. You can then cross this box and collect the Turn-of-Events Track. To access the Winged Candypop Bud, jump from the box to the Bouncy Mushroom next to it, which will lead to a fan that will take you to the high platform with the Candypop Bud. To access the hole to the next sublevel, jump on the fan next to the treasure's location, which will take you to another platform with the hole.
Sublevel 4[edit]

- Treasures:
 Gold Nugget × 15
 Relentless Spear (inside the Tusked Blowhog)
 Sphere of Beginnings (partially buried)
- Enemies:
 Fiery Blowhog × 2
- Honeywisp × 2
 Pyroclasmic Slooch × 2
- Tusked Blowhog × 1
- Obstacles:
 Bubble blower × 3
 Clipboard (high) × 1 (requires 10 Yellow Pikmin or Winged Pikmin)
 Dirt wall × 1
- Iron fence × 2 (lowered by pressing the button)
 Sizzling floor × 2 (one extinguished by defeating the Pyroclasmic Slooches, one extinguished by activating the sprinkler)
 Sprinkler × 1 (extinguishes the sizzling floor it's on when activated, and then automatically deactivates)
- Tools:
- Button × 1 (lowers iron fences)
 Clay valve × 1 (inside sizzling floor, requires 16 pieces of raw material)
 Geyser × 1 (plugged)
 Pup tunnel × 1
- Wild Pikmin:
- Red Pikmin × 5 (fighting the Pyroclasmic Slooches)
- Others:
- Candypop Bud (Winged) × 1
 Candypop Bud (Red) × 1 (if player has 5 or fewer Red Pikmin)
 Candypop Bud (Yellow) × 1 (if player has 5 or fewer Yellow Pikmin)
This sublevel is themed around sizzling floors. To start, destroy the dirt wall and defeat the Tusked Blowhog to collect the Relentless Spear. Attack the nearby geyser to gain access to a high platform with a Winged Candypop Bud. Then head down to the area with the sizzling floors, leaving your Yellow Pikmin and Winged Pikmin behind. Defeat the Pyroclasmic Slooches and Fiery Blowhogs, and build the clay valve. Collecting the Gold Nuggets at the same time can increase the efficiency of this step. Once the valve is built, rotating it will activate a sprinkler that will extinguish the sizzling floor, and then the sprinkler will automatically deactivate itself. This allows the items around the sizzling floor to be collected, since items cannot be carried over a lit sizzling floor. Finally, send Oatchi into the pup tunnel, throw 10 Yellow Pikmin up the ledge, switch to Oatchi to throw those Pikmin at the clipboard, and press the white button, which will lower the iron fences. To reach the hole to the next sublevel, return to the S.S. Beagle and walk across the narrow metal bridge with Oatchi, jumping over the gap in the middle.
Sublevel 5[edit]

- Treasures:
 Amplified Amplifier (inside the Groovy Long Legs)
- Enemies:
 Groovy Long Legs × 1
- Obstacles:
 Numbered gate × 1 (lowers when 1 Groovy Long Legs is defeated)
- Tools:
- None
- Wild Pikmin:
- None
- Others:
- See also: Groovy Long Legs#Strategy.
This sublevel contains the boss of the cave: the Groovy Long Legs. After defeating it, carry back the treasure it drops and the castaway behind the numbered gate.
Gallery[edit]
Various moving walkways, Bouncy Mushrooms, and fans in sublevel 3.
Pikmin moving around on a circuit in sublevel 3.
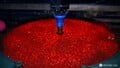
A sizzling floor in sublevel 4 about to be extinguished by the sprinkler.
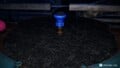
A sizzling floor in sublevel 4 that has been extinguished by the sprinkler.
The Groovy Long Legs hanging in sublevel 5.
Fighting the Groovy Long Legs in sublevel 5.


Names in other languages[edit]
| Language | Name | Meaning |
|---|---|---|
| スクラップディスコ? Sukurappu Disuko |
Scrap Disco | |
(traditional) |
廢材迪斯可 Fèicái Dísīkě |
Scrap Disco |
(simplified) |
废材迪斯可 Fèicái Dísīkě |
Scrap Disco |
| Disco in de diepte | Disco in the depths | |
| Discothèque souterraine | Subterranean discotheque | |
| Verwilderte Diskothek | Overgrown Discotheque | |
| Scantinato discoteca | Discotheque basement | |
| 스크랩 디스코 Seukeuraep Diseuko |
Scrap Disco | |
| Discoteca subterrânea | Subterranean discotheque | |
| Discoteca subterránea | Subterranean discotheque |
See also[edit]
| Caves in Pikmin 4 | |
|---|---|
| Rescue Command Post | Burrow of Beginnings |
| Sun-Speckled Terrace | Last-Frost Cavern • Crackling Cauldron • Aquiferous Summit • Industrial Maze • Hectic Hollows |
| Blossoming Arcadia | Drafty Gallery • Secluded Courtyard • Sightless Passage • Kingdom of Beasts |
| Serene Shores | Seafloor Resort • Subzero Sauna • Below-Grade Discotheque • Engulfed Castle |
| Hero's Hideaway | Doppelgänger's Den • Frozen Inferno • Plunder Palace |
| Giant's Hearth | Ultimate Testing Range • Dream Home • Cradle of the Beast |
| Primordial Thicket | The Mud Pit • Subterranean Swarm • Cavern for a King |
| Dandori Challenges | Dandori Day Care • Hotshock Canyon • Rockaway Cellars • Test Tubs • Ice-Cross Course • Hefty Haulway • Aerial Incinerator • Strategic Freezeway • Planning Pools • Toggle Training • Cliff-Hanger's Hold • Oasis of Order • Trial of the Sage Leaf |
| Dandori Battles | Trial Run • Battle in a Box • Dandori Castle • Leafy Showdown • Hot Sandy Duel • Final Battle |