Hotshock Canyon
| Hotshock Canyon | |||||||||
|---|---|---|---|---|---|---|---|---|---|
| |||||||||
| Available Pikmin | |||||||||
| |||||||||
| Requirements | |||||||||
| |||||||||
| Dandori level | |||||||||
| Time limit | 7:00 | ||||||||
| Music | Dandori Challenge 2 | ||||||||


Hotshock Canyon (炎と電気の実験室?, lit.: "Flame and Electricity Laboratory") is the second Dandori Challenge in Pikmin 4. It is themed around fire and electricity, with Red and Yellow Pikmin being available.
How to reach[edit]
This Dandori Challenge is the second in the dynamic order. It is preceded by Dandori Day Care and followed by Rockaway Cellars.
Overview[edit]
Hotshock Canyon's name comes from the fact that the area is based around fiery and electrical obstacles like electric gates and sizzling floors. It takes place in a dirt cave made up of many connected chambers. The stage contains many treasures on raised platforms and buried in the ground to display the unique traits of Yellow Pikmin.
Layout[edit]
The S.S. Beagle is located roughly in the center of the stage in a round chamber with four exits. The north exit contains a crescent-shaped path around to the eastern chamber of the stage. The east exit is blocked by a ledge and an iron fence, meaning that both the leader and Oatchi must be present to use the pathway, and even then only the leader may continue through. The south exit is blocked by a potted plant which must be cleared from the opposite side. The west exit is clear and leads to the western chamber.
The northern crescent-shaped hallway contains a partially buried Sticky Jewel, a partially buried Deceptive Snack, an egg, and three Skitter Leaves. There are 10 Yellow Pikmin sprouts. The south-west exit connects with the starting chamber and is clear. The south-east exit connects with the eastern chamber, and is blocked by some Spotcaps and a Kingcap.
The eastern chamber contains a pile of 50 Gold Nuggets, a sleeping Bulborb holding a Deceptive Snack, and a pup tunnel leading to a switch which lowers the iron fences. The north exit of this area connects to the crescent-shaped hallway and is blocked by some Spotcaps and a Kingcap. The south exit is clear and leads to the south-eastern chamber. The west exit connects to the starting chamber and is blocked by an iron fence, as well as a short drop preventing return without Oatchi.
The south-eastern chamber contains a Fiery Blowhog, an electric gate with one bar remaining, and a Cushion Cake and Condensed Sunshine on top of two tin cans. The Cushion Cake can be accessed from before the electric gate, and the Condensed Sunshine can be accessed from behind it. Both can be transported with Yellow Pikmin due to their raised position, but can also be knocked down with Oatchi's Rush. The north exit is clear and leads to the eastern chamber, and the west exit is clear and leads to the southern chamber.
The southern chamber is a large open space split into two sections. These sections are separated by four rusty iron fences and a numbered gate. The outer area contains a sizzling floor with one lump. The inner area contains 10 Red Pikmin sprouts, a Sweet Torrent, and three Anode Beetles which must be defeated to lower the numbered gate and transport the treasure. The north exit is blocked by a potted plant which can be cleared from this side, and leads to the starting chamber. The east exit is clear and leads to the south-eastern chamber. The west exit is clear and leads to the south-western chamber.
The south-western chamber is a small round room with two eggs, a Pyroclasmic Slooch fueling a sizzling floor, and a Puzzle Snack on top of the sizzling floor. The north exit is blocked by a partially-destroyed dirt wall and leads to the western chamber. The east exit is clear and leads to the southern chamber.
The western chamber is a large round room containing two Dwarf Bulborbs, a pile of 25 Gold Nuggets, and 10 Yellow Pikmin sprouts. The east exit is clear and leads to the starting chamber, and the southern exit leading to the south-western chamber is blocked by a dirt wall.
Guides[edit]
|
The following article or section contains guides. |
A good way to approach this Dandori Challenge is to clear each room one at a time, and travel through the stage in a cycle. Begin by clearing the western chamber. Defeat the two Dwarf Bulborbs and pluck the 10 Yellow Pikmin sprouts. Set 5 Red Pikmin to work on the gold nuggets, and use the remaining 5 plus a Yellow Pikmin to transport the Dwarf Bulborbs.
While these tasks are being cleared, move into the northern crescent-shaped chamber. Defeat the Skitter Leaves each with a well-aimed throw or a Rush from Oatchi. Set the appropriate amount of Yellow Pikmin to dig up and transport the two buried treasures here, as well as the three Skitter Leaves. Pluck the 10 buried Yellow Pikmin in the corner. From here, quickly return to the base to gather the Pikmin who have finished their tasks, and return to where you were.
Clear out the Spotcaps and Kingcaps and use the nectar they drop to boost your squad. It is important to clear all of the mushrooms, as Pikmin doing tasks through this area may not consider the path open until all are gone. Defeat the Bulborb with a Rush and send Oatchi through the pup tunnel. While he is going through, set five Yellow Pikmin on the gold nuggets, and fifteen on the Deceptive Snack and Bulborb corpse. Ensure that you still have some Red Pikmin with you for the upcoming area. By the time you have sorted out carrying numbers, Oatchi should be through the door, so switch to him and use the switch to lower the iron fences in this area. The path to the base from here is short, so follow the Pikmin carrying objects back and regroup.
Continuing through to the south-eastern chamber, defeat the Fiery Blowhog with another Rush, and set your Yellow Pikmin onto the electric gate. While they are destroying it, use your Red Pikmin to extinguish the sizzling floor. The Red Pikmin should finish first, so set them to pull the potted plant in this room. After the Yellow Pikmin have destroyed the electric gate, use them and Oatchi to transport the two treasures and the Fiery Blowhog in this room (use a Rush to knock down a treasure if you do not have enough Pikmin).
Now, alone, head to the southern chamber where your Red Pikmin were uprooting the potted plant. Let them continue with the task, and walk through the rusty iron fence to the area with the three Anode Beetles. Pluck the 10 Red Pikmin in this section and use them to defeat the Anode Beetles, then transport them. By now, your other Red Pikmin should have uprooted the potted plant (if they haven't, finish this task first). Use this opportunity to regroup and gather the idle Pikmin at the base. Use Yellow Pikmin to transport the Sweet Torrent behind the rusty iron fences, and continue into the south-western chamber. Defeat the Pyroclasmic Slooch and transport all the objects in this room. It is not necessary to clear the dirt wall. Finally, while this is happening, gather the remaining Pikmin at the base and use them to finish up the large pile of gold nuggets in the eastern chamber if that has not been cleared.
Objects[edit]
- Pikmin:
 Red Pikmin × 20
 Yellow Pikmin × 20
- 20 buried.
- Treasures:
 Gold Nugget × 75 (piles of 25 and 50)
 Condensed Sunshine × 1
 Cushion Cake × 1
 Deceptive Snack × 2 (one is partially buried and one is inside a Bulborb)
 Puzzle Snack × 1 (inside Sizzling floor)
 Sticky Jewel × 1 (partially buried)
 Sweet Torrent × 1
- Enemies:
 Anode Beetle × 3
 Bulborb × 1
 Dwarf Bulborb × 2
 Fiery Blowhog × 1
 Pyroclasmic Slooch × 1
 Skitter Leaf × 3
- Obstacles:
 Dirt wall × 1
 Electric gate × 1
 Iron fence × 1
 Iron fence × 2 (lowered by button press)
 Kingcap × 1
 Numbered gate × 1 (lowered after defeating 3 Anode Beetles)
 Potted plant × 1
 Pup tunnel × 1
 Sizzling floor × 2
 Spotcap × 5
- Others:
 Egg ×3
Notes[edit]
[edit]
“An underground lab that sparks and sputters with flames and electricity. Use these two Pikmin types to create a Dandorified chemical reaction.”
Gallery[edit]
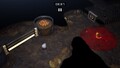
The south-eastern chamber, with many electrical and fiery hazards.
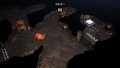
The eastern chamber, containing a sleeping Bulborb as well as a pup tunnel and switch.


Trivia[edit]
- With the exception of Gold Nuggets, all of the treasures in this Dandori Challenge are sweet or savory snacks.
Names in other languages[edit]
| Language | Name | Meaning |
|---|---|---|
| 炎と電気の実験室? Honō to Denki no Jikkenshitsu |
Flame and Electricity Laboratory | |
(traditional) |
火與電的實驗室 Huǒ yǔ Diàn de Shíyànshì |
Fire-Electricity Laboratory |
(simplified) |
火与电的实险室 Huǒ yǔ Diàn de Shíyànshì |
Fire-Electricity Laboratory |
| Kokende elektrokloof | Boiling electrocanyon | |
| Labo pyro-électrique | Pyro-electrical lab | |
| Feuer-Blitz-Canyon | Fire Lightning Canyon | |
| Laboratorio scintilla | Spark laboratory | |
| 불꽃과 전기의 실험실 Bulkkot-gwa Jeongi-ui Silheomsil |
Flame and Electric Laboratory | |
| Centelhas e labaredas | Sparks and flames | |
| Cueva de llamas y chispas | Cave of flames and sparks |