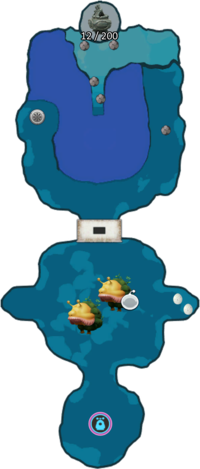
Kingdom of Beasts
| Kingdom of Beasts | |
|---|---|
| [[File:|]] | |
| Location | Blossoming Arcadia |
| Sublevels | 6 |
| Rescues | 2 |
| Treasures | 16 |
| Onions | 0 |
| Suggested Pikmin | |
|
The following article or section contains guides. |
|
The following article or section is in need of assistance from someone who plays Pikmin 4. |
The Kingdom of Beasts is a cave in the Blossoming Arcadia in Pikmin 4. It is located behind an ice wall across a series of mushrooms near south section of the area. It is the hardest cave in the area, with 6 sublevels and many dangerous predators. Specifically, the many members of the Grub-dog family and pseudooculii genus of the Breadbug family, including a boss encounter with the Empress Bulblax and two Emperor Bulblax. This cave has ![]() × 933 worth of treasure.
× 933 worth of treasure.
How to reach[edit]
Go to the Misshapen Pond base (which is number 2), then go east. Build the clay wall and activate the mushrooms by walking over them or by rushing into them with Oatchi. Go up the wall and across the activated mushrooms, use some ice Pikmin to destroy the thermal gate, dig up the entrance, and then you can enter the cave.
Notes[edit]
Olimar's Voyage Log[edit]
Sublevel 1[edit]
|
The following article or section is in need of assistance from someone who plays Pikmin 4. |
- Treasures:
- Enemies:
- Obstacles:
 Dirt wall × 2
 Fire geyser × 3
 Iron fence × 1
 Sizzling floor × 3
- Tools:
- Wild Pikmin:
 Red Pikmin × 5 (Sprouts)
 Red Pikmin × 5 (fighting Bulborb)
- Others:
 Candypop Bud (Red) × 1 (if 5 or less Red Pikmin)
 Raw material pile × 1 (12 pieces)
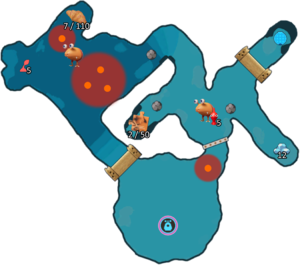
Guide: Destroy the Dirt Wall next to where you begin, then use Red Pikmin to destroy the Sizzling Floors near the Bulborb without waking it up. Once you're done, rush the Bulborb with Oatchi. Continue onwards and do the same for the next Bulborb, then destroy the hazards present in the level with Red Pikmin and gather all the treasure.
Sublevel 2[edit]
|
The following article or section is in need of assistance from someone who plays Pikmin 4. |
- Treasures:
 Ambiguous Goo
 Anxious Sprout (fully buried)
- Enemies:
 Dwarf Orange Bulborb × 4
 Mitite × 10
 Orange Bulborb × 1
- Obstacles:
 Crystal wall × 3
 Iron fence × 1
- Tools:
- None
- Wild Pikmin:
 Rock Pikmin × 10
- Others:
 Raw material pile × 1 (15 pieces)
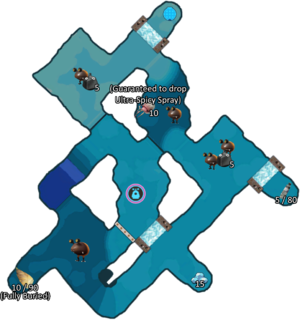
Guide: Go the opposite direction of the gate and crush the Orange Dwarf Bulborb. Be wary of the bush near this enemy, as it's got some Mitites. Go right and kill the 2 Orange Dwarf Bulborbs to get Rock Pikmin, allowing you to destroy the glass walls. Prioritize destroying the glass wall near the Beagle first. As the Rock Pikmin slowly destroy the glass wall, go on and fight the regular Orange Bulborb. Rush it with Oatchi from the front, as this makes most Pikmin on Oatchi attack the enemy in the eye. Go towards the dead end on the left, as there's an hidden treasure there that requires 10 Pikmin to carry. By now, the Rock Pikmin would have destroyed the glass wall. Go through it and go the opposite direction of where the glass wall originally was. Jump on top of the platform and crush the Orange Dwarf Bulborb, obtaining 5 more Rock Pikmin. Use 5 Rock Pikmin each for the two remaining glass walls to destroy them around the same time. Grab the last treasure and go onto the next floor.
Sublevel 3[edit]
- Treasures:
- Enemies:
 Empress Bulblax × 1
- Obstacles:
 Numbered gate × 1 (lowers when 1 Empress Bulblax is defeated)
- Tools:
- None
- Wild Pikmin:
- None
- Others:
 Castaway × 1
- See also: Empress Bulblax strategy.
Guide: This is the first bossfight in the cave. After waking up the Empress Bulblax, the fight will start. If you wish to defeat the Empress quickly, rush with Oatchi onto the front. If you hit the Empress in the head, your Pikmin cannot be crushed until they're shaken off. Repeat this process until the Empress Bulblax is defeated. However, if you want minimal deaths from this fight, use your Rock Pikmin to attack the Empress. Though slow, this strategy garantuees minimal deaths, as Rock Pikmin can't be crushed.
Sublevel 4[edit]
|
The following article or section is in need of assistance from someone who plays Pikmin 4. |
- Treasures:
 Planetary Rubber Cutie
 Sweet Stumble-Not (inside Whiptongue Bulborb)
 Gold Nugget × 20
- Enemies:
- Obstacles:
 Clipboard × 1 (weighing 20)
 Crystal wall × 1
 Fire geyser × 3
 Iron fence × 3
 Sizzling floor × 1
 Water body
- Tools:
 Button × 1
 Pup tunnel × 1
- Wild Pikmin:
 Rock Pikmin × 5 (fighting Whiptongue Bulborb)
- Others:
 Candypop Bud (Red) × 1 (if 5 or less Red Pikmin)
 Candypop Bud (Rock) × 1 (if 5 or less Rock Pikmin)
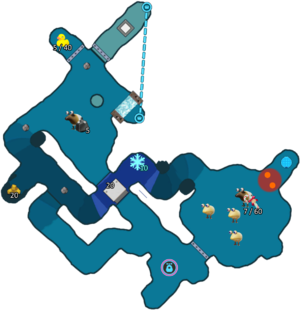
Guide: Proceed through the only regular path and destroy the Fire Geyser. Don't instantly grab the nuggets to your left, since there's no path. Destroy the other Fire Geyser and rush the Whiptongue Bulborb with Oatchi, hopefully defeating it. Lower the clipboard to clear a path (it requires 20 Pikmin), start destroying the glass wall and use 20 Pikmin to carry the gold nuggets. Use Oatchi to lower the gates. Destroy the last Fire Geyser to grab the Planetary Rubber Cutie. Go back to the Beagle and through the now lowered gate. Rush into the Whiptongue Bulborb and then crush the Albino Dwarf Bulborbs. Grab the final treasure, destroy the Sizzling Floor and proceed.
Sublevel 5[edit]
|
The following article or section is in need of assistance from someone who plays Pikmin 4. |
- Treasures:
 Cookie of Prosperity
 Crew-Cut Gourd (partially buried)
 Chance Totem × 3 (inside the Spotty Bulbear)
- Enemies:
 Dwarf Bulbear × 5 (1 falls from the sky)
 Iridescent Flint Beetle × 1 (contains raw material × 18)
 Spotty Bulbear × 1
- Obstacles:
 Crystal wall × 2
 Iron fence × 1
- Tools:
 Button × 1
- Wild Pikmin:
 Rock Pikmin × 5 (Sprouts)
 Rock Pikmin × 5 (fighting Dwarf Bulbear)
- Others:
 Candypop Bud × 1 (if 5 or less Rock Pikmin)
 Raw material pile × 1 (pile of 15)
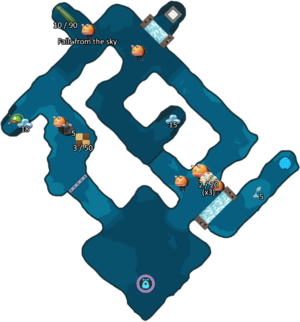
Guide: Go right, start destroying the glass wall and Rush into the Spotty Bulbear. Once defeated, your Pikmin will automatically attack the Dwarf Bulbears. Grab the Chance Totems and proceed. Crush the Dwarf Bulbear and go get the next treasure, though be wary, as a Dwarf Bulbear will fall from the sky. Go on and grab the last treasure. Before proceeding to the next level, pluck the Rock Pikmin near the exit.
Sublevel 6[edit]
|
The following article or section is in need of assistance from someone who plays Pikmin 4. |
- Treasures:
- Enemies:
 Emperor Bulblax × 2
- Obstacles:
 Fire geyser × 5
 Numbered gate × 1 (lowers when 2 Emperor Bulblax's are defeated)
 Water body
- Tools:
- None
- Wild Pikmin:
- None
- Others:
Guide: Remember that, if only one of the Emperor Bulblaxes is active, the first thing the active Emperor will do is screech, activating the other one. This means that the best strategy available is to rush the first Emperor as soon as it is vulnerable with Oatchi, before it can screech, and thus, activate the other Emperor. You can manage to do this after starting with 50 Pikmin in the cave: due to the high amount of wild Pikmin here (35, to be exact), you should normally end the cave with around 80 Pikmin. If this strategy is succesful, you can attack the relatively weak Emperor Bulblaxes one at a time. Just remember to throw a Pikmin to activate the Emperors instead of going near them, as they will knock you back in that case. This strategy should make the fight pitifully easy. Afterwards, destroy the Fire Geysers and grab the final treasure in the cave.
Gallery[edit]
|
This article or section is in need of more images. |
Names in other languages[edit]
| Language | Name | Meaning |
|---|---|---|
| けだものの王国? Kedamono no Ōkoku |
Kingdom of Beasts | |
(traditional) |
野獸王國 Yěshòu Wángguó |
Kingdom of Beasts |
(simplified) |
野兽王国 Yěshòu Wángguó |
Kingdom of Beasts |
| Koninkrijk der bullebakken | Kingdom of bullies | |
| Royaume des bêtes | Kingdom of beasts | |
| Königreich der Bestien | Kingdom of Beasts | |
| Regno delle bestie | Kingdom of beasts | |
| 짐승의 왕국 Jimseung-ui Wangguk |
Kingdom of Beasts | |
| Reino das feras | Kingdom of beasts | |
| Reino de las bestias | Kingdom of beasts |
Trivia[edit]
- The name "Kingdom of Beasts" references two caves from Pikmin 2; the Hole of Beasts and the Bulblax Kingdom. Both include a wide variety of Grub-dog family and both of their boss encounters appear in the Kingdom of Beasts (the Empress Bulblax and Emperor Bulblax respectively).
- Additionally, the sublevels both bosses are fought in are similar to the sublevels they are fought in both these cave's final sublevels.
- This is the second longest cave in Pikmin 4 and the only cave along the final cave to have more than 5 sublevels, despite being in the second area of the game.
