Perplexing Pool: Difference between revisions
No edit summary |
(Added icons, it still needs obstacles and vegetation though.) |
||
| Line 24: | Line 24: | ||
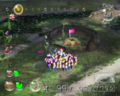
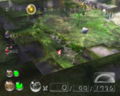
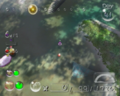
[[File:Perplexing Pool View.png|thumb|A view of where the Yellow Pikmin are located.]] | [[File:Perplexing Pool View.png|thumb|A view of where the Yellow Pikmin are located.]] | ||
In ''Pikmin 2'', [[Yellow Pikmin]] are discovered in this area. The player must navigate around the stumps and use the [[scales]] to get to higher elevation. Alternately, if they are skilled enough, they can throw their Pikmin onto the ledge near the bridge to the right of the large stumps, then carefully guide them to building the bridge. Any Pikmin that fall in the water can be easily whistled back. The Fiery Blowhog in the way can be bypassed. Then, the player must fight a [[Fiery Bulblax]] with [[Red Pikmin]]. After killing the Fiery Bulblax, [[White Pikmin]] must break down a bramble gate with poison pipes inside. The Yellow Pikmin are on the other side of this gate. | In ''Pikmin 2'', [[Yellow Pikmin]] are discovered in this area. The player must navigate around the stumps and use the [[scales]] to get to higher elevation. Alternately, if they are skilled enough, they can throw their Pikmin onto the ledge near the bridge to the right of the large stumps, then carefully guide them to building the bridge. Any Pikmin that fall in the water can be easily whistled back. The Fiery Blowhog in the way can be bypassed. Then, the player must fight a [[Fiery Bulblax]] with [[Red Pikmin]]. After killing the Fiery Bulblax, [[White Pikmin]] must break down a bramble gate with poison pipes inside. The Yellow Pikmin are on the other side of this gate. | ||
==Caves== | ==Caves== | ||
| Line 40: | Line 31: | ||
*[[Submerged Castle]] | *[[Submerged Castle]] | ||
==Enemies== | ==Objects== | ||
===Treasures=== | |||
{{columns|2| | |||
*{{icon|Gherkin Gate|y}} | |||
*{{icon|Impediment Scourge|y}} | |||
*{{icon|Aquatic Mine|y}} | |||
*{{icon|Fortified Delicacy|y}} | |||
*{{icon|Onion Replica|y}} | |||
*{{icon|Optical Illustration|y}} (US) / {{icon|Abstract Masterpiece|y|v=EU}} (Europe) | |||
*{{icon|Massage Girdle|y}} | |||
}} | |||
===Enemies=== | |||
{{todo|Confirm the following: | {{todo|Confirm the following: | ||
*How and when the Dwarf Bulbears appear. | *How and when the Dwarf Bulbears appear. | ||
| Line 46: | Line 50: | ||
*How many Honeywisps there are.}} | *How many Honeywisps there are.}} | ||
* | {{columns|2| | ||
* | *{{icon|Toady Bloyster|y}} × 1 | ||
* | *{{icon|Shearwig|y}} × 11 (3 of them replace a Yellow Wollywog on day 30) | ||
* | *{{icon|Skitter Leaf|y}} × 5 | ||
* | *{{icon|Wogpole|y}} × 5 (disappear after being defeated; near [[Shower Room]] entrance) | ||
* | *{{icon|Withering Blowhog|y}} × 1 | ||
* | *{{icon|Fiery Blowhog|y}} × 1 | ||
* | *{{icon|Fiery Blowhog|y}} × 1 (disappears after being defeated) | ||
* | *{{icon|Spotty Bulbear|y}} × 1 (after day 30) | ||
* | *{{icon|Dwarf Bulbear|y}} × 6 (more appear after day 30) | ||
* | *{{icon|Yellow Wollywog|y}} × 6 (one of which is replaced by a trio of Shearwigs on day 30) | ||
* | *{{icon|Water Dumple|y}} × 7 | ||
* | *{{icon|Swooping Snitchbug|y}} × 2 | ||
* | *{{icon|Beady Long Legs|y}} × 1 (after day 30, in front of base (note that Pikmin will [[Carrying|carry]] items over the area where it appears)) | ||
* | *{{icon|Ravenous Whiskerpillar|y}} × 3 | ||
* | *{{icon|Hermit Crawmad|y}} × 2 | ||
* | *{{icon|Honeywisp|y}} × 3 | ||
*{{icon|Mitite|y}} (potentially, from [[egg]]s) | |||
}} | |||
==Gallery== | ==Gallery== | ||
Revision as of 00:51, August 15, 2015
| Perplexing Pool | |
|---|---|
| |
| Treasures | 7 |
| Caves | 4 |
| Pikmin available | Yellow |
| Requirements | Collect the Geographic Projection |
| Music | Perplexing Pool |


The Perplexing Pool is the third area discovered in Pikmin 2, of the four in the game. It is the most aquatic area in Pikmin 2, with multiple lakes spread across its length and two of the caves being submerged, making Blue Pikmin a necessity. The level contains four caves, seven treasures, and a variety of beasts, many of them spending a lot of time in water. The Perplexing Pool is considered a representation of Summer. There are ![]() × 560 worth of treasure in the US version and
× 560 worth of treasure in the US version and ![]() × 450 in the European version.
× 450 in the European version.
The area is noted to bear a number of striking resemblances to The Distant Spring in the first game, for which reason it can be confidently considered to be the same area of the Pikmin planet. At one point, Olimar points out how much the area has changed since his last visit.
Additional enemies appear after day 30. These creatures are rather difficult to defeat, making it advisable for inexperienced players to complete the area before that day.
General layout
The Perplexing Pool has a close resemblance to The Distant Spring of the first game, though it does have some changes. There is a big area where there were only small islands and water, there is no water in the middle of the area, the Shower Room is where the Massage Machine was in Pikmin, the Submerged Castle is where the Chronos Reactor was, most of the gates are gone, and there are 3 Burgeoning Spiderworts in the area – two in the middle of the area and one in the water. There are some Yellow Wollywogs and one Toady Bloyster in the water to the south of the landing site.
Yellow Pikmin

In Pikmin 2, Yellow Pikmin are discovered in this area. The player must navigate around the stumps and use the scales to get to higher elevation. Alternately, if they are skilled enough, they can throw their Pikmin onto the ledge near the bridge to the right of the large stumps, then carefully guide them to building the bridge. Any Pikmin that fall in the water can be easily whistled back. The Fiery Blowhog in the way can be bypassed. Then, the player must fight a Fiery Bulblax with Red Pikmin. After killing the Fiery Bulblax, White Pikmin must break down a bramble gate with poison pipes inside. The Yellow Pikmin are on the other side of this gate.
Caves
Objects
Treasures
Enemies
|
To do: Confirm the following:
Care to do so? |
 Toady Bloyster × 1
 Shearwig × 11 (3 of them replace a Yellow Wollywog on day 30)
 Skitter Leaf × 5
 Wogpole × 5 (disappear after being defeated; near Shower Room entrance)
 Withering Blowhog × 1
 Fiery Blowhog × 1
- Fiery Blowhog × 1 (disappears after being defeated)
 Spotty Bulbear × 1 (after day 30)
 Dwarf Bulbear × 6 (more appear after day 30)
 Yellow Wollywog × 6 (one of which is replaced by a trio of Shearwigs on day 30)
 Water Dumple × 7
 Swooping Snitchbug × 2
 Beady Long Legs × 1 (after day 30, in front of base (note that Pikmin will carry items over the area where it appears))
 Ravenous Whiskerpillar × 3
 Hermit Crawmad × 2
 Honeywisp × 3
 Mitite (potentially, from eggs)
Gallery
The Beady Long Legs and Spotty Bulbear near the landing zone.
Part of the western path, with a Burgeoning Spiderwort in the distance.
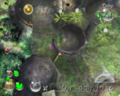
Two stumps on the western part of the area.
Area where Yellow Pikmin are first found.
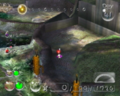
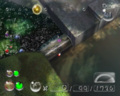
Entrance to the Glutton's Kitchen.
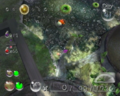
The northwestern corner of the area.
The northeastern corner of the area.
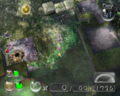
The maze at the east, with some Burgeoning Spiderworts.
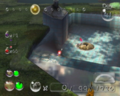
The area with Toady Bloysters.
The entrance to the Shower Room.
A tube that separates the western and southwestern areas.


Other images
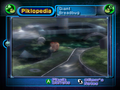
In the Piklopedia, the layout of the Perplexing Pool is slightly different.

A wire-frame version of the Perplexing Pool that can be found in the background of the Piklopedia and Treasure Hoard.
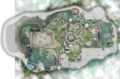
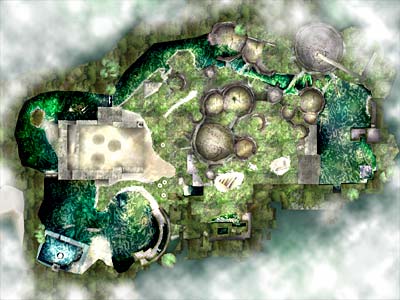
Overview map.
- 1457748-2.jpg
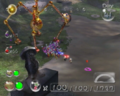
Wogpoles, Captain Olimar, Louie, and Blue Pikmin in an early version of the Perplexing Pool. The Shower Room can be seen ahead. Also note the Male Sheargrub, which never appears in the final version of the level.
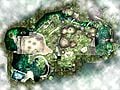
A map of the Perplexing Pool.
The pattern for The Distant Spring laid on a map of the Perplexing Pool.
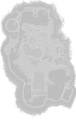
The texture used for the radar.


Trivia
|
To do: Get the source for the Perplexing Spring statement. |
- The Perplexing Pool was originally going to be called the Perplexing Spring.
- While walking through the area, translucent cicada calls can be heard. In the evening, they are replaced with evening cicadas.
Names in other languages
| Language | Name | Meaning |
|---|---|---|
| Source Troublante | Disturbing Spring | |
| Mythische Quelle |
See also
| Pikmin 2 areas |
|---|
 Click an area on the image
Valley of Repose • Awakening Wood • Perplexing Pool • Wistful Wild |