Controls (Exploration Notes): Difference between revisions
mNo edit summary |
No edit summary |
||
| Line 1: | Line 1: | ||
{{game icons|pikmin3=y}} | {{game icons|pikmin3=y}} | ||
{{game help|p3|Get the US Stylus mode text.}} | {{game help|p3|Get the US Stylus mode text.}} | ||
'''Controls''' is a category in the [[Exploration Notes]] menu. These [[Data File]]s explain the basic controls of | '''Controls''' is a category in the [[Exploration Notes]] menu. These [[Data File]]s explain the basic controls of {{P3}}, as well as what to do in some special events. Most of them feature images of characters who appear to be [[Olimar]], [[Louie]], [[The President]], [[Alph]], [[Brittany]], and [[Charlie]]. Seven of the 30 [[Data File]]s are found around the terrain of certain [[areas]], while the other 23 are acquired by completing specific tasks. | ||
In this article, | In this article, if there is no location stated for a Data File, it should already be obtained automatically, after meeting certain requirements, such as obtaining a certain item. Unless otherwise specified, the text provided is the same in both the US and European [[Region|versions]]. | ||
==Moving== | ==Data files== | ||
===Moving=== | |||
[[File:Controls1.jpeg|right]] | [[File:Controls1.jpeg|right]] | ||
*'''Text''': "''Move with {{button|wiiu|lstick|wii|stick|wiiu|pclstick}}.''" | *'''Text''': "''Move with {{button|wiiu|lstick|wii|stick|wiiu|pclstick}}.''" | ||
| Line 11: | Line 12: | ||
{{clear}} | {{clear}} | ||
==Using the Whistle== | ===Using the Whistle=== | ||
[[File:Controls2.jpeg|right]] | [[File:Controls2.jpeg|right]] | ||
*'''Classic controls text''': "''Press {{button|wiiu|zr|wii|b|wiiu|pczr}} to blow the whistle and call Pikmin over. Hold {{button|wiiu|zr|wii|b|wiiu|pczr}} longer to increase the whistle's range.''" | *'''Classic controls text''': "''Press {{button|wiiu|zr|wii|b|wiiu|pczr}} to blow the whistle and call Pikmin over. Hold {{button|wiiu|zr|wii|b|wiiu|pczr}} longer to increase the whistle's range.''" | ||
| Line 18: | Line 19: | ||
{{clear}} | {{clear}} | ||
==Throwing== | ===Throwing=== | ||
[[File:Controls3.jpeg|right]] | [[File:Controls3.jpeg|right]] | ||
*'''Classic controls text''': "''Take aim and press {{button|wiiu|a|wii|a|wiiu|pca}} to throw.''" | *'''Classic controls text''': "''Take aim and press {{button|wiiu|a|wii|a|wiiu|pca}} to throw.''" | ||
| Line 25: | Line 26: | ||
{{clear}} | {{clear}} | ||
==Plucking #1== | ===Plucking #1=== | ||
[[File:Controls4.jpeg|right]] | [[File:Controls4.jpeg|right]] | ||
*'''US text''': "''Press {{button|wiiu|a|wii|a|wiiu|pca}} to pluck nearby Pikmin sprouts. Press {{button|wiiu|zr|wii|b|wiiu|pczr}} to cancel.''" | *'''US text''': "''Press {{button|wiiu|a|wii|a|wiiu|pca}} to pluck nearby Pikmin sprouts. Press {{button|wiiu|zr|wii|b|wiiu|pczr}} to cancel.''" | ||
| Line 32: | Line 33: | ||
{{clear}} | {{clear}} | ||
==Plucking #2== | ===Plucking #2=== | ||
{{todo|Get the US Stylus mode file.}} | {{todo|Get the US Stylus mode file.}} | ||
[[File:Controls5.jpeg|right]] | [[File:Controls5.jpeg|right]] | ||
| Line 39: | Line 40: | ||
*'''Area''': [[Tropical Wilds]] | *'''Area''': [[Tropical Wilds]] | ||
*'''Location''': In a small alcove right near the base, guarded by two [[Pellet Posy|Pellet Posies]]. | *'''Location''': In a small alcove right near the base, guarded by two [[Pellet Posy|Pellet Posies]]. | ||
==Looking Around== | ===Looking Around=== | ||
[[File:Controls6.jpeg|right]] | [[File:Controls6.jpeg|right]] | ||
*'''US text''': "''Press {{button|wiiu|zl|wii|z|wiiu|pczl}} to move camera behind you.''" | *'''US text''': "''Press {{button|wiiu|zl|wii|z|wiiu|pczl}} to move camera behind you.''" | ||
| Line 47: | Line 47: | ||
*'''Europe Stylus mode text''': "''Touch and slide left and right on the {{button|wiiu|gamepad}} to look around. Press {{button|wiiu|zl}} to face forward.''" | *'''Europe Stylus mode text''': "''Touch and slide left and right on the {{button|wiiu|gamepad}} to look around. Press {{button|wiiu|zl}} to face forward.''" | ||
*'''How to obtain''': Comes pre-installed with the Exploration Notes app on the KopPad. | *'''How to obtain''': Comes pre-installed with the Exploration Notes app on the KopPad. | ||
==Locking On== | ===Locking On=== | ||
[[File:Controls7.jpeg|right]] | [[File:Controls7.jpeg|right]] | ||
*'''US text''': "''Point at the object you want to examine and hold {{button|wiiu|zl|wii|z|wiiu|pczl}} to lock on.''" | *'''US text''': "''Point at the object you want to examine and hold {{button|wiiu|zl|wii|z|wiiu|pczl}} to lock on.''" | ||
| Line 56: | Line 55: | ||
{{clear}} | {{clear}} | ||
==Dismissing Squad== | ===Dismissing Squad=== | ||
[[File:Controls8.jpeg|right]] | [[File:Controls8.jpeg|right]] | ||
*'''US text''': "''Dismiss your squad with {{button|wiiu|b|wii|nunchukshake|wiiu|pcb}}, and the Pikmin will sort themselves into different color groups.''" | *'''US text''': "''Dismiss your squad with {{button|wiiu|b|wii|nunchukshake|wiiu|pcb}}, and the Pikmin will sort themselves into different color groups.''" | ||
| Line 62: | Line 61: | ||
*'''Europe Stylus mode text''': "''Use "whistle button" on the {{button|wiiu|gamepad}} to dismiss your squad. The Pikmin will split up into different colour groups.''" | *'''Europe Stylus mode text''': "''Use "whistle button" on the {{button|wiiu|gamepad}} to dismiss your squad. The Pikmin will split up into different colour groups.''" | ||
*'''How to obtain''': Comes pre-installed with the Exploration Notes app on the KopPad. | *'''How to obtain''': Comes pre-installed with the Exploration Notes app on the KopPad. | ||
==Charging== | ===Charging=== | ||
[[File:Controls9.jpeg|right]] | [[File:Controls9.jpeg|right]] | ||
"'''Charge!'''" in the European version. | "'''Charge!'''" in the European version. | ||
| Line 72: | Line 70: | ||
*'''Area''': [[Distant Tundra]] | *'''Area''': [[Distant Tundra]] | ||
*'''Location''': On the other side of the tunnel behind the Drake. | *'''Location''': On the other side of the tunnel behind the Drake. | ||
==Selecting Pikmin Type== | ===Selecting Pikmin Type=== | ||
[[File:Controls10.jpeg|right]] | [[File:Controls10.jpeg|right]] | ||
*'''US text''': "''Select the Pikmin or person you want to throw using {{button|wiiu|l|wii|c|wiiu|pcl}}.''" | *'''US text''': "''Select the Pikmin or person you want to throw using {{button|wiiu|l|wii|c|wiiu|pcl}}.''" | ||
| Line 80: | Line 77: | ||
*'''Europe Stylus mode text''': "''Press {{button|wiiu|l}} without touching the {{button|wiiu|gamepad}}, or use {{button|wiiu|padu}} to select the Pikmin or teammate you wish to throw.''" | *'''Europe Stylus mode text''': "''Press {{button|wiiu|l}} without touching the {{button|wiiu|gamepad}}, or use {{button|wiiu|padu}} to select the Pikmin or teammate you wish to throw.''" | ||
*'''How to obtain''': Obtained after discovering the Rock Pikmin. | *'''How to obtain''': Obtained after discovering the Rock Pikmin. | ||
==Switching Leaders== | ===Switching Leaders=== | ||
[[File:Controls11.jpeg|right]] | [[File:Controls11.jpeg|right]] | ||
*'''US text''': "''Press {{button|wiiu|y|wii|-|wiiu|pcy}} to switch leaders.''" | *'''US text''': "''Press {{button|wiiu|y|wii|-|wiiu|pcy}} to switch leaders.''" | ||
| Line 88: | Line 84: | ||
*'''Europe Stylus mode text''': "''Use the "leader button" icons on the {{button|wiiu|gamepad}}, or press {{button|wiiu|padd}} to switch to a teammate outside the current group.''" | *'''Europe Stylus mode text''': "''Use the "leader button" icons on the {{button|wiiu|gamepad}}, or press {{button|wiiu|padd}} to switch to a teammate outside the current group.''" | ||
*'''How to obtain''': Obtained after rescuing Brittany and completing the tutorial of throwing leaders. | *'''How to obtain''': Obtained after rescuing Brittany and completing the tutorial of throwing leaders. | ||
==Throwing Leaders== | ===Throwing Leaders=== | ||
[[File:Controls12.jpeg|right]] | [[File:Controls12.jpeg|right]] | ||
*'''Text''': "''Throw teammates to places that can't be reached on foot.''" | *'''Text''': "''Throw teammates to places that can't be reached on foot.''" | ||
| Line 97: | Line 92: | ||
{{clear}} | {{clear}} | ||
==Using Ultra-Spicy Spray== | ===Using Ultra-Spicy Spray=== | ||
[[File:Controls13.jpeg|right]] | [[File:Controls13.jpeg|right]] | ||
*'''Classic controls text''': "''Press {{button|wiiu|padu|wii|padu|wiiu|pcpadu}} to use an Ultra-Spicy Spray and invigorate the Pikmin in your squad.''" | *'''Classic controls text''': "''Press {{button|wiiu|padu|wii|padu|wiiu|pcpadu}} to use an Ultra-Spicy Spray and invigorate the Pikmin in your squad.''" | ||
| Line 104: | Line 99: | ||
{{clear}} | {{clear}} | ||
==Using Ultra-Spicy Nectar== | ===Using Ultra-Spicy Nectar=== | ||
[[File:Controls14.jpeg|right]] | [[File:Controls14.jpeg|right]] | ||
"'''Ultra-Spicy Nectar'''" in the European version. | "'''Ultra-Spicy Nectar'''" in the European version. | ||
| Line 110: | Line 105: | ||
*'''Europe text''': "''Explorers collect Ultra-Spicy Nectar directly when they find it.''" | *'''Europe text''': "''Explorers collect Ultra-Spicy Nectar directly when they find it.''" | ||
*'''How to obtain''': Obtained after discovering the Ultra-Spicy Spray. | *'''How to obtain''': Obtained after discovering the Ultra-Spicy Spray. | ||
==Using the Radar #1== | ===Using the Radar #1=== | ||
[[File:Controls16.jpeg|right]] | [[File:Controls16.jpeg|right]] | ||
*'''US text''': "''Slide to scroll through your map and check your surroundings.''" | *'''US text''': "''Slide to scroll through your map and check your surroundings.''" | ||
| Line 119: | Line 113: | ||
{{clear}} | {{clear}} | ||
==Using the Radar #2== | ===Using the Radar #2=== | ||
{{todo|Confirm the US text, exactly.}} | {{todo|Confirm the US text, exactly.}} | ||
[[File:Controls17.jpeg|right]] | [[File:Controls17.jpeg|right]] | ||
| Line 127: | Line 121: | ||
{{clear}} | {{clear}} | ||
==Using the Radar #3== | ===Using the Radar #3=== | ||
[[File:Controls18.jpeg|right]] | [[File:Controls18.jpeg|right]] | ||
*'''Text''': "''Review the replay to fine-tune your strategy.''" | *'''Text''': "''Review the replay to fine-tune your strategy.''" | ||
| Line 133: | Line 127: | ||
{{clear}} | {{clear}} | ||
==Fruit Finder== | ===Fruit Finder=== | ||
[[File:Controls19.jpeg|right]] | [[File:Controls19.jpeg|right]] | ||
*'''US text''': "''Display the location of fruit, even in areas you haven't explored.''" | *'''US text''': "''Display the location of fruit, even in areas you haven't explored.''" | ||
| Line 140: | Line 134: | ||
{{clear}} | {{clear}} | ||
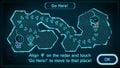
==Go Here!== | ===Go Here!=== | ||
[[File:Controls20.jpeg|right]] | [[File:Controls20.jpeg|right]] | ||
*'''US text''': "''On the KopPad's radar, align "Pointer" with your destination and touch Go here to start moving!''" | *'''US text''': "''On the KopPad's radar, align "Pointer" with your destination and touch Go here to start moving!''" | ||
| Line 146: | Line 140: | ||
*'''Area''': [[Garden of Hope]] | *'''Area''': [[Garden of Hope]] | ||
*'''Location''': Past the [[Crystal Wall]] right in the base. | *'''Location''': Past the [[Crystal Wall]] right in the base. | ||
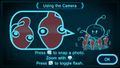
==Using the Camera== | ===Using the Camera=== | ||
[[File:Controls21.jpeg|right]] | [[File:Controls21.jpeg|right]] | ||
{{todo|Check if the text changes with the American version.}} | {{todo|Check if the text changes with the American version.}} | ||
| Line 155: | Line 148: | ||
{{clear}} | {{clear}} | ||
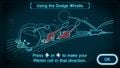
==Using the Dodge Whistle== | ===Using the Dodge Whistle=== | ||
[[File:Controls15.jpeg|right]] | [[File:Controls15.jpeg|right]] | ||
*'''Text''': "''Press {{button|wiiu|padl|wii|padl|wiiu|pcpadl}} or {{button|wiiu|padr|wii|padr|wiiu|pcpadr}} to make your Pikmin roll in that direction.''" | *'''Text''': "''Press {{button|wiiu|padl|wii|padl|wiiu|pcpadl}} or {{button|wiiu|padr|wii|padr|wiiu|pcpadr}} to make your Pikmin roll in that direction.''" | ||
| Line 161: | Line 154: | ||
{{clear}} | {{clear}} | ||
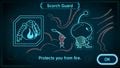
==Scorch Guard== | ===Scorch Guard=== | ||
[[File:Controls22.jpeg|right]] | [[File:Controls22.jpeg|right]] | ||
*'''Text''': "''Protects you from fire.''" | *'''Text''': "''Protects you from fire.''" | ||
| Line 167: | Line 160: | ||
{{clear}} | {{clear}} | ||
==Anti-Electrifier== | ===Anti-Electrifier=== | ||
[[File:Controls23.jpeg|right]] | [[File:Controls23.jpeg|right]] | ||
*'''Text''': "''Prevents you from getting zapped.''" | *'''Text''': "''Prevents you from getting zapped.''" | ||
| Line 173: | Line 166: | ||
{{clear}} | {{clear}} | ||
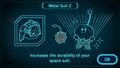
==Metal Suit Z== | ===Metal Suit Z=== | ||
[[File:Controls24.jpeg|right]] | [[File:Controls24.jpeg|right]] | ||
*'''Text''': "''Increases the durability of your space suit.''" | *'''Text''': "''Increases the durability of your space suit.''" | ||
| Line 179: | Line 172: | ||
{{clear}} | {{clear}} | ||
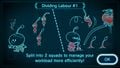
==Dividing Labor #1== | ===Dividing Labor #1=== | ||
[[File:Controls25.jpeg|right]] | [[File:Controls25.jpeg|right]] | ||
"'''Dividing Labour #1'''" in the European version. | "'''Dividing Labour #1'''" in the European version. | ||
| Line 186: | Line 179: | ||
{{clear}} | {{clear}} | ||
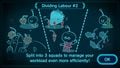
==Dividing Labor #2== | ===Dividing Labor #2=== | ||
[[File:Controls26.jpeg|right]] | [[File:Controls26.jpeg|right]] | ||
"'''Dividing Labour #2'''" in the European version. | "'''Dividing Labour #2'''" in the European version. | ||
| Line 192: | Line 185: | ||
*'''Area''': [[Tropical Wilds]] | *'''Area''': [[Tropical Wilds]] | ||
*'''Location''': On the other side of the small bridge, it should be right next to a Dirt Wall and some Fragments. | *'''Location''': On the other side of the small bridge, it should be right next to a Dirt Wall and some Fragments. | ||
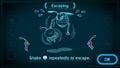
==Escaping== | ===Escaping=== | ||
[[File:Controls27.jpeg|right]] | [[File:Controls27.jpeg|right]] | ||
*'''Text''': "''Shake {{button|wiiu|lstick|wii|stick|wiiu|pclstick}} repeatedly to escape.''" | *'''Text''': "''Shake {{button|wiiu|lstick|wii|stick|wiiu|pclstick}} repeatedly to escape.''" | ||
| Line 201: | Line 193: | ||
{{clear}} | {{clear}} | ||
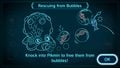
==Rescuing from Bubbles== | ===Rescuing from Bubbles=== | ||
[[File:Controls28.jpeg|right]] | [[File:Controls28.jpeg|right]] | ||
*'''Text''': "''Knock into Pikmin to free them from bubbles!''" | *'''Text''': "''Knock into Pikmin to free them from bubbles!''" | ||
| Line 208: | Line 200: | ||
{{clear}} | {{clear}} | ||
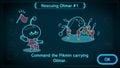
==Rescue Olimar #1== | ===Rescue Olimar #1=== | ||
[[File:Controls29.jpeg|right]] | [[File:Controls29.jpeg|right]] | ||
*'''US text''': "''Command the Pikmin carrying Captain Olimar!''" | *'''US text''': "''Command the Pikmin carrying Captain Olimar!''" | ||
| Line 215: | Line 207: | ||
{{clear}} | {{clear}} | ||
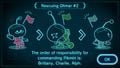
==Rescue Olimar #2== | ===Rescue Olimar #2=== | ||
[[File:Controls30.jpeg|right]] | [[File:Controls30.jpeg|right]] | ||
*'''Text''': "''The order of responsibility for commanding Pikmin is: Brittany, Charlie, Alph.''" | *'''Text''': "''The order of responsibility for commanding Pikmin is: Brittany, Charlie, Alph.''" | ||
Revision as of 11:48, November 12, 2016
|
The following article or section is in need of assistance from someone who plays Pikmin 3. |
Controls is a category in the Exploration Notes menu. These Data Files explain the basic controls of Pikmin 3, as well as what to do in some special events. Most of them feature images of characters who appear to be Olimar, Louie, The President, Alph, Brittany, and Charlie. Seven of the 30 Data Files are found around the terrain of certain areas, while the other 23 are acquired by completing specific tasks.
In this article, if there is no location stated for a Data File, it should already be obtained automatically, after meeting certain requirements, such as obtaining a certain item. Unless otherwise specified, the text provided is the same in both the US and European versions.
Data files
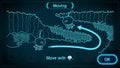
Moving
- Text: "Move with
 /
/  / ."
/ ." - How to obtain: Comes pre-installed with the Exploration Notes app on the KopPad.
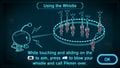
Using the Whistle
- Classic controls text: "Press
 /
/  /
/  to blow the whistle and call Pikmin over. Hold / / longer to increase the whistle's range."
 - Stylus mode text: "While touching and sliding on the
 to aim, press
  to blow your whistle and call Pikmin over."
 - How to obtain: Comes pre-installed with the Exploration Notes app on the KopPad.
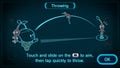
Throwing
- Classic controls text: "Take aim and press
 /
/  / to throw."
 - Stylus mode text: "Touch and slide on the to aim, then tap quickly to throw."
- How to obtain: Comes pre-installed with the Exploration Notes app on the KopPad.
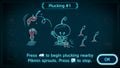
Plucking #1
- US text: "Press / / to pluck nearby Pikmin sprouts. Press / / to cancel."
- Europe text: "Press / / / to begin plucking nearby Pikmin sprouts. Press / / /
 to stop."
 - How to obtain: Comes pre-installed with the Exploration Notes app on the KopPad.
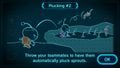
Plucking #2
|
To do: Get the US Stylus mode file. |
- US Classic controls text: "Press / / to throw your teammates and automatically pluck sprouts."
- Europe text: "Throw your teammates to have them automatically pluck sprouts."
- Area: Tropical Wilds
- Location: In a small alcove right near the base, guarded by two Pellet Posies.
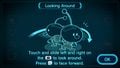
Looking Around
- US text: "Press /
 /
/  to move camera behind you."
 - Europe Classic controls text: "Press / / to switch the camera angle to the front."
- Europe Stylus mode text: "Touch and slide left and right on the to look around. Press to face forward."
- How to obtain: Comes pre-installed with the Exploration Notes app on the KopPad.
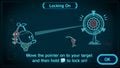
Locking On
- US text: "Point at the object you want to examine and hold / / to lock on."
- Europe text: "Move the pointer on to your target and then hold / / to lock on!"
- How to obtain: Comes pre-installed with the Exploration Notes app on the KopPad.
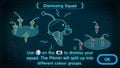
Dismissing Squad
- US text: "Dismiss your squad with
 /
/  / , and the Pikmin will sort themselves into different color groups."
 - Europe Classic controls text: "Dismiss your squad with / / and the Pikmin will sort themselves into different colour groups."
- Europe Stylus mode text: "Use "whistle button" on the to dismiss your squad. The Pikmin will split up into different colour groups."
- How to obtain: Comes pre-installed with the Exploration Notes app on the KopPad.
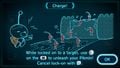
Charging
"Charge!" in the European version.
- US text: "While locked on, attack with / / !"
- Europe Classic controls text: "While locked on to a target, use / / to unleash your Pikmin! Cancel lock-on with / / ."
- Europe Stylus mode text: "While locked on to a target, use "whistle button" on the to unleash your Pikmin! Cancel lock-on with / / ."
- Area: Distant Tundra
- Location: On the other side of the tunnel behind the Drake.
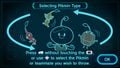
Selecting Pikmin Type
- US text: "Select the Pikmin or person you want to throw using /
 /
/  ."
." - Europe Classic controls text: "Select the Pikmin type you want to throw using / / . You can also throw teammates."
- Europe Stylus mode text: "Press without touching the , or use
 to select the Pikmin or teammate you wish to throw."
 - How to obtain: Obtained after discovering the Rock Pikmin.
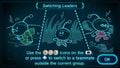
Switching Leaders
- US text: "Press
 /
/  / to switch leaders."
 - Europe Classic controls text: "Press / / to switch control to a teammate outside the current squad."
- Europe Stylus mode text: "Use the "leader button" icons on the , or press
 to switch to a teammate outside the current group."
 - How to obtain: Obtained after rescuing Brittany and completing the tutorial of throwing leaders.
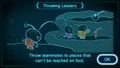
Throwing Leaders
- Text: "Throw teammates to places that can't be reached on foot."
- Area: Garden of Hope
- Location: Right outside of where Brittany is trapped.
Using Ultra-Spicy Spray
- Classic controls text: "Press /
 / to use an Ultra-Spicy Spray and invigorate the Pikmin in your squad."
 - Stylus mode text: "Tap "spray button" on the to use an Ultra-Spicy Spray and invigorate the Pikmin in your squad."
- How to obtain: Obtained after discovering the Ultra-Spicy Spray.
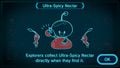
Using Ultra-Spicy Nectar
"Ultra-Spicy Nectar" in the European version.
- US text: "Explorers automatically collect Ultra-Spicy Nectar when they find it."
- Europe text: "Explorers collect Ultra-Spicy Nectar directly when they find it."
- How to obtain: Obtained after discovering the Ultra-Spicy Spray.
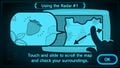
Using the Radar #1
- US text: "Slide to scroll through your map and check your surroundings."
- Europe text: "Touch and slide to scroll the map and check your surroundings."
- How to obtain: Comes pre-installed with the Exploration Notes app on the KopPad.
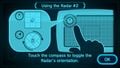
Using the Radar #2
|
To do: Confirm the US text, exactly. |
- US text: "Touch compass to toggle the radars orientation."
- Europe text: "Touch the compass to toggle the Radar's orientation."
- How to obtain: Comes pre-installed with the Exploration Notes app on the KopPad.
Using the Radar #3
- Text: "Review the replay to fine-tune your strategy."
- How to obtain: Comes pre-installed with the Exploration Notes app on the KopPad.
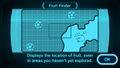
Fruit Finder
- US text: "Display the location of fruit, even in areas you haven't explored."
- Europe text: "Displays the location of fruit, even in areas you haven't yet explored."
- How to obtain: Obtained after collecting 10 pieces of fruit.
Go Here!
- US text: "On the KopPad's radar, align "Pointer" with your destination and touch Go here to start moving!"
- Europe text: "Align "Pointer" on the radar and touch 'Go Here!' to move to that place!"
- Area: Garden of Hope
- Location: Past the Crystal Wall right in the base.
Using the Camera
|
To do: Check if the text changes with the American version. |
- Text: "Press to snap a photo. Zoom with . Press to toggle flash."
- How to obtain: Comes pre-installed with the Exploration Notes app on the KopPad.
Using the Dodge Whistle
- Text: "Press
 /
/  / or
/ or  /
/  / to make your Pikmin roll in that direction."
 - How to obtain: Obtained after returning the Dodge Whistle to the S.S. Drake.
Scorch Guard
- Text: "Protects you from fire."
- How to obtain: Obtained after returning the Scorch Guard to the Drake.
Anti-Electrifier
- Text: "Prevents you from getting zapped."
- How to obtain: Obtained after returning the Anti-Electrifier to the Drake.
Metal Suit Z
- Text: "Increases the durability of your space suit."
- How to obtain: Obtained after returning the Metal Suit Z to the Drake.
Dividing Labor #1
"Dividing Labour #1" in the European version.
- Text: "Split into 2 squads to manage your workload more efficiently!"
- How to obtain: Obtained after rescuing Brittany and completing the tutorial on throwing leaders.
Dividing Labor #2
"Dividing Labour #2" in the European version.
- Text: "Split into 3 squads to manage your workload even more efficiently!"
- Area: Tropical Wilds
- Location: On the other side of the small bridge, it should be right next to a Dirt Wall and some Fragments.
Escaping
- Text: "Shake / / repeatedly to escape."
- Area: Distant Tundra
- Location: On the ledge home to two Swooping Snitchbugs and a Burgeoning Spiderwort. It should be in a corner at the very edge.
Rescuing from Bubbles
- Text: "Knock into Pikmin to free them from bubbles!"
- Area: Garden of Hope
- Location: Near the Citrus Lump found to the left of the Bamboo Gate.
Rescue Olimar #1
- US text: "Command the Pikmin carrying Captain Olimar!"
- European text: "Command the Pikmin carrying Olimar."
- How to obtain: Obtained once Olimar is carried.
Rescue Olimar #2
- Text: "The order of responsibility for commanding Pikmin is: Brittany, Charlie, Alph."
- How to obtain: Obtained once Olimar is carried.
Gallery
Moving the leaders.
Calling Pikmin to the party.
Throwing Pikmin.
Manual plucking.
Automatic plucking.
Changing the camera angle.
Locking on to a target.
Dismissing the party.
Charging Pikmin at a target.
Choosing a Pikmin to throw.
Changing leaders.
Throwing leaders.

Using Ultra-Spicy spray.
Obtaining Ultra-Spicy spray through nectar.
Searching for something on the radar.
Using the compass on the radar.

Using the replay on the radar.
The beacon showing fruit's location.
The Go Here! command.
Using the KopPad camera.
Dodge Whistle.
Scorch Guard.
- Anti-ElectrifierDataFile.jpeg
Anti-Electrifier.
Metal Suit Z.
Two-captain gameplay.
Three-captain gameplay.
Escaping enemy clutches.
Escaping bubbles.
Waypoint of the Olimar escape.
Chain of command in the Olimar escape.


| Exploration Notes |
|---|
| Pikmin Behavior • Controls • Indigenous Life • Area Hints • Olimar's Log • Other • Olimar's Log Vol. 2 |