Glitches in Pikmin 3: Difference between revisions
Jump to navigation
Jump to search
(Two new glitches.) |
(Cleanup.) |
||
| Line 2: | Line 2: | ||
{{game icons|p3=y}} | {{game icons|p3=y}} | ||
This is a collection of [[glitch]]es possible in ''[[Pikmin 3]]''. | This is a collection of '''[[glitch]]es''' possible in ''[[Pikmin 3]]''. | ||
Please read the [[Pikipedia:Glitch notes|glitch notes]] before attempting any of these glitches or before adding your own. | Please read the [[Pikipedia:Glitch notes|glitch notes]] before attempting any of these glitches or before adding your own. | ||
{{spoiler}} | {{spoiler}} | ||
==Main== | ==Main== | ||
=== | ===Early Quaggled Mireclops=== | ||
{{ glitch | reproducibility = medium | danger = Helpful | youtube = 5OmaauaJyss | {{ glitch | reproducibility = medium | danger = Helpful | versionmin = ? | versionmax = ? | youtube = 5OmaauaJyss | ||
| effects = Get access to the [[Quaggled Mireclops]] without having to build the blue pot. | |effects = Get access to the [[Quaggled Mireclops]] without having to build the blue pot. | ||
| prerequisites = Make sure [[Blue Pikmin]] have been discovered. | |prerequisites = Make sure [[Blue Pikmin]] have been discovered. | ||
| howto = At the [[Garden of Hope]] once Louie has ran away, discover the Blue Pikmin and take a group of Winged Pikmin under the large pail underwater. By standing in that certain spot, the Winged Pikmin will go higher and higher until they are on the land above the pail. From there, have them collect the group of 10 | |howto = At the [[Garden of Hope]] once Louie has ran away, discover the Blue Pikmin and take a group of [[Winged Pikmin]] under the large pail underwater. By standing in that certain spot, the Winged Pikmin will go higher and higher until they are on the land above the pail. From there, have them collect the group of 10 fragments by [[charging]], and have a small group [[Digging|dig up]] the remaining fragments. If done correctly, a leader can now be thrown across to the incomplete blue bridge. Throw a few Rock Pikmin along with the leader to get the last 20 fragments inside the crystal. | ||
| notes = The [[Peckish Aristocrab]] will not interfere with the Winged Pikmin, so don't worry | |notes = The [[Peckish Aristocrab]] will not interfere with the Winged Pikmin, so don't worry. | ||
}} | }} | ||
=== | ===Early Scornet Maestro=== | ||
{{ glitch | reproducibility = | {{ glitch | reproducibility = Medium | danger = Helpful | versionmin = ? | versionmax = ? | youtube = dey-g6_RceA | ||
| effects = | |effects = Get access to fight the [[Scornet Maestro]] without having to build the red bridge. | ||
| prerequisites = Have | |prerequisites = Have the second half of the [[Twilight River]] unlocked, and have three leaders ready. | ||
|howto = First, go into the area to the side of the red bridge (the area with two [[Desiccated Skitter Leaf|Desiccated Skitter Leaves]] and leading to the three [[Orange Bulborb]]s). From there, throw two captains up onto the root near the pink 5 [[Pellet Posy]]. From there, quickly throw another leader up onto the elevated area above. This must be done quickly or else the leaders will slide back down. From there, switch to the leader up above and have them walk near the rock closest to the path. If they continue to walk, they will eventually phase through it, fall out of bounds, and appear on the path to the Scornet Maestro's lair. From there, have them whistle a group of Pikmin under the path. When the leader at the top enters the transition zone, all Pikmin in the group will teleport to their side. | |||
| | |notes = In [[Update|version]] 1.0 to 1.3, the captain takes no damage. In version 1.4 onwards, the captain loses 1/3 of their health. It is also advised to start building the bridge while the boss fight is going on, so that when it is defeated, spoils can easily be carried back. | ||
| explanation = | |explanation = Collision detection algorithms should be simple when it comes to scenery. While the path's wall pushes the leader back, the rock pushes them forward, resulting in no lateral movement. The forward movement, however, is still enough to move the leader forwards (considering there are no collision forces stopping them efficiently on that direction), so they slowly make progress forward, until they no longer collide with the geometry and go through. | ||
}} | |||
===Early Shaggy Long Legs=== | |||
{{ glitch | reproducibility = Medium | danger = Helpful | versionmin = ? | versionmax = ? | |||
|effects = Makes the player fight against [[Shaggy Long Legs]] earlier than normal, and with unlimited time. | |||
|prerequisites = Have access to the [[Distant Tundra]], and have not gone there before. | |||
|howto = In the cave were the Yellow Pikmin are found, after breaking down the exit's blockade, go out of bounds using the same method as in the [[#Yellow Onion skip|Yellow Onion skip]] glitch, only, rather than going above the entrance, go behind it and walk around to the Shaggy Long Legs' arena. The battle will proceed as normal, only there will be an unlimited day length, and Brittany will have infinite health. | |||
|notes = When battling the Shaggy Long Legs before breaking the blockade, if enough Pikmin die, it will be impossible to gain enough Pikmin to push the [[iron ball]]; and if all the Pikmin die, the Yellow Onion will not eject another seed. Additionally, any Red Pikmin (obtained via the [[Crimson Candypop Bud]]) will be invisible during the cutscene where the weight is pushed. | |||
|explanation = When Brittany is in the cave, the [[day]] is set to be in a "tutorial" state, where the leader have unlimited health and the day lasts forever, as with day 1. When exiting the main entrance of the cave, it is set to end the "tutorial" state and begin the day as normal; but if one exits via the other entrance, it will not. | |||
}} | |||
===Early Winged Pikmin=== | |||
{{glitch | reproducibility = Low | danger = Helpful | versionmin = ? | versionmax = ? | youtube = PSV8afEt4n0 | |||
|effects = Allows the player to get to the Winged Pikmin's Onion without building the long blue bridge across the river. | |||
|prerequisites = Have the Twilight River unlocked and have two leaders. | |||
|howto = At the [[Twilight River]] have one leader walk across the river with the [[Water Dumple]], with no [[Pikmin family|Pikmin]] in the area. Once near the lily pad, have the leader walk in the corner of the rock to the left of it and the lily pad. If done correctly, the leader will begin to go through the rock. Walk onto the brown land area, and the leader will fall down into an abyss. They will later respawn on the side of the river with the Winged Pikmin's [[Onion]]. From there, switch to a leader at the landing site, and have them throw across some Pikmin, preferably [[Rock Pikmin]], to free the Onion from the [[Arachnode]]'s web. Throw some in the water, and then switch to the other çeader so that they can [[Whistle|call]] them to the other shore. | |||
|notes = In [[Update|version 1.0]], the captain takes no damage if they fall in. However, in version 1.4 and onwards, they take damage equal to 1/3 of their total health. Even though the bridge is skipped, it is recommended to build it eventually to allow easy retrieval of items. | |||
|explanation = Collision detection algorithms should be simple, in order to not overload the console, specially for things as trivial as scenery objects such as rocks. It is possible that the gap between the rocks angles inwards, and when the leader attempts to move between them, each wall pushes them in opposite directions, which results in no lateral movement. The forward movement, however, is still enough to move the leader forwards (considering there are no collision forces stopping them efficiently on that direction), so they slowly make progress forward, until they no longer collide with the geometry and go through. | |||
}} | }} | ||
=== | ===Formidable Oak backwards=== | ||
{{glitch | reproducibility = | {{ glitch | reproducibility = Medium | danger = Helpful | versionmin = ? | versionmax = ? | youtube = sZkldNUsqXM | ||
| | |effects = Allows the player to do the Formidable Oak cave backwards, and clear out all enemies before actually encountering the [[Plasm Wraith]]. | ||
|howto = | |prerequisites = Have 2 leaders available, have the [[Dodge Whistle]], and of course, have the Formidable Oak unlocked. | ||
|notes = It | |howto = Take one leader and throw them onto the small root to the right of the path leading down into the Plasm Wraith arena. The placement must be perfect or else the glitch will not work. Once there, walk off and to the left, and proceed to walk up the large root of the white tree. Make sure the leader is facing away from the arena, and use a [[dodge]] roll to get on top of the rock. From there, simply whistle the other two leaders and walk inside the cave. The glitch is easier seen than explained, so watch the YouTube video above. | ||
|notes = It is advised to throw a leader who would be switched to directly (i.e. Brittany throws Charlie, Charlie throws Alph, and Alph throws Brittany) so that the leader thrown on the root can be switched to immediately and they won't fall off. | |||
|explanation = Although there is a ledge blocking off the exit to the cave, there is no actual barrier blocking off the cave's exit, and it functions just like an entrance. The only invisible wall present is next to the large rock, which is why the Dodge Whistle must be used to get over the rock. By going through the cave backwards, the player can clear out all the obstacles easily without having to worry about the Plasm Wraith, and can rescue Olimar from the cave within a few minutes. | |||
}} | }} | ||
=== | ===Remote-controlled Pikmin=== | ||
{{glitch | reproducibility = | {{ glitch | reproducibility = High | danger = Helpful | versionmin = ? | versionmax = ? | ||
| | |effects = Control Pikmin without being exactly where they are. | ||
|prerequisites = Obtain the [[Dodge Whistle]]. | |||
| | |howto = [[Throw]] Pikmin up a ledge or over a gap, call them, and repeatedly use the [[Dodge Whistle]] against a wall. The Pikmin should roll, going farther than possible to throw. If you [[dismiss]] your Pikmin after they have rolled close to an object, such as the [[hay]] pile north of the landing site in the [[Distant Tundra]], they will interact with it, allowing access to some areas that shouldn't be accessible. | ||
|explanation = When dodging, the Pikmin are programmed to roll with the leader, but if the captain's roll path is blocked, and the Pikmin's is not, then they will still roll. | |||
}} | }} | ||
=== | ===Yellow Onion skip=== | ||
{{glitch | reproducibility = | {{ glitch | reproducibility = Medium | danger = Harmful | versionmin = ? | versionmax = ? | ||
|effects = | |effects = Allows the player to skip the [[Yellow Onion]] and continue the game without it. | ||
| | |prerequisites = Have access to the [[Distant Tundra]], and have not gone there before. | ||
|howto = In the cave where the Yellow Pikmin are found, go between the [[iron ball]] and the slide and walk against the wall. If done correctly, Brittany should walk against the edge of the slide, rather than sliding down. Continue pushing against the wall while going down the slide to get out of bounds; from there, walk above the blocked entrance, and the game will treat it as you have exited the cave. Use the five yellow Pikmin and the [[Golden Candypop Buds]] to reunite Alph and Brittany. The day after, the Yellow Onion will be missing from the cave, and Yellow Pikmin produced by Candypop Buds will bring their loot to the master Onion and produce more Yellow Pikmin, although it is impossible to deposit or withdraw any into the Onion, and any Yellow Pikmin will vanish at the end of the day, even if they are in your squad or close to the landing site. Once you gain access to the [[Twilight River]] and rescue the Winged Pikmin, it is possible to withdraw Yellow Pikmin by using the "take out all types" feature; every one Red and Rock Pikmin taken out with this feature takes out one Yellow as well. To deposit Yellow Pikmin, take out Winged Pikmin and begin depositing them, but then hold the button that allows you to take out all the types, and Yellow Pikmin should be put in, instead. | |||
|explanation = Some flags that the game keeps to hold track of the story mode progression might get set or not set like intended if the glitch is performed. This results in the Onion's menu using some behaviors for some flags, resulting in unintended behavior. | |||
}} | }} | ||
==Aesthetic== | |||
===Delayed typing sound=== | ===Delayed typing sound=== | ||
{{glitch | reproducibility = Medium | danger = Harmless | versionmin = ? | versionmax = 2.0.0 | {{glitch | reproducibility = Medium | danger = Harmless | versionmin = ? | versionmax = 2.0.0 | ||
| Line 60: | Line 82: | ||
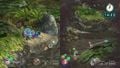
{{ glitch | reproducibility = Medium | danger = Harmless | image = GlitchWaterCutscene.jpeg | {{ glitch | reproducibility = Medium | danger = Harmless | image = GlitchWaterCutscene.jpeg | ||
|effects = Shows the fire effect and the water effect overlap incorrectly. | |effects = Shows the fire effect and the water effect overlap incorrectly. | ||
|prerequisites = Never had a Pikmin drown. | |prerequisites = Never had a Pikmin drown before. | ||
|howto = Go to the cave with [[Pyroplasmic Slooch]]es on the [[Distant Tundra]]. Let the Slooches draw some trails of fire and get a Pikmin to start drowning. If the | |howto = Go to the cave with [[Pyroplasmic Slooch]]es on the [[Distant Tundra]]. Let the Slooches draw some trails of fire and get a Pikmin to start drowning. If the positioning and the [[camera]] angle line up, the fire trail will appear in the same place as the water from the camera's line of sight, but the two will overlap in odd ways. | ||
}} | }} | ||
===Invisible bomb rock=== | ===Invisible bomb rock=== | ||
{{glitch | reproducibility = High | danger = Harmless | image = Invisible bomb rock.jpg | {{glitch | reproducibility = High | danger = Harmless | versionmin = ? | versionmax = 2.0.0 | image = Invisible bomb rock.jpg | ||
|effects = Makes the [[bomb rock]] a Pikmin is holding turn invisible. It is completely normal besides that. | |effects = Makes the [[bomb rock]] a Pikmin is holding turn invisible. It is completely normal besides that. | ||
|prerequisites = Have access to the cave with the [[Medusal Slurker]] that is carrying a [[Juicy Gaggle]], on the [[Tropical Wilds]]. | |prerequisites = Have access to the cave with the [[Medusal Slurker]] that is carrying a [[Juicy Gaggle]], on the [[Tropical Wilds]]. | ||
| Line 109: | Line 95: | ||
===Invisible Pikmin=== | ===Invisible Pikmin=== | ||
{{ glitch | reproducibility = High | danger = Harmless | youtube = rl5aWgW32GE | image = InvisiblePikmin.jpeg | {{ glitch | reproducibility = High | danger = Harmless | versionmin = ? | versionmax = ? | youtube = rl5aWgW32GE | image = InvisiblePikmin.jpeg | ||
| effects = Have Pikmin on the field that are invisible. | |effects = Have Pikmin on the field that are invisible. They still behave like normal. | ||
| prerequisites = Have at least | |prerequisites = Have at least two types of Pikmin unlocked. | ||
| howto = First, get out 100 of the type Pikmin you ''don't'' want invisible. Afterwards, go back into the Onion menu and deposit some Pikmin and take out a few of species of Pikmin you want invisible. Now, right as the Pikmin go inside the [[Onion]], use the whistle. If done correctly, there will be a few invisible Pikmin of the type that was originally going to come out of the Onion. | |howto = First, get out 100 (or less, although 100 is advised) of the type Pikmin you ''don't'' want invisible. Afterwards, go back into the Onion menu and deposit some Pikmin and take out a few of species of Pikmin you want invisible. Now, right as the Pikmin go inside the [[Onion]], use the whistle. If done correctly, there will be a few invisible Pikmin of the type that was originally going to come out of the Onion. | ||
| | |explanation = When a Pikmin is going in the Onion, its model becomes invisible (so it doesn't appear to clip inside the Onion), and only on the next few [[frame]]s does the Pikmin actually get removed from the field. Whistling a Pikmin in this state will not fix its model, making it remain invisible. | ||
}} | }} | ||
===Odd carrying positions=== | ===Odd carrying positions=== | ||
{{glitch | reproducibility = Low | danger = Harmless | versionmin = ? | versionmax = ? | image = BombRockGlitch.jpeg | youtube = GUBOwr6N7jI&t=775 | {{glitch | reproducibility = Low | danger = Harmless | versionmin = ? | versionmax = ? | image = BombRockGlitch.jpeg | youtube = GUBOwr6N7jI&t=775 | ||
|effects = Makes Pikmin carry an object in a weird position, such as upside down. | |effects = Makes Pikmin carry an object in a weird position, such as upside-down. | ||
|howto = Throw a Pikmin at an object that has fallen down, such as one falling from a [[Medusal Slurker]] or in a [[dirt mound]]. The timing is difficult, making this a glitch hard to do intentionally. | |howto = Throw a Pikmin at an object that has fallen down, such as one falling from a [[Medusal Slurker]] or in a [[dirt mound]]. The timing is difficult, making this a glitch hard to do intentionally. | ||
|notes = The glitch only seems to work on objects that require 1 Pikmin to carry. | |||
|explanation = Once an object, such as a bomb rock, falls down onto the ground, Pikmin will chase after it and pick it up. However, if a Pikmin manages to pick up the object before it reaches its natural position, it accepts that as the natural position of carrying. The Pikmin are told to stick to a specific location and angle relative to the object, which could result in them being placed incorrectly. | |explanation = Once an object, such as a bomb rock, falls down onto the ground, Pikmin will chase after it and pick it up. However, if a Pikmin manages to pick up the object before it reaches its natural position, it accepts that as the natural position of carrying. The Pikmin are told to stick to a specific location and angle relative to the object, which could result in them being placed incorrectly. | ||
}} | }} | ||
| Line 132: | Line 117: | ||
|notes = This does not affect the Pikmin count; the Pikmin that go idle are not counted as dead. | |notes = This does not affect the Pikmin count; the Pikmin that go idle are not counted as dead. | ||
|explanation = There is no code to handle the case in which a Pikmin going for the Onion would touch a bit of nectar, given the unlikeliness of it happening. | |explanation = There is no code to handle the case in which a Pikmin going for the Onion would touch a bit of nectar, given the unlikeliness of it happening. | ||
}} | }} | ||
===Stretched Burrowing Snagret=== | ===Stretched Burrowing Snagret=== | ||
{{glitch | reproducibility = Medium | danger = Harmless | image = Stretched Burrowing Snagret.jpg | {{glitch | reproducibility = Medium | danger = Harmless | versionmin = ? | versionmax = ? | image = Stretched Burrowing Snagret.jpg | ||
|effects = Stretches out the [[Burrowing Snagret]]'s corpse. If it is stretched too much, it becomes invisible. | |effects = Stretches out the [[Burrowing Snagret]]'s corpse. If it is stretched too much, it becomes invisible. | ||
|prerequisites = The [[ | |prerequisites = The [[#Early Winged Pikmin|Early Winged Pikmin glitch]] has to be done. | ||
|howto = First of all, the [[ | |howto = First of all, do the [[#Early Winged Pikmin|Early Winged Pikmin glitch]], so the blue bridge won't be built. Then the [[paper bag]] in front of the [[Onion#Pink|pink Onion]] must be pushed. After that, the [[Burrowing Snagret]] must be defeated and its corpse must be carried by 10 [[Winged Pikmin]] or more. These Pikmin will be blocked in front of the bridge which is unfinished. Whistle them and order them to carry the Burrowing Snagret again; they will pass above the lilypad with the head of the Snavian but its foot will be stuck to the [[lily pad]]. The Winged Pikmin will keep carrying the corpse, and the body between the stuck point and the head will begin stretching as the Pikmin carry it forward. If it is stretched too far, the body will eventually turn invisible. Despite this, the corpse will still be harvested once brought to the [[Onion#Master|Master Onion]]. | ||
}} | }} | ||
| Line 164: | Line 141: | ||
|howto = From the day selection screen, pick a day where you have not met the Scornet Maestro, preferably the first day in which it's possible to visit the [[Twilight River]]. Use the [[KopPad]]'s radar app and pan to where the Scornet Maestro's arena is. If it's not already disabled, turn off Off-TV Play so you can use the GamePad and the TV. From the TV, you should be able to see the Scornet Maestro's shadow in a T-pose (with its arms spread out sideways). If you gently pan the camera around, you'll be able to bump into the Scornet Maestro itself, which will be roughly at camera-height. It should only be possible to see an arm or some feathers, because for the most part, the camera goes inside the creature. | |howto = From the day selection screen, pick a day where you have not met the Scornet Maestro, preferably the first day in which it's possible to visit the [[Twilight River]]. Use the [[KopPad]]'s radar app and pan to where the Scornet Maestro's arena is. If it's not already disabled, turn off Off-TV Play so you can use the GamePad and the TV. From the TV, you should be able to see the Scornet Maestro's shadow in a T-pose (with its arms spread out sideways). If you gently pan the camera around, you'll be able to bump into the Scornet Maestro itself, which will be roughly at camera-height. It should only be possible to see an arm or some feathers, because for the most part, the camera goes inside the creature. | ||
|explanation = Unlike other bosses, the Scornet Maestro is not hidden when the area is loaded and the enemy is not being used. This normally would not be a problem, as players would never be able to see it in its default pose (the T-pose), seeing as panning the radar to its arena would just reveal a black fog, due to the section never being entered. But if on the same save file, the boss had been encountered once, the arena will be visible on any day, including a day where the Maestro appears in its T-pose. | |explanation = Unlike other bosses, the Scornet Maestro is not hidden when the area is loaded and the enemy is not being used. This normally would not be a problem, as players would never be able to see it in its default pose (the T-pose), seeing as panning the radar to its arena would just reveal a black fog, due to the section never being entered. But if on the same save file, the boss had been encountered once, the arena will be visible on any day, including a day where the Maestro appears in its T-pose. | ||
}} | }} | ||
===Warped sunset music=== | ===Warped sunset music=== | ||
{{todo|Check if it happens with other cutscene interruptions, like a suit upgrade, Pikmin in peril, or leader down. Also, point | {{todo|Check if it happens with other cutscene interruptions, like a suit upgrade, Pikmin in peril, or leader down. Also, point down whether this is heard through the TV, GamePad, or both (keep Off-TV Play in mind).}} | ||
{{glitch | reproducibility = High | danger = Harmless | {{glitch | reproducibility = High | danger = Harmless | versionmin = ? | versionmax = ? | ||
|effects = Makes the sunset theme sound warped and low-quality, as if played through a speaker. | |effects = Makes the sunset theme sound warped and low-quality, as if played through a speaker. | ||
|prerequisites = Be on day two or further. | |prerequisites = Be on day two or further. | ||
|howto = When the [[day]] is about to end, pause the game via the [[radar]], and unpause it using the Alph icon on the top-right corner. When the sunset cutscene starts, it will have the same filter applied to it as the area song when heard through the KopPad's unpause feature. | |howto = When the [[day]] is about to end, pause the game via the [[radar]], and unpause it using the Alph icon on the top-right corner. When the sunset cutscene starts, it will have the same filter applied to it as the area song when heard through the KopPad's unpause feature. | ||
|explanation = An audio filter is applied to the current area's song when the game is unpaused using Alph's icon. This change in the music is meant to reflect how the action is still happening, but the player is not in it | |explanation = An audio filter is applied to the current area's song when the game is unpaused using Alph's icon. This change in the music is meant to reflect how the action is still happening, but the player is not in it. However, there is nothing to handle a sunset during this time, so the music filter is never removed. | ||
}} | }} | ||
=== | ==Misc.== | ||
{{ glitch | reproducibility = | ===Brittany's pseudo-reunion === | ||
| effects = | {{ glitch | reproducibility = High | danger = Helpful | versionmin = ? | versionmax = ? | ||
| prerequisites = Have | |effects = Reunite Brittany and Alph in the [[Distant Tundra]] before constructing the double bridge. | ||
| howto = | |prerequisites = Have Brittany and Alph separated at the [[Distant Tundra]] without having built the double bridge, and have obtained the [[Dodge Whistle]] with Alph. | ||
| notes = | |howto = At the [[Distant Tundra]], with Brittany, go to the top of the slide near the [[Whiptongue Bulborb]] and [[dodge]] roll to hit the west side of the slide's edge, then walk against it. If done correctly, Brittany should not slide down, but rather be walking against the wall. Continue walking down the wall and it should be possible to get up the wall and out of bounds. Once Brittany is out of bounds, she can jump off over at the side of the river where Alph is. However, it will be impossible to call Alph (or Brittany, after switching) and they will not react to being pushed, either. After the day ends, Brittany will automatically be sent back into the cave, unless the double bridge is finished. | ||
| | |notes = If Pikmin are brought out of bounds with Brittany, they can be [[throw]]n on the partially-submerged [[dirt wall]] and it can be broken, allowing easy access between the two sides of the river. | ||
}} | |||
===Character line mix-up=== | |||
{{glitch | reproducibility = medium | danger = Harmless | versionmin = ? | versionmax = ? | image = GlitchDrakeConversation.jpeg | icaption = In this scenario, Alph's icon is displayed for Brittany's line. | |||
|effects = Makes one character's icon appear for another's line. | |||
|howto = There is no known way to execute the glitch on purpose. | |||
|notes = It only seems to happen on the US [[Region|version]]. | |||
}} | }} | ||
=== | ===Counter glitch=== | ||
{{ glitch | reproducibility = Medium | danger = | {{glitch | reproducibility = Medium | danger = Harmless | versionmin = ? | versionmax = 2.0.0 | image = Pikmin 3 counter glitch.jpg | icaption = In this case, player 1's counter shows no standby bubble for Blue Pikmin, and player 2's shows 3 Red Pikmin on standby, but 0 on the squad. | ||
| | |effects = Makes the counter show erroneous numbers, like more Pikmin for standby than the number of Pikmin on the squad, or vice-versa | ||
| | |howto = There is no concise way to reproduce this glitch, but so far, it was only reported to work on the [[Quaggled Mireclops]] mission in co-op mode. Just playing through the mission as normal will be enough for the counter to eventually glitch. | ||
| | |notes = The counter returns to normal when the standby Pikmin/leader is switched, or a Pikmin type is added to or removed from the squad. A similar glitch can also happen in ''[[Glitches in Pikmin#Counter glitch|Pikmin]]''. | ||
| | |||
}} | }} | ||
== | ===Crimson Banquet glitch=== | ||
{{glitch | reproducibility = ? | danger = Harmful | versionmin = ? | versionmax = ? | |||
|effects = Makes Pikmin carrying part of the [[Crimson Banquet]] survive the sunset. The pieces then become irretrievable the next day. | |||
|howto = Carry both the defeated [[Sandbelching Meerslug]] and the [[Crimson Banquet]] pieces towards the landing site. After the body comes out of the pathway between the arena and the mainland, call back all of the Pikmin carrying it, but not the ones carrying the fruit. The day must then end, and if done correctly, none of the fruit carriers should be lost to sunset. Come back the next day, and pieces of the fruit should be scattered around the area where the body was, but they might not be there, meaning that they are gone. You need to restart the previous day to get the fruit back. | |||
}} | |||
===Floating fruit=== | ===Floating fruit=== | ||
{{ glitch | reproducibility = Medium | danger = Harmful | versionmin = ? | versionmax = ? | image = Floatingfruit.jpeg | icaption = Demonstration of the glitch on [[The Rustyard]]. | |||
|effects = Fruits will hover in the air and Pikmin will not grab onto it. | |||
| prerequisites = Find a fruit that is located on a ledge that is oddly shaped, like the one in the picture. | |prerequisites = Find a fruit that is located on a ledge that is oddly shaped, like the one in the picture. | ||
| howto = Just as the object is about to fall onto the lower ground, call back all Pikmin carrying the object. It is possible that the object will be stuck in the air beyond the ledge. | |howto = Just as the object is about to fall onto the lower ground, call back all Pikmin carrying the object. It is possible that the object will be stuck in the air beyond the ledge. | ||
| notes = The object will most likely remain | |notes = The object will most likely remain irretrievable afterwards, so attempt the glitch where it is not harmful, like [[Mission Mode]]. | ||
| explanation = There is a certain small area located at the end of the ledge when an object is being carried back to base, acting like a sort of ramp so that the Pikmin do not fall straight down. Since Pikmin cannot actually walk on this "ramp" of sorts, the Pikmin will try to attempt to carry the fruit but won't actually be able to. Winged Pikmin, of course, will be able to free the object. | |explanation = There is a certain small area located at the end of the ledge when an object is being carried back to base, acting like a sort of ramp so that the Pikmin do not fall straight down. Since Pikmin cannot actually walk on this "ramp" of sorts, the Pikmin will try to attempt to carry the fruit but won't actually be able to. Winged Pikmin, of course, will be able to free the object. | ||
}} | |||
===Plasm Wraith push out=== | |||
{{glitch | reproducibility = Low |danger = Harmful | versionmin = ? | versionmax = ? | |||
|effects = Enter the [[Formidable Oak]] during the [[Plasm Wraith]] boss fight. | |||
|prerequisites = Get a large amount of plasm to fall out (easiest to destroy an elemental plasm or to ground the boss (attack it with a large amount of Winged or Yellow Pikmin) when it levitates). | |||
|howto = Fight the Plasm Wraith as normal until its health is down 1/3 of the way. When it starts to send out the elemental plasms, destroy them and stand in the puddles until the boss reabsorbs them. Very rarely, the plasm should push the player through the floor and out of the level; the player will lose 1/3 of their health, but will respawn in the final puzzle room of the [[Formidable Oak]]'s dungeon. | |||
|notes = The room will appear like it does in story mode but with no water, enemies, or [[Common Glowcap]]s, leaving it totally dark. As the game is still in Mission Mode, the exits are blocked and the room becomes effectively inescapable. The battle outside will be completely paused until the player switches leaders. | |||
}} | |||
===Tremendous Sniffer without bomb rocks=== | |||
{{ glitch | reproducibility = High | danger = Helpful | versionmin = ? | versionmax = ? | image = Tremendous Sniffer glitch.jpg | |||
|effects = Obtaining the Tremendous Sniffer in the Twilight River without bomb rocks. | |||
|prerequisites = Keep the Reinforced Wall up. | |||
|howto = At the Twilight River, approach the Tremendous Sniffer. Throw Yellow Pikmin at the pear, having them carry it into the wall. Call them back and end the day. The next day, the Tremendous Sniffer will be outside of its alcove. | |||
|notes = Pikmin will become idle quickly if they can't return to you, so end the day immediately after calling them back. | |||
|explanation = The game keeps track of where the fruit is. Instead of saving exact coordinates, it might only save the "general" location. If the fruit is not moved, its "general location" is considered inside the alcove. If it gets too close to the gate, the location starts being considered the open space outside the alcove. When it loads the next day, it places the fruit in the vague location it had saved the previous day. Alternately, the game might save the exact location, but due to the carrying, the pear gets slightly embedded against the wall, and when the game loads a new day, it attempts to spawn the fruit in the same place, but to prevent it from clipping, it pushes it off and outside the wall. | |||
}} | }} | ||
=== | ===Weird color juice=== | ||
{{glitch | reproducibility = | {{ glitch | reproducibility = Medium | danger = Harmless | versionmin = ? | versionmax = ? | image = Weird Juice.jpg | ||
| prerequisites = | |effects = Gives the [[juice]] a blue color. | ||
|prerequisites = Have a half bottle of purple juice and have at least one [[Zest Bomb]] left to collect. | |||
| | |howto = First, have a half bottle of purple juice (which comes from [[Dusk Pustules]] or a [[Juicy Gaggle]]) and go to an area where there is a [[Zest Bomb]]. Bring it back to the [[S.S. Drake]] as the first fruit, so that at the end of the day, it will mix its juice with the purple juice. The mixture will be of an abnormal cyan blue color. | ||
|notes = This might not be a glitch and may actually be intended by the game. | |||
}} | }} | ||
==Minor | ==Minor== | ||
The following glitches cannot easily be reproduced and/or are not noteworthy, but are documented for completion's sake. | The following glitches cannot easily be reproduced and/or are not noteworthy, but are documented for completion's sake. | ||
| Line 229: | Line 223: | ||
File:Brittany blue cursor.jpg|Brittany's cursor with a blue sphere. | File:Brittany blue cursor.jpg|Brittany's cursor with a blue sphere. | ||
</gallery> | </gallery> | ||
==See also== | |||
*[[Unused content in Pikmin 3|Unused content in ''Pikmin 3'']] | |||
*[[Mistake]] | |||
[[Category:Glitches]] | [[Category:Glitches]] | ||
[[Category:Real world]] | [[Category:Real world]] | ||
[[Category:Technical]] | [[Category:Technical]] | ||
Revision as of 08:03, August 21, 2015
This is a collection of glitches possible in Pikmin 3.
Please read the glitch notes before attempting any of these glitches or before adding your own.
Main
Early Quaggled Mireclops
| Reproducibility | Consequences | Demonstration |
|---|---|---|
| medium | {{{consequences}}} | YouTube video |
- Effects: Get access to the Quaggled Mireclops without having to build the blue pot.
- Prerequisites: Make sure Blue Pikmin have been discovered.
- How to: At the Garden of Hope once Louie has ran away, discover the Blue Pikmin and take a group of Winged Pikmin under the large pail underwater. By standing in that certain spot, the Winged Pikmin will go higher and higher until they are on the land above the pail. From there, have them collect the group of 10 fragments by charging, and have a small group dig up the remaining fragments. If done correctly, a leader can now be thrown across to the incomplete blue bridge. Throw a few Rock Pikmin along with the leader to get the last 20 fragments inside the crystal.
- Notes: The Peckish Aristocrab will not interfere with the Winged Pikmin, so don't worry.
- Possible explanation: None.
Early Scornet Maestro
| Reproducibility | Consequences | Demonstration |
|---|---|---|
| Medium | {{{consequences}}} | YouTube video |
- Effects: Get access to fight the Scornet Maestro without having to build the red bridge.
- Prerequisites: Have the second half of the Twilight River unlocked, and have three leaders ready.
- How to: First, go into the area to the side of the red bridge (the area with two Desiccated Skitter Leaves and leading to the three Orange Bulborbs). From there, throw two captains up onto the root near the pink 5 Pellet Posy. From there, quickly throw another leader up onto the elevated area above. This must be done quickly or else the leaders will slide back down. From there, switch to the leader up above and have them walk near the rock closest to the path. If they continue to walk, they will eventually phase through it, fall out of bounds, and appear on the path to the Scornet Maestro's lair. From there, have them whistle a group of Pikmin under the path. When the leader at the top enters the transition zone, all Pikmin in the group will teleport to their side.
- Notes: In version 1.0 to 1.3, the captain takes no damage. In version 1.4 onwards, the captain loses 1/3 of their health. It is also advised to start building the bridge while the boss fight is going on, so that when it is defeated, spoils can easily be carried back.
- Possible explanation: Collision detection algorithms should be simple when it comes to scenery. While the path's wall pushes the leader back, the rock pushes them forward, resulting in no lateral movement. The forward movement, however, is still enough to move the leader forwards (considering there are no collision forces stopping them efficiently on that direction), so they slowly make progress forward, until they no longer collide with the geometry and go through.
Early Shaggy Long Legs
| Reproducibility | Consequences |
|---|---|
| Medium | {{{consequences}}} |
- Effects: Makes the player fight against Shaggy Long Legs earlier than normal, and with unlimited time.
- Prerequisites: Have access to the Distant Tundra, and have not gone there before.
- How to: In the cave were the Yellow Pikmin are found, after breaking down the exit's blockade, go out of bounds using the same method as in the Yellow Onion skip glitch, only, rather than going above the entrance, go behind it and walk around to the Shaggy Long Legs' arena. The battle will proceed as normal, only there will be an unlimited day length, and Brittany will have infinite health.
- Notes: When battling the Shaggy Long Legs before breaking the blockade, if enough Pikmin die, it will be impossible to gain enough Pikmin to push the iron ball; and if all the Pikmin die, the Yellow Onion will not eject another seed. Additionally, any Red Pikmin (obtained via the Crimson Candypop Bud) will be invisible during the cutscene where the weight is pushed.
- Possible explanation: When Brittany is in the cave, the day is set to be in a "tutorial" state, where the leader have unlimited health and the day lasts forever, as with day 1. When exiting the main entrance of the cave, it is set to end the "tutorial" state and begin the day as normal; but if one exits via the other entrance, it will not.
Early Winged Pikmin
| Reproducibility | Consequences | Demonstration |
|---|---|---|
| Low | {{{consequences}}} | YouTube video |
- Effects: Allows the player to get to the Winged Pikmin's Onion without building the long blue bridge across the river.
- Prerequisites: Have the Twilight River unlocked and have two leaders.
- How to: At the Twilight River have one leader walk across the river with the Water Dumple, with no Pikmin in the area. Once near the lily pad, have the leader walk in the corner of the rock to the left of it and the lily pad. If done correctly, the leader will begin to go through the rock. Walk onto the brown land area, and the leader will fall down into an abyss. They will later respawn on the side of the river with the Winged Pikmin's Onion. From there, switch to a leader at the landing site, and have them throw across some Pikmin, preferably Rock Pikmin, to free the Onion from the Arachnode's web. Throw some in the water, and then switch to the other çeader so that they can call them to the other shore.
- Notes: In version 1.0, the captain takes no damage if they fall in. However, in version 1.4 and onwards, they take damage equal to 1/3 of their total health. Even though the bridge is skipped, it is recommended to build it eventually to allow easy retrieval of items.
- Possible explanation: Collision detection algorithms should be simple, in order to not overload the console, specially for things as trivial as scenery objects such as rocks. It is possible that the gap between the rocks angles inwards, and when the leader attempts to move between them, each wall pushes them in opposite directions, which results in no lateral movement. The forward movement, however, is still enough to move the leader forwards (considering there are no collision forces stopping them efficiently on that direction), so they slowly make progress forward, until they no longer collide with the geometry and go through.
Formidable Oak backwards
| Reproducibility | Consequences | Demonstration |
|---|---|---|
| Medium | {{{consequences}}} | YouTube video |
- Effects: Allows the player to do the Formidable Oak cave backwards, and clear out all enemies before actually encountering the Plasm Wraith.
- Prerequisites: Have 2 leaders available, have the Dodge Whistle, and of course, have the Formidable Oak unlocked.
- How to: Take one leader and throw them onto the small root to the right of the path leading down into the Plasm Wraith arena. The placement must be perfect or else the glitch will not work. Once there, walk off and to the left, and proceed to walk up the large root of the white tree. Make sure the leader is facing away from the arena, and use a dodge roll to get on top of the rock. From there, simply whistle the other two leaders and walk inside the cave. The glitch is easier seen than explained, so watch the YouTube video above.
- Notes: It is advised to throw a leader who would be switched to directly (i.e. Brittany throws Charlie, Charlie throws Alph, and Alph throws Brittany) so that the leader thrown on the root can be switched to immediately and they won't fall off.
- Possible explanation: Although there is a ledge blocking off the exit to the cave, there is no actual barrier blocking off the cave's exit, and it functions just like an entrance. The only invisible wall present is next to the large rock, which is why the Dodge Whistle must be used to get over the rock. By going through the cave backwards, the player can clear out all the obstacles easily without having to worry about the Plasm Wraith, and can rescue Olimar from the cave within a few minutes.
Remote-controlled Pikmin
| Reproducibility | Consequences |
|---|---|
| High | {{{consequences}}} |
- Effects: Control Pikmin without being exactly where they are.
- Prerequisites: Obtain the Dodge Whistle.
- How to: Throw Pikmin up a ledge or over a gap, call them, and repeatedly use the Dodge Whistle against a wall. The Pikmin should roll, going farther than possible to throw. If you dismiss your Pikmin after they have rolled close to an object, such as the hay pile north of the landing site in the Distant Tundra, they will interact with it, allowing access to some areas that shouldn't be accessible.
- Notes: None.
- Possible explanation: When dodging, the Pikmin are programmed to roll with the leader, but if the captain's roll path is blocked, and the Pikmin's is not, then they will still roll.
Yellow Onion skip
| Reproducibility | Consequences |
|---|---|
| Medium | {{{consequences}}} |
- Effects: Allows the player to skip the Yellow Onion and continue the game without it.
- Prerequisites: Have access to the Distant Tundra, and have not gone there before.
- How to: In the cave where the Yellow Pikmin are found, go between the iron ball and the slide and walk against the wall. If done correctly, Brittany should walk against the edge of the slide, rather than sliding down. Continue pushing against the wall while going down the slide to get out of bounds; from there, walk above the blocked entrance, and the game will treat it as you have exited the cave. Use the five yellow Pikmin and the Golden Candypop Buds to reunite Alph and Brittany. The day after, the Yellow Onion will be missing from the cave, and Yellow Pikmin produced by Candypop Buds will bring their loot to the master Onion and produce more Yellow Pikmin, although it is impossible to deposit or withdraw any into the Onion, and any Yellow Pikmin will vanish at the end of the day, even if they are in your squad or close to the landing site. Once you gain access to the Twilight River and rescue the Winged Pikmin, it is possible to withdraw Yellow Pikmin by using the "take out all types" feature; every one Red and Rock Pikmin taken out with this feature takes out one Yellow as well. To deposit Yellow Pikmin, take out Winged Pikmin and begin depositing them, but then hold the button that allows you to take out all the types, and Yellow Pikmin should be put in, instead.
- Notes: None.
- Possible explanation: Some flags that the game keeps to hold track of the story mode progression might get set or not set like intended if the glitch is performed. This results in the Onion's menu using some behaviors for some flags, resulting in unintended behavior.
Aesthetic
Delayed typing sound
| Reproducibility | Consequences |
|---|---|
| Medium | {{{consequences}}} |
- Effects: On the voyage log screen, the typewriter tapping sound that accompanies the text becomes delayed, and eventually lags behind.
- Prerequisites: None.
- How to: There is no consistent way for this glitch to happen.
- Notes: This glitch has only been proven to happen on the European version, although it might work on the American version as well. It is possible that the lagging happens in specific messages every time.
- Possible explanation: During an early version of the game, the log text was a certain way, and during that time, the script that plays the tapping sound was made to match that text. Before the final release, some words were removed from the text, making it appear faster, but the sound scripting was never adjusted, following the slower speed of the old text.
Drowning cutscene glitch
File:GlitchWaterCutscene.jpeg
Demonstration of the glitch.
| Reproducibility | Consequences |
|---|---|
| Medium | {{{consequences}}} |
- Effects: Shows the fire effect and the water effect overlap incorrectly.
- Prerequisites: Never had a Pikmin drown before.
- How to: Go to the cave with Pyroplasmic Slooches on the Distant Tundra. Let the Slooches draw some trails of fire and get a Pikmin to start drowning. If the positioning and the camera angle line up, the fire trail will appear in the same place as the water from the camera's line of sight, but the two will overlap in odd ways.
- Notes: None.
- Possible explanation: None.
Invisible bomb rock

| Reproducibility | Consequences |
|---|---|
| High | {{{consequences}}} |
- Effects: Makes the bomb rock a Pikmin is holding turn invisible. It is completely normal besides that.
- Prerequisites: Have access to the cave with the Medusal Slurker that is carrying a Juicy Gaggle, on the Tropical Wilds.
- How to: Get a bomb rock from the main area outside the cave, like from the dirt mound near the landing site. Then, simply enter the cave with that Pikmin.
- Notes: The bomb rock becomes visible again once you exit the cave.
- Possible explanation: None.
Invisible Pikmin
File:InvisiblePikmin.jpeg
Demonstration of the glitch.
| Reproducibility | Consequences | Demonstration |
|---|---|---|
| High | {{{consequences}}} | YouTube video |
- Effects: Have Pikmin on the field that are invisible. They still behave like normal.
- Prerequisites: Have at least two types of Pikmin unlocked.
- How to: First, get out 100 (or less, although 100 is advised) of the type Pikmin you don't want invisible. Afterwards, go back into the Onion menu and deposit some Pikmin and take out a few of species of Pikmin you want invisible. Now, right as the Pikmin go inside the Onion, use the whistle. If done correctly, there will be a few invisible Pikmin of the type that was originally going to come out of the Onion.
- Notes: None.
- Possible explanation: When a Pikmin is going in the Onion, its model becomes invisible (so it doesn't appear to clip inside the Onion), and only on the next few frames does the Pikmin actually get removed from the field. Whistling a Pikmin in this state will not fix its model, making it remain invisible.
Odd carrying positions
File:BombRockGlitch.jpeg
Demonstration of the glitch.
| Reproducibility | Consequences | Demonstration |
|---|---|---|
| Low | {{{consequences}}} | YouTube video |
- Effects: Makes Pikmin carry an object in a weird position, such as upside-down.
- Prerequisites: None.
- How to: Throw a Pikmin at an object that has fallen down, such as one falling from a Medusal Slurker or in a dirt mound. The timing is difficult, making this a glitch hard to do intentionally.
- Notes: The glitch only seems to work on objects that require 1 Pikmin to carry.
- Possible explanation: Once an object, such as a bomb rock, falls down onto the ground, Pikmin will chase after it and pick it up. However, if a Pikmin manages to pick up the object before it reaches its natural position, it accepts that as the natural position of carrying. The Pikmin are told to stick to a specific location and angle relative to the object, which could result in them being placed incorrectly.
Pikmin out at night

| Reproducibility | Consequences |
|---|---|
| Medium | {{{consequences}}} |
- Effects: Makes a Pikmin stay idle during the nighttime cutscene, and then vanish when it's time for takeoff.
- Prerequisites: Have leaf or bud Pikmin in your party.
- How to: Have a drop of nectar on one of the Onion's legs, and have leaf or bud Pikmin with you. The best way to do this is to knock on an Iridescent Flint Beetle when it is near the Onion; this can be done on the Garden of Hope and Twilight River. End the day from the pause menu. The Pikmin in your party will make their way to the Onion's legs, but leaves and buds should stop by the nectar and begin drinking it. When they're done, they'll remain idle on their spot, and the Onion will fly off without them. When that happens, they will vanish instantly.
- Notes: This does not affect the Pikmin count; the Pikmin that go idle are not counted as dead.
- Possible explanation: There is no code to handle the case in which a Pikmin going for the Onion would touch a bit of nectar, given the unlikeliness of it happening.
Stretched Burrowing Snagret

| Reproducibility | Consequences |
|---|---|
| Medium | {{{consequences}}} |
- Effects: Stretches out the Burrowing Snagret's corpse. If it is stretched too much, it becomes invisible.
- Prerequisites: The Early Winged Pikmin glitch has to be done.
- How to: First of all, do the Early Winged Pikmin glitch, so the blue bridge won't be built. Then the paper bag in front of the pink Onion must be pushed. After that, the Burrowing Snagret must be defeated and its corpse must be carried by 10 Winged Pikmin or more. These Pikmin will be blocked in front of the bridge which is unfinished. Whistle them and order them to carry the Burrowing Snagret again; they will pass above the lilypad with the head of the Snavian but its foot will be stuck to the lily pad. The Winged Pikmin will keep carrying the corpse, and the body between the stuck point and the head will begin stretching as the Pikmin carry it forward. If it is stretched too far, the body will eventually turn invisible. Despite this, the corpse will still be harvested once brought to the Master Onion.
- Notes: None.
- Possible explanation: None.
T-pose Pikmin

| Reproducibility | Consequences |
|---|---|
| High | {{{consequences}}} |
- Effects: Shows a Pikmin in a T-pose.
- Prerequisites: None
- How to: Go to a Pikmin sprout and choose to pluck it. Just when the leader's hands make contact with the Pikmin, the creature will be shown in a T-pose (also known as blind pose or reference pose), meaning its arms will be stretched out horizontally. It will also appear at ground level instead of being underground. This lasts only for a single frame. With the KopPad's camera and a secondary leader, it is possible to see it better, specially if you snap a photo.
- Notes: If you're finding it hard to see (without pausing), try not having many Pikmin shown on-camera at once, as it may help the game slow down to less than 60 frames per second, making it possible for it to skip the frame in which it would show the pose.
- Possible explanation: When a Pikmin is plucked, its "sprout" object is removed from the world, and its "normal" object is created. It takes one frame for the object's animation to be set, so for a single frame, it uses the default animation pose, which is a T-pose, commonly used during development to make it easier to see and work with the model. This T-pose is set at ground-level instead of submerged underground.
T-pose Scornet Maestro

| Reproducibility | Consequences |
|---|---|
| High | {{{consequences}}} |
- Effects: Shows the Scornet Maestro in a T-pose.
- Prerequisites: Have a save file with any day after the defeat of the Scornet Maestro.
- How to: From the day selection screen, pick a day where you have not met the Scornet Maestro, preferably the first day in which it's possible to visit the Twilight River. Use the KopPad's radar app and pan to where the Scornet Maestro's arena is. If it's not already disabled, turn off Off-TV Play so you can use the GamePad and the TV. From the TV, you should be able to see the Scornet Maestro's shadow in a T-pose (with its arms spread out sideways). If you gently pan the camera around, you'll be able to bump into the Scornet Maestro itself, which will be roughly at camera-height. It should only be possible to see an arm or some feathers, because for the most part, the camera goes inside the creature.
- Notes: None.
- Possible explanation: Unlike other bosses, the Scornet Maestro is not hidden when the area is loaded and the enemy is not being used. This normally would not be a problem, as players would never be able to see it in its default pose (the T-pose), seeing as panning the radar to its arena would just reveal a black fog, due to the section never being entered. But if on the same save file, the boss had been encountered once, the arena will be visible on any day, including a day where the Maestro appears in its T-pose.
Warped sunset music
|
To do: Check if it happens with other cutscene interruptions, like a suit upgrade, Pikmin in peril, or leader down. Also, point down whether this is heard through the TV, GamePad, or both (keep Off-TV Play in mind). |
| Reproducibility | Consequences |
|---|---|
| High | {{{consequences}}} |
- Effects: Makes the sunset theme sound warped and low-quality, as if played through a speaker.
- Prerequisites: Be on day two or further.
- How to: When the day is about to end, pause the game via the radar, and unpause it using the Alph icon on the top-right corner. When the sunset cutscene starts, it will have the same filter applied to it as the area song when heard through the KopPad's unpause feature.
- Notes: None.
- Possible explanation: An audio filter is applied to the current area's song when the game is unpaused using Alph's icon. This change in the music is meant to reflect how the action is still happening, but the player is not in it. However, there is nothing to handle a sunset during this time, so the music filter is never removed.
Misc.
Brittany's pseudo-reunion
| Reproducibility | Consequences |
|---|---|
| High | {{{consequences}}} |
- Effects: Reunite Brittany and Alph in the Distant Tundra before constructing the double bridge.
- Prerequisites: Have Brittany and Alph separated at the Distant Tundra without having built the double bridge, and have obtained the Dodge Whistle with Alph.
- How to: At the Distant Tundra, with Brittany, go to the top of the slide near the Whiptongue Bulborb and dodge roll to hit the west side of the slide's edge, then walk against it. If done correctly, Brittany should not slide down, but rather be walking against the wall. Continue walking down the wall and it should be possible to get up the wall and out of bounds. Once Brittany is out of bounds, she can jump off over at the side of the river where Alph is. However, it will be impossible to call Alph (or Brittany, after switching) and they will not react to being pushed, either. After the day ends, Brittany will automatically be sent back into the cave, unless the double bridge is finished.
- Notes: If Pikmin are brought out of bounds with Brittany, they can be thrown on the partially-submerged dirt wall and it can be broken, allowing easy access between the two sides of the river.
- Possible explanation: None.
Character line mix-up
File:GlitchDrakeConversation.jpeg
In this scenario, Alph's icon is displayed for Brittany's line.
| Reproducibility | Consequences |
|---|---|
| medium | {{{consequences}}} |
- Effects: Makes one character's icon appear for another's line.
- Prerequisites: None.
- How to: There is no known way to execute the glitch on purpose.
- Notes: It only seems to happen on the US version.
- Possible explanation: None.
Counter glitch

| Reproducibility | Consequences |
|---|---|
| Medium | {{{consequences}}} |
- Effects: Makes the counter show erroneous numbers, like more Pikmin for standby than the number of Pikmin on the squad, or vice-versa
- Prerequisites: None.
- How to: There is no concise way to reproduce this glitch, but so far, it was only reported to work on the Quaggled Mireclops mission in co-op mode. Just playing through the mission as normal will be enough for the counter to eventually glitch.
- Notes: The counter returns to normal when the standby Pikmin/leader is switched, or a Pikmin type is added to or removed from the squad. A similar glitch can also happen in Pikmin.
- Possible explanation: None.
Crimson Banquet glitch
| Reproducibility | Consequences |
|---|---|
| ? | {{{consequences}}} |
- Effects: Makes Pikmin carrying part of the Crimson Banquet survive the sunset. The pieces then become irretrievable the next day.
- Prerequisites: None.
- How to: Carry both the defeated Sandbelching Meerslug and the Crimson Banquet pieces towards the landing site. After the body comes out of the pathway between the arena and the mainland, call back all of the Pikmin carrying it, but not the ones carrying the fruit. The day must then end, and if done correctly, none of the fruit carriers should be lost to sunset. Come back the next day, and pieces of the fruit should be scattered around the area where the body was, but they might not be there, meaning that they are gone. You need to restart the previous day to get the fruit back.
- Notes: None.
- Possible explanation: None.
Floating fruit
File:Floatingfruit.jpeg
Demonstration of the glitch on The Rustyard.
| Reproducibility | Consequences |
|---|---|
| Medium | {{{consequences}}} |
- Effects: Fruits will hover in the air and Pikmin will not grab onto it.
- Prerequisites: Find a fruit that is located on a ledge that is oddly shaped, like the one in the picture.
- How to: Just as the object is about to fall onto the lower ground, call back all Pikmin carrying the object. It is possible that the object will be stuck in the air beyond the ledge.
- Notes: The object will most likely remain irretrievable afterwards, so attempt the glitch where it is not harmful, like Mission Mode.
- Possible explanation: There is a certain small area located at the end of the ledge when an object is being carried back to base, acting like a sort of ramp so that the Pikmin do not fall straight down. Since Pikmin cannot actually walk on this "ramp" of sorts, the Pikmin will try to attempt to carry the fruit but won't actually be able to. Winged Pikmin, of course, will be able to free the object.
Plasm Wraith push out
| Reproducibility | Consequences |
|---|---|
| Low | {{{consequences}}} |
- Effects: Enter the Formidable Oak during the Plasm Wraith boss fight.
- Prerequisites: Get a large amount of plasm to fall out (easiest to destroy an elemental plasm or to ground the boss (attack it with a large amount of Winged or Yellow Pikmin) when it levitates).
- How to: Fight the Plasm Wraith as normal until its health is down 1/3 of the way. When it starts to send out the elemental plasms, destroy them and stand in the puddles until the boss reabsorbs them. Very rarely, the plasm should push the player through the floor and out of the level; the player will lose 1/3 of their health, but will respawn in the final puzzle room of the Formidable Oak's dungeon.
- Notes: The room will appear like it does in story mode but with no water, enemies, or Common Glowcaps, leaving it totally dark. As the game is still in Mission Mode, the exits are blocked and the room becomes effectively inescapable. The battle outside will be completely paused until the player switches leaders.
- Possible explanation: None.
Tremendous Sniffer without bomb rocks

| Reproducibility | Consequences |
|---|---|
| High | {{{consequences}}} |
- Effects: Obtaining the Tremendous Sniffer in the Twilight River without bomb rocks.
- Prerequisites: Keep the Reinforced Wall up.
- How to: At the Twilight River, approach the Tremendous Sniffer. Throw Yellow Pikmin at the pear, having them carry it into the wall. Call them back and end the day. The next day, the Tremendous Sniffer will be outside of its alcove.
- Notes: Pikmin will become idle quickly if they can't return to you, so end the day immediately after calling them back.
- Possible explanation: The game keeps track of where the fruit is. Instead of saving exact coordinates, it might only save the "general" location. If the fruit is not moved, its "general location" is considered inside the alcove. If it gets too close to the gate, the location starts being considered the open space outside the alcove. When it loads the next day, it places the fruit in the vague location it had saved the previous day. Alternately, the game might save the exact location, but due to the carrying, the pear gets slightly embedded against the wall, and when the game loads a new day, it attempts to spawn the fruit in the same place, but to prevent it from clipping, it pushes it off and outside the wall.
Weird color juice

| Reproducibility | Consequences |
|---|---|
| Medium | {{{consequences}}} |
- Effects: Gives the juice a blue color.
- Prerequisites: Have a half bottle of purple juice and have at least one Zest Bomb left to collect.
- How to: First, have a half bottle of purple juice (which comes from Dusk Pustules or a Juicy Gaggle) and go to an area where there is a Zest Bomb. Bring it back to the S.S. Drake as the first fruit, so that at the end of the day, it will mix its juice with the purple juice. The mixture will be of an abnormal cyan blue color.
- Notes: This might not be a glitch and may actually be intended by the game.
- Possible explanation: None.
Minor
The following glitches cannot easily be reproduced and/or are not noteworthy, but are documented for completion's sake.
- While playing through the Quaggled Mireclops mission, it's possible for the cursor for player two as Brittany to be colored all pink like normal, except for the sphere in the center, which will be blue. This happens for when the cursor is not on top of a target (i.e. on the ground).
Brittany's cursor with a blue sphere.
