Formidable Oak: Difference between revisions
mNo edit summary |
(Added Japanese name.) |
||
| Line 11: | Line 11: | ||
}} | }} | ||
The '''Formidable Oak''' is the fifth and final area of ''[[Pikmin 3]]''. It is home to the final boss, the [[Plasm Wraith]]. The leaders come here after being pointed to it by [[Louie]]. The area requires the use of all five Pikmin types discovered over the course of Story Mode. Most of the map is a massive cave system, in which the player must transport an unconscious [[Captain Olimar]] (using 5 to 10 Pikmin) through the maze of puzzles and enemies, while making sure that the [[Plasm Wraith]] doesn't catch up to Olimar. After transporting him outside, the final boss fight with the Plasm Wraith will automatically begin. There are no [[fruit]]s to collect in this area, and the [[enemies]] desintegrate after being killed (aside from the [[Nectarous Dandelfly]]). | The '''Formidable Oak''' ({{j|哀しき獣の塔|Kanashiki Kemono no Tō|Tower of Sorrowful Beast}}) is the fifth and final area of ''[[Pikmin 3]]''. It is home to the final boss, the [[Plasm Wraith]]. The leaders come here after being pointed to it by [[Louie]]. The area requires the use of all five Pikmin types discovered over the course of Story Mode. Most of the map is a massive cave system, in which the player must transport an unconscious [[Captain Olimar]] (using 5 to 10 Pikmin) through the maze of puzzles and enemies, while making sure that the [[Plasm Wraith]] doesn't catch up to Olimar. After transporting him outside, the final boss fight with the Plasm Wraith will automatically begin. There are no [[fruit]]s to collect in this area, and the [[enemies]] desintegrate after being killed (aside from the [[Nectarous Dandelfly]]). | ||
==Plot== | ==Plot== | ||
Revision as of 15:21, October 20, 2015
| Formidable Oak | |
|---|---|

| |
| Fruits | 0 |
| Pikmin available | None |
| Requirements | Save Louie from the Quaggled Mireclops |
| Music | Formidable Oak |
The Formidable Oak (哀しき獣の塔?, lit.: "Tower of Sorrowful Beast") is the fifth and final area of Pikmin 3. It is home to the final boss, the Plasm Wraith. The leaders come here after being pointed to it by Louie. The area requires the use of all five Pikmin types discovered over the course of Story Mode. Most of the map is a massive cave system, in which the player must transport an unconscious Captain Olimar (using 5 to 10 Pikmin) through the maze of puzzles and enemies, while making sure that the Plasm Wraith doesn't catch up to Olimar. After transporting him outside, the final boss fight with the Plasm Wraith will automatically begin. There are no fruits to collect in this area, and the enemies desintegrate after being killed (aside from the Nectarous Dandelfly).
Plot
After Louie has been rescued from the Quaggled Mireclops, he discloses the location where he thinks Captain Olimar is, which happens to be at the Formidable Oak. As the Koppaites land in the area, they make their way up the termite hill, only to find an unconcious Olimar with a strange golden creature standing over him. As the explorers approach the life form, it forms a protective bubble around Olimar, but with the help of the Pikmin, they free the captain in seconds. Since they can't take the same path they took up the termite hill to get back to the S.S. Drake, they venture through the cave, as Brittany guides the carrier Pikmin.
As Alph and Captain Charlie go into the cave with the remaining Pikmin, the gold creature comes in pursuit of them in a form known as the Mysterious Life Form. The Mysterious Life Form chases after the Pikmin carrying Olimar, and tries to take him back out to the termite hill. As such, Brittany tries to stall the creature as Alph and Charlie clear the way forward.
They eventually make it to the end of the cave, in which they end up in a circular arena near base. As the Mysterious Life Form makes it out of the cave, it transforms into the Plasm Wraith and absorbs Olimar. The explorers begin to fight the wraith, and once defeated flees to the termite hill, freeing the captain. Olimar and the Koppaites proceed to have a conversation, in which Olimar apologizes for the trouble Louie has caused them by giving a "piece of treasure", which is actually the cosmic drive key. Olimar mentions how the Hocotate ship is out of commision, so the Koppaites offer to drop Olimar off on Hocotate before venturing to Koppai. As they leave, they have a small conversation about the Pikmin, how much they helped them along the journey, and how their life will go on without them. Before they hit the atmosphere, they see the Plasm Wraith atop of the termite hill, roaring at the S.S. Drake.
Overview
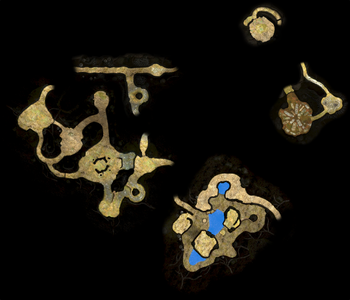
The Formidable Oak is a large termite hill found in a desert/steppe climate. From the top of the termite hill, one can access the cave system, which is the largest cave system in Pikmin 3. It has all sorts of areas, from open rooms to tight corridors,with some sections connecting with others. It also boasts much biodiversity, having enemies like the Arachnode and the Bearded Amprat all in the same cave. This area is also home to all known species of Candypop Buds in Pikmin 3. This cave is also home to some enemies that are found nowhere else, such as the Watery Blowhog and the Shearwig. However, whenever enemies are defeated, they explode into plasm, possibly meaning that the only enemy in this area is the Plasm Wraith, and all other enemies are illusions. South of the landing site is a circular arena which is where the Plasm Wraith is fought. Interestingly, the pattern on the ground of the arena resembles the few islands near the Smoky Progg's egg from The Distant Spring in Pikmin (game).
Key sections
The densest part of the area takes place inside the hill. On the following list, each section corresponds to a different section of the area, meaning that a transition occurs when going from one to another.
- Landing site
The S.S. Drake lands on a stump a bit above ground level. There are two corridors here. One leads to the top of the hill, while a smaller one goes to the Plasm Wraith's arena. This battlefield has a very rough round shape, with an alcove that is a dead end and has a ledge from which one exits the underground part of the area.
- Top of the hill
The corridor that leads to the top ends in a dead end, but has an opening to fall down onto a circular room. This is where Captain Olimar sleeps and where the Mysterious Life Form is first encountered. A hole leads inside the termite hill, and one can get back up to the corridor by use of a nearby geyser, meaning that Olimar cannot be carried back through the same path.
- Entrance corridor
Upon entering the hill, there is a long pathway leading forward. Near the start there is a fork in the path that goes to a shortcut, but it is blocked off by a reinforced wall, so it cannot be taken the first time around, as bomb rocks can't be found yet. There is a column-like wall in the middle of this shortcut, which leads to a section further down south. At the end of the main hallway is the first main section of the cave.
- First main section
The section starts off with an open room containing Yellow Spectralids. The corridor on the other end splits into two, with one side heading to a new room and the other being blocked off by a paper bag on a higher ledge.
The second room has Red Bulborbs and a dirt wall blocking the way forward. It also has a pathway coming off the side that drops down to the Spectralid room for a one-way shortcut back.
After that room is a T-junction. To the left, there is a small room with Candypop Buds, closed off by a crystal wall. To the right, the path goes up and accesses the next room. There is an iron ball at the entrance, that can be used to burst open the aforementioned crystal wall.
The next room is quite large, and has a ring shaped wall in the center, opened on two ends. To the west is the path that leads to the paper bag, which can be pushed from here. To the east is a bridge leading up to the next ledge, but with an Arachnode web in the way. To the south is a convoluted path with two U-turns and two dirt walls, that ends up on the same ledge the bridge does. On this ledge, the northern path goes to the shortcut on the starting corridor, and the eastern path goes to the second main part of the cave.
- Second main section
The last section of the area takes place in a huge room with several walls and platforms. To the southwest of the entrance is a ledge with an access ramp. The main path from the entrance goes south and circles between the wall and the lake in the center, which is split in two due to a high ledge. This high ledge is reachable from the one near the entrance, using a bridge.
The path continues south, circles the lake and ends up at the eastern side of the cave. As it heads north, it circles around the second main ledge, and makes a U-turn. The path then goes west surrounding the lake, and almost closing a circuit, if not for the walkway on the northwest up above. Regardless, a small tunnel provides access back to the starting point.
The aforementioned walkway takes place on the northern edge of the room, and circles over a small lake to the north of the bottom path. To the east of the walkway is the exit that leads to the Plasm Wraith's arena.
Objects
|
The following article or section is in need of assistance from someone who plays Pikmin 3. |
Enemies
 Arachnode × 2
 Bearded Amprat × 1
- [icon] Dwarf Red Bulborb × 6
 Female Sheargrub × 4
 Fiery Blowhog × 1
 Male Sheargrub × 10
- [icon] Mysterious Life Form × 1
 Nectarous Dandelfly × 1
 Red Bulborb × 1
 Shearwig × ?
 Skutterchuck × 2
 Swooping Snitchbug × 2
 Watery Blowhog × 1
- [icon] Yellow Spectralid × 3
 Plasm Wraith – Final boss
All enemies disappear into plasm when defeated, making them Plasm Wraith illusions. The Nectarous Dandelfly just flies away, meaning it is not possible to conclude whether it's an illusion as well or not.
Plants and fungi
Guide
|
The following article or section contains guides. |
Basic guide
|
This article is a stub. You can help Pikipedia by expanding it. |
Speed completion
|
This article is a stub. You can help Pikipedia by expanding it. |
Pikmin drawings
- Main article: Pikmin drawing.
|
Warning: the following text contains major spoilers about the secret drawings in the area.
|
|---|
|


Quotes
|
This article is a stub. You can help Pikipedia by expanding it. |
Gallery
- Formidable Oak Map.jpg
Map of the area.
- FormidableOak-Pikmin3.jpg
The Formidable Oak as seen from afar.
- Formidableoakbackground.jpg
Some of the background scenery at the Formidable Oak.
- ZlCfzR4zti0xS2qBXO.jpg
Spatial view of Formidable Oak.
- Formidoak.jpg
The landsite.
- See more: Formidable Oak images category.
Trivia
- This is the only level in which Shearwigs and a Watery Blowhog appear in Story Mode. However, since they are apparently just illusions created by the Plasm Wraith, it could be said they do not appear in Story Mode at all.
- Because every creature here is an illusion, it could also be said that the only creatures here are a Nectarous Dandelfly and the Plasm Wraith.
- The music that plays outside while raining is similar to the music that plays at The Final Trial.
- It is possible to go out of bounds here, which enables the player to go through the cave backwards. This makes it much easier to retrieve Captain Olimar and complete the game faster. However, actually having a leader climbing to the top of the Oak where the Plasm Wraith is first encountered will cause a severely broken sequence of displaced camera positioning and unused cutscenes.
- Although it is said to be a tree, this level is actually one of several termite hills on this desert continent. Other hills like this can be seen in the background.
- To completely finish the maze (including Data Files), the only Pikmin required are Yellow Pikmin. However, other Pikmin types are recommended for convenience.
- The area where the Plasm Wraith is fought has a similar pattern on the ground as the area where the Smoky Progg egg is found in The Distant Spring.
- By using the camera to look upward, the player can notice that the cave has no roof.
See also
| Formidable Oak | |
|---|---|
|
Click an object |
|
![[icon]](/index.php?title=Special:Upload&wpDestFile=Dwarf_Red_Bulborb_icon.png)
![[icon]](/index.php?title=Special:Upload&wpDestFile=Mysterious_Life_Form_icon.png)
![[icon]](/index.php?title=Special:Upload&wpDestFile=Yellow_Spectralid_icon.png)
![[icon]](/index.php?title=Special:Upload&wpDestFile=Gray_Candypop_Bud_icon.png)
![[icon]](/index.php?title=Special:Upload&wpDestFile=Pink_Candypop_Bud_icon.png)
| Pikmin 3 areas |
|---|
 Click an area on the image Tropical Wilds • Garden of Hope • Distant Tundra • Twilight River • Formidable Oak |