Scornet Maestro: Difference between revisions
m (Linked to Group move.) |
No edit summary |
||
| Line 1: | Line 1: | ||
{{Infobox enemy | {{Boss Order | ||
| previous = Burrowing Snagret | |||
| series = Pikmin 3 | |||
| current = #05 | |||
| next = Bug-Eyed Crawmad}} | |||
<p data-skip="true">{{Template:Infobox enemy | |||
|image = Scornet maestro.png | |||
|size = 270px | |||
|pikmin3 = y | |pikmin3 = y | ||
| | |areas = '''''Pikmin 3'''''<br>[[Twilight River]] | ||
| | |challenge = '''''Pikmin 3'''''<br>''Defeat Bosses''<br>Scornet Maestro | ||
| | |attacks = Orders its swarm at your Pikmin | ||
|weight = 10 | |weight = 10 | ||
|seeds = 50 | |seeds = 50 | ||
| | |max_pikmin = 20}}The '''Scornet Maestro''' is a boss in ''[[Pikmin 3]] ''found in the [[Twilight River]], and is the fourth major boss encountered in Story Mode. It quickly abducts [[Louie]] before the player can reach him. It seems to be like a queen bee of sorts, since it's able to command a swarm of [[scornet|Scornets]] using its harp-like beak. The Scornet retinue is used to attack the [[Leader|Captains]] and their [[Pikmin family|Pikmin]]. It relies heavily on the Scornets as the Scornet Maestro itself has no way attacking.</p> | ||
<p data-skip="true">It cannot be attacked while its swarm is surrounding it, requiring the captains to aim their Pikmin (preferably [[Winged Pikmin]]) at the boss after it exposes itself after one of its coordinated attacks. Once defeated, the Scornet Maestro will drop a [[Seed Hive]] and Louie, and all 100 of the Scornets it commanded will be able to be carried as well.</p> | |||
The '''Scornet Maestro''' is | |||
==Strategy== | |||
==Notes== | |||
===''Pikmin 3 ''Prima Guide=== | |||
"The Scornet Maestro is located in the Twilight River. As its name implies, this creature attacks by controlling a swarm of scornets. | |||
The Scornet Maestro is well defended by its minions. Avoid attacking while the Scornets are in the area. Each time the Scornets move into a tight formation, avoid their attack and allow them to fly out of the area. Whenit's safe, use your Winged Pikmin to wrestle the vulnerable Scornet Maestro to the ground, then have the rest of your squad charge in to attack. When the Scornets return to the area, gather your Pikmin and repeat the process. | |||
Each time a Scornet manages to impale one of your Pikmin, defeat the enemy before your Pikmin succumbs to its injuries." | |||
{{Subjective}} | |||
===Standard Strategy=== | |||
[[File:Aaa.png|thumb|left|129px|Scornets]] | |||
The strategy is mainly to defend your Pikmin from the Scornets and then attack the Scornet Maestro. As the battle progresses, it will create different formations with its retinue in an attempt to destroy your swarm. One should note that this boss completely relies on its own swarm to attack, their eyes turning red and buzzing, possessing no offensive moves of its own besides shaking off Pikmin. | |||
The | The first formation is a gigantic cone-like formation, the easiest to avoid. The attack is simple to dodge, just wait for the formation to attack and strafe around the swarm. If any Pikmin are captured by the swarm, the swarm will move the around the boss in a circle formation, holding the captured Pikmin. The swarm must be attacked swiftly to free the Pikmin. If Pikmin aren't released from the swarm, they will be killed. | ||
The second formation is an array. It will release one line after another to attack your Pikmin. This formation can be tricky to avoid, as the lines of Scornets adjust their flight if you try to run around them. However, as the Scornets are gathering in the array, they are extremely vulnerable to Pikmin attacks. Rock Pikmin seem to do well at picking off Scornets in this formation. | |||
The third formation has the swarm forming a circle surrounding you, slowly closing in. If any Pikmin are left behind inside the circle, they will be captured. You need to use your Pikmin to create gaps in the circle to allow your group to escape. To avoid leaving Pikmin behind, one can use an [[Ultra-Spicy Spray]] to create a hole quickly and get out faster. Once any of the formations are complete, the swarm will temporarily leave the boss, giving you a chance to attack the boss, which you can use Winged Pikmin to reach. | |||
If all the Maestro's Scornets are killed, it will use a period during which it would normally create an attack formation to summon more onto the field from the trees in the background. | |||
Once enough Pikmin are latched onto it, it will fall to the ground, allowing any ground-based Pikmin to swarm it as well. Once it dies, it will drop a large fruit, alongside [[Louie]]. Its body, alongside the corpses of its swarm, can be taken back to the Onion. As with all bosses in the game, the Scornet Maestro's corpse produces 50 Pikmin. | |||
===Expert Strategy=== | |||
'''Warning: it is advised that this strategy is only attempted by experienced players.''' | |||
The Scornet Maestro will only attempt to attack the captain who is currently active. This can be used to an advantage by having an unoccupied captain stand away from another captain who has all the Pikmin. When the Maestro attacks, it will attack the captain with no Pikmin, allowing the captain that does have the Pikmin to freely attack it by swarming it with Winged Pikmin. Once it falls to the ground, pelt the creature with Rock Pikmin to rapidly diminish its health. | |||
Due to the scripting of this boss battle, this process must be done '''4 '''times to take down the boss. However, this strategy will allow for a quick defeat in under '''3''' minutes. | |||
==Videos== | |||
<gallery hideaddbutton="true"> | |||
File:Pikmin 3 Walkthrough Scornet Maestro Boss Battle (Part 13)|Scornet Maestro Boss Battle | |||
</gallery> | |||
==Gallery== | ==Gallery== | ||
<gallery> | <gallery> | ||
Scornet Maestro attack no.1.jpg|Cone Formation. | |||
Scornet Maestro attack no.2.jpg|Line formation. | |||
Scornet Maestro attack no.3.jpg|Circle formation. | |||
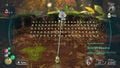
Bee Boss.jpg|Captured Pikmin. | |||
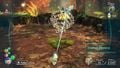
Beee.png|The defeated Scornet Maestro, surrounded by its fruit and Louie. | |||
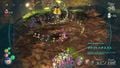
Maestro attacked.jpg|The boss being weighed down by winged pikmin. | |||
</gallery> | </gallery> | ||
== | ==Trivia == | ||
*The Scornet Maestro | |||
*The Scornet Maestro is the second airborne boss to appear in the series, the first being the [[Vehemoth Phosbat]], both appearing in the same game. | |||
*The Japanese name for Scornet Maestro, "Tategotohachisuzume," translates to "Harp Bee Sparrow." | |||
*The Scornet Maestro is the smallest boss in the ''Pikmin'' series. | |||
*The Scornet Maestro is similar to a boss in another Nintendo game, [http://metroid.wikia.com/wiki/Metroid_Prime_3:_Corruption Metroid Prime 3: Corruption], [http://metroid.wikia.com/wiki/Helios Helios]. Both Helios and the Scornet Maestro are smaller bosses (in comparison to other bosses) that use smaller minions to both protect themselves and attack the player. | |||
*The Scornet Maestro might be considered the third boss in the ''Pikmin ''series to use other small enemies as helpers, the others being the [[Empress Bulblax]] and the [[Vehemoth Phosbat]]. While the Scornet's Maestro are for attack purposes, the others are mostly for distraction. | |||
*The Scornet Maestro is the only boss in the Pikmin series that cannot directly kill your Pikmin, although its [[Scornet]]s can. | |||
*Even if the player scans the Scornets, it will say Scornet Maestro instead. | |||
*Intestingly, when the Scornet Maestro is defeated, not only will the Maestro's corpse fall, but all the Scornets as well, which can be brought back to the [[Onion]]. Normally, Scornets are not retrievable when defeated. | |||
*The Scornet Maestro can command up to 100 Scornets at the same time, much like the player and the Pikmin. | |||
{{Enemies}} | {{Enemies}} | ||
[[Category:Bosses]] | [[Category:Bosses]] | ||
[[Category:Airborne enemies]] | [[Category:Airborne enemies]] | ||
[[Category:Pikmin 3]] | |||
[[Category:Pikmin 3 Enemies]] | |||
[[Category:Enemies]] | |||
[[Category:Twilight River]] | |||
[[Category:Creatures with no known family]] | |||
[[Category:Scornet]] | |||
[[Category:Scornet Maestro]] | |||
[[Category:Airborne Enemies]] | |||
Revision as of 22:55, July 22, 2014
| Scornet Maestro | |
|---|---|

| |
| Appears in | Pikmin 3 |
| Scientific name | Unknown |
| Family | Unknown |
| Areas | Pikmin 3 Twilight River |
| Mission Mode Collect Treasure! stages | None |
| Mission Mode Battle Enemies! stages | None |
| Side Story days | None |
| Bingo Battle stages | None |
| Attacks | Orders its swarm at your Pikmin |
The Scornet Maestro is a boss in Pikmin 3 found in the Twilight River, and is the fourth major boss encountered in Story Mode. It quickly abducts Louie before the player can reach him. It seems to be like a queen bee of sorts, since it's able to command a swarm of Scornets using its harp-like beak. The Scornet retinue is used to attack the Captains and their Pikmin. It relies heavily on the Scornets as the Scornet Maestro itself has no way attacking.
It cannot be attacked while its swarm is surrounding it, requiring the captains to aim their Pikmin (preferably Winged Pikmin) at the boss after it exposes itself after one of its coordinated attacks. Once defeated, the Scornet Maestro will drop a Seed Hive and Louie, and all 100 of the Scornets it commanded will be able to be carried as well.
Strategy
Notes
Pikmin 3 Prima Guide
"The Scornet Maestro is located in the Twilight River. As its name implies, this creature attacks by controlling a swarm of scornets.
The Scornet Maestro is well defended by its minions. Avoid attacking while the Scornets are in the area. Each time the Scornets move into a tight formation, avoid their attack and allow them to fly out of the area. Whenit's safe, use your Winged Pikmin to wrestle the vulnerable Scornet Maestro to the ground, then have the rest of your squad charge in to attack. When the Scornets return to the area, gather your Pikmin and repeat the process.
Each time a Scornet manages to impale one of your Pikmin, defeat the enemy before your Pikmin succumbs to its injuries." Template:Subjective
Standard Strategy
The strategy is mainly to defend your Pikmin from the Scornets and then attack the Scornet Maestro. As the battle progresses, it will create different formations with its retinue in an attempt to destroy your swarm. One should note that this boss completely relies on its own swarm to attack, their eyes turning red and buzzing, possessing no offensive moves of its own besides shaking off Pikmin.
The first formation is a gigantic cone-like formation, the easiest to avoid. The attack is simple to dodge, just wait for the formation to attack and strafe around the swarm. If any Pikmin are captured by the swarm, the swarm will move the around the boss in a circle formation, holding the captured Pikmin. The swarm must be attacked swiftly to free the Pikmin. If Pikmin aren't released from the swarm, they will be killed.
The second formation is an array. It will release one line after another to attack your Pikmin. This formation can be tricky to avoid, as the lines of Scornets adjust their flight if you try to run around them. However, as the Scornets are gathering in the array, they are extremely vulnerable to Pikmin attacks. Rock Pikmin seem to do well at picking off Scornets in this formation.
The third formation has the swarm forming a circle surrounding you, slowly closing in. If any Pikmin are left behind inside the circle, they will be captured. You need to use your Pikmin to create gaps in the circle to allow your group to escape. To avoid leaving Pikmin behind, one can use an Ultra-Spicy Spray to create a hole quickly and get out faster. Once any of the formations are complete, the swarm will temporarily leave the boss, giving you a chance to attack the boss, which you can use Winged Pikmin to reach.
If all the Maestro's Scornets are killed, it will use a period during which it would normally create an attack formation to summon more onto the field from the trees in the background.
Once enough Pikmin are latched onto it, it will fall to the ground, allowing any ground-based Pikmin to swarm it as well. Once it dies, it will drop a large fruit, alongside Louie. Its body, alongside the corpses of its swarm, can be taken back to the Onion. As with all bosses in the game, the Scornet Maestro's corpse produces 50 Pikmin.
Expert Strategy
Warning: it is advised that this strategy is only attempted by experienced players.
The Scornet Maestro will only attempt to attack the captain who is currently active. This can be used to an advantage by having an unoccupied captain stand away from another captain who has all the Pikmin. When the Maestro attacks, it will attack the captain with no Pikmin, allowing the captain that does have the Pikmin to freely attack it by swarming it with Winged Pikmin. Once it falls to the ground, pelt the creature with Rock Pikmin to rapidly diminish its health.
Due to the scripting of this boss battle, this process must be done 4 times to take down the boss. However, this strategy will allow for a quick defeat in under 3 minutes.
Videos
- Pikmin 3 Walkthrough Scornet Maestro Boss Battle (Part 13)
Scornet Maestro Boss Battle
Gallery
Cone Formation.
Line formation.
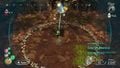
Circle formation.
Captured Pikmin.
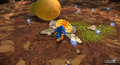
The defeated Scornet Maestro, surrounded by its fruit and Louie.
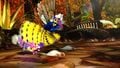
The boss being weighed down by winged pikmin.


Trivia
- The Scornet Maestro is the second airborne boss to appear in the series, the first being the Vehemoth Phosbat, both appearing in the same game.
- The Japanese name for Scornet Maestro, "Tategotohachisuzume," translates to "Harp Bee Sparrow."
- The Scornet Maestro is the smallest boss in the Pikmin series.
- The Scornet Maestro is similar to a boss in another Nintendo game, Metroid Prime 3: Corruption, Helios. Both Helios and the Scornet Maestro are smaller bosses (in comparison to other bosses) that use smaller minions to both protect themselves and attack the player.
- The Scornet Maestro might be considered the third boss in the Pikmin series to use other small enemies as helpers, the others being the Empress Bulblax and the Vehemoth Phosbat. While the Scornet's Maestro are for attack purposes, the others are mostly for distraction.
- The Scornet Maestro is the only boss in the Pikmin series that cannot directly kill your Pikmin, although its Scornets can.
- Even if the player scans the Scornets, it will say Scornet Maestro instead.
- Intestingly, when the Scornet Maestro is defeated, not only will the Maestro's corpse fall, but all the Scornets as well, which can be brought back to the Onion. Normally, Scornets are not retrievable when defeated.
- The Scornet Maestro can command up to 100 Scornets at the same time, much like the player and the Pikmin.