Tropical Forest Remix: Difference between revisions
m (Consistency.) |
No edit summary |
||
| Line 29: | Line 29: | ||
Outside of that area is another Dirt Wall. Directly behind it is a Seed Hive, and the incomplete bridge leading back to the SPERO. East of the room with the Orange Bulborbs is another small room blocked off by an [[electric gate]]. The room holds a plethora of treasures, including a pile of Nuggets and some Dawn Pustules. The room also holds the remaining Fragments, some Red Pikmin, and 2 Ivory Candypop Buds, and is all guarded by a Bulborb. Once the bridge is build, the Pikmin and the [[leader]]s can take a shortcut to the SPERO. | Outside of that area is another Dirt Wall. Directly behind it is a Seed Hive, and the incomplete bridge leading back to the SPERO. East of the room with the Orange Bulborbs is another small room blocked off by an [[electric gate]]. The room holds a plethora of treasures, including a pile of Nuggets and some Dawn Pustules. The room also holds the remaining Fragments, some Red Pikmin, and 2 Ivory Candypop Buds, and is all guarded by a Bulborb. Once the bridge is build, the Pikmin and the [[leader]]s can take a shortcut to the SPERO. | ||
== | ==Objects== | ||
{{todo|Fill in all the obstacles.}} | |||
{{columns|0|'''Pikmin''' | |||
*{{icon|Red Pikmin|y}} × 33 | *{{icon|Red Pikmin|y}} × 33 | ||
*{{icon|Yellow Pikmin|y}} × 17 | *{{icon|Yellow Pikmin|y}} × 17 | ||
*{{icon|White Pikmin|y}} × 12 | *{{icon|White Pikmin|y}} × 12 | ||
'''Flora''' | |||
*{{icon|Ivory Candypop Bud|y}} × 10 | *{{icon|Ivory Candypop Bud|y}} × 10 | ||
|'''Enemies''' | |||
*{{icon|Dwarf Orange Bulborb|v=P3|y}} × 2 | *{{icon|Dwarf Orange Bulborb|v=P3|y}} × 2 | ||
*{{icon|Fiery Blowhog|v=P3|y}} × 1 | *{{icon|Fiery Blowhog|v=P3|y}} × 1 | ||
| Line 44: | Line 44: | ||
*{{icon|Red Bulborb|v=P3|y}} × 1 | *{{icon|Red Bulborb|v=P3|y}} × 1 | ||
*{{icon|Yellow Wollywog|v=P3|y}} × 1 | *{{icon|Yellow Wollywog|v=P3|y}} × 1 | ||
}} | |||
{{columns|0|'''Treasure''' | |||
*{{icon|Dawn Pustules|y}} × 20, 1 bunch | *{{icon|Dawn Pustules|y}} × 20, 1 bunch | ||
*{{icon|Juicy Gaggle|y}} × 9 | *{{icon|Juicy Gaggle|y}} × 9 | ||
| Line 51: | Line 51: | ||
*{{icon|Seed Hive|y}} × 1 | *{{icon|Seed Hive|y}} × 1 | ||
*{{icon|Nugget|y}} × 200 (2 piles of 50, 1 pile of 100) | *{{icon|Nugget|y}} × 200 (2 piles of 50, 1 pile of 100) | ||
|'''Obstacles''' | |||
*{{icon|Dirt wall|y}} × 2 | |||
*{{icon|Electric gate|v=P3|y}} × 1 | |||
}} | |||
==Gallery== | ==Gallery== | ||
Revision as of 21:45, December 1, 2015
| Tropical Forest Remix Collect Treasure! | |||||||||||||||
|---|---|---|---|---|---|---|---|---|---|---|---|---|---|---|---|
| Starting Pikmin | |||||||||||||||
| |||||||||||||||
| Requirements | |||||||||||||||
| |||||||||||||||
| Time limit | 8:00 | ||||||||||||||
| Music | {{{music}}} | ||||||||||||||

Tropical Forest Remix is map that was released in the November 6th, 2013 DLC. It was given to all players for free, while the following four maps could be purchased via the eShop. Like the name implies, it is a remastered version of the original Tropical Forest stage, with slightly increased difficulty. This stage is only available in Collect Treasure! mode. The stage features many Ivory Candypop Buds, giving the player the chance to obtain many more White Pikmin and strategize with their great mobility.
Terrain
The overall layout of the stage remains vastly unchanged from the original Tropical Forest. The player starts off as Alph in an elevated area slightly east of the SPERO. Near him are two groups of Red Pikmin, one of which is planted. South of that area is another group of idle Red Pikmin. Nearby them is a large room with a Fiery Blowhog, some Juicy Gaggles, a pile of Nuggets, and 2 Ivory Candypop Buds. The Candypop Buds can turn the Reds into White Pikmin, which can be used to collect the objects faster.
West of that room is the SPERO, and where Brittany starts off. She has some Yellow Pikmin nearby, which can be thrown up to Alph via the Bouncy Mushroom directly behind her. Further southwest of that area is another group of planted White Pikmin, along with some more Ivory Candypop Buds. Along the path is a Pyroclasmic Slooch, which guards a small little room holding some more planted White Pikmin and a Nectar Egg holding an ultra-spicy spray.
North of there is yet another Pyroclasmic Slooch, guarding a group of planted Yellow Pikmin, a few Bomb Rocks, and a small alcove holding some bridge fragments for the bridge near the start of the area. For the fragments to reach the bridge, a nearby Dirt Wall must be destroyed. Beyond that Dirt Wall is a Yellow Wollywog, which should be defeated so that the bridge can be completed easily. Further north is another group of Red Pikmin, just outside of an area with 2 Dwarf Orange Bulborbs and an Orange Bulborb. In that same room are 2 Ivory Candypop Buds, more Yellow Pikmin, and another pile of Nuggets. Bomb Rocks should be used to dispose of them.
Outside of that area is another Dirt Wall. Directly behind it is a Seed Hive, and the incomplete bridge leading back to the SPERO. East of the room with the Orange Bulborbs is another small room blocked off by an electric gate. The room holds a plethora of treasures, including a pile of Nuggets and some Dawn Pustules. The room also holds the remaining Fragments, some Red Pikmin, and 2 Ivory Candypop Buds, and is all guarded by a Bulborb. Once the bridge is build, the Pikmin and the leaders can take a shortcut to the SPERO.
Objects
|
To do: Fill in all the obstacles. |
Pikmin
Flora
|
Enemies
|
Treasure
|
Obstacles
|
Gallery
|
This article or section is in need of more images. Particularly: |
- Screenshot 2014-02-21 at 9.54.40 PM.png
The Tropical Forest Remix, shown as a wrapped gift, before it is opened.
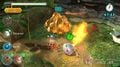
Alph attacking a Fiery Blowhog in front of 50 Nuggets and two Juicy Gaggles.
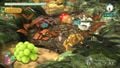
Here, we can see a Bulborb, 15 Fragments, 100 Nuggets and 20 Dawn Pustules in the Tropical Forest Remix. Notice the idle Red Pikmin in the brown Clover.

