Armored Mawdad: Difference between revisions
m (Italicized.) |
(Some links and spelling correction.) |
||
| Line 9: | Line 9: | ||
|attacks = Eats Pikmin | |attacks = Eats Pikmin | ||
}} | }} | ||
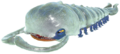
The '''Armored Mawdad''' is the first boss in ''[[Pikmin 3]]'', and the boss of the [[Garden of Hope]]. It has pincers at the front, and light blue armor scales protecting its soft underside; these can only be broken using [[Rock Pikmin]]. It attacks by trapping [[Pikmin family|Pikmin]] with its pincers then eating them, and ramming into the player and their Pikmin army, knocking them over and deflowering them. The boss crawls about, trying to dodge the player's attacks, and is able to climb up the sides of walls as a means of fleeing. Upon death, it spits out the Data Glutton, and the [[Firebreathing Feast]]. The Firebreathing Feast provides the leaders with 2 1/2 bottles of juice, and the Data Glutton unlocks the next area, the [[Distant Tundra]]. | The '''Armored Mawdad''' is the first boss in ''[[Pikmin 3]]'', and the boss of the [[Garden of Hope]]. It has pincers at the front, and light blue armor scales protecting its soft underside; these can only be broken using [[Rock Pikmin]]. It attacks by trapping [[Pikmin family|Pikmin]] with its pincers then eating them, and ramming into the player and their Pikmin army, knocking them over and deflowering them. The boss crawls about, trying to dodge the player's attacks, and is able to climb up the sides of walls as a means of fleeing. Upon death, it spits out the [[Data Glutton]], and the [[Firebreathing Feast]]. The Firebreathing Feast provides the leaders with 2 1/2 bottles of juice, and the Data Glutton unlocks the next area, the [[Distant Tundra]]. | ||
==Strategy== | ==Strategy== | ||
| Line 15: | Line 15: | ||
At the time it is encountered, the Armored Mawdad seems to be a titanic battle for new players. However, with the proper strategy, it is a relatively easy (but time consuming) fight. | At the time it is encountered, the Armored Mawdad seems to be a titanic battle for new players. However, with the proper strategy, it is a relatively easy (but time consuming) fight. | ||
First off, [[Rock Pikmin]] are a necessity, and [[Red Pikmin]] are recommended. A large amount is best, but Pikmin with leaves will have a better chance at getting caught than those with buds or flowers. It is recommended that the other captain(s) be left outside the arena as backup with only one entering the arena. Start the battle with only Rock Pikmin but leave a squad of Red Pikmin outside. | First off, [[Rock Pikmin]] are a necessity, and [[Red Pikmin]] are recommended. A large amount is best, but Pikmin with leaves will have a better chance at getting caught than those with buds or flowers. It is recommended that the other [[captain]](s) be left outside the arena as backup with only one entering the arena. Start the battle with only Rock Pikmin but leave a squad of Red Pikmin outside. | ||
Once you walk far enough into the hollow stump where this beast resides, a cutscene will ensue. As soon as the cutscene is over, the Mawdad will charge at you. Move quickly to the side and avoid being caught. Once is has gone a certain distance, the Mawdad will clamp its mandibles together. Any [[Pikmin]] or captains caught inside the mandibles will be licked and eaten (Pikmin) or damaged (Captains). | Once you walk far enough into the hollow stump where this beast resides, a cutscene will ensue. As soon as the cutscene is over, the Mawdad will charge at you. Move quickly to the side and avoid being caught. Once is has gone a certain distance, the Mawdad will clamp its mandibles together. Any [[Pikmin]] or captains caught inside the mandibles will be licked and eaten (Pikmin) or damaged (Captains). | ||
| Line 21: | Line 21: | ||
If you get caught in the mandibles, it is possible to throw the trapped Pikmin out, but this is tricky and should only be used if already trapped. | If you get caught in the mandibles, it is possible to throw the trapped Pikmin out, but this is tricky and should only be used if already trapped. | ||
If just | If just Pikmin are caught inside the Mawdad's mandibles, it is possible to save most of them by rapidly throwing any Rock Pikmin in your squad at the shell on its back. If the shell is damaged, the Mawdad will rear up and roar, freeing the Pikmin that were previously trapped. | ||
After the initial charge at the captain, the Mawdad will begin roaming around the arena and occasionally stopping for a few seconds it is recommend remain close to its midsection but not touching. If the Mawdad cannot see the captain, it will not charge, thus keeping any stray Pikmin safe from harm. Every time armor is damaged the Mawdad will rear up, and if the captain is struck by this he will lay on the ground for several seconds, leaving him vulnerable. | After the initial charge at the captain, the Mawdad will begin roaming around the arena and occasionally stopping for a few seconds it is recommend remain close to its midsection but not touching. If the Mawdad cannot see the captain, it will not charge, thus keeping any stray Pikmin safe from harm. Every time armor is damaged the Mawdad will rear up, and if the captain is struck by this he will lay on the ground for several seconds, leaving him vulnerable. | ||
| Line 31: | Line 31: | ||
Now, keeping near the Mawdad's body as before, throw Red Pikmin onto the exposed sections of the body. They will cling on until being shaken off, meaning they will likely deal damage faster than Rock Pikmin. | Now, keeping near the Mawdad's body as before, throw Red Pikmin onto the exposed sections of the body. They will cling on until being shaken off, meaning they will likely deal damage faster than Rock Pikmin. | ||
Once the Mawdad has reached sufficiently low life, it will begin climbing on walls and only coming down when it spots the player and charges (destroying the mandibles ahead of time will effectively neutralize any threat from this). Locking on to the Mawdad during this period is recommended, as one can see where it currently is, but it may be difficult for some players to get out of the way if they cannot see their captain. The other (more unpredictable) strategy is to just run around and whenever the captain makes an exclamations such as "Here | Once the Mawdad has reached sufficiently low life, it will begin climbing on walls and only coming down when it spots the player and charges (destroying the mandibles ahead of time will effectively neutralize any threat from this). Locking on to the Mawdad during this period is recommended, as one can see where it currently is, but it may be difficult for some players to get out of the way if they cannot see their captain. The other (more unpredictable) strategy is to just run around and whenever the captain makes an exclamations such as "Here it comes!" move quickly to the side. However, as you won't see where it is coming from, this can very easily go awry. | ||
During this period, throw Red Pikmin onto the exposed parts. They will cling on, sometimes even riding the Mawdad up the wall, but they will eventually be shaken off. It is best to occasionally round up of Pikmin to ensure that none are caught. Repeat this until the Mawdad perishes. | During this period, throw Red Pikmin onto the exposed parts. They will cling on, sometimes even riding the Mawdad up the wall, but they will eventually be shaken off. It is best to occasionally round up of Pikmin to ensure that none are caught. Repeat this until the Mawdad perishes. | ||
Revision as of 15:07, March 20, 2014
| Armored Mawdad | |
|---|---|
| File:Pikmin3Screen1.jpg | |
| Appears in | Pikmin 3 |
| Scientific name | Unknown |
| Family | Unknown |
| Areas | Garden of Hope |
| Mission Mode Collect Treasure! stages | None |
| Mission Mode Battle Enemies! stages | None |
| Side Story days | None |
| Bingo Battle stages | None |
| Attacks | Eats Pikmin |
The Armored Mawdad is the first boss in Pikmin 3, and the boss of the Garden of Hope. It has pincers at the front, and light blue armor scales protecting its soft underside; these can only be broken using Rock Pikmin. It attacks by trapping Pikmin with its pincers then eating them, and ramming into the player and their Pikmin army, knocking them over and deflowering them. The boss crawls about, trying to dodge the player's attacks, and is able to climb up the sides of walls as a means of fleeing. Upon death, it spits out the Data Glutton, and the Firebreathing Feast. The Firebreathing Feast provides the leaders with 2 1/2 bottles of juice, and the Data Glutton unlocks the next area, the Distant Tundra.
Strategy
At the time it is encountered, the Armored Mawdad seems to be a titanic battle for new players. However, with the proper strategy, it is a relatively easy (but time consuming) fight.
First off, Rock Pikmin are a necessity, and Red Pikmin are recommended. A large amount is best, but Pikmin with leaves will have a better chance at getting caught than those with buds or flowers. It is recommended that the other captain(s) be left outside the arena as backup with only one entering the arena. Start the battle with only Rock Pikmin but leave a squad of Red Pikmin outside.
Once you walk far enough into the hollow stump where this beast resides, a cutscene will ensue. As soon as the cutscene is over, the Mawdad will charge at you. Move quickly to the side and avoid being caught. Once is has gone a certain distance, the Mawdad will clamp its mandibles together. Any Pikmin or captains caught inside the mandibles will be licked and eaten (Pikmin) or damaged (Captains).
If you get caught in the mandibles, it is possible to throw the trapped Pikmin out, but this is tricky and should only be used if already trapped.
If just Pikmin are caught inside the Mawdad's mandibles, it is possible to save most of them by rapidly throwing any Rock Pikmin in your squad at the shell on its back. If the shell is damaged, the Mawdad will rear up and roar, freeing the Pikmin that were previously trapped.
After the initial charge at the captain, the Mawdad will begin roaming around the arena and occasionally stopping for a few seconds it is recommend remain close to its midsection but not touching. If the Mawdad cannot see the captain, it will not charge, thus keeping any stray Pikmin safe from harm. Every time armor is damaged the Mawdad will rear up, and if the captain is struck by this he will lay on the ground for several seconds, leaving him vulnerable.
Throw Rock Pikmin at the armor pieces until you break them off(be warned, every time an armor piece is fully broken off, . It is possible to defeat the Mawdad with only one part broken off, but is recommended that you have most of the midsection off ease of aim. The mandibles can also be broken off but this is risky. The risk will pay off later, but it is not needed to win the battle. If the mandibles are broken off, this will make the battle near danger-less.
Once you have a sufficient strip of the Mawdad's body exposed, leave the arena with all the Rock Pikmin you brought in. Leave the Rock Pikmin outside and bring in Red Pikmin. Again, bring in only one captain.
Now, keeping near the Mawdad's body as before, throw Red Pikmin onto the exposed sections of the body. They will cling on until being shaken off, meaning they will likely deal damage faster than Rock Pikmin.
Once the Mawdad has reached sufficiently low life, it will begin climbing on walls and only coming down when it spots the player and charges (destroying the mandibles ahead of time will effectively neutralize any threat from this). Locking on to the Mawdad during this period is recommended, as one can see where it currently is, but it may be difficult for some players to get out of the way if they cannot see their captain. The other (more unpredictable) strategy is to just run around and whenever the captain makes an exclamations such as "Here it comes!" move quickly to the side. However, as you won't see where it is coming from, this can very easily go awry.
During this period, throw Red Pikmin onto the exposed parts. They will cling on, sometimes even riding the Mawdad up the wall, but they will eventually be shaken off. It is best to occasionally round up of Pikmin to ensure that none are caught. Repeat this until the Mawdad perishes.
Note: This battle can be quite time consuming, but in Pikmin 3 enemies do keep damage from the previous day. The battle can be performed over several days.
Weaknesses
Rock Pikmin must be thrown at its armor to knock it off the Armored Mawdad, then the player can use any Pikmin type to attack the boss. Its mandible can also be broken off, which keeps it from trapping Pikmin. In addition, throwing a Pikmin at its eyes causes it to panic and run around aimlessly until it can shake the Pikmin off.
Gallery
- Armored Mawdad dead.jpg
The dead Armored Mawdad, as well as the Data Glutton and the Firebreathing Feast it spat out.
Concept art of the Armored Mawdad.

Names in other languages
| Language | Name | Meaning |
|---|---|---|
| Mandipatte | Portmanteau of "mandibule" (mandible) and "patte" (leg). |
Trivia
- The Armored Mawdad bears a strong resemblance to the Emperor Pinchipede in the game Nintendo Land.
- This was one of the "Trailer creatures" shown in the Pikmin 3 trailer.