Olimar's monitor: Difference between revisions
(Split off the Olimar's Monitor section from Menu) |
(Added category, links, and heading) |
||
| Line 1: | Line 1: | ||
{{game icons|p=y}} | {{game icons|p=y}} | ||
{{main|Radar}} | {{main|Radar}} | ||
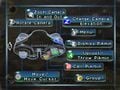
Although the radar menu is implemented into the [[ | Although the radar menu is implemented into the [[Menu/Pause|pause menu]] in {{p2}}, in {{p}}, it is in its own menu, titled "'''Olimar's monitor'''"{{cite quote|'''Olimar's monitor''' / {{button|gc|y}} You can check this screen by pressing the '''Y''' Button during the game. Press the '''Y''' or '''B''' Button to return to the game.|Information about Olimar's monitor|the corresponding page of the ''Pikmin'' instruction manual}}, and it can be opened by pressing {{button|gc|y|wii|+}} mid-game. This menu contains the actual radar on the right side, with instructions on how to pan and zoom on the top-right corner. On the top-left corner of the screen, there is the name of the current [[area]]. Below that, the number of Pikmin in the squad and in the [[Onion]]s appears, for each type. Below those, the number of total idle Pikmin in the field. Finally, in the bottom-right corner, the number of collected ship parts is written. | ||
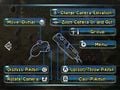
By pressing {{button|gc|r|wii|padr}}, the player will be taken to a different page, explaining the [[controls]]. This one contains an illustration of a [[GameCube]] Controller, or a [[Wii]] Remote with a Nunchuk attached. Boxes scattered around the screen explain what each button and stick does. The buttons and sticks on the illustration flash in order, with each one flashing three times. | By pressing {{button|gc|r|wii|padr}}, the player will be taken to a different page, explaining the [[controls]]. This one contains an illustration of a [[GameCube]] Controller, or a [[Wii]] Remote with a Nunchuk attached. Boxes scattered around the screen explain what each button and stick does. The buttons and sticks on the illustration flash in order, with each one flashing three times. | ||
| Line 10: | Line 10: | ||
NPCP controls.jpg|The controls page in ''New Play Control! Pikmin''. | NPCP controls.jpg|The controls page in ''New Play Control! Pikmin''. | ||
</gallery> | </gallery> | ||
==References== | |||
[[Category:Menus]] | |||
Revision as of 19:36, October 24, 2020
- Main article: Radar.
Although the radar menu is implemented into the pause menu in Pikmin 2, in Pikmin, it is in its own menu, titled "Olimar's monitor"[1], and it can be opened by pressing ![]() /
/ ![]() mid-game. This menu contains the actual radar on the right side, with instructions on how to pan and zoom on the top-right corner. On the top-left corner of the screen, there is the name of the current area. Below that, the number of Pikmin in the squad and in the Onions appears, for each type. Below those, the number of total idle Pikmin in the field. Finally, in the bottom-right corner, the number of collected ship parts is written.
mid-game. This menu contains the actual radar on the right side, with instructions on how to pan and zoom on the top-right corner. On the top-left corner of the screen, there is the name of the current area. Below that, the number of Pikmin in the squad and in the Onions appears, for each type. Below those, the number of total idle Pikmin in the field. Finally, in the bottom-right corner, the number of collected ship parts is written.
By pressing ![]() /
/ ![]() , the player will be taken to a different page, explaining the controls. This one contains an illustration of a GameCube Controller, or a Wii Remote with a Nunchuk attached. Boxes scattered around the screen explain what each button and stick does. The buttons and sticks on the illustration flash in order, with each one flashing three times.
, the player will be taken to a different page, explaining the controls. This one contains an illustration of a GameCube Controller, or a Wii Remote with a Nunchuk attached. Boxes scattered around the screen explain what each button and stick does. The buttons and sticks on the illustration flash in order, with each one flashing three times.

Olimar's monitor in Pikmin, on the radar page.
The controls page.
The controls page in New Play Control! Pikmin.


References
- ^ “Olimar's monitor /
 You can check this screen by pressing the Y Button during the game. Press the Y or B Button to return to the game.” – Information about Olimar's monitor in the corresponding page of the Pikmin instruction manual