Terror Trench: Difference between revisions
(Created page with "{{infobox area |screenshot = |map = |image = Terror Trench 2.jpg |size = 320px |caption = |sector = 6 |ar...") |
No edit summary |
||
| Line 15: | Line 15: | ||
}} | }} | ||
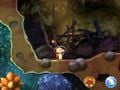
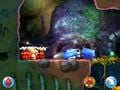
'''Terror Trench''' is the third main [[area]] in the [[Sweltering Parchlands]]. It takes place inside a cave that has many narrow hallways, and for most of them, some spiked | '''Terror Trench''' is the third main [[area]] in the [[Sweltering Parchlands]]. It takes place inside a cave that has many narrow hallways, and for most of them, some spiked pine cones<ref>The model for these objects is inside <code>togebokkuri.bch.z</code>, which is short for {{j|とげ 松ぼっくり|toge matsubokkuri|spiked pine cone|f=tp}}. However, the generator for these objects is internally called <code>gimmick_spike_boulder_generator</code>, as per <code>/stage/map_0033.csv</code>.</ref> show up from the ceiling in intervals and roll inside the hallways, eventually falling into the [[pit]] at the end of the path. Others even bounce against walls, or roll back and forth in a half-pipe. The player must wait in [[vine]]s, stand on alternative platforms, our even outrace the pine cones to avoid losing their Pikmin. | ||
{{game help|hp|Fill in the infobox.}} | {{game help|hp|Fill in the infobox.}} | ||
| Line 41: | Line 41: | ||
! Doorway Mockiwi | ! Doorway Mockiwi | ||
| [[File:Terror Trench doorway cutscene.jpg|200px]] | | [[File:Terror Trench doorway cutscene.jpg|200px]] | ||
| The player enters the doorway to the left of the spiked | | The player enters the doorway to the left of the spiked pine cone that rolls back and forth. | ||
| Olimar and four of his Red Pikmin exit the doorway. The rightmost Pikmin notices something coming from the right, and runs back inside. As it does, the other Pikmin and Olimar, one by one, notice the previous crew member running off, check the right, see the problem, and run inside as well. Eventually, the danger shows up, moving from right to left: a [[Mockiwi]]. It walks from one end to the other without even noticing the crew, however. | | Olimar and four of his Red Pikmin exit the doorway. The rightmost Pikmin notices something coming from the right, and runs back inside. As it does, the other Pikmin and Olimar, one by one, notice the previous crew member running off, check the right, see the problem, and run inside as well. Eventually, the danger shows up, moving from right to left: a [[Mockiwi]]. It walks from one end to the other without even noticing the crew, however. | ||
|} | |} | ||
| Line 77: | Line 77: | ||
Terror Trench 3.jpg|Location of the [[Sorcerer's Wand]]. | Terror Trench 3.jpg|Location of the [[Sorcerer's Wand]]. | ||
Terror Trench 4.jpg|Location of the [[Self-Reflection Engine]]. | Terror Trench 4.jpg|Location of the [[Self-Reflection Engine]]. | ||
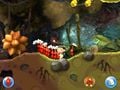
Terror Trench 5.jpg|The spiked | Terror Trench 5.jpg|The spiked pine cone that rocks back and forth. | ||
Terror Trench 6.jpg|Location of the [[Extended Hand of Friendship]]. | Terror Trench 6.jpg|Location of the [[Extended Hand of Friendship]]. | ||
Terror Trench 7.jpg|The | Terror Trench 7.jpg|The pine cone chase section. | ||
</gallery> | </gallery> | ||
Revision as of 13:36, October 15, 2017
| Terror Trench Sector 6 – Area C | |
|---|---|

| |
| Treasures | 3 |
| Pikmin available | Red Pikmin |
| Requirements | Complete Lights in the Darkness or Sizzling Precipice |
| Music | |
Terror Trench is the third main area in the Sweltering Parchlands. It takes place inside a cave that has many narrow hallways, and for most of them, some spiked pine cones[1] show up from the ceiling in intervals and roll inside the hallways, eventually falling into the pit at the end of the path. Others even bounce against walls, or roll back and forth in a half-pipe. The player must wait in vines, stand on alternative platforms, our even outrace the pine cones to avoid losing their Pikmin.
|
The following article or section is in need of assistance from someone who plays Hey! Pikmin. |
Plot
|
The following article or section is in need of assistance from someone who plays Hey! Pikmin. |
Description
|
The following article or section is in need of assistance from someone who plays Hey! Pikmin. |
Cutscenes
| Cutscene | Screenshot | Trigger | Description |
|---|---|---|---|
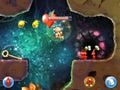
| Mockiwi chase | 
|
From the start, the player advances a bit forward. | Four Red Pikmin are running away from a Mockiwi that is chasing after them. They jump behind a stone, and when the Mockiwi reaches it, it sniffs around, notices it can't find the Pikmin, turns around, and walks away. |
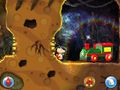
| Tripping Pikmin | 
|
The player whistles the Pikmin behind a pile of leafs inside a small room in the top screen, where the exit to reach Olimar is a hole with Sparklium Seeds. | Four Red Pikmin jump out from behind the leafs and do a gymnast salutation. They run down to the exit of the room, but the last one trips and stays on the floor, face-first. One of the other three Pikmin eventually returns to check up on its friend. The Pikmin stands up, the two stare at each other for a bit, and then run off to join the others. |
| Doorway Mockiwi | 
|
The player enters the doorway to the left of the spiked pine cone that rolls back and forth. | Olimar and four of his Red Pikmin exit the doorway. The rightmost Pikmin notices something coming from the right, and runs back inside. As it does, the other Pikmin and Olimar, one by one, notice the previous crew member running off, check the right, see the problem, and run inside as well. Eventually, the danger shows up, moving from right to left: a Mockiwi. It walks from one end to the other without even noticing the crew, however. |
Pikmin locations
|
The following article or section is in need of assistance from someone who plays Hey! Pikmin. |
| Spot | Location | Pikmin | Requirements | Notes |
|---|---|---|---|---|
Objects
|
The following article or section is in need of assistance from someone who plays Hey! Pikmin. |
Treasures
Enemies
Obstacles
Others
Guide
|
The following article or section contains guides. |
|
The following article or section is in need of assistance from someone who plays Hey! Pikmin. |
Gallery
Starting location.
Location of the Sorcerer's Wand.
Location of the Self-Reflection Engine.
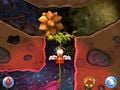
The spiked pine cone that rocks back and forth.
Location of the Extended Hand of Friendship.
The pine cone chase section.


Names in other languages
|
The following article or section is in need of assistance from someone who plays Hey! Pikmin. |
| Language | Name | Meaning |
|---|
References
| Sector 6: Sweltering Parchlands | |
|---|---|
| Normal areas | 6-A: Scorched Earth • 6-B: Lights in the Darkness • 6-C: Terror Trench • 6-D: Barriers of Flame • 6-E: Blazing Winds |
| Extra areas | 6-X: Sizzling Precipice • Secret Spot 21 • Secret Spot 22 • Secret Spot 23 • Secret Spot 24 • Sparklium Springs |