User:Soprano/Pikmin 3 Area Design Analysis
Pikmin 3 has really good area design. It manages to have dense and interconnected maps that aren't too confusing to navigate, and feel large while also being fairly small. In this essay, I'm going to try to work out how the game does this in each of its areas.
General information
Pikmin 3 has 5 areas: the Garden of Hope, Distant Tundra, Tropical Wilds, Twilight River, and Formidable Oak, which are visited in Story Mode in that order. However, it's not the case that the player will explore one area completely and then move onto the next. All the areas (except the last) require backtracking later in the game to get all the fruits in the area, due to the way that each new type of Pikmin allows access to previously inaccessible sections of the map. This means that the areas must facilitate a fairly linear story segment and non-linear fruit collecting at the same time. However, what I find fascinating is that each area has a different way of doing this. The general layout features of each area are substantially different, as will be looked at later, but they each have a similar effect. The exception to this design style is the final area, the Formidable Oak, which cannot be analyzed in the same way as the other areas due to having no fruit and being a simple linear trial before the final boss battle. However, its general layout will be analyzed anyway. Note that the following sections assume you're quite familiar with the area being discussed.
Garden of Hope
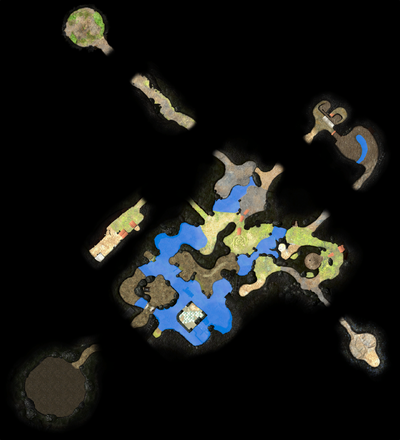
The Garden of Hope is designed a bit like a dungeon in the early Zelda games, in that it can be divided up into rooms. Some rooms offer simple challenges and connect to other rooms, while other rooms are more complex standalone challenges with a single entrance/exit. This is clear from the map, as there's a main hub part of the area and several separate rooms (sub-areas) on the sides. However, even in the main area, these rooms are still present. You start at the landing site in a room next to a lake. Cross either of the bridges, and you're in a room with some enemies. Walk up either of the corridors, and you'll arrive at the same room (the one with the captain-throwing tutorial). This loop is a core element of the first story segment of this area, and the player is expected to go around the entire loop in an anti-clockwise direction, ending up where they started. This is quite clever, as it teaches the player about the connected nature of the areas in the game. The loop also has a room to the side in a cave where Rock Pikmin are unlocked, and 3 fruits in easy-to-access locations to teach the player about collecting fruits. It's a great tutorial for the structure of the game.
This loop also has 2 electric gates blocking off other rooms, and this is another important element of the Garden of Hope: it features heavy use of gates to block off areas until later types are discovered. The area has 4 electric gates, 1 crystal wall not broken as part of the loop section, 2 underwater dirt walls, and a special cinder block that is destroyed after the Twilight River story section. This means that the area can frequently be revisited for more fruit, and also helps break up the area.
The large room to the north of the landing site has no fruit and mainly serves as yet another tutorial, but it also acts as a hub for the first boss arena and 2 other sub-areas – 1 of which is connected back to the main area. This unique sub-area with 2 entrances from the main area is unusual, as both halves contain a fruit but there's also a ramp box separating them that needs to be pushed from one direction. It's weird, but it's a unique feature that allows the cave to be completed in multiple ways. The other sub-area in the west is also interesting for being divided in 2 by an electric gate, so the first fruit can be collected after getting Brittany, but the second requires Yellow Pikmin, and yet the puzzles that allow access to the 2 fruits are connected.
The Garden of Hope is unique for having 2 story sections, and this is a weird point in its design, as once the second (southwest) half of the area is unlocked, the area changes quite a bit. The second half of the area is mostly separate from the first half, but there's a clever bit of connection between them. The main route between the areas is the path with the destroyed cinder block, but there's a second connection that can only be opened once Blue Pikmin (found in the second half of the area) have been unlocked. It's an underwater dirt wall next to a required pile of fragments that is actually located in the first half of the area. It's a really clever bit of connection, and helps make the halves of the area feel slightly less separate.
The second half of the area is interesting for its verticality. It mainly features a large lake, but there are 3 bridges that can be built over it. The bridges connect to islands with fruits on them, and the islands are surrounded by looped paths of water. This layout can be a bit confusing, but it's not really found elsewhere in the game. This part of the area has 7 fruits and several piles of fragments, so there's always something to do in this dense part of the area.
Overall, the Garden of Hope is an area based around rooms and small loops. The area is designed to give the player a reason to come back often through clever use of barriers and clearly defined sections. While the strong focus on the linear story does limit the map's potential for exploration, there's enough to do in the area to keep it interesting over time.
Distant Tundra
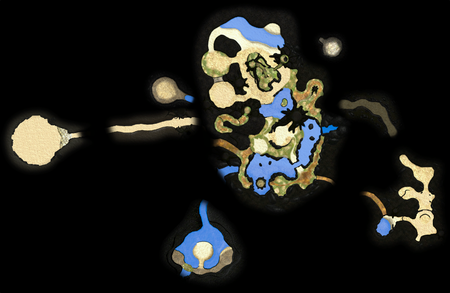
The Distant Tundra is an area dominated by loops. Its design features small loops all over the place, but the dominant layout feature of the map is an enormous loop that goes through 5 sub-areas. There are no sub-areas in this area with only 1 entrance/exit, which really says something about its structure.
When Alph and Brittany first land in the area, they are separated on opposite sides of a large river. Until the double bridge is built, there is no way for a leader to walk to the other side. This is achieved by lining Brittany's side of the river with small ledges, and placing 2 dirt walls in the water such that only Blue Pikmin can break them. (While this could lead to the area gaining additional connections upon finding Blue Pikmin, there's little need to destroy these walls, and only 2 fruits in the area require or encourage the use of Blue Pikmin, so these dirt walls aren't particularly notable.) On separate sides of the area, both leaders need to use both Yellow Pikmin and Rock Pikmin to collect fragment piles, due to the positions of the piles. This requires the use of a clearly marked throwing point to exchange Pikmin. This section of the story is interesting due to the way it separates the area into 2 distinct sections. Each section has a hub-and-spoke structure, with a space at the center (next to where the bridge is constructed) connected in several directions to other room-like spaces nearby, which contain things like fragments, fruits, enemies, and the Yellow Onion.
After the leaders unite, the storyline takes the leaders on a roundabout tour of the entire area, which is a clever way of showing off the mega-loop. However, because the loop is so long, the location of the boss is on the opposite side of the map from the start of the loop. As a result, the map screen implies that the 'signal' they are receiving from Charlie is behind the bouncy mushrooms, when the player actually needs to go in the opposite direction to progress. (Pikmin 3 Deluxe improves this slightly by showing the whole map from the start, but this change also has the effect of reducing the sense of discovery.) This is a slight flaw in the design.
The loop first passes through a basic cave, then an outside area which the player will recognize from Charlie's day 1 tutorial. (Reusing areas from earlier in the game for new purposes is smart.) The next cave introduces them to the boss, the Vehemoth Phosbat, and the next cave is a boss fight. The boss fight here is special for being heavily based around the environment around it, as the 5 lights in the room are used to beat the boss. There's little sense of direction in this room, which makes it confusing compared to the straightforward loop, but it also allows the boss to be defeated in several ways. The far end of that cave connects back up to the main area with a ramp box to make a previously 1-way path a 2-way path. From there, the base is nearby, completing the loop.
The Distant Tundra also features a mini-boss, the Shaggy Long Legs, and it is fought in its own arena which is notable for being accessible in 2 ways. It can be accessed from Brittany's cave by throwing a captain up a ledge, and it can be accessed from the main area by going through the water with Winged Pikmin. This adds more options for completing the game.
The area features much more verticality than other areas in the game, particularly in the northwestern and southern parts of the area. There are 5 geysers and a ramp made of hay for ascending ledges. Also, the pathways in the area tend to be more winding and narrower than in other areas. These are characteristic features of the area, though they contribute to making this area the easiest one for Pikmin to get separated from the leader in.
Overall, the Distant Tundra is an area based around loops and hub-and-spoke networks. The area is designed to reinforce connection between its many distinct spaces. It has some confusing sections but is overall a good area for navigation.
Tropical Wilds
In comparison to the other areas, the Tropical Wilds doesn't have a single defining layout feature. However, there are still a bunch of unique concepts when compared to the other areas, and a few repeated themes.
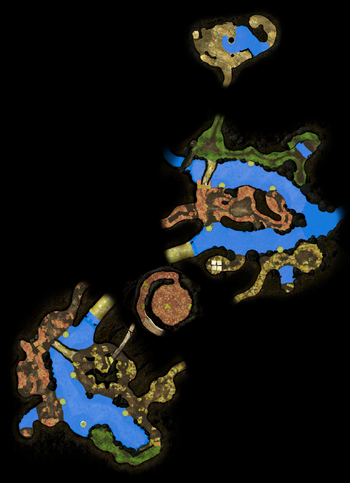
The Tropical Wilds can be roughly divided into 2 main sections: the north and the south. The northern half of the area is centered around a loop that surrounds a plateau. Unusually for areas in Pikmin 3, it's possible to walk on this plateau due to the seesaw block adjacent to it. From here, a few fruits can be accessed, including one that involves walking on a log that passes over the lower area. (And this one is unusual yet again, because it's in a cave that is accessed by falling in from above – the only vertical loading zone boundary in the game.) North of the plateau is a lake with 2 fruits, and west of it is a mini-boss fight in a unique double-arena. This loop section is dense and a bit confusing, but it's still interesting.
The southern half of the area is where the story section of the area is focused, and it also centers around a loop, albeit a very different loop. The player must throw a leader across an unbuilt bridge, then after building that bridge, the player must use all 3 leaders to cross part of the lake using a small island. This allows a ramp box to be pushed, allowing access to and from the boss arena. These throwing puzzles are clever, as they act as both a tutorial and a way to gate off the boss of the area until all 3 leaders are obtained. A leader can also be thrown up a ledge to arrive at Alph's landing site, which now contains a suit upgrade and a fruit, which is another neat way of reusing tutorial areas. This tutorial area also connects back up to the main area via a cave, which forms another loop (intersecting the story one).
Connecting the 2 halves of the area are 3 paths. The main one is a red bridge, but the northern half of the area must be accessed before that can be built (unless Blue Pikmin are used, which are unlocked late in the game). The second path is a long path to the east along the lake, which has a curious ledge, making walking one way along it faster than walking the other way. The third path requires 3 captains, but is also the most unique. By going through a tunnel to the west, the player will arrive at an area with multiple ledges and an Armored Cannon Larva. By using all captains to get to the top, the player will not only get a nice view and a data file, but a path down to the northern half – using terrain that would normally be considered out-of-bounds. Apart from Secret Files, there's no other place that the player is expected to walk on out-of-bounds terrain. (This route is entirely optional and inefficient, but it is clever.)
An interesting thing this area does is use reinforced walls as shortcuts. There are 3 in the area, and while destroying them is optional, it is very useful. One is south of the loop plateau, one is west of the landing site, and one blocks the eastern entrance to the northern Shaggy Long Legs arena. Without destroying these walls, a rather inefficient path must be taken to access what's on the other side. There are several sources of bomb rocks in the area that can be used to destroy these walls.
Overall, the Tropical Wilds is a diverse but cohesive area. It has the most fruit of all the areas in the game, and places that fruit in diverse locations to make collecting each one a different experience. There's a lot going on and some parts are a bit puzzling; however it does all fit together overall.
Twilight River
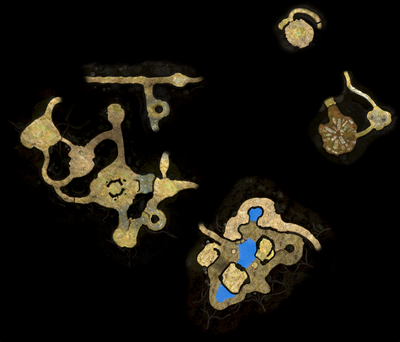
The Twilight River has a very different layout to the other fruit-bearing areas in Pikmin 3, mainly due to its central focus around the rivers that go through the area. This unique feature results in a distinctive design for the area. Looking at the map, the most obvious difference is that there are 2 main sections to the area instead of 1. There's the first section in the north, with 2 rivers, and the second section in the south, with 1. And these 2 sections have 3 paths between them – a 1-way path along the river, and 2 bi-directional paths that can only be used after the second part of the area has been accessed. In addition, there are only 2 other sub-areas. (Technically there are 3, but 2 of them are in the same loading zone and are associated with the boss.) This unique overall structure makes the area less focused on rooms and loops than the other areas, and more focused on paths.
The river is the main terrain feature of the area, and it's worth analyzing how it works. There are 2 separate rivers in the area: one in the north of the first half of the area, and one connecting the first and second halves. It's possible to walk through the rivers, but this can only be done with Blue and Winged Pikmin because of the water. In addition, the river is often lined with walls that make it impossible to walk out of in certain locations. As a result, the main way of traversing the river is with the lily pads. Lily pads work like trains, coming down the river every few seconds. Captains and Pikmin can hop onto the lily pads at specific spots from both sides of the river. (These spots are marked by stationary lily pads.) They can then hop off at any 'station' downstream, and if all stations have been passed, they will automatically hop off at the end of the river. Going upstream generally requires walking on regular terrain, and there are various slopes and drops that make it easier to walk upstream than downstream, to encourage the use of the lily pads. Crossing the river generally requires use of the lily pads too, but there are 2 naturally generated bridges across it (one of which is a 1-way path), as well as 1 fragment bridge and 1 Bouncy Mushroom. The northern river is available from the start, but using the southern river requires lifting a dam to allow lily pads to go down it.
The rivers divide the terrain into multiple distinct segments. The northern half is divided into 3 segments and the southern half is divided into 2, and these segments are surprisingly narrow. They function as a linear arrangement of rooms, and each room contains something, such as a fruit or enemy. Very often, these segments have obstacles limiting movement between rooms until they're destroyed, or one-way paths limiting the direction of movement along them. The simplicity of each segment makes the Twilight River surprisingly simple to navigate, with clear paths between any 2 sections of the map.
Just as with any public transportation system, the placement of stations is important. Stations on the river are always in front of small open spaces that connect in multiple directions to other paths, making the area a bit like a web of hub-and-spoke layouts. The stations are just the right distance apart to make them the most useful.
The progression of the Twilight River relates strongly to its layout. The area has the longest story segment of any area, involving the building of 2 long bridges. The placement of fragment piles here is extremely important, and they are all placed well. For the first bridge, one is at the first stop the player will likely arrive at on the lily pad train, one is in a clear location along the northern segment, and one is in the cave and requires a small puzzle to get to. For the second bridge, all are in locations that require Winged Pikmin to access. The entire second half is designed around the newly discovered type, as the fragment piles are all across the river from the bridge, making Winged Pikmin the most efficient. But there are also 3 Arachnodes in clever locations on carrying routes. The entire area is extremely cohesive.
Overall, while the Twilight River may have the least fruits of all the major areas, its design is incredibly interesting in how cleverly designed it is around the river and the attributes of Winged Pikmin. The unique layout style with rooms on the sides of rivers and 3 paths connecting the 2 parts of the area is great, and my only disappointment is how little there is to do.
Formidable Oak
The Formidable Oak is not designed like the other areas at all, because it has a fundamentally different role. Instead of being an area full of fruit, it's a single long puzzle featuring the Mysterious Life Form, as well as a boss fight. However, it's not totally linear either, as there's a lot of stuff to do besides running away from the boss.
The Formidable Oak can be divided into 3 sections: the outside, the light part of the cave, and the dark part of the cave. The outside is simple, with the landing site being next to a boss arena, and another arena-like area being at the top of the hill. But this upper area connects (in a way impossible in real-world geometry) to a large cave system that eventually leads back to the outside again. This cave system is where most of the area is.
The first room of the light part of the cave is a long linear path, with a branch to the side blocked by a reinforced wall. This side path has a useful purpose – if the player spends multiple days completing the puzzle (which is likely), this path serves as an optional shortcut to get the player to the dark part of the cave much faster. By doing a small task with bomb rocks, a lot of time can be saved later on, which is clever.
The main room of the light part of the cave is a complex network of rooms and narrow paths, a little bit like caves in Pikmin 2. To reach the exit, either the bridge must be built, or the long side path must be taken. On their own these tasks would be simple, but one large threat is present in the room: the Mysterious Life Form, chasing Olimar. Plus, there are a lot of enemies. (Interestingly, the central room of this area has enemies representing the abilities of the different types of Pikmin, testing the player's knowledge like The Final Trial in the first game.) To make running away a bit too easy, the section contains 2 prominent loops. There is a small 1-way loop between 2 rooms near the entrance of the section, and a larger loop that goes through the central room and can only be used once a paper bag is pushed down. These loops turn something that should be stressful into something that's annoying. This is the main flaw of the area: its main mechanic can be easily bypassed. It would be very difficult to design the area without loops of this kind, but it could have been done better.
The dark part of the cave is a large puzzle. There are no enemies, and instead a fragment bridge must be built (where Blue Pikmin and Winged Pikmin are the fastest to do it with) and 3 electrodes must be turned on (with Yellow Pikmin) to be able to cross bridges of Bloominous Stemples. This section is very confusing to navigate, and the darkness makes it even harder. But that's fitting for a final puzzle to a game with lots of navigation. After completing the bridges, it's a simple walk to the exit of the cave, and after that, the only thing left to do in the game is to defeat the final boss.
Overall, the Formidable Oak is a good challenging area to finish the game, but by being so different to the other areas in Pikmin 3, it ends up not really testing the same skills. The area may have exploration, combat, and carrying, but to a lesser extent than the other areas. The existence of loops also makes its main challenge less challenging. But it still manages to be interesting and creative.
That's the end of my area design analysis; thanks for reading! If you have any comments or suggestions, put them on my user talk page, as I'm open to changing this to make it an even better analysis.


