Garden of Hope
| Garden of Hope | |
|---|---|
| |
| Fruits | 17 |
| Pikmin discovered | Rock Pikmin and Blue Pikmin |
| Requirements | Complete day 1 |
| Music | Garden of Hope |


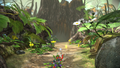
The Garden of Hope (再会の花園?, lit.: "Garden of Reunion") is an area in Pikmin 3. It is set in a temperate garden with lush vegetation, plenty of flowers, and several man-made elements. Rock Pikmin and Blue Pikmin are discovered in this area, and it is where Brittany first lands. The bosses of the area are the Armored Mawdad and the Quaggled Mireclops. The seventeen fruits in the area give a total of 26 bottles of juice (13 on Ultra-Spicy difficulty).
Plot[edit]
After Alph finds the S.S. Drake on day 1, he must find Brittany, and notices a signal coming from another area. Alph lands to investigate, and after discovering the Rock Pikmin, is able to free Brittany, who was behind a crystal wall. The reunited explorers work together to build a bridge to a hollow tree stump where a new signal is coming from. After a battle with the game's first boss, the Armored Mawdad, the signal is revealed to be coming from a cell phone, called the Data Glutton, that the Mawdad had ingested. Upon returning it to Drake, the whereabouts of Charlie are revealed and the Distant Tundra is charted.
After recovering Louie from the Twilight River later in the game, Louie will land the S.S. Drake while Alph, Brittany, and Charlie are asleep and runs off with their food and treasures, blowing up an otherwise blocking cinder block. This grants the player access to the second half of the level, where they will discover the Blue Pikmin. This is also where the player will fight the game's fifth boss, the Quaggled Mireclops, which has abducted Louie.
Louie will not do anything if the crew has less than a full bottle at the start of a new day. When he does steal, he takes every bottle, including unfinished ones, and when he is recaptured, any unfinished bottles the Koppaites gathered in the meantime will be combined with any unfinished bottles Louie had, off-screen.
Overview[edit]
The Garden of Hope appears to be the main forest level in Pikmin 3 and looks, in regards to terrain, similar to The Impact Site, The Forest of Hope, and Awakening Wood. It has a lot of grassy floors, dirt, and rocks to walk on. Although the area is quite natural, there are some clearly man-made structures, such as vases, tiles, buckets and bricks.
This large garden has several walls that twist and turn, separating its layout. Besides walls, there are lakes too, further splitting the stage. Despite these separations, the area's large size stops it from having cramped locations. Vertically, there is not much variation, although once Blue Pikmin are found, the lakes provide a rough second level of altitude.
There are a few caves and segments, and two boss arenas. The landing site is roughly in the center of the main area, but the southern half can only be entered after Louie runs away, blowing up a cinder block that used to block off that part of the area.
Segments[edit]
The main segment of the area can be divided into two halves, with the southern half only being accessible after Louie's escape. The landing site is on the center, but really close to the cinder block covering the second half. The following is a list of all segments in the area:
- Main segment
In its northern half, the immediate terrain around the landing spot is surrounded with walls, gates and water. To the east, beyond a small river, is the bit of the area where Brittany is found; the general path makes a rough "3" shape with the botanist's room in the middle. To the north of the landing site is a riverside path, and the other side of the river leads to a corridor that, in turn, leads to the Armored Mawdad's arena.
The southern half of the main area is mostly underwater. There is a large portion of shore at the north, connecting to the first half of the area. There is an island fully surrounded by water with a Waddlepus on it, to the southeast; it can be reached with a bridge. To the southwest is another island, equally reachable with a bridge, but it is connected to a bucket that gives access to the Quaggled Mireclops. Small inlet bits of land exist around the lake, leading to fruits. To the southwest is a small strip of land hugging the nearby island, but the two are separated by a wall.
- Rock Pikmin cave
To the east of Brittany's landing spot is a cave. It is roughly circular, and at the end, the Rock Onion can be found.
- Armored Mawdad arena access
A long corridor leading up to the arena. It can be entered from the northwest of the main area.
- Armored Mawdad arena
The arena is inside a large, hollowed-out tree stump. It only has one entrance and is mostly circular, save for a few crevices, and also has many mushrooms.
- Quaggled Mireclops arena
Unlike other boss arenas in the same style, this one does not have a corridor segment. The arena is circular and the terrain is marshy, giving in every time the Mireclops stomps.
- Elevator platform room
To the west is a narrow, linear room with elevator platform puzzles. It can be entered from a path at the northwest of the landing site, past the wall. The camera is pointing sideways here, giving the impression of 2.5D gameplay.
- Bug-Eyed Crawmad cave
This cave is split into two rooms, separated by a paper bag. The northwestern room has two dips that have elevator platforms, and ramps leading out. It is entered through a plain corridor on the northwestern part of the main area. The other room has a small curved river running through the middle and is accessed using an entrance to the north of Brittany's crash site.
Objects[edit]
|
The following article or section is in need of assistance from someone who plays Pikmin 3. |
Fruits[edit]
 Astringent Clump × 1
 Citrus Lump × 1
 Dusk Pustules × 1
 Face Wrinkler × 1
 Fire-Breathing Feast × 1
 Lesser Mock Bottom × 1
 Pocked Airhead × 1
 Scaly Custard × 1
 Searing Acidshock × 2
 Stellar Extrusion × 1
 Sunseed Berry × 3
 Velvety Dreamdrop × 1
 Wayward Moon × 1
 Zest Bomb × 1
Enemies[edit]
|
To do: Verify these numbers. Some may be incorrect. |
 Armored Mawdad – Boss × 1
 Bug-Eyed Crawmad – Miniboss × 2
 Bulborb × 1
 Dwarf Bulborb × 4 (Two extra appear next to the Bulborb after the Data Glutton is collected.)
 Fiery Blowhog × 3
 Hermit Crawmad × 2
 Iridescent Flint Beetle × 1 (Only appears after the Data Glutton is collected near the landing site)
 Medusal Slurker × 1 (Disappears when the Food Thief is collected)
 Peckish Aristocrab × 1
 Puckering Blinnow × 8
 Quaggled Mireclops – Boss × 1
 Red Spectralids × 1 (Only appears after the Quaggled Mireclops is defeated, in its arena)
 Skitter Leaf × 4 (Two only appear after the Data Glutton is collected, all disappear after the Food Thief is collected)
 Skutterchuck × 2 (Disappears when the Food Thief is collected)
 Sputtlefish × 3
 Toady Bloyster × 1
 Waddlepus × 2
 White Spectralids × 4 (One only appears after the Data Glutton is collected)
 Wolpole × 4 (Not present in Pikmin 3 Deluxe until the Data Glutton is collected.)
 Yellow Spectralids × 3 (One only appears after the Data Glutton is collected)
 Yellow Wollyhop × 2
Obstacles[edit]
|
This section is a stub. You can help Pikipedia by expanding it. |
 Bamboo gate × 1
 Clipboard × 1
 Crystal nodule × 5
 Crystal wall × 3
 Dirt wall × 7
 Dusty Mushroom × 51
 Electric gate × 4
 Large crystal × 7
 Paper bag × 1
 Small crystal × 1
 Tin box × 1
 Water body × 3*
*More bodies of water can be formed with the Quaggled Mireclops. Two are connected by a sewer, so they are technically one, although the sewer does not serve as a shortcut.
Tools[edit]
 Bridge (Blue)
  × 49 (Piles of 20 in a crystal and 29)
- Bridge (Blue) × 50 (Piles of 20 in crystal, 10, and 20 that are buried nearby the group of 10)
- Bridge (Brown) × 29 (Piles of 14 and 15)
- Bridge (Pot-shaped) × 60 (2 piles of 30, one of which is underwater)
- Bridge (Red) × 46 (Piles of 20 in a crystal and 26)
- Bridge (Red) × 54 (2 piles of 27, one of which is underwater)
 Dirt mound × 3
 Elevator platform × 6 (3 pairs)
Vegetation and mycobiota[edit]
 Burgeoning Spiderwort × 2 (1 after Data Glutton has been retrieved and disappears when Louie lands the Drake)
 Clover × 2
 Dandelion × 6 (1 beyond the cinder block)
 Figwort × 18 (5 beyond the cinder block)
 Flukeweed × 4 (3 beyond the cinder block)
 Pellet Posy × 25 (15 beyond the cinder block, 9 of which are upon the Quaggled Mireclops' corpse)
Other[edit]
Data files[edit]
- Main article: Data file.
- Pikmin Behavior / Pikminology
- Controls
- Locking On; Pikmin 3 Deluxe only
- Charging! / Charge!; Pikmin 3 Deluxe only
- Throwing Leaders; Pikmin 3 only
- Go Here!
- Rescuing from Bubbles
- Indigenous Life
- Armored Mawdad #1 / Armoured Mawdad #1
- Armored Mawdad #2 / Armoured Mawdad #2
- Quaggled Mireclops #1
- Quaggled Mireclops #2
- Bulborb #1; Pikmin 3 only
- Bulborb #2
- Dwarf Bulborb; Pikmin 3 Deluxe only
- Yellow Wollywog / Yellow Wollyhop
- Bug-Eyed Crawmad / Bugeyed Crawmad
- Hiding / Hiding Place
- Area Hints
- Olimar's Log
- Journal Entry #1 / Olimar's diary #1
- Journal Entry #2 / Olimar's diary #2
- Journal Entry #3 / Olimar's diary #3
- Secret File
- Olimar's Log Vol. 2
Hidden murals[edit]
- Main article: Hidden mural.
|
Warning: the following text contains major spoilers about the hidden murals in the area.
|
|---|
|


Quotes[edit]
|
This section is a stub. You can help Pikipedia by expanding it. |
Changes in Pikmin 3 Deluxe[edit]
Like most areas, Garden of Hope has received some notable changes in Pikmin 3 Deluxe:
- There is more grass on the ground around the landing site.
- An additional brick is in the ground next to the Onion.
- There is more grass in the area with the Bulborb southeast of the landing site.
- There is stone on the ground instead of grass in the sloped path southeast of the Bulborb area.
- There is stone on the ground instead of dirt in the area southeast of that path.
- There is more grass on the ledge with the first Sunseed Berry the player sees.
- There is more grass in the area near the circle Brittany is found in.
- Two 1-Pellet Posies and a 5-Pellet Posy can be found near the circle Brittany is found in.
- There is more grass in the area with the Skutterchucks east of the landing site.
- A dirt mound near a cinder block in the cave northeast of the landing site is removed.
- There is stone on the ground instead of grass in the area with the Fiery Blowhogs north of the landing site.
- There is stone on the ground instead of grass in the area across the lake from the Fiery Blowhog area.
- There is stone on the ground instead of dirt in the path leading to the Armored Mawdad arena.
- There are less brown mushrooms in the Armored Mawdad arena.
- There is grass on the ground instead of dirt in the area with the Yellow Wollywogs northwest of the landing site.
- There is grass on the ground instead of dirt in the area with the seesaw blocks west of the landing site, before the electric gate.
- The Yellow Spectralids near the large seesaw block puzzle has been replaced by a White Spectralids, and moved a bit farther from the entrance to the room.
- There is dark wet dirt on the ground instead of grass and light dirt in the entire second (southeast) half of the area, except for underwater areas or the bit of land next to the clipboard.
- The path through the wall Louie destroys is made of a different kind of dirt and stands out more.
- All Wogpoles have been removed.
- There are many more nectar eggs in the Normal difficulty, and a few more in the Hard difficulty:
- A few can be found by the cinder block that blocks the path to the Blue Onion.
- A few can be found hidden around the rock to the right of the first crystal wall approaching Brittany.
- A few can sometimes be found right beside the crystal wall trapping Brittany.
- A few can sometimes be found right beside the bridge leading back to base near the Skutterchucks.
- A few can be sometimes found near the Fiery Blowhogs.
- A few can be found just before the dirt wall blocking off the Armored Mawdad arena. These eggs vary in quantity, seemingly at random.
- There are added screws in the ground in several places: 1 on a brick near where Brittany is first found, 1 on the throwing point marked with an "X" north of the landing site, and 1 on the rocky bit of land next to the flukeweed containing the Lesser Mock Bottom.
- Some data files have been added, removed, or moved elsewhere.
Guide[edit]
|
The following article or section contains guides. |
Basic guide[edit]
- First visit
Upon landing in the area, the first main task is to rescue Brittany. Start by taking all your Red Pikmin out of the Onion and destroy the wall to the right; this will allow access to a set of bridge fragments. Go the other direction from the base, defeat the Dwarf Red Bulborb, and carry the other set of bridge fragments. During this process you should be increasing your Pikmin population by carrying pellets and enemies nearby. When the bridge is done, cross it and defeat the Bulborb. Destroy the dirt wall behind it, and continue over the hill. Go into the cave and defeat the Medusal Slurker to unlock Rock Pikmin. Carry the enemy and all the pellets in the room to the Rock Onion, then leave with all your Pikmin. Destroy both crystal walls to unlock Brittany, and complete the leader throwing tutorial. After that, return to the base, either by going back the way you came, or continuing on the path to the area with the Skutterchucks and building a red bridge to return to the landing site.
The second main task is to collect the Data Glutton. Destroy the crystal wall next to the landing site, and defeat the Fiery Blowhogs. You will see a body of water with a crossing point marked by an arrow and an "X" mark. Throw a leader and lots of Pikmin across the gap at the crossing point. Switch to the other leader and carry the blue bridge fragments, some of which are inside a crystal. After the bridge is done, reunite with both leaders on the far side of the body of water, and destroy the dirt wall. Follow the path to arrive at the first boss of the game, the Armored Mawdad. See here for strategies on how to beat it. After defeating the boss, carry the phone it drops back to the landing site to complete the first story section of the area.
- Second visit
After rescuing Louie from the Twilight River, the ship will make a surprise landing here, and you'll have no juice left. The main task in this area is to rescue Louie, but to do this, several bridges will need to be built with a new type of Pikmin, Blue Pikmin. Start by heading in the direction Louie ran in the cutscene. Walk through the gap in the wall, then throw 3 Winged Pikmin at the Flukeweed on the left. Meanwhile, charge the rest of your squad on the nearby dirt wall. Walk back to the Flukeweed, which should have come out of the ground to reveal the Blue Onion. Pluck the Pikmin, and carry the nearby pellets to grow at least 10 Pikmin. Go downhill and defeat the Sputtlefish, and start to carry the orange bridge fragments next to it. Back at the surface, call the Pikmin that were on the dirt wall and use them to carry the other set of orange bridge fragments. When the bridge is complete, cross it with your squad and collect the Searing Acidshock in the crystal and lift up the bamboo gate. Take this time to harvest more Blue Pikmin.
After this, a white pot-shaped bridge must be built. The first pile of fragments is in the western corner of the area. Go under the bamboo gate, making sure to defeat the Puckering Blinnows, and turn right to find the first pile of white fragments. Make sure to not walk too far, or you'll awaken a mini-boss, the Bug-Eyed Crawmad. The second pile of fragments is underwater in an area accessible from earlier in the game. Destroy the underwater dirt wall near the orange bridge, then walk further, turn right and defeat the underwater enemies. Destroy the dirt wall behind them, and you'll find the second pile of white fragments.
Once the pot-shaped bridge is completed, regroup with all your leaders. Head to the area on the mainland nearest to the new bridge, and throw 2 leaders and a large group of Pikmin (including some Rock Pikmin) onto it. Switch to one of those leaders and throw the third leader onto the other side along with the Pikmin. Switch to the third leader and defeat the Peckish Aristocrab. It is useful to build a blue bridge for easier access to the main part of the area. The first pile of fragments is in a crystal next to the bridge. The second pile is further along the path, but most of the fragments are actually in a dirt mound next to it, which should be dug up completely.
After completing the blue bridge, cross it with a large group of Pikmin and walk onwards to the fifth boss in the game, the Quaggled Mireclops. See here for strategies on how to beat it. After defeating the boss, carry Louie back to the S.S. Drake, and you will regain all your missing juice and complete the second story section of the area.
Speed completion[edit]
- First visit
Upon landing, the first task is to build the brown bridge and destroy the dirt wall on the opposite shore as quickly as possible. The fastest way to do this involves first throwing a Pikmin at the nearby Pellet Posy, most on the nearby dirt wall, and about 7 across the incomplete bridge, where you can then whistle them from within the water and charge them onto the wall from below. From here, divide the rest of the Pikmin between carrying fragments, pellets, and the Dwarf Bulborb. As soon as the dirt wall next to the Onion is complete, carry all the fragments behind it. As soon as the bridge is done, cross it and defeat the Dwarf Bulborbs but not the large Bulborb. Finish destroying the dirt wall and progress onwards towards the Rock Onion, not carrying the fruit along the way. Grow all the Rock Pikmin possible inside the cave, and then exit it and save Brittany straight away. In the throwing tutorial, throw Brittany and 5 Pikmin across, and once the tutorial is done, call them back – you don't need to carry the fruit, as there are faster fruits on later days. If you're playing Pikmin 3 Deluxe, be sure to flower some of your Pikmin using the nearby eggs.
Head straight back to the landing site and destroy the crystal wall next to it. Throw 1 Red Pikmin on each of the Fiery Blowhogs and head to the throwing point. Throw the other leader across with all the Pikmin, and put a few Pikmin on each of the fragment piles while putting the rest on the dirt wall. As soon as the wall is destroyed, head to the Armored Mawdad. See here for strategies on how to defeat it. After defeating the boss, carry the Data Glutton back to the landing site, as the bridge should be done by now. If you're playing Pikmin 3 Deluxe, be sure to flower some of your Pikmin using the eggs on the route back.
- Second visit
Take all your Pikmin out of the Onion and walk towards the broken cinder block. Throw 3 Winged Pikmin onto the Flukeweed with the Blue Onion and throw a leader there as well, and charge the rest of the Pikmin onto the dirt wall. Walk underwater with the other 2 leaders to the far corner of the underwater dirt wall near the Sunseed Berry. Clip a leader through the rock, and they will land at the edge of the platform on the other side. Walk with the underwater leader back to the Pikmin squad, and make sure the Blue Pikmin is plucked. Defeat the Dwarf Bulborb and wait at the end of the bridge. With the leader on the other side, walk until the point where the terrain rises, and do a long whistle towards the other leader and walk towards the loading zone. If done correctly, the entire squad should reappear with you. Before defeating the Quaggled Mireclops, head back and throw a few Pikmin into the dirt mound with the fragments. Then, enter the arena, and defeat the boss using a fast strategy, such as the one here. When the boss is defeated, start carrying Louie back, and while that is happening, defeat the Peckish Aristocrab and build the blue bridge.
In other game modes[edit]
These Mission Mode and Side Story stages take place within the Garden of Hope:
- Mission Mode
- Side Stories
In the Super Smash Bros. series[edit]
|
This article or section is a short summary on the Smash Bros stage. |


The Garden of Hope appears as a stage in Super Smash Bros. for Wii U and Super Smash Bros. Ultimate. While there are many key differences, the general layout of the stage, which is in the area where Blue Pikmin are discovered, remains the same, except for the addition of a massive waterfall. A Bulborb will occasionally appear in the background for decoration, and a Peckish Aristocrab will act as a stage hazard, running from one side to the other, destroying the climbing stick and the teacup, as well as damaging any fighter that comes into contact with it. Although the Aristocrab cannot destroy the bridge, fighters can. Wild Pikmin will come back to rebuild the objects if they are destroyed.
The following changes can be noted between the area in Pikmin 3 and the Smash Bros. arena:
- The pieces of land are now connected by a (breakable) bridge.
- The S.S. Drake is seen in the area, where a Burgeoning Spiderwort and a tin box would be in Pikmin 3.
- The china pot half that is made out of white fragments can now be found on land, and is breakable.
- There are two connected elevator platforms, one on each of the ends of the stage.
- There is a breakable climbing stick on the stage that players can stand on.
- There is a tin can in place of the bamboo gate.
- Most significantly, the other part of the area is no longer there. Instead, there is a massive waterfall.
Gallery[edit]
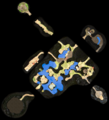
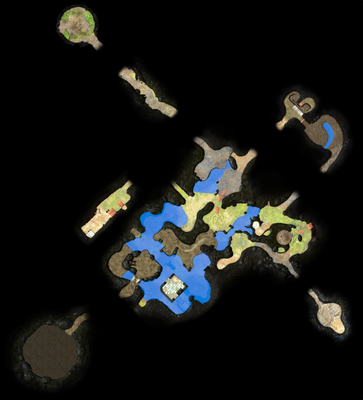
The radar map of the Garden of Hope in Pikmin 3.

The radar map of the Garden of Hope in Pikmin 3 Deluxe.
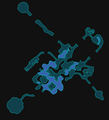
The mini radar map of the Garden of Hope in Pikmin 3 Deluxe.
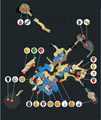
An annotated map from the Prima guide.
The S.S. Drake flies through the area.
The path to the Armored Mawdad's lair, which is inside of a rotting hollow tree.
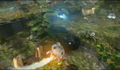
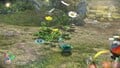
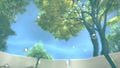
An example of the scenery in this flora-filled area.
The S.S. Drake and the Onion flying over the area.

Spatial view of Garden of Hope.
An Iridescent Flint Beetle coming out from some yellow wood sorrel.
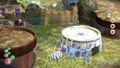
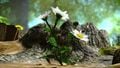
The overturned china pot.
The china pot's ceiling, or lack thereof, as seen from the KopPad.


- See more: Garden of Hope images category.
Trivia[edit]

- The bucket where Brittany crash landed has a makeshift shelter and a bed made out of a rock and a petal built in it. While one can infer that Brittany made the shelter when she landed in the bucket, Side Stories reveals that this shelter already existed in the Flower Garden mission, prior to the Koppaites crashing on PNF-404.
- This is the only area in the game to feature two major bosses.
- This is also the only area in the game to introduce two types of Pikmin: Rock Pikmin and Blue Pikmin.
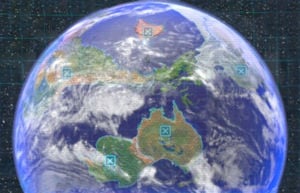
- This location's continental shape is based on Australia.
- This is the only area of the game that can be entered on day 2; Alph will refuse to revisit the Tropical Wilds.
- It is also the only area without Bomb Rocks.
- Strangely, there is a Yellow Spectralids behind the dirt wall that leads to the Astringent Clump, out of bounds to the right side. It mostly flutters in place against the edge of the transition zone, though given enough time and luck, it's possible that it will fly down and actually be reachable. Its positioning is most likely a mistake, as it is hard to spot and have Pikmin attack it.
- A nearby White Spectralids actually spawns under the floor on the opposite out-of-bounds ledge to this Yellow Spectralids, but when the day starts, it goes to the nearby Dandelion right away.
- Behind the electric gate next to the Fiery Blowhogs, there is a path to the left that leads to a ledge that goes down to the section of the area with the fragments used to build the bridge to the Armored Mawdad. This branch with the ledge serves no use, as it does not help in getting any fruits. It may be left over from an early version of the Garden of Hope, where the electric gate was a bamboo gate and thus an alternate route to the landing site may have been necessary.
- After building the vase from fragments, one can go under it from an opening. By using the KopPad's camera app, it's possible to see that the ceiling of the vase is not shown. Curiously, the KopPad will not display the leaders or Pikmin on top of the pot, if any.
- Louie will not steal any food if the crew doesn't have a full bottle. It is possible to have less than 1.0 juice by collecting only some grapes, for instance.
Names in other languages[edit]
| Language | Name | Meaning | Notes |
|---|---|---|---|
| 再会の花園? Saikai no Hanazono |
Garden of Reunion | ||
(traditional) |
再會花園 Zài huì huāyuán |
Garden of Reunion | |
(simplified) |
再会花园 Zàihuì huāyuán |
Garden of Reunion | |
| Pikmin-Paradijs | Pikmin Paradise | Name taken from the Super Smash Bros. stage. | |
| Verger de l'espoir | Orchard of hope | ||
| Garten der Begegnung | Garden of Encounter | ||
| Serra speranza | Hope greenhouse | ||
| 재회의 화원 jaehoeui hwawon |
Garden of Reunion | ||
| Jardim da Esperança | Garden of Hope | Name taken from the Super Smash Bros. for Nintendo Wii U stage. | |
| Vergel de la Esperanza | Orchard of Hope | ||
| Сад Надежды Sad Nadezhdy |
Garden of Hope | Name taken from the Super Smash Bros. stage. | |
| Zahrada Naděje | Garden of Hope | Name taken from Nintendo's official website. | |
| Ogród Nadziei | Garden of Hope | Name taken from Nintendo's official website. |
See also[edit]
| Pikmin 3 areas |
|---|
 Click an area on the image Tropical Wilds • Garden of Hope • Distant Tundra • Twilight River • Formidable Oak |