Twilight River
| Twilight River | |
|---|---|
| |
| Fruits | 15 |
| Pikmin discovered | Winged Pikmin |
| Requirements | Collect the Folded Data Glutton |
| Music | Twilight River |


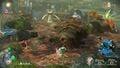
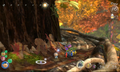
The Twilight River (交わりの渓流?, lit.: "Mountain Stream of Communion") is an area in Pikmin 3. It is set in an autumnal forest and features a river with a pair of streams running through the area, with lily pads on the river providing means of transportation. Winged Pikmin are discovered in this area, and the Scornet Maestro serves as its boss. The 15 fruits in the area give a total of 20.5 bottles of juice (10.25 on Ultra-Spicy difficulty).
Plot[edit]
Once the Folded Data Glutton is brought to the S.S. Drake, a signal is detected in the Twilight River. Charlie thinks that the signal is Captain Olimar, who they believe took the cosmic-drive key. After lifting the branch near the Winged Pikmin's Onion, a transmission is intercepted. It turns out to be Louie who franticly states that he is in trouble. Alph mistakes Louie for Olimar and the explorers decide to save him. Upon entering the spot they were pointed to, the explorers find out that Louie was taken captive by the Scornet Maestro. After the creature is defeated and Louie is saved, he is taken back to the Drake and identified as "Hocotatian". The next morning, the group unexpectedly arrives back at the Garden of Hope.
Overview[edit]
The Twilight River is split into two distinct sections, with one or two rivers crossing through. Most of the area is open-ended, especially considering that leaders and some Pikmin can go in or over the river at will. Unlike most areas in the game, it only has one cave; other than that, the boss arena and its access corridor are the only segments in the Twilight River.
Because of the autumn motif, the terrain mostly consists of dried leaves and dirt, with only a few bits of grass. The ground tends to vary in height, with bumps or depressions here and there, but the biggest altitude changer is the river. The river can be crossed by using bridging paths or by riding on the lily pads that appear in a constant flow, and travel downstream. Special platforms can be used to board in and out of lily pads.
Segments[edit]

The landing site is the main section of the map. The following is a list of all segments in the area:
- First main segment
The Drake lands on an peninsula in the center of this part of the area. To the east of it is where the river originates, splitting into two, and going through each side of the peninsula. To cross the rivers, lily pads must be used. To the east, there is a path to the second part of the area, but is blocked by a paper bag.
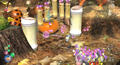
The flow of lily pads on the southern river is blocked by a dam. On the other shore of this river are two bits of land. The western one leads to a small alcove with Dusk Pustules. The eastern one is accessible through a bridge, and is where the Winged Onion is first found. This river ends in a tube that leads to the second main segment of the area.
On the northern side of the northern river is another stretch of land. To the east is a dead end with a Dapper Blob and some bridge fragments on it. The western part of this shore has a bit of an open area, and a log that gives one-way access back to the peninsula. To the north is the entrance to the cave.
- Second main segment
This portion of the area has the same river as the southern one from the previous segment running through its middle. The first time this segment is entered is through a one-way tube, while riding a lily pad on that same river.
The western shore has a small walkway at the north that leads back to the main area, as well as a bridge to the other shore. To the south is a different bit of land that is higher above, so it cannot be reached from the northern side. This strip of land has two clipboards and the Tremendous Sniffer, and connects to terrain further down to the south with an alcove and a puddle.
On the eastern shore, there's a circular bit of land with roots going up in the center; these roots lead to the top of the large tree. Further to the southeast, the path splits into two. To the northeast, a small arena with a Burrowing Snagret and an access back to the main area. To the southeast is a dead end, but is also where the leaders and Pikmin end up if they didn't board off their lily pad. On the opposite shore is a similar stretch of terrain that overlaps this one, but is higher up and can only be reached with a Bouncy Mushroom poking out of the water.
- Cave
Along the left wall from the entrance to the cave is a path blocked by Bloominous Stemples. The rest of this part of the cave is solid ground, until a lake, which makes up the other half of the main room. Crossing the lake gives access to a small alcove that turns and ends in a dead end with three Juicy Gaggles.
- Scornet Maestro arena access
This is simply a path made out of dry wood that curves around the outside of the tree.
- Scornet Maestro arena
This circular arena takes place on a flat tree top.
Objects[edit]
Fruits[edit]
 Blonde Impostor × 1 (inside of a large crystal)
 Citrus Lump × 1 (underwater)
 Crunchy Deluge × 1 (underwater)
 Dapper Blob × 1 (inside of a large crystal)
 Delectable Bouquet × 1
 Dusk Pustules × 1
 Insect Condo × 1 (inside of the Burrowing Snagret)
 Juicy Gaggle × 3
 Lesser Mock Bottom × 1 (underneath a Flukeweed)
 Portable Sunset × 1
 Searing Acidshock × 1 (underneath a Flukeweed)
 Seed Hive × 1 (inside of the Scornet Maestro)
 Tremendous Sniffer × 1 (behind a reinforced wall)
Enemies[edit]
 Arachnode × 5
 Burrowing Snagret × 1 – Mini-boss
 Desiccated Skitter Leaf × 4
 Dwarf Orange Bulborb × 10 (8 underneath a clipboard, and 2 east of the landing site)
 Female Sheargrub × 3 (underneath a Flukeweed)
 Flighty Joustmite × 1
 Iridescent Flint Beetle × 1
 Male Sheargrub × 3 (underneath a Flukeweed)
 Nectarous Dandelfly × 1
 Orange Bulborb × 3
 Puffy Blowhog × 1
 Scornet × 30 (in the lone swarm near the clipboard section; there is an endless amount in the boss battle)
 Scornet Maestro × 1 – Boss
 Skeeterskate × 1
 Toady Bloyster × 1
 Water Dumple × 5 (3 in the cave, 2 in the river)
 Yellow Wollyhop × 2 (1 in water)
Obstacles[edit]
 Large crystal × 3
 Paper bag × 2
 Electric gate × 2
 Bamboo gate × 1
 Arachnode web × 5
 Dirt wall × 2
Tools[edit]
Vegetation and mycobiota[edit]
 Bloominous Stemple × 2
 Bouncy Mushroom × 1
 Burgeoning Spiderwort × 2
 Common Glowcap (blue) × 15
 Flukeweed × 16 (3 on the dam)
 Lily pad × 9 (plus infinite stream of flowing lily pads)
 Pellet Posy × 17
 Shoot (Arachnode-brown) × 10 (2 never return after saving the Winged Onion)
- Shoot (brown) × 12
 Spotcap × 14
Other[edit]
Data files[edit]
- Main article: Data file.
- Pikmin Behavior / Pikminology
- Controls
- None
- Indigenous Life
- Scornet
- Scornet Maestro
- Dwarf Bulborb; Pikmin 3 only
- Desiccated Skitter Leaf; Pikmin 3 only
- Toady Bloyster
- Arachnode
- Burrowing Snagret
- Area Hints
- Olimar's Log
- Journal Entry #6 / Olimar's diary #6; Pikmin 3 only
- Secret File
- Olimar's Log Vol. 2
Hidden murals[edit]
- Main article: Hidden mural.
|
Warning: the following text contains major spoilers about the hidden murals in the area.
|
|---|
|
In addition to the three main Pikmin murals, there is also some carving on the base of the light-bulb in this area's cave.
|


Quotes[edit]
|
This section is a stub. You can help Pikipedia by expanding it. |
Changes in Pikmin 3 Deluxe[edit]
Like most areas, Twilight River has received some notable changes in Pikmin 3 Deluxe:
- Leaves are removed from the tops of rocks at the landing site.
- There are more leaves on the elevated path east of the landing site.
- There are more leaves around the ramp west of the landing site.
- There is more grass in the area with the Puffy Blowhog northwest of the landing site.
- There is more grass in the corridor north of the landing site across the river.
- There is less grass in the alcove with the fragment pile northeast of the landing site across the river.
- There are more leaves in the area south of the landing site where the Winged Onion is found, and some of these leaves are 3-dimensional.
- A leaf is removed from the top of a rock near the Dusk Pustules.
- The grass is more vivid on the plateau with the crystal.
- There is an added screw in the ground on the high ledge near the Yellow Wollywogs northeast of the landing site.
- Some data files have been added, removed, or moved elsewhere.
Guide[edit]
|
The following article or section contains guides. |
Basic guide[edit]
The story section in the Twilight River is the longest of all the story sections in the game, so make sure you have enough juice for several days before starting. Upon first landing in the area, take Pikmin out of the Onion and walk up the hill to the east to see the Winged Onion on the other side of the river. Rescuing this Onion is the first task of the area, but to do that, a light blue bridge must be built first. Walk downhill past the Dwarf Orange Bulborbs and take a ride on the lily pad. Get off on the other side of the river, and destroy the nearby crystal to release a pile of 20 bridge fragments. To the right is an electric gate; destroying that will open an area with 2 Yellow Wollywogs (which should be defeated first), a pile of 30 bridge fragments, and a Burgeoning Spiderwort. It is recommended to start harvesting ultra-spicy spray from this plant. Heading in the other direction from the original pile of fragments, you will arrive at a room with a Puffy Blowhog. Defeat it and turn right into a cave. Light up the room by throwing 20 Yellow Pikmin at the electrode, then cross the Bloominous Stemples to carry a set of 30 bridge fragments. Once all the fragments have been collected, return to the base, make sure there are less Pikmin on the field than the limit, and cross the light blue bridge.
On the other side of the river, you will find the Winged Onion trapped in the web of an Arachnode. Throw some Rock Pikmin to rescue it, and pluck the Winged Pikmin the new Onion sends out. Begin to harvest Winged Pikmin from the nearby pellets and enemies, some of which are under Flukeweeds. Once you have a substantial amount, throw 10 Winged Pikmin at the dam next to the Winged Onion site. This will lift up the dam, allowing lily pads to flow down the second river in the area. Ride the river downstream to enter the second half of the area.
In this half, the overall goal is to build a red bridge to access the boss of the area. There are 3 piles of fragments, and Winged Pikmin are necessary to access each one. To access the first pile, ride downstream to the third stop in the second part of the area. There will be a group of Scornets. Defeat them and take Winged Pikmin across the small body of water behind them to carry a pile of 24 fragments. To access the second pile, destroy the dirt wall next to where the Scornets were, to access a room with 2 clipboards. Ignore the first one, since it contains a group of Dwarf Orange Bulborbs, but lift the second one, as it contains a pile of 15 fragments. Make sure to defeat the nearby Arachnode to avoid Winged Pikmin getting blocked along the way. To access the third pile, get back on a lily pad, and ride until a Bouncy Mushroom is within reach of the cursor. Quickly throw a leader, a group of Winged Pikmin, and preferably some Rock Pikmin onto it; they will bounce onto the land above. Switch to this leader, defeat the Arachnode, and send the Winged Pikmin onto the last pile of 18 fragments behind the web.
Walk to the newly completed red bridge, destroying the walls along the way. Walk up the tree stump to find the boss of the area, the Scornet Maestro. See here for strategies on how to defeat it. The boss will drop a Hocotatian upon defeat, and carrying it to the S.S. Drake will unlock the next part of the story. It is recommended to push down the paper bags at the 2 exits of the second part of the area to allow easy access to it in the future.
Speed completion[edit]
The Twilight River's story section is the hardest section to complete in 1 day, but it can be done. It is important to not waste any time. Start by getting at least 30 Yellow Pikmin and a good number of Rock Pikmin and Red Pikmin, but not more than 70 Pikmin in total. Go straight to the north bank of the river, and start destroying the electric gate, making sure to keep at least 20 Yellow Pikmin with you. Destroy the crystal and put 20 (non-Yellow) Pikmin on the fragments inside it, then leave a leader there and walk onwards. Defeat the Puffy Blowhog with Rock Pikmin, enter the cave, activate the electrode, and start carrying the pile of fragments inside the cave. Walk outside, collect the bomb rocks with Yellow Pikmin, and defeat the Flighty Joustmite and destroy the reinforced wall near the landing site. The electric gate should be done by now, so switch to the leader near it, call the Pikmin who were on it and those who were carrying the fragments inside the crystal, and get them to carry the last pile of fragments. At this point, get a leader to head towards the cyan bridge with a few Rock Pikmin. Meanwhile, send another leader to the locations of fragment piles to collect the Pikmin who have finished carrying them. As soon as the bridge is done, cross it and save the Winged Onion. Start growing Winged Pikmin as fast as you can; the enemies nearby are an efficient source of Pikmin sprouts. Lift the dam as soon as you can, and once you have at least 30 Winged Pikmin, hop onto a lily pad. Switch to the leader collecting the other groups of Pikmin, and head to the lily pad station downstream to get on the same lily pad or one just before or afterwards.
In the second half of the area, defeat the Arachnode next to where you start, and then get the non-Winged Pikmin to start destroying the dirt wall. Meanwhile, send a leader with the Winged Pikmin through the river to the area with all the Scornets. Defeat them with Winged Pikmin, and meanwhile get another leader to go to the same location via the natural bridge and the lily pads. When the Scornets are defeated, start carrying the red fragments on the other side of the small body of water with at least 12 Winged Pikmin. With the non-Winged Pikmin, start destroying the dirt wall next to where the Scornets were. Take the remaining Winged Pikmin and go to the circular island with fragments on top. Charge Winged Pikmin onto the fragments, skipping the puzzle. (This may take a few charges to work.) When the wall is destroyed, take at least 8 Winged Pikmin you have access to and lift the clipboard with the last pile of fragments. They can be carried with any type, so you can use the Winged Pikmin for something else. When all 3 piles are being carried, head straight to the base of the red bridge with whatever Pikmin you can get there with. It doesn't matter if this isn't all your Pikmin, since you can get another leader to collect them and send them to the boss with Go Here!. When the bridge is done, walk up to the Scornet Maestro arena and start the boss fight. Defeat the boss using a quick method, such as the one at Scornet Maestro#Strategy. When it's defeated, immediately throw flowered Pikmin onto the Hocotatian to carry him back to the S.S. Drake. If you've been efficient enough, he should make it back by the end of the day.
In other game modes[edit]
These Mission Mode and Side Story stages take place within the Twilight River:
- Mission Mode
- Side Stories
Gallery[edit]
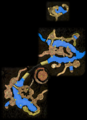
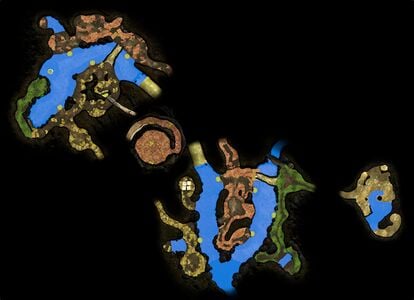
The radar map of the Twilight River in Pikmin 3.
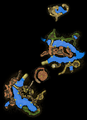
The radar map of the Twilight River in Pikmin 3 Deluxe.
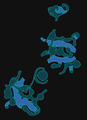
The mini radar map of the Twilight River in Pikmin 3 Deluxe.
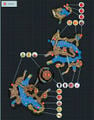
An annotated map from the Prima guide.

A view of the Twilight River from space.
Looking out from the hill near the landing site.
Walking up the path near the Scornet Maestro arena.
Lifting up a bamboo gate.


- See more: Twilight River images category.
Trivia[edit]
- This location's continental shape is based on South America.
- The tunnel which the lily pads pass through to get to the second area resembles a Warp Pipe from Super Mario Bros.
Names in other languages[edit]
| Language | Name | Meaning |
|---|---|---|
| 交わりの渓流? Majiwari no Keiryū |
Mountain Stream of Fellowship | |
(traditional) |
交匯溪流 Jiāohuì xīliú |
Confluence Stream |
(simplified) |
交汇溪流 Jiāohuì xīliú |
Confluence Stream |
| Rivière du destin | River of destiny | |
| Fluss der Veränderung | River of Change | |
| Fiume tramonto | Sunset river | |
| 교차하는 시냇물 gyochahaneun sinaesmul |
Crisscrossing Stream | |
| Río Azaroso | Venturesome River |
See also[edit]
| Pikmin 3 areas |
|---|
 Click an area on the image Tropical Wilds • Garden of Hope • Distant Tundra • Twilight River • Formidable Oak |