Twisted Cavern: Difference between revisions
(added the category "Naming" and the sub-category "Names in other languages", where I added the german and spanish Name and Translation) |
m (Replaced P2 Marble icons with P3 equivalents.) |
||
| (9 intermediate revisions by 5 users not shown) | |||
| Line 4: | Line 4: | ||
==Layouts== | ==Layouts== | ||
The variation unlock order, as explained [[Bingo Battle#Maps|here]], is B, A, C. | |||
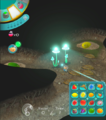
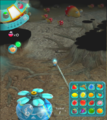
===Layout A=== | ===Layout A=== | ||
[[File:Map 07 twisted cavern a.jpg|thumb|400px|Layout A.]] | [[File:Map 07 twisted cavern a.jpg|thumb|400px|Layout A.]] | ||
This layout gives players [[Red Pikmin]] to start with, and [[Rock Pikmin]] can be found. | |||
'''Enemies''': | |||
{{columns|2| | {{columns|2| | ||
*{{icon|Bulborb|y|v=P3}} × 2 | |||
*{{icon|Calcified Crushblat|y}} × 1 | *{{icon|Calcified Crushblat|y}} × 1 | ||
*{{icon|Dwarf | *{{icon|Dwarf Bulborb|y|v=P3}} × 4 | ||
*{{icon|Female Sheargrub|y|v=P3}} × 8 | *{{icon|Female Sheargrub|y|v=P3}} × 8 | ||
*{{icon|Male Sheargrub|y|v=P3}} × 6 | *{{icon|Male Sheargrub|y|v=P3}} × 6 | ||
*{{icon|Skutterchuck|y}} × 4 | *{{icon|Skutterchuck|y}} × 4 | ||
}} | }} | ||
'''Fruits''': | |||
{{columns|2| | {{columns|2| | ||
*{{icon|Citrus Lump|y|v=FF}} × 1 | *{{icon|Citrus Lump|y|v=FF}} × 1 | ||
| Line 29: | Line 31: | ||
*{{icon|Zest Bomb|y}} ×1 | *{{icon|Zest Bomb|y}} ×1 | ||
}} | }} | ||
*{{icon| | '''Marbles''': | ||
*{{icon| | *{{icon|Blue Marble|v=P3}} [[Crystallized Clairvoyance|Blue Marble]] × 1 | ||
*{{icon| | *{{icon|Red Marble|v=P3}} [[Crystallized Telepathy|Red Marble]] × 1 | ||
*{{icon|Yellow Marble|v=P3}} [[Crystallized Telekinesis|Yellow Marble]] × 2 | |||
'''Obstacles''': | |||
*{{icon|Crystal wall|y}} × 2 | |||
*{{icon|Crystal nodule|y}} × 10 | *{{icon|Crystal nodule|y}} × 10 | ||
*{{icon|Large crystal|y}} × 2 | *{{icon|Large crystal|y}} × 2 | ||
{{ | '''Plants and fungi''': | ||
*{{icon|Pellet Posy|v=P3}} [[Pellet Posy|1-Pellet Posy]] × 16 | |||
'''Other objects''': | |||
*{{icon|Egg|v=P3|y}} × 4 | |||
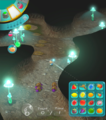
===Layout B=== | ===Layout B=== | ||
[[File:Map 08 twisted cavern b.jpg|thumb|400px|Layout B.]] | [[File:Map 08 twisted cavern b.jpg|thumb|400px|Layout B.]] | ||
This layout gives players Red Pikmin to start with, and no other Pikmin can be found. | |||
'''Enemies''': | |||
{{columns|2| | {{columns|2| | ||
*{{icon|Bulborb|y|v=P3}} × 3 | |||
*{{icon|Desiccated Skitter Leaf|y}} × 5 | *{{icon|Desiccated Skitter Leaf|y}} × 5 | ||
*{{icon|Dwarf | *{{icon|Dwarf Bulborb|y|v=P3}} × 8 | ||
*{{icon|Female Sheargrub|y|v=P3}} × 6 | *{{icon|Female Sheargrub|y|v=P3}} × 6 | ||
*{{icon|Male Sheargrub|y|v=P3}} × 8 | *{{icon|Male Sheargrub|y|v=P3}} × 8 | ||
}} | }} | ||
'''Fruits''': | |||
{{columns|2| | {{columns|2| | ||
*{{icon|Citrus Lump|y|v=FF}} × 1 | *{{icon|Citrus Lump|y|v=FF}} × 1 | ||
| Line 65: | Line 73: | ||
*{{icon|Zest Bomb|y}} ×1 | *{{icon|Zest Bomb|y}} ×1 | ||
}} | }} | ||
{{ | '''Marbles''': | ||
*{{icon|Blue Marble|v=P3}} [[Crystallized Clairvoyance|Blue Marble]] × 1 | |||
*{{icon|Red Marble|v=P3}} [[Crystallized Telepathy|Red Marble]] × 1 | |||
*{{icon|Yellow Marble|v=P3}} [[Crystallized Telekinesis|Yellow Marble]] × 1 | |||
'''Plants and fungi''': | |||
*{{icon|Pellet Posy|v=P3}} [[Pellet Posy|1-Pellet Posy]] × 14 | |||
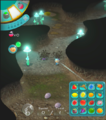
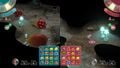
===Layout C=== | ===Layout C=== | ||
[[File:Map 09 twisted cavern c.jpg|thumb|400px|Layout C.]] | [[File:Map 09 twisted cavern c.jpg|thumb|400px|Layout C.]] | ||
This layout gives players Red Pikmin to start with, and [[White Pikmin]] can be found. | |||
'''Enemies''': | |||
{{columns|2| | {{columns|2| | ||
*{{icon|Bug-Eyed Crawmad|y}} × 1 | *{{icon|Bug-Eyed Crawmad|y}} × 1 | ||
*{{icon|Bulborb|y|v=P3}} × 1 | |||
*{{icon|Desiccated Skitter Leaf|y}} × 2 | *{{icon|Desiccated Skitter Leaf|y}} × 2 | ||
*{{icon|Dwarf Orange Bulborb|y|v=P3}} × 2 | *{{icon|Dwarf Orange Bulborb|y|v=P3}} × 2 | ||
*{{icon|Dwarf | *{{icon|Dwarf Bulborb|y|v=P3}} × 2 | ||
*{{icon|Male Sheargrub|y|v=P3}} × 8 | *{{icon|Male Sheargrub|y|v=P3}} × 8 | ||
*{{icon|Orange Bulborb|y|v=P3}} × 2 | *{{icon|Orange Bulborb|y|v=P3}} × 2 | ||
}} | }} | ||
'''Fruits''': | |||
{{columns|2| | {{columns|2| | ||
*{{icon|Citrus Lump|y|v=FF}} × 1 | *{{icon|Citrus Lump|y|v=FF}} × 1 | ||
| Line 95: | Line 107: | ||
*{{icon|Velvety Dreamdrop|y}} × 1 | *{{icon|Velvety Dreamdrop|y}} × 1 | ||
}} | }} | ||
{{ | '''Marbles''': | ||
{{columns|2| | |||
*{{icon|Blue Marble|v=P3}} [[Crystallized Clairvoyance|Blue Marble]] × 1 | |||
*{{icon|Red Marble|v=P3}} [[Crystallized Telepathy|Red Marble]] × 1 | |||
*{{icon|Yellow Marble|v=P3}} [[Crystallized Telekinesis|Yellow Marble]] × 2 | |||
*{{icon|Lucky Marble|y}} × 1 | |||
}} | |||
'''Tools''': | |||
*{{icon|Mine|y}} × 6 | |||
'''Plants and fungi''': | |||
*{{icon|Pellet Posy|v=P3}} [[Pellet Posy|1-Pellet Posy]] × 12 | |||
'''Other objects''': | |||
*{{icon|Egg|v=P3|y}} × 2 | |||
==Naming== | ==Naming== | ||
===Names in other languages=== | ===Names in other languages=== | ||
{{foreignname | {{foreignname | ||
| Line 112: | Line 132: | ||
|Spa=Refugio Subterráneo | |Spa=Refugio Subterráneo | ||
|SpaM=Dugout | |SpaM=Dugout | ||
|Fra=Terrier tellurique | |||
|FraM=Telluric Burrow | |||
|Ita=Covo sotterraneo | |||
|ItaM=Underground Lair | |||
}} | }} | ||
| Line 117: | Line 141: | ||
<gallery> | <gallery> | ||
Twisted Cavern radar.png|Texture used on the [[radar]]. | Twisted Cavern radar.png|Texture used on the [[radar]]. | ||
P3 Twisted Cavern 1.png|Player 1's Onion. | |||
P3 Twisted Cavern 2.png|[[Pellet Posy|Pellet Posies]] near the cyan Onion. | |||
P3 Twisted Cavern 3.png|Different angle of the previous image. | |||
P3 Twisted Cavern 4.png|One of the tunnels. | |||
P3 Twisted Cavern 5.png|The entrance to the main room. | |||
P3 Twisted Cavern 6.png|Different angle of the previous images. | |||
P3 Twisted Cavern 7.png|Different angle of the previous images. | |||
P3 Twisted Cavern 8.png|One of the alcoves. | |||
P3 Twisted Cavern 9.png|Player 2's Onion. | |||
P3 Twisted Cavern 10.png|A small alcove. | |||
P3 Twisted Cavern 11.png|Pellet Posies. | |||
Twisted Cavern P3 Bulborbs.png|Bulborbs. | Twisted Cavern P3 Bulborbs.png|Bulborbs. | ||
P3 Twisted Cavern 12.png|Path away from the Bulborbs. | |||
P3 Twisted Cavern 13.png|The cyan Onion. | |||
Twisted Cavern gameplay.jpg|Gameplay screenshot. | Twisted Cavern gameplay.jpg|Gameplay screenshot. | ||
</gallery> | </gallery> | ||
==See also== | |||
* [[Buried Pond]] | |||
{{BB}} | {{BB}} | ||
Latest revision as of 20:34, March 12, 2024

Twisted Cavern is the third stage of Bingo Battle in Pikmin 3. This stage consists of three rooms joined by corridors, and takes place in a cave. It is possible to get Red Pikmin, Rock Pikmin, and White Pikmin in this stage. As such, this, Corroded Maze, and Jigsaw Colosseum are the only stages where it is possible to see an Onion eject White Pikmin seeds (with the use of the +5 Rare Pikmin item).
Layouts[edit]
The variation unlock order, as explained here, is B, A, C.
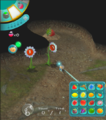
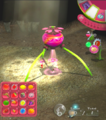
Layout A[edit]

This layout gives players Red Pikmin to start with, and Rock Pikmin can be found.
Enemies:
 Bulborb × 2
 Calcified Crushblat × 1
 Dwarf Bulborb × 4
 Female Sheargrub × 8
 Male Sheargrub × 6
 Skutterchuck × 4
Fruits:
 Citrus Lump × 1
 Dapper Blob × 1
 Face Wrinkler × 1
 Golden Sunseed × 1
 Sunseed Berry × 1
 Velvety Dreamdrop × 1
 Zest Bomb ×1
Marbles:
 Blue Marble × 1
 Red Marble × 1
 Yellow Marble × 2
Obstacles:
 Crystal wall × 2
 Crystal nodule × 10
 Large crystal × 2
Plants and fungi:
 1-Pellet Posy × 16
Other objects:
 Egg × 4
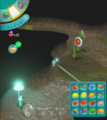
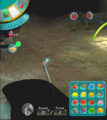
Layout B[edit]

This layout gives players Red Pikmin to start with, and no other Pikmin can be found.
Enemies:
- Bulborb × 3
 Desiccated Skitter Leaf × 5
- Dwarf Bulborb × 8
- Female Sheargrub × 6
- Male Sheargrub × 8
Fruits:
- Citrus Lump × 1
- Dapper Blob × 1
- Face Wrinkler × 1
 Heroine's Tear × 1
 Insect Condo × 1
- Sunseed Berry × 1
- Velvety Dreamdrop × 1
- Zest Bomb ×1
Marbles:
- Blue Marble × 1
- Red Marble × 1
- Yellow Marble × 1
Plants and fungi:
- 1-Pellet Posy × 14
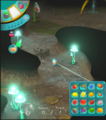
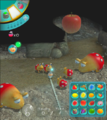
Layout C[edit]

This layout gives players Red Pikmin to start with, and White Pikmin can be found.
Enemies:
 Bug-Eyed Crawmad × 1
- Bulborb × 1
- Desiccated Skitter Leaf × 2
 Dwarf Orange Bulborb × 2
- Dwarf Bulborb × 2
- Male Sheargrub × 8
 Orange Bulborb × 2
Fruits:
- Citrus Lump × 1
- Dapper Blob × 1
- Golden Sunseed × 1
- Insect Condo × 1
- Sunseed Berry × 1
- Velvety Dreamdrop × 1
Marbles:
- Blue Marble × 1
- Red Marble × 1
- Yellow Marble × 2
 Lucky Marble × 1
Tools:
 Mine × 6
Plants and fungi:
- 1-Pellet Posy × 12
Other objects:
- Egg × 2
Naming[edit]
Names in other languages[edit]
| Language | Name | Meaning |
|---|---|---|
| Terrier tellurique | Telluric Burrow | |
| Untergrundbasis | Underground Base | |
| Covo sotterraneo | Underground Lair | |
| Refugio Subterráneo | Dugout |
Gallery[edit]
Texture used on the radar.

Player 1's Onion.
Pellet Posies near the cyan Onion.
Different angle of the previous image.
One of the tunnels.
The entrance to the main room.
Different angle of the previous images.
Different angle of the previous images.
One of the alcoves.
Player 2's Onion.

A small alcove.
Pellet Posies.
Bulborbs.
Path away from the Bulborbs.
The cyan Onion.
Gameplay screenshot.


