Bingo Battle

Bingo Battle (ビンゴバトル?, lit.: "Bingo Battle") is a 2-player competitive game mode in Pikmin 3. The mode involves each player attempting to fill a bingo card before their opponent by carrying various fruits, enemies, and marbles to the Onion. Player 1 controls a cyan team of Koppaites on the left side of the screen, while player 2 controls a pink team of Hocotatians on the right side.
Players can take control of Pikmin of any type (up to two types), but only within their team. The only way to distinguish which Pikmin belong to which team is with the top of their stems: their leaf, bud or flower will be cyan when they belong to player 1's team, and pink for player 2's. Players start with a certain type of Pikmin – the same for both teams, but it is possible to find more Pikmin of their team buried in the wild. Plucking them increases the actual Pikmin count for the team, meaning that if the Pikmin are not plucked, they count as not belonging to the player in the first place.
Each player has an Onion, and near it, some Pellet Posies. Onions work as they do in Story Mode, but there is a Pikmin limit of 50 per player. Seeing as leaders cannot access the Onion menu, the Onion is in charge of automatically spitting out Pikmin seeds whenever there is space for them in the field. Pikmin that die to opposing Pikmin attacks simply respawn at the Onion, after a short delay.
There are some special collectibles scattered around the stage, which have different effects when recovered. Each player's leaders and Pikmin can engage with each other in combat as elaborated below. In Pikmin 3 Deluxe players can also press a button to make the camera face north and, for a few seconds, display a blinking arrow that points to their team's Onion.
The setup menu allows choosing between a number of different options.
Stages[edit]
There are 12 stages to choose from in Bingo Battle. There are 6 themes (garden, construction site, cavern, sandbox, metal, and toy), and there are two stages for each theme. Three of the themes (cavern, metal, and toy) are similar to cave themes seen in Pikmin 2.
Each stage has three layouts. Each layout has two sides, and each side has positions for its Onion, leaders, Pikmin, etc. At the start of a battle, one of the stage's available layouts is randomly picked, and each player is randomly assigned one of the sides. Player 1 will always appear on the left half of the screen, so the stage will always be rotated such that player 1 is on the western side. In Pikmin 3 Deluxe, players can use the pause menu to restart the battle – this will use the same stage layout, but it will reshuffle the player sides, and will generate new bingo cards.
At the start of the saved game, players only have the first stage available, but each time a battle is finished in the newest available stage, the next one in the list is unlocked. Likewise, each stage only has one layout available when played for the first time, and every time a battle is finished, another layout is unlocked on that stage, up to three layouts total. The order in which layouts are unlocked depends on the stage, and is explained in the "Layouts" section of each stage's article.
Ways to win[edit]
There are four ways to score a victory over the opponent:
- Scoring a bingo. By completing a row, column, or diagonal line of four items on their bingo card, the player immediately wins.
- Stealing the Victory Macaroon. By enabling the Victory Macaroon mode, players can steal this object from their opponent's base and deliver it to their Onion to win.
- The opponent suffers a Pikmin extinction. Note that this cannot happen with an inter-Pikmin battle, since Pikmin that die to opposing Pikmin simply respawn at the Onion; even if the Pikmin counter on the HUD displays 0, the game knows that a Pikmin will soon reappear and the battle keeps going.
- An opponent's leader is down. If a leader loses all of their health, the other player's team wins, even if there is another living leader on the team.
Even if there are not enough remaining items for one player to score a bingo, the match continues, as powerups could theoretically still allow for them to win.
Options[edit]
Before starting, players must choose their control method. Players can choose any of the control schemes they could in Story Mode. It is possible to re-establish the control types for each player by choosing the icon on the lower-right corner of the screen, but it is not possible to change controls mid-battle – the exception to this is toggling Stylus mode on the GamePad via the pause menu.
Before the battle starts, players can also set the following match options:
- Victory Macaroon: Setting this to on will enable the Victory Macaroons. The default value is off.
- Battle Type: Allows players to choose the number of starting leaders: one or two. The default value is 1 vs 1. Every time this option is set to on, the secondary leader on player 1's team toggles between Brittany and Charlie.
- Number of Pikmin: Allows players to choose the starting number of Pikmin (excluding those buried), for each team individually, in increments of five. If the chosen number of starting Pikmin plus the number of Pikmin buried in the wild exceeds 50, the number of starting Pikmin will be decreased accordingly. The option to start with 1 Pikmin is also available. The maximum amount is 50, and the default value is 5 for each team.
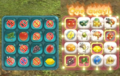
Bingo card[edit]

Each player starts with a 4 × 4 bingo card, that is randomly generated when the match starts. The card is filled with items that can be recovered in the current stage – fruits, enemies and marbles. Every time an item is recovered, that square becomes highlighted. By highlighting four squares in the same row, column, or diagonal line, the player wins.
Any item that is held inside an enemy appears on the bingo card as a question mark, and is only truly revealed once the unknown enemy that held it is defeated. If an item is no longer available on the stage for a player to take to their Onion, a no symbol appears on top of it.
Oftentimes, multiple instances of the same item will appear on a stage. Generally in this situation, the bingo card will display only one corresponding item square, and count any instance of the item being recovered for the singular square. On other occasions, however, the bingo card will display multiple of the same item; randomly deciding which is selected upon recovery of one of its instances. This is most noticeable in stage layouts containing large amounts of marbles. This results in a situation where a bingo card may display more items available than are actually present on the stage; since both squares are technically still obtainable, as they are chosen at random, but both cannot be obtained at the same time through traditional means.
When a line is one item away from a bingo, a dotted line appears across it on the HUD. This can happen for more than one line at once, and will still happen even if the last square in the set is marked as being no longer present on the stage.
Collectibles[edit]
Certain special collectibles appear on the stage.
Victory Macaroon[edit]
The Victory Macaroon is a macaron (a sweet that sometimes goes by the name "macaroon") with a team-colored flag on top. Each one starts near its team's Onion, and is available for capture by the enemy's Pikmin. If the opponent delivers the macaroon to their own Onion, they are declared the victor. A player's Pikmin can carry their own macaroon back to their base, but because it cannot be delivered to the Onion, the Pikmin carrying it behave oddly – they alternate between celebrating a successful delivery and re-grabbing it, until they eventually settle down and leave the macaroon alone. The Victory Macaroons will only appear if the corresponding option is enabled. It weighs 1 unit, and has a maximum of 8 carrier Pikmin.
Cupid's Grenade[edit]
- See more: Cupid's Grenade.
Cupid's Grenades randomly spawn about the stage, and delivering one to an Onion grants the player an item spin on their roulette wheel. More than one spin can be queued, and the number of spins available is presented on the HUD. Up to five spins may be in queue, and after an item is used, the next spin in the queue instantly takes place. Cupid's Grenades stop spawning after Lucky Marbles begin doing so. Each weighs 1 unit, has a maximum of 2 carrier Pikmin, and is carried at a faster speed than normal.
Golden Grenade[edit]
- See more: Golden Grenade.
Golden Grenades resemble Cupid's Grenades, but are completely golden. When one is delivered to an Onion, the corresponding player's roulette wheel spin queue is filled. As such, it is more efficient to first use the spins in queue before recovering a Golden Grenade. Each weighs 1 unit, has a maximum of 2 carrier Pikmin, but unlike Cupid's Grenades which are carried very quickly, these are transported at a normal pace. They tend to appear next to the Onion of the player that is behind, when the other player is one-away from victory.
Lucky Marble[edit]

A Lucky Marble is a golden marble that resembles the helmet and head of the President of Hocotate Freight. Upon being delivered, it fills up a random unfilled space on the player's bingo card. Undiscovered objects, which are shown by the '?' on the bingo card, will never be filled by a Lucky Marble. If the player is one away before this happens, the screen will spread over to show that player's screen more, since there is a possibility that the Lucky Marble can fill the last slot needed. The marble weighs 1 unit and has a maximum of 8 carrier Pikmin.

Lucky Marbles can be found in three ways:
- After any match has gone on for eight minutes, the message "Give it a spin!" appears and Lucky Marbles start randomly spawning. At this point, Cupid's Grenades stop spawning, and the music changes to a calmer mood.
- The Lucky Marble item will give the player the exact same effects as if they had successfully collected a Lucky Marble.
- Lucky Marbles are also naturally present in some stages, usually in hard-to-reach places such as behind walls or on a high ledge:
- Twisted Cavern, layout C: In the room with the Bug-Eyed Crawmad, in an alcove guarded by an Orange Bulborb.
- Rusted Labyrinth, layout C: Center stage, on the side of the brick walls opposite to the iron ball.
- Jigsaw Fortress, layout A: One can be found very high atop a building made of blocks. This building is at floor level, and is the one closest to the baskets in the background. A second can be found on the bottom level of the fortress, on a room pointing towards the grounded player's Onion, guarded by an Orange Bulborb.
- Buried Pond, layout A: Under a flukeweed in the central island.
- Sandbox Kingdom, layout A: Buried at the center of the stage.
- Corroded Maze, layout C: Two are buried at the center of the stage.
- Jigsaw Colosseum, layout C: One can be found just south of the player 1's base, beyond an electric gate, and another can be found just north of the player 2's base, also beyond an electric gate.
Items[edit]
- "Lightning" redirects here. For the item in Pikmin 4, see Lightning Shock.
- "Warp" redirects here. For the item in Pikmin 4, see Dandori Battle#Mystery Capsules.

A player can get items by carrying cherries back to their Onion. If a Golden Grenade is obtained, the player gets five items instead. Recovering a cherry will make the item roulette spin, and when it's done, it'll randomly land on an item. Players can then use that item at any moment by pressing ![]() /
/ ![]() /
/ ![]() , tapping the item icon if on Stylus mode, or holding
, tapping the item icon if on Stylus mode, or holding ![]() /
/ ![]() and choosing the rightmost option. If more cherries are collected before the player uses the current item, they'll be added to a queue, for a maximum of 5 items waiting to be used. Pressing the item button in these cases will use the current item and instantly make the roulette spin for the next one.
and choosing the rightmost option. If more cherries are collected before the player uses the current item, they'll be added to a queue, for a maximum of 5 items waiting to be used. Pressing the item button in these cases will use the current item and instantly make the roulette spin for the next one.
Underneath the roulette are five cherry silhouette icons, each becoming filled by a cherry to represent an item in the queue; the current item also has a cherry icon. Each spin takes around three seconds, which stops the player from using an item right after another. Although it's identified as and looks like a roulette wheel, its spinning behavior more closely resembles a slot machine's reel.
Players have access to 12 different items that benefit them, disadvantage their opponent, or both. The following is a list of all items, sorted and named by the Pikmin 3 electronic manual:
| Icon | Name | Description |
|---|---|---|
| +10 Pikmin | Makes the user's Onion generate ten of the player's starting Pikmin. | |
| +5 Rare Pikmin | Makes the user's Onion generate five of the type of Pikmin the player did not start with. On stage layouts that only have one Pikmin type, this item still appears in the roulette, but can never be landed on. | |
| Lightning | Strikes opponent leaders and their nearby non-Yellow Pikmin with an immobilizing current of lightning. Like all electric hazards in this game, it simply immobilizes them, and proves no direct harm to the Pikmin. Only Pikmin that are currently on-screen will be affected. | |
| Lucky Marble | Acts the exact same as if collecting a Lucky Marble. | |
| Rock Storm | Causes five large boulders to fall near where the opponent's leader is standing, killing any non-Rock Pikmin and non-Winged Pikmin. It's harder to dodge these boulders than their Pikmin 2 counterparts. A leader can escape intact if they are always moving throughout the storm. If the player knows that the strike is incoming, they can dismiss their Pikmin to minimize the death toll. These boulders can also harm enemies, leaders and Pikmin from the team that spawned them, and Pikmin that are shocked on the floor. | |
| Ultra-Spicy Spray | Acts the exact same as if using an ultra-spicy spray. | |
| Enemy Annihilator | Kills all on-screen enemies. Mini-boss enemies will not be hurt. | |
| Bomb | Causes a bomb rock to spawn in front of the player's leader. | |
| Shuffle | Scrambles the opponent's bingo card. Although rare, it's possible that the items will be shuffled in a way that triggers a victory for the opponent. | |
| Mine | Spawns a mine in front of the active leader. Pikmin can carry these, just like bomb rocks. When the Pikmin is thrown, the mine sticks to wherever the Pikmin hits, and will only detonate when a leader walks by. | |
| Warp | Teleports the opponent to a random area on the map, along with any Pikmin under their control. It is possible for Warp to send the opponent to an otherwise inaccessible place, such as the high buckets in Shaded Terrace that only Yellow Pikmin can reach. | |
| Macaroon Recovery | Transports the player's macaroon back to their Onion, even if it is already nearby. This item is only present in the roulette wheel when playing with the "Victory Macaroon" option on. |
Strategies[edit]
|
The following article or section contains guides. |
Bingo Battle is highly random in nature, with elements like the stage layouts, bingo boards, the item roulette, and enemy behavior being unpredictable but nonetheless vital to victory. Strong planning, adaptability, and general game skill are all necessary to consistently win in Bingo Battle.
General Pikmin competitive strategies[edit]
Per-stage knowledge[edit]
For specific strategies to employ in the different arenas, check the "Strategies" section of each stage's article.
Radar-checking opportunities[edit]
At the start of a game, you should compare your bingo card to the stage's map in order to figure out the most efficient way to land a bingo. In Pikmin 3, this can be easily done while gaining Pikmin in the starting area due to the game screen and the Wii U GamePad displaying independently. In Pikmin 3 Deluxe however, the only way to check the stage map is to pull the radar up on your own side of the screen. This not only prevents you from taking action for as long as the radar is displaying, but it also allows your opponent to see the map just fine on your side of the screen without any impairment to their gameplay. The best times to check the radar are when your leader is busy plucking, or when you find a quiet moment while Pikmin are carrying things to the base.
Pikmin behavior with carriable objects[edit]
Understanding Pikmin behavior is absolutely vital for winning items back from your opponent's Pikmin. It is important to note that Pikmin will almost always prefer fighting opponent Pikmin over picking up objects, and as a result simply throwing Pikmin at a target object in the middle of a brawl will not result in any Pikmin attempting to grab it. However, Pikmin commanded to charge will ignore all opponent Pikmin, meaning that they will not replace enemy Pikmin currently carrying an object and will instead join them and try to overpower them. A combined strategy is necessary to obtain objects currently being transported by the opponent; throwing Pikmin to dislodge opposing Pikmin from the item, and then charging to focus your army onto the object.
If your macaroon is being taken, do not charge at it from behind. The Pikmin will not reach it fast enough, and will give up chasing it. Instead try throwing from behind.
Strategically killing off Pikmin[edit]
In rare situations, the lack of direct access to an Onion interface can make it advantageous to intentionally kill off your own Pikmin to make room for a more desirable type. This strategy is incredibly risky and largely inadvisable, but still has its place, particularly in Buried Pond, where obtaining Blue Pikmin or Winged Pikmin and then drowning off all remaining Red Pikmin affords the player exceptional maneuverability.
Using items[edit]

Offensive strategies on the best times and scenarios in which to use items.
- Lightning: Use the lightning when the opponent's leader has a large group of Pikmin with them. It is best used when the leader is busy fighting an enemy, as it renders their leader and Pikmin briefly immobile. Lightning will also set off any explosives that the enemy's Pikmin are holding, although a quirk of Pikmin 3's programming means that electrocuted Pikmin are immune to explosions so long as they aren't cured of electrocution. As a result, this strategy may only have limited use against a clever player. This attack will only impact Pikmin visible on your opponent's screen, meaning that it is also best used while your opponent has as many of their Pikmin on-screen as possible.
- Rock Storm: This is also best used when the leader is with a large group of Pikmin; particularly if that group has many slow Pikmin. Try not to use it if your opponent is near an enemy, as the rocks will destroy the enemy, nor when in direct combat with the opponent, as the rocks can harm your Pikmin, too. This item is also largely ineffective against Rock Pikmin and Winged Pikmin. While not always effective in killing many Pikmin, the threat of its use can be enough to put pressure on an opponent.
- Ultra-spicy spray: Best used before fighting a mini-boss. It is also good to use it before fighting your opponent's Pikmin (note that maturity does not have an effect on the result of a battle between Pikmin, though the effects of ultra-spicy spray do). Finally, it can also be used to instantly mature any Pikmin to flower stage. This tool can be vital in stealing items from opponents as it increases the chances of winning battles as well as the speed with which your Pikmin can transport spoils. Like the actual ultra-spicy spray, this item only powers up Pikmin currently in your squad.
- Enemy Annihilator: This can be extremely effective in clearing pathways for transportation or collecting enemy corpses. Note that it will not instantly kill mid-bosses like the Bug-Eyed Crawmad. It's also important to be careful not to kill any enemies in such a way as to benefit your opponent.
- Warp: Use it when your opponent is near an item or enemy that they need to win. Also good to use when they are trying to steal your Victory Macaroon, or while an opponent is busy fighting; usually guaranteeing a few lost opponent Pikmin. The opponent will generally only be teleported to areas near where they have already been before, meaning that the item has limited use early-on in a battle, although it does still have a chance to teleport them anywhere; potentially even to locations advantageous for them.
- Bomb: Can be used to destroy enemies, break dirt walls, or instantly unearth items. It can also be used quite effectively against enemy Pikmin. Avoid carrying around bomb rocks for long periods of time when possible, since an opponent with Rock Storm or Lightning can turn their power against you.
- Shuffle: The Shuffle should be used when your opponent is close to a victory. On the other hand, since the opponent's board is shuffled, there is always a chance that it will shuffle into an advantageous layout or possibly even a win for them. The chances of both happening only increase as the opponent gains more items, and using the item while the opponent has five or more near-complete sets will typically guarantee them a win, making the item advisable to use as early as possible so as to avoid clogging up the item roulette.
- Mine: This functions similarly to (and can generally be used just like) the bomb rock. It's effective on enemies and obstacles, but it is often most effectively placed on items that your opponent needs to win. Placing it near their Onion is also advisable, although its slow execution and flashiness make it relatively easy for an opponent to safely navigate Pikmin away from it. While it can be used by your own leaders to defeat enemies, the fact that it requires the player to get close to it to detonate means it can endanger your own leaders and Pikmin.
- Macaroon Recovery: With this item in queue, you can adopt strategies that leave your base wide open. So long as you can pay attention to your opponent's side of the screen, and to the Pikmin chants with the music, you'll know when they are planning to capture your macaroon. Once they do so, let them carry the macaroon all the way to their base, but use the item before the object is actually retrieved. This maximizes the amount of time the opponent wastes. If you can tell your opponent is not going to go for an assault on your macaroon, and you have other spins of the roulette wheel in queue, consider throwing this item away so you can have access to more important items.
Defending against items[edit]
These are defensive strategies if any items are used against you.
- Lightning: This affects only the Pikmin directly visible on your side of the screen. If you believe your opponent is about to use this, changing the camera angle to point away from Pikmin or switching to a different leader can reduce the damage of the attack. If you have a Pikmin holding an explosive, avoid whistling them after they are shocked in order to take advantage of the immunity that shocked Pikmin have to explosives.
- Rock Storm: If you see that your opponent is readying the use of this item, it is advised to keep your party small, divided, speedy, and if possible carry only Rock or Winged Pikmin. If rocks are already coming, just keep moving forward, and if possible, go near some enemies, as the rocks can potentially kill them. Dismissing your squad might seem like a good idea, and it sometimes is, but it also increases the chances of huge amounts of your Pikmin being hit by a single rock. Note that high walls and tall objects can sometimes block the impact, as the rocks move at a slight angle while falling.
- Enemy Annihilator: Keep note of which hordes of enemies your opponent kills, and if any of them are important for you or too important for your enemy to have and mobilize immediately. Also keep note of which passages may be safe to travel through now that they have been cleared of enemies.
- Bomb: Bomb rocks are slow to activate and easy to avoid, so long as you are aware that your enemy possesses them.
- Shuffle: There is no real way to avoid this. However, this item can be turned against the opponent by simply collecting as many items at random as possible, increasing the chances of an advantageous shuffle to the point that your opponent may hesitate or entirely resist using the item, preventing them from accessing others.
- Mine: If you can notice that your opponent has one, keep a lookout to see where they put it. Otherwise, if you think a mine is set somewhere, disband your squad and check for mines, so that if there's a detonation, no Pikmin will perish. Remember to also rotate the camera around before recovering important objects, as a mine might reveal itself from a different angle. Regardless, keep an ear out for its distinctive beeping noise.
- Macaroon Recovery: If you notice your opponent got this item, try to find the time to threaten their team's macaroon, preferably using a small handful of Pikmin. Balance out this offensive, since if you are far too weak to succeed at stealing the macaroon, the opponent will call your bluff and hit you with the item or attack you in some other way, and you'll have just wasted your time. On the flip-side, if you actually succeed and are too effective, you may be spreading yourself too thin, and it will be all for naught since the opponent only has to press the item button to undo your progress. Ideally, you want to distract and string the opponent along, making them never be too sure of when to use that item, and to instead hold onto it for as long as possible, since it stops them from using other items. That said, be wary not to spend too much time with these high jinks.
Endgame[edit]
Battles can be quite lengthy, and it is unlikely that either player will have a secure victory over long periods of time due to the random nature of the game. It should be noted that there are certain things that are affected by the factors contributing to lengthy battles.
- The chances of getting the more obscure item rolls like Shuffle and Enemy Annihilator increase as the battle goes on. Players who feel secure about a win should stay aware of this fact and consider alternative ways of winning if their current plan gets squandered last second.
- Similarly to the above point, as the game goes on, Cupid's Grenades spawn more often and in larger clusters, Golden Grenades begin spawning (typically nearer the base of the player with the fewest squares on their bingo board), and Lucky Marbles become easier to encounter as an item in the roulette. They will also spawn during an event that begins once the clock hits 8 minutes. A desperate losing player can use this to their advantage if their chances aren't looking good, especially due to the overall lack of defensive items in the item roulette for the winning player to use to their advantage in this situation. Note that trying to actively search out these items can be lengthy, and is itself a gamble for time.
- Keep in mind that, particularly for players hoarding items near their Onion to avoid suspicion, the game has no absolute way of measuring proximity to winning. While this means that a player that feels like they are losing can keep fighting until the very end, it also means that it's even more important not to get too relaxed if it seems like your opponent is losing. It is always important to keep an eye on the activities of your opponent.
Player interactions[edit]
Players have a few ways of directly interacting with each other's group. Players cannot whistle or pluck each other's Pikmin.
- For general combat information, see here.
- When a player's Pikmin are carrying or holding on to an object, if an opponent Pikmin shows up, what happens depend on how close the new Pikmin is to the closest carrier Pikmin:
- If they are close, the two Pikmin will start fighting each other.
- If they are far away, the new Pikmin will also grab onto the object. Any Pikmin grabbing onto the object, regardless of team, contributes to the carrying strength, and if the strength requirement is met, all of those Pikmin contribute to transporting the object. The Onion that receives the object is controlled by the majority; in the case of a tie this is controlled by which team grabbed the object first if the object was stopped, or by which team it was already going to if it was moving. Once the object is delivered, the previously-cooperative Pikmin from the different teams will start fighting one another as normal.
- A number of the available items directly interfere with the opposing player's group.
Radar[edit]
In Pikmin 3, the Wii U GamePad provides a map of the area, and Off-TV Play cannot be enabled. Since there is no GamePad in Pikmin 3 Deluxe, each player can instead open the radar on their own half of the screen. In either game, this map merely shows the area in its entirety and cannot be interacted with. It shows the location of fruits, enemies, Cupid's Grenades, leaders and Pikmin. The color of the Pikmin's dots represent the Pikmin type, not the team. Oddly, in Pikmin 3 Deluxe, it is not possible to move while the radar is up, unless the leader is holding a Pikmin.
Badges[edit]
In Pikmin 3 Deluxe, there are six badges the player can gain from playing Bingo Battle:
- Gadget Master: Using ten different types of items in Bingo Battle.
- Game Changer: Playing a round of Bingo Battle with the Victory Macaroon rule.
- Line 'Em Up: Playing a round of Bingo Battle.
- Bingo Buff: Playing 10 rounds of Bingo Battle.
- Bingo Fiend: Playing a round on all 12 Bingo Battle maps.
- Pincer Attack: Being one space away from winning a round in Bingo Battle on two separate rows and/or columns.

Gadget Master. The badge shows a Cupid's Grenade in the middle of a roulette wheel.
Game Changer. The badge shows a red Victory Macaroon.

Line 'Em Up. The badge shows a blank bingo card.
Bingo Buff. The badge shows a bingo card with a single row completed.
Bingo Fiend. The badge shows three bingo cards.
Pincer Attack. The badge shows a bingo card with two rows completed.


Gallery[edit]
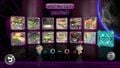
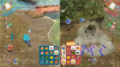
The stage select screen in Bingo Battle.
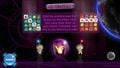
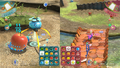
The rules for a round of Bingo Battle.
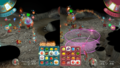
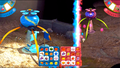
The blue team is one item away from winning.
Player 1's card (left) has too many unobtainable items to score a bingo, and all the remaining items in player 2's card (right) are one-aways.
Alph stealing Olimar's victory macaroon.
The blue team activating the Rock Storm item.
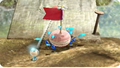
The blue team carrying the red team's Victory Macaroon.
E3 2013 gameplay screenshot of Bingo Battle, where the blue team is carrying an Insect Condo to the Onion.

One of the possible control schemes in Bingo Battle.


Trivia[edit]
- Bingo Battle and Mission Mode are the only modes in which the player can find White Pikmin and Purple Pikmin in Pikmin 3.
- Prior to Pikmin 4, Bingo Battle was the only instance in the series where White Pikmin and Purple Pikmin could be produced by an Onion.
- When the Koppaite team is carrying to the Onion an item that might score them the win, the Pikmin chant "Kop-pai, Kop-pai". When the Hocotatian team does this, the Pikmin chant "Hocotate", or "Ho-cotate, Ho-cotate."
- When a roulette starts spinning, it goes backward either 3 or 4 spaces for a windup, and then dashes forward. It passes through those same 3 or 4 spaces, then the empty space the roulette was idling on, then 8 inconsequential spaces, and afterwards it passes through a continuous cycle of the same 16 spaces. It passes through the entire 16-strip 4 times, and on the fifth time it stops at the 8th item of the strip. The 16-strip always contains the same set of items, randomly shuffled each roulette wheel spin: +10 Pikmin × 2; Lucky Marble × 2; Rock Storm × 2; Ultra-Spicy Spray × 2; Macaroon Recovery, but replaced by a Bomb if macaroons are disabled; all of the other items × 1.
Names in other languages[edit]
| Language | Name | Meaning | Notes |
|---|---|---|---|
| ビンゴバトル? Bingobatoru |
Bingo Battle | ||
(traditional) |
賓果對決 | Bingo Showdown | |
(simplified) |
宾果战斗 | Bingo Showdown | |
| Duel bingo | Bingo duel | ||
| Bingoduell | Bingo duel | ||
| Bingo | - | ||
| 빙고 배틀 Binggo Baeteul |
Bingo Battle | ||
| Batalla de bingo | Bingo Battle | ||
| Лото / Состязание Loto / Sostyazaniye |
Lotto / Competition | Names taken from Nintendo's official website |
Bingo card
| Language | Name | Meaning |
|---|---|---|
| La grille de bingo | Bingo grid | |
| Bingokarte | Bingo Card | |
| Cartón de bingo | Bingo cardboard |
Victory Macaroon
| Language | Name | Meaning |
|---|---|---|
| 勝利のマカロン? Shōri no makaron |
Victory Macaroon | |
(traditional) |
勝利馬卡龍 | Victory Macaroon |
(simplified) |
胜利马卡龙 | Victory Macaroon |
| Macaron victorieux | Victory Macaroon | |
| Siegerdrops | Victory drops | |
| Macaron della vittoria | Victory Macaroon | |
| 승리의 마카롱 seungliui makalong |
Victory Macaroon | |
| Pastelito de la victoria | Victory Macaroon |
Items
| English | (traditional) |
(simplified) |
|||||||
|---|---|---|---|---|---|---|---|---|---|
| Item | Objets | Bonus | Items | Objeto | |||||
| ピクミン+10 | +10 Pikmin | + 10 Pikmin | + 10 Pikmin | +10 Pikmin | |||||
| レアピクミン+5 | +5 Rare Pikmin | + 5 Pikmin rares | + 5 Pikmin rares | +5 seltene Pikmin | |||||
| サンダー | Lightning | Foudre | Foudre | Blitz | |||||
| チャンスだま | Lucky Marble | Bille joker | Bille joker | Glücksmurmel | |||||
| ラクセキ | Rock Storm | Éboulis | Chute de pierres | Felssturm | |||||
| ゲキカラスプレー | Ultra-spicy spray | Vaporisateur épicé | Spray épicé | Ultra-Motivier Spray | |||||
| テキゼンメツ | Enemy Annihilator | Anéantissement | Ennemis éliminés | Rundumschlag | |||||
| バクダン | Bomb | Bombe | Bombe | Bombe | |||||
| シャッフル | Shuffle | Mélange | Mélange | Mischen | |||||
| センサーバクダン | Mine | Bombe à capteur | Bombe à capteur | Sensorbombe | |||||
| ワープ | Warp | Téléportation | Téléportation | Teleporter | |||||
| 勝利のマカロンリターン | Macaroon Recovery | Retour du macaron | Retour du macaron | Siegerdrops zurück |
See also[edit]