Sparklium Springs: Difference between revisions
(→Names in other languages: added SpaA) |
(Minor cleanup, and added Verdant Waterfront's data.) |
||
| Line 7: | Line 7: | ||
'''Sparklium Springs''' are special [[area]]s in {{hp}} in which [[Captain Olimar]] can collect [[Sparklium]] from the rocks that enter and exit the playing field, under a time limit. | '''Sparklium Springs''' are special [[area]]s in {{hp}} in which [[Captain Olimar]] can collect [[Sparklium]] from the rocks that enter and exit the playing field, under a time limit. | ||
These areas take place in a single room, in which the [[camera]] does not move. If there are any Pikmin, they are trapped inside a large bubble during the starting countdown. Once the challenge starts, the bubble bursts, the Pikmin join Olimar, and the player can start controlling him. Shortly thereafter, Sparklium rocks start appearing from the edges of the screen, and move about in some pattern before eventually leaving the screen, or touching | These areas take place in a single room, in which the [[camera]] does not move. If there are any Pikmin, they are trapped inside a large bubble during the starting countdown. Once the challenge starts, the bubble bursts, the Pikmin join Olimar, and the player can start controlling him. Shortly thereafter, Sparklium rocks start appearing from the edges of the screen, and move about in some pattern before eventually leaving the screen, or touching the terrain and disappearing. Throughout this, a timer ticks down, and when it's up, the stage ends, and the player's Sparklium total is increased depending on what the rocks the player managed to gather. | ||
These rocks are collected by having either Olimar or a Pikmin touch them. The main challenge in these springs is in using the Pikmin effectively, because of how long it takes for Pikmin to re-unite with Olimar after thrown, and if the player is caught without Pikmin to throw at important rocks, they may miss them. Considering [[throw]]n Pikmin do not bounce back after touching them, and that the rocks usually move in groups, having Olimar collect rocks from one group while throwing Pikmin to handle a group farther away is key to getting the most out the spring. The idea is to get the most and best rocks possible, not to get them all. In fact, the game does not acknowledge a perfect completion whatsoever. | These rocks are collected by having either Olimar or a Pikmin touch them. The main challenge in these springs is in using the Pikmin effectively, because of how long it takes for Pikmin to re-unite with Olimar after thrown, and if the player is caught without Pikmin to throw at important rocks, they may miss them. Considering [[throw]]n Pikmin do not bounce back after touching them, and that the rocks usually move in groups, having Olimar collect rocks from one group while throwing Pikmin to handle a group farther away is key to getting the most out the spring. The idea is to get the most and best rocks possible, not to get them all. In fact, the game does not acknowledge a perfect completion whatsoever. | ||
| Line 33: | Line 33: | ||
** '''Red''': 84 ({{Sparklium|252}}) | ** '''Red''': 84 ({{Sparklium|252}}) | ||
** '''Rainbow''': 7 ({{Sparklium|35}}) | ** '''Rainbow''': 7 ({{Sparklium|35}}) | ||
** '''Clocks''': 3 | ** '''Clocks''': 3 (extra 30 seconds) | ||
* '''Sparklium total''': {{Sparklium|448}} | * '''Sparklium total''': {{Sparklium|448}} | ||
| Line 43: | Line 43: | ||
* '''Pikmin''': 11 [[Blue Pikmin]] | * '''Pikmin''': 11 [[Blue Pikmin]] | ||
* '''Starting time''': | * '''Starting time''': 30 seconds | ||
* '''Requirements''': Complete [[Glowing Bloom Pond]] | * '''Requirements''': Complete [[Glowing Bloom Pond]] | ||
* '''Objects''': | * '''Objects''': | ||
** '''Yellow''': ({{Sparklium|}}) | ** '''Yellow''': 155 ({{Sparklium|155}}) | ||
** '''Red''': ({{Sparklium|}}) | ** '''Red''': 41 ({{Sparklium|123}}) | ||
** '''Rainbow''': ({{Sparklium|}}) | ** '''Rainbow''': 62 ({{Sparklium|310}}) | ||
** '''Clocks''': | ** '''Clocks''': 3 (extra 30 seconds) | ||
* '''Sparklium total''': {{Sparklium|}} | * '''Sparklium total''': {{Sparklium|588}} | ||
{{clear}} | {{clear}} | ||
| Line 56: | Line 56: | ||
[[File:Sparklium Springs 3.jpg|thumb|The Sparkling Labyrinth Sparklium Springs.]] | [[File:Sparklium Springs 3.jpg|thumb|The Sparkling Labyrinth Sparklium Springs.]] | ||
[[Sector 3]]'s Sparklium Springs take place inside a cave, decorated with [[crystal]]s in the background. Most of the objects in these springs fall down inside large hard bubbles. When a Pikmin hits one of these bubbles, it gets bounced back, and some of the bubble's durability chips away. Its remaining durability is presented with a health bar. When it's completely gone, the bubble bursts, and the objects inside can be collected. If a bubble touches the ground or walls, the objects inside will be gone. | [[Sector 3]]'s Sparklium Springs take place inside a cave, decorated with [[crystal]]s in the background. Most of the objects in these springs fall down inside large hard bubbles. When a Pikmin hits one of these bubbles, it gets bounced back, and some of the bubble's durability chips away. Its remaining durability is presented with a health bar. When it's completely gone, the bubble bursts, and the objects inside can be collected. If a bubble touches the ground or walls, the objects inside will be gone. Sparklium rocks can also touch the walls as they drift around, and if they do, they vanish. | ||
{{game help|hp|Figure out how much "health" each bubble has.}} | {{game help|hp|Figure out how much "health" each bubble has.}} | ||
| Line 90: | Line 90: | ||
[[File:Sparklium Springs 5.jpg|thumb|The Leafswirl Lagoon Sparklium Springs.]] | [[File:Sparklium Springs 5.jpg|thumb|The Leafswirl Lagoon Sparklium Springs.]] | ||
[[Sector 5]]'s Sparklium Springs take place inside a cave with no visible floor | [[Sector 5]]'s Sparklium Springs take place inside a cave with dirt walls and no visible floor. Throughout the challenge, there's an updraft that keeps Olimar and the Pikmin afloat. Four of the [[Winged Pikmin]] Olimar has with him hold him in place, and allow him to move around on the top screen in all directions. Meanwhile, the player can throw the other Winged Pikmin at the objects incoming from below, by aiming directly at the touch screen. | ||
* '''Pikmin''': 11 [[Winged Pikmin]] | * '''Pikmin''': 11 [[Winged Pikmin]] | ||
| Line 106: | Line 106: | ||
[[File:Sparklium Springs 6.jpg|thumb|The Sweltering Parchlands Sparklium Springs.]] | [[File:Sparklium Springs 6.jpg|thumb|The Sweltering Parchlands Sparklium Springs.]] | ||
[[Sector 6]]'s Sparklium Springs take place in pit of charred leafs and | [[Sector 6]]'s Sparklium Springs take place in a pit of charred leafs and soil. The room has a [[Bouncy Mushroom]] pointing straight up, and a go-through platform above it. Most of the objects in these springs appear flying horizontally above the platform, and the only way to reach them is by using the mushroom. Some appear falling in a straight line to the left and to the right of the platform, and disappear when they touch the ground. The difficulty comes in throwing enough Pikmin to the Bouncy Mushroom such that there are Pikmin airborne for as long as possible, but not to throw too many, since if the player loses all of them, they'll have to wait for the thrown Pikmin to bounce on the mushroom, jump on it, and walk off the platform before they reunite with Olimar. During this time, the player may miss out on even better rewards that flew by. It is also important to sometimes split the focus between the lines that fall vertically to the ground, and the lines going horizontally up above. | ||
* '''Pikmin''': 12 [[Red Pikmin]] | * '''Pikmin''': 12 [[Red Pikmin]] | ||
| Line 122: | Line 122: | ||
[[File:Sparklium Springs 7.jpg|thumb|The Snowfall Field Sparklium Springs.]] | [[File:Sparklium Springs 7.jpg|thumb|The Snowfall Field Sparklium Springs.]] | ||
[[Sector 7]]'s Sparklium Springs take place inside a small room that looks like an ice rink enclosed in snowy dirt walls. It acts like one too – Olimar and the Pikmin have much lower friction while walking on this floor, so the main challenge here is to move and align | [[Sector 7]]'s Sparklium Springs take place inside a small room that looks like an ice rink enclosed in snowy dirt walls. It acts like one too – Olimar and the Pikmin have much lower friction while walking on this floor, so the main challenge here is to move and align Olimar while the low friction throws the player's movements off. | ||
* '''Pikmin''': 11 [[Blue Pikmin]] | * '''Pikmin''': 11 [[Blue Pikmin]] | ||
Revision as of 10:53, May 1, 2018
|
This article is a stub. You can help Pikipedia by expanding it.
|
Sparklium Springs are special areas in Hey! Pikmin in which Captain Olimar can collect Sparklium from the rocks that enter and exit the playing field, under a time limit.
These areas take place in a single room, in which the camera does not move. If there are any Pikmin, they are trapped inside a large bubble during the starting countdown. Once the challenge starts, the bubble bursts, the Pikmin join Olimar, and the player can start controlling him. Shortly thereafter, Sparklium rocks start appearing from the edges of the screen, and move about in some pattern before eventually leaving the screen, or touching the terrain and disappearing. Throughout this, a timer ticks down, and when it's up, the stage ends, and the player's Sparklium total is increased depending on what the rocks the player managed to gather.
These rocks are collected by having either Olimar or a Pikmin touch them. The main challenge in these springs is in using the Pikmin effectively, because of how long it takes for Pikmin to re-unite with Olimar after thrown, and if the player is caught without Pikmin to throw at important rocks, they may miss them. Considering thrown Pikmin do not bounce back after touching them, and that the rocks usually move in groups, having Olimar collect rocks from one group while throwing Pikmin to handle a group farther away is key to getting the most out the spring. The idea is to get the most and best rocks possible, not to get them all. In fact, the game does not acknowledge a perfect completion whatsoever.
Occasionally, clocks appear that act just like rocks, and can be collected in the same way. With this, there are four types of objects in total:
 Yellow rocks: The most common type. These rocks are small, and are worth each.
 Red rocks: These are rarer, bigger, and usually appear in harder patterns. They are worth each.
 Rainbow rocks: These are the largest, and usually appear at the final seconds of the challenge, so it is important to collect as many clocks as possible. They are worth each.
 Clock: Increases the timer by 10 seconds.
Once a spring is entered, it cannot be reentered until some real-time hours have passed. Other springs can be accessed in the meantime though, if they aren't locked out from their own timers as well.
List of Sparklium Springs
Brilliant Garden

Sector 1's Sparklium Springs take place in a simple vertical shaft, with dirt walls, and a flowered floor. The objects in this stage simply fall from the top of the screen to the bottom, and disappear when they touch the floor.
- Pikmin: 10 Red Pikmin
- Starting time: 30 seconds
- Requirements: Complete Mushroom Valley
- Objects:
- Yellow: 161 ()
- Red: 84 ()
- Rainbow: 7 ()
- Clocks: 3 (extra 30 seconds)
- Sparklium total:
Verdant Waterfront

Sector 2's Sparklium Springs are basic as well, taking place in a shaft with dirt walls and a grassy floor. The major difference is that objects can now fall in an arc instead of straight down. Since the walls of this area have a slant on them, some objects will slide down them and fall at an angle.
- Pikmin: 11 Blue Pikmin
- Starting time: 30 seconds
- Requirements: Complete Glowing Bloom Pond
- Objects:
- Yellow: 155 ()
- Red: 41 ()
- Rainbow: 62 ()
- Clocks: 3 (extra 30 seconds)
- Sparklium total:
Sparkling Labyrinth

Sector 3's Sparklium Springs take place inside a cave, decorated with crystals in the background. Most of the objects in these springs fall down inside large hard bubbles. When a Pikmin hits one of these bubbles, it gets bounced back, and some of the bubble's durability chips away. Its remaining durability is presented with a health bar. When it's completely gone, the bubble bursts, and the objects inside can be collected. If a bubble touches the ground or walls, the objects inside will be gone. Sparklium rocks can also touch the walls as they drift around, and if they do, they vanish.
|
The following article or section is in need of assistance from someone who plays Hey! Pikmin. |
- Pikmin: 13 Rock Pikmin
- Starting time:
- Requirements: Complete The Burning Sky
- Objects:
- Yellow: ()
- Red: ()
- Rainbow: ()
- Clocks:
- Sparklium total:
Ravaged Rustworks

Sector 4's Sparklium Springs take place inside a room with a metal floor, and concrete walls. The walls are low, but not low enough to go over. The gimmick in these springs is that Olimar has no Pikmin with him. Instead, he must collect the objects by moving around, and making smart use of the jetpack. The rocks are mostly grouped in lines that curve around and do loops as they drift around the sky. The player must strategize when to activate and deactivate the jetpack, since there is only a limited amount of flight time each activation (that depends on how upgraded the jetpack is), and deactivating it costs some time, on the account of Olimar's lengthy bounce on the floor. Using it for too long could result in the fuel running out in the middle of collecting an important line, and deactivating it too soon could subject the player to waiting for the landing animation while other rocks are flying by.
- Pikmin: None
- Starting time:
- Requirements: Complete Steel Pipe Forest
- Objects:
- Yellow: ()
- Red: ()
- Rainbow: ()
- Clocks:
- Sparklium total:
Leafswirl Lagoon

Sector 5's Sparklium Springs take place inside a cave with dirt walls and no visible floor. Throughout the challenge, there's an updraft that keeps Olimar and the Pikmin afloat. Four of the Winged Pikmin Olimar has with him hold him in place, and allow him to move around on the top screen in all directions. Meanwhile, the player can throw the other Winged Pikmin at the objects incoming from below, by aiming directly at the touch screen.
- Pikmin: 11 Winged Pikmin
- Starting time:
- Requirements: Complete Valley of the Breeze
- Objects:
- Yellow: ()
- Red: ()
- Rainbow: ()
- Clocks:
- Sparklium total:
Sweltering Parchlands

Sector 6's Sparklium Springs take place in a pit of charred leafs and soil. The room has a Bouncy Mushroom pointing straight up, and a go-through platform above it. Most of the objects in these springs appear flying horizontally above the platform, and the only way to reach them is by using the mushroom. Some appear falling in a straight line to the left and to the right of the platform, and disappear when they touch the ground. The difficulty comes in throwing enough Pikmin to the Bouncy Mushroom such that there are Pikmin airborne for as long as possible, but not to throw too many, since if the player loses all of them, they'll have to wait for the thrown Pikmin to bounce on the mushroom, jump on it, and walk off the platform before they reunite with Olimar. During this time, the player may miss out on even better rewards that flew by. It is also important to sometimes split the focus between the lines that fall vertically to the ground, and the lines going horizontally up above.
- Pikmin: 12 Red Pikmin
- Starting time:
- Requirements: Complete Terror Trench
- Objects:
- Yellow: ()
- Red: ()
- Rainbow: ()
- Clocks:
- Sparklium total:
Snowfall Field

Sector 7's Sparklium Springs take place inside a small room that looks like an ice rink enclosed in snowy dirt walls. It acts like one too – Olimar and the Pikmin have much lower friction while walking on this floor, so the main challenge here is to move and align Olimar while the low friction throws the player's movements off.
- Pikmin: 11 Blue Pikmin
- Starting time:
- Requirements: Complete Over Wintry Mountains
- Objects:
- Yellow: ()
- Red: ()
- Rainbow: ()
- Clocks:
- Sparklium total:
Lushlife Murk

Sector 8's Sparklium Springs take place inside a simple shaft with a mossy floor and walls. The objects in this level are inside hard bubbles, like the ones in the Sparkling Labyrinth Sparklium Springs. They go from one side of the screen to the other and wave up and down as they move. Some fly really high up, high enough that only the Yellow Pikmin Olimar has can reach them.
|
The following article or section is in need of assistance from someone who plays Hey! Pikmin. |
- Pikmin: 14 Yellow Pikmin
- Starting time:
- Requirements: Complete Olimar's Madcap Ride
- Objects:
- Yellow: ()
- Red: ()
- Rainbow: ()
- Clocks:
- Sparklium total:
Gallery
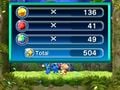
The results screen (from the Verdant Waterfront springs).

Pikmin trapped in a bubble (from the Brilliant Garden springs).


Names in other languages
| Language | Name | Meaning |
|---|---|---|
| Sprankliumbron | Sparklium well | |
| Source scintillante | Sparklium spring | |
| Glitzerquelle | Sparklium Spring | |
| Fonte luminescente | Sparklium spring | |
| Fuente refulgente | Sparklium spring | |
| Fuente Refulgente | Sparklium Spring |