Throw
|
The following article or section is in need of assistance from someone who plays Pikmin 3. |
Throwing (投げる?, lit.: "Throw") is one of the main ways of giving instructions to Pikmin, the others being swarming, dismissing and charging. The player can aim where the thrown Pikmin land at, by use of the cursor, and if a Pikmin lands near a task, it will begin working on it; it will remain idle on the spot, otherwise (in Hey! Pikmin and Pikmin Adventure, the Pikmin will return to the leader). If a Pikmin hits an enemy during its flight, it will latch on to it, if it can, and begin attacking. To throw, the next Pikmin to be thrown must be close enough to the current leader.
Pikmin are thrown upwards at an arc, leaving sparkling particles through their trajectory. The cursor estimates the landing location of a thrown Pikmin, but if there is a wall or object in the way, the Pikmin might bump into it and fall short. This is only true in the first two games, as Pikmin 3 and Pikmin 4's cursors take into account walls and obstacles, and the line connecting it to the leader changes to a preview arc. One of the traits Yellow Pikmin possess is the ability to be thrown higher than other types. This allows them to reach ledges otherwise unreachable. The throw arc of Purple Pikmin is slightly different from the rest: they are thrown faster than the others, so that the apex of their jump is located somewhere above the cursor. When the cursor is reached, the Pikmin loses its horizontal momentum and drops down with a great impact. Besides homing in on enemies, when landing, they cause high damage and can also cause the creatures to bounce up, making them unable to move for less than a second, or stun them altogether for a few seconds. Rock Pikmin have a much lower throwing arc than other Pikmin types, and will bounce off the ground and roll forward when they land, meaning they won't land exactly where the reticle is. Winged Pikmin can be thrown, though they will not land on the ground like the other Pikmin types do. If a Winged Pikmin is thrown near an enemy, the Pikmin will fly towards the enemy and attempt to latch on.
In Pikmin 3, leaders can also be thrown. Unlike Pikmin, leaders are unable to latch on to enemies and will always remain idle (unless they are near an enemy, at which point they panic and run around in circles). The trajectory that leaders are thrown through is noticeably lower than the arc of a Pikmin; this is likely to prevent exploits by throwing leaders up to an otherwise inaccessible area. It could also be to show that they are slightly heavier than a Pikmin.
The next Pikmin type to be thrown will be shown on the HUD. This reflects the type of the Pikmin closest to the leader in the GameCube games and their Wii rereleases, but the group can be reordered in some games. From Pikmin 3 onward, the next type to be thrown only changes when altered by the player.
In the first two games, Blue Pikmin can also throw drowning Pikmin: if an idle Blue Pikmin finds a drowning Pikmin nearby, it will grab it, carry it near the surface, and throw it to solid terrain. Should the ledge be too high up, it is possible that the Pikmin won't make it to dry land, fall back into the water, and be thrown again, in an endless cycle.[1] At least in Pikmin 2, a Blue Pikmin's rescue throw is the same as a normal leader throw, which means it can be used to crush Dwarf Red Bulborbs, for instance.[2] In Pikmin 2's 2-Player Battle mode, leaders can also grab and throw bomb rocks.
Controls[edit]
| Pikmin / Pikmin 2 | Pikmin 3 | Pikmin 3 Deluxe / Pikmin 4 | ||||||
|---|---|---|---|---|---|---|---|---|
| Nintendo Gamecube | Wii | Nintendo Switch | GamePad / Pro Controller | Wii Remote | Stylus Mode | Dual Joy-Con / Pro Controller | Single Joy-Con | |
| Hold | ||||||||
| Throw | Release |
Release |
Release |
Release |
Release |
Release |
Release |
Release |
| Release held Pikmin | N/A | |||||||
| Cycle held type | ||||||||
| Cycle held maturity | N/A | N/A | ||||||
Holding[edit]
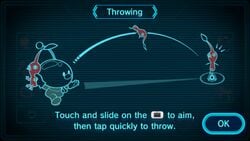
Before throwing, it is possible to hold on to a Pikmin/leader by keeping the button pressed. While held on, the Pikmin or leader will make a sound indicating that they are ready to be thrown; in Pikmin 2, this sound is repeated several times with varying pitches, until thrown. The leader can move around with a party member in their hand, which can be useful if one wishes to bring a single slow Pikmin with them. In Pikmin and Pikmin 2, when a Pikmin is being held onto, all other Pikmin in the group will be organized by type, so that those of the type of the currently held Pikmin are at the front of the line – this allows the leader to throw several of the same type of Pikmin in a row.
While holding, it is also possible to swap the currently held Pikmin/leader for one of a different type in the party, or even maturity, depending on the games, as outlined above.
In New Play Control! Pikmin, if ![]() is slightly moved while Captain Olimar is holding a Pikmin, Olimar will start facing the cursor, which will cause the Pikmin to follow behind where he's facing.[3]
is slightly moved while Captain Olimar is holding a Pikmin, Olimar will start facing the cursor, which will cause the Pikmin to follow behind where he's facing.[3]
The leader cannot perform any of the following actions while holding a Pikmin:
- Switch leader
- Dismiss
- Whistle (whistling cancels the throw instead)
- Lie down
- Use sprays
- Swarm
- Pluck, punch, or any other action that requires pressing the throw button
While it is not possible to swarm, the player can make the group thinner and longer by holding ![]() in any direction, in the GameCube games. In New Play Control! Pikmin, holding
in any direction, in the GameCube games. In New Play Control! Pikmin, holding ![]() will make the cursor flash to indicate a swarm, but the Pikmin will stay in their place regardless. In New Play Control! Pikmin 2, nothing happens if one attempts to swarm while holding.
will make the cursor flash to indicate a swarm, but the Pikmin will stay in their place regardless. In New Play Control! Pikmin 2, nothing happens if one attempts to swarm while holding.
Interestingly, any held Pikmin in Pikmin 3 cannot be killed. If an enemy attacks (just) the Pikmin, it will squeal, but nothing else will happen to it. It will also not be affected by hazards, except water.
In Pikmin, a mechanic goes unused that possibly explains why Pikmin make a sound while held. By holding onto a Pikmin for longer, the throw height climbs to a second value found in the game's parameters. Because the parameter is identical to the base throw height, however, the mechanic does essentially nothing, unless the values are changed. The climbing of the throw height finishes around the same time as the end of the noise a Pikmin makes while being held. The parameters also exist in Pikmin 2, though the code to change the height is gone.
Special throws[edit]
Some Pikmin throws perform special actions, instead of making the Pikmin work on a task or latch on to something.
- In the original Pikmin (but not the New Play Control! or the Nintendo Switch versions), thrown Yellow Pikmin carrying bomb-rocks will become "ready". When whistled, they will drop and activate the bomb-rock. In addition, if thrown next to a gate or enemy, the Pikmin will in turn throw the bomb at the target.
- Throwing a Pikmin at a Pellet Posy's pellet will make it drop it after just one attack in Pikmin, or make it drop instantly from Pikmin 2 onwards (this only works for 1 pellets in Pikmin 3 and Pikmin 4). Winged Pikmin cannot do this unless thrown at a very specific spot on the pellet.
- The following enemies behave differently when a Pikmin is thrown directly at them:
- Albino Dwarf Bulborb: landing a Pikmin on its back deals ⅔ of its base health.
- Anode Beetle: makes it flip over and expose its weak point.
- Breadbug and Giant Breadbug: damages it and makes it temporarily drop its object. In Pikmin 2, only Purple Pikmin can do this to Giant Breadbugs. In Pikmin 4, Giant Breadbugs can be damaged by being crushed by the weight of ten Pikmin of any type.
- Dwarf Bulborb, Snow Bulborb and Dwarf Orange Bulborb: if the Pikmin is thrown onto the creature's back, it will die instantly. However, in Pikmin 4, 2 Pikmin are needed to be thrown on the back of the Dwarf Orange Bulborb to defeat it.
- Dwarf Bulbear: in the first game, throwing a Pikmin onto the creature's back deals a large amount of damage to it, but doesn't kill it; in Pikmin 2 and Pikmin 3, it kills them instantly. In Pikmin 4, landing a Pikmin on its back deals one third of its base health.
- Dwarf Frosty Bulborb: throwing an Ice Pikmin or Glow Pikmin onto the creature's back will kill it instantly, other Pikmin types will be frozen.
- Honeywisp: makes it drop its nectar (in the first game) or egg (in the second and fourth games) instantly and fly away.
- Iridescent Flint Beetle, Iridescent Glint Beetle, and Doodlebug: makes it flip in the air and drop some spoils.
- Moldy Dwarf Bulborb and Moldy Slooch: landing any type of Pikmin on the Toxstool growths deals a sizeable chunk of damage. However, it also releases a cloud of poison which will affect any Pikmin that aren't White Pikmin or Glow Pikmin.
- Female Sheargrub, Male Sheargrub, Shearflea, and Shearwig: all Mandiblards die in one hit if a Pikmin is landed directly on its back when grounded. Additionally, Purple Pikmin kill all grounded Mandiblards and other small enemies in a medium-sized range when landing in Pikmin 4. If airborne, Shearwigs die right away in the first two games. in Pikmin 3 and Pikmin 4, it instead reduces them to ⅓ health and knocks them to the ground.
- Skitter Leaf and Desiccated Skitter Leaf: throwing a Pikmin onto either one of the creature's back will instantly kill them.
- Unmarked Spectralids, Red Spectralids, White Spectralids, and Yellow Spectralids: the creature instantly dies. Interestingly, Unmarked Spectralids die in one hit even though they have the same amount of health as a Dwarf Bulborb.
- When a Blue Pikmin is thrown at the Goolix's larger core, while the creature is stretched, the two cores will slam against one another, and all Pikmin attacking the smaller core will scatter around. The damage dealt to the beast will be respective of the amount of Pikmin on the smaller core; the more Pikmin, the higher the amount of damage.
- A Pikmin that is thrown at the Armored Cannon Beetle or Horned Cannon Beetle's blowhole while it's sucking in air will become trapped in it and make it overheat, exposing its weak point. After the Cannon Beetle covers its weak point again, the Pikmin will come out unharmed.
- The shockwaves made by a Purple Pikmin landing after being thrown will make a Waterwraith temporarily vulnerable. In Pikmin 4, Purple Pikmin can also be thrown directly at the Waterwraith to make it vulnerable.
- A thrown Purple Pikmin can destroy rocks fired by Armored Cannon Beetle Larvae and Decorated Cannon Beetles in Pikmin 2.
- In Pikmin 3, Rock Pikmin thrown at crystals deal more damage to them than just running into or charging at them. This is no longer the case in Pikmin 3 Deluxe, where Rock Pikmin attacking or charging crystals deals the same amount of damage as being thrown at them.
- In Pikmin 3, any kind of Pikmin thrown directly at a grub-dog's eyes will cause it to recoil and spit out any Pikmin it may have started to eat.
- When enough Pikmin are thrown onto the tail of a Crusted Rumpup or the Ancient Sirehound, it will stun them, exposing their weak point on the tip of the tail (Crusted Rumpup) or the stomach (Ancient Sirehound).
Tricks[edit]
|
The following article or section is in need of assistance from someone who plays the Nintendo Switch version of Pikmin 1. |
Swarm trick[edit]
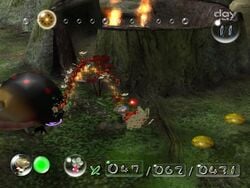
|
To do: Some comparison times would be really nice. |
Under normal circumstances, when the leader presses the throw button with Pikmin nearby, the closest Pikmin will move from its spot towards the leader's hand, where it can then be thrown. This delay varies between games, but it normally makes it so that a player who wants to throw several Pikmin quickly can only throw three or four per second, while mashing the throw button in Pikmin. In Pikmin 2, this delay is shorter, but relevant all the same.
The closer the Pikmin is to the leader, the shorter this delay is. By using the swarming function, one can move the Pikmin so that they are constantly around the leader. While doing this, the throw button can then be pressed repeatedly and quickly in order to throw Pikmin at a much faster pace.
For the GameCube games, it is relatively simple: after setting the cursor on the intended location, the player can move one digit to ![]() (such as the left or right thumb) and another to
(such as the left or right thumb) and another to ![]() (like the right thumb or right index). The player can then mash
(like the right thumb or right index). The player can then mash ![]() and tilt
and tilt ![]() so that the group is always near the leader. Due to the way swarming works in the New Play Control! games, this is a harder task in those games.
so that the group is always near the leader. Due to the way swarming works in the New Play Control! games, this is a harder task in those games. ![]() moves the Pikmin towards the cursor, which should be pointing at the enemy or ledge. The Pikmin are on the opposite side from the leader, so in order to keep them close, the player must press
moves the Pikmin towards the cursor, which should be pointing at the enemy or ledge. The Pikmin are on the opposite side from the leader, so in order to keep them close, the player must press ![]() in short spurts, so that the Pikmin are neither too far ahead or behind.
in short spurts, so that the Pikmin are neither too far ahead or behind.
The method for the New Play Control! games is quite a lot harder than the GameCube way, as it is harder to position the fingers so that both ![]() and
and ![]() can be pressed, especially without releasing the Nunchuk; it is also hard to maintain a steady cursor while two fingers are pressing on the Wii Remote repeatedly. Finally, it is hard to maintain two different button rhythms at once. As such, an alternate strategy is normally used instead. Because the leader can move independently of the cursor, the latter can be held on the target, and the player can focus on moving the leader through the group. Care should be taken in order to keep the cursor from deviating from its intended place, though. One way to stop the cursor from leaving its spot on the screen is to place the Nunchuk hand's wrist in front of the Wii Remote's sensor.[4] A better method is to simply move in circles while throwing. It's not quite as effective, but it still increases throw speed.
can be pressed, especially without releasing the Nunchuk; it is also hard to maintain a steady cursor while two fingers are pressing on the Wii Remote repeatedly. Finally, it is hard to maintain two different button rhythms at once. As such, an alternate strategy is normally used instead. Because the leader can move independently of the cursor, the latter can be held on the target, and the player can focus on moving the leader through the group. Care should be taken in order to keep the cursor from deviating from its intended place, though. One way to stop the cursor from leaving its spot on the screen is to place the Nunchuk hand's wrist in front of the Wii Remote's sensor.[4] A better method is to simply move in circles while throwing. It's not quite as effective, but it still increases throw speed.
In Pikmin 3 and Pikmin 4, if a Pikmin of the selected type is at least somewhat nearby and in the current leader's squad, it will instantly teleport into the leader's hand.
Longer throw trick[edit]
In Pikmin and Pikmin 2 on the GameCube, if the leader is moving while throwing a Pikmin, the leader's speed is added to the Pikmin throw's speed, with the Pikmin effectively carrying the momentum of the leader's walking with it. Hence, if a leader is running forward while throwing a Pikmin in the same direction, it will land much farther than normal. This trick can be used to throw Pikmin to places where they were not meant to reach. An example would be over to the island with the two stick bridges on it in the Awakening Wood, skipping the need for Blue Pikmin to be unlocked to enter the Snagret Hole.
In the rereleases on the Wii and Nintendo Switch, the leader's momentum is not carried over. This change was made in the New Play Control! versions, likely because if it weren't removed, the player would not be able to accurately throw Pikmin while moving, negating one of the new control scheme's biggest advantages. In these games, the throw distance limit has been raised compared to the GameCube games, especially so in the Nintendo Switch versions, which allows for naturally longer throws that can permit the same exploits as those granted by the carried momentum in the original games.
High ledge glitch[edit]
By using the aforementioned trick to throw at longer distances, one can make non-Yellow Pikmin reach ledges they shouldn't be able to normally.[5][6] This glitch is only possible in Pikmin and Pikmin 2, as well as their New Play Control! and Nintendo Switch ports.
With the added distance of the trick comes added throw strength, which, when used towards a wall, can be enough to propel the Pikmin high enough to reach a high ledge. The Pikmin must scrape the wall a bit during the ascending part of their jump in order to make it. The exact amount of contact with the wall depends, and some surfaces (especially when they aren't perfectly vertical) work better than others.
In Pikmin 2, Purple Pikmin are especially more likely to make it up these ledges. This is because while other Pikmin have the peak of their throw arc be midway between the leader and cursor, a Purple Pikmin's throw arc has the peak be at the cursor. This means they are thrown farther by the leader, even though normally they don't go any farther than the cursor since they stop mid-air to pound. This stop can't happen if the Purple Pikmin is thrown against the wall, though the extra speed will still be used, to great effect.
In the New Play Control! versions, the cursor must be placed so that it is at the longest possible distance or beyond. This gives the throw enough force to perform the glitch.
Escorting a few Pikmin[edit]
If the player must bring a single Pikmin with them, having the leader carry the Pikmin on their hand is a safe and fast way to bring the Pikmin to the destination. This is particularly useful with slow Pikmin.
If the player needs a small amount of Pikmin (around five), it can be faster to repeatedly throw them ahead all in a row while moving forward, and whistling them back to the leader. This keeps them always ahead of the player's character, instead of staying behind and risking lagging. This is easier if the control scheme allows the cursor to be moved independently from the leader. Once again, this is more helpful when used with slow Pikmin.
Throwing Pikmin higher or further[edit]
Interestingly, there are a few ways to throw Pikmin even higher or further, in New Play Control! Pikmin and New Play Control! Pikmin 2. It depends on the type and the way the Pikmin is thrown. The following tricks do not have any known uses at the moment, however. Also, they do not work in Pikmin nor Pikmin 2, only the Wii ports.
- Throwing Pikmin higher: If Yellow Pikmin are thrown from a plant[7] or on top of a piece of chiyogami,[8] they will go higher than normal. Yellow Pikmin can also be thrown higher thanks to fire geysers,[9] corpses,[10] and treasures.[11]
- Changing the distance of the throw: The aforementioned tricks can be used to throw Yellow Pikmin both higher and further. However, there are some ways to increase or decrease the distance of the throw for other Pikmin types. Thanks to plants (particularly the Figwort), it is possible to throw Red, White, and Blue Pikmin slightly further[12] and Purple Pikmin slightly less far.[13] However, if Purple Pikmin are thrown against a Breadbug, they will go further.[14] Similarly, Purple Pikmin can be thrown further thanks to the fire of a Fiery Blowhog.[15] This also makes Yellow Pikmin ascend higher.
- Other tricks: If Pikmin are thrown from a poison emitter, they will suddenly gain a lot of speed when choking.[16] This does not happen if they are not thrown. Finally, if a Purple Pikmin is thrown at a gate while very close to the gate, and is thrown at full force, it will go through and attack from the other side.[17]
Oddities[edit]
For unknown reasons, when the player tries to throw in Pikmin, there is a chance that Olimar will simply twitch instead. This is not the case if the Pikmin to throw is in front of Olimar, or is far away from him. Every once in a while, the game will enter a state for 1 frame where it will reject the throw if the player presses the button on that frame. In the GameCube game, this happens every 11 frames, though sometimes it's every 10 frames instead, and in the New Play Control! release, it's roughly every 3 frames, with the periodic break of 20 frames where the glitch won't happen.[18]
In Pikmin 3 Deluxe, if the player is repeatedly pressing the throw button quickly enough, when they run out of Pikmin of the current standby type and the next type is bomb rocks, the game will quickly swap to the next type over instead. Possibly as a result of this, if the player holds a non-bomb Rock Pikmin, then swaps types while holding until they select bomb rocks, throwing that Pikmin and then quickly pressing the throw button again will make the game swap to the next type, causing the player to hold or even throw a non-bomb Rock Pikmin.[19] Care should be taken as to not throw unarmed Pikmin into an active bomb. Giving a small pause between the next throw, or simply swapping to bomb rocks without holding a Pikmin allows the player to throw several bombs without this risk.
Interestingly, flower Pikmin twirl after they reach the apex of a throw arc in Pikmin and Pikmin 2, and this results in them falling slower. It also results in the Pikmin losing some horizontal momentum, and ending up closer to the leader compared to a leaf or bud. Purple Pikmin, regardless of maturity, do a pound instead and no twirl.
In Pikmin 3, leaders and Pikmin cannot be thrown while standing on an enemy corpse. This is likely to prevent the player from going out of bounds by using the corpse to reach higher, normally inaccessible areas. However, they can be thrown while standing on a pellet, although this is difficult because the leaders will automatically slide off of the pellet.[20]
Technical information[edit]
Pikmin 3's data includes a parameter file with the throw height value for each Pikmin and leader, in plain English. This file can be found in /content/CMCmn/system/param_db.szs/pikminparam_db.txt.
| Type | Height (in game distance units) |
|---|---|
| Other Pikmin | 72.5 |
| Yellow Pikmin | 107.0 |
| Purple Pikmin | 60.0 |
| Leaders | 30.0 |
In other games[edit]
In the Super Smash Bros. series[edit]
|
This article or section is a short summary on the move Pikmin Throw. |
In the Super Smash Bros. series, Olimar's forward-special move is called "Pikmin Throw". When used, the next Pikmin in line is grabbed and instantly thrown forward, where it may land on the ground and rejoin the group some seconds later, or latch onto an opponent, where it will cause damage until it falls off. The type of Pikmin determines the damage caused and the throw arc. Yellow Pikmin are thrown at a higher arc, Purple Pikmin are thrown a very short distance, and White Pikmin are thrown very fast and far. Red Pikmin cause strong fire damage, Yellow Pikmin cause electrical moderate damage, Blue Pikmin cause regular damage and White Pikmin cause high poison damage. Purple Pikmin do not latch on, but instead, knock the opponent away.
In Pikmin Adventure[edit]
Only the Olimar player can throw Pikmin in Pikmin Adventure. When they have a Pikmin nearby, they will grab it and toss it right away. To toss a Pikmin, the player must tap on the target on the GamePad. If the Mii Pikmin are stacked atop the leader, they can be thrown all at the same time by the latter.
Trivia[edit]
- In Pikmin and Pikmin 2, Pikmin in mid-throw retain their position and velocity when a cutscene is triggered. In Pikmin 3 however, cutscenes often involve a leader speaking in a paused world; these cutscenes behave differently than most, and when gameplay resumes, thrown Pikmin still retain their position but not their forward velocity. They fall to the ground idle, which can put the player at a disadvantage if they were combating an enemy before the cutscene started.
- In Pikmin 3, throwing a Pikmin or a leader on a higher ground will make them wave at the active leader.
Names in other languages[edit]
| Language | Name | Meaning |
|---|---|---|
| 投げる? Nageru |
Throw | |
(traditional) |
投擲 | Throw |
(simplified) |
投掷 | Throw |
| Lancer | Throw | |
| Werfen | Throw | |
| Lanciare | Throw | |
| 던지다 deonjida |
Throw | |
| Lanzar | Throw |
References[edit]
- ^ YouTube video showing Blue Pikmin constantly failing to throw their partners to safety
- ^ Twitch clip on Twitch, published on June 21st, 2019, retrieved on June 21st, 2019
- ^ YouTube video demonstrating how Pikmin follow Olimar when the stick is slightly moved in New Play Control! Pikmin.
- ^ YouTube video demonstrating how one can cover the infrared sensor on the Wii Remote to stop the cursor from shaking about
- ^ YouTube video showing how the high ledge glitch can be used to get non-Yellow Pikmin up high ledges
- ^ 2:25 of part 4 of a speedrun on Speed Demos Archive
- ^ YouTube video showing Yellow Pikmin being thrown higher from a plant
- ^ YouTube video showing Yellow Pikmin being thrown higher from a piece of chiyogami
- ^ YouTube video showing Yellow Pikmin being thrown higher thanks to fire geysers
- ^ YouTube video showing Yellow Pikmin being thrown higher thanks to corpses
- ^ YouTube video showing Yellow Pikmin being thrown higher thanks to treasures
- ^ YouTube video showing White, Blue and Red Pikmin thrown further thanks to a Figwort
- ^ YouTube video showing Purple Pikmin being thrown less far because of plants
- ^ YouTube video showing Purple Pikmin being thrown further thanks to a Breadbug
- ^ YouTube video showing Purple Pikmin being thrown further thanks to a Fiery Blowhog
- ^ YouTube video showing how Pikmin can gain speed when choking
- ^ YouTube video showing Purple Pikmin being thrown through a gate
- ^ YouTube video showing how Olimar can fail to throw, and how various actions like whistling do not fix the problem, published on July 20th, 2020, retrieved on July 22nd, 2020
- ^ Twitter video on Twitter, published on December 1st, 2020, retrieved on December 1st, 2020
- ^ YouTube video of a speedrun where leaders are thrown from a pellet (at 40:00), published on November 4th, 2020, retrieved on July 10th, 2023
| Controls |
|---|
| Charge • Dismiss • Dodge • Jetpack • Lie down • Lock-on • Pluck • Punch • Spray • Swarm • Throw • Whistle |
| Pikmin | |
|---|---|
| Types | Red Pikmin • Yellow Pikmin • Blue Pikmin • Purple Pikmin • White Pikmin Rock Pikmin • Winged Pikmin • Ice Pikmin • Bulbmin • Glow Pikmin |
| Biology | Candypop Bud • Flarlic • Glow pellet • Idle • Lumiknoll • Maturity • Onion Pellet • Pikmin extinction • Trip • Sprout • Seedling • Soul • Squad |
| Abilities | Carry • Dig • Dodge • Fight • Hide |
| Controls | Charge • Dismiss • Swarm • Pluck • Throw • Whistle |
| Other | Decor Pikmin • Leafling • Mushroom Pikmin • Pikpik carrot |
