War Path: Difference between revisions
No edit summary |
m (Capitalized enemy names.) |
||
| (45 intermediate revisions by 22 users not shown) | |||
| Line 1: | Line 1: | ||
[[ | {{game icons|p2=y}} | ||
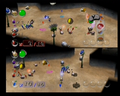
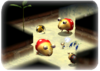
[[File:WarPath.png|thumb|300px|Stage preview.]] | |||
'''War Path''' is the second [[2-Player Battle]] stage in {{p2}}. Unlike other stages, players start with only one of each [[spray]] type on this map, instead of two. | |||
The cave's | The [[cave]] is designed around tightly knit corridors, placing players' bases in close proximity to each other. Each layout makes use of concrete rooms and pipe corridors, scattering [[Snow Bulborb]]s and [[Female Sheargrub]]s along the map. The first layout connects both bases with a concrete corridor, the second layout connects both bases with a trapezoid-shaped room and an independent corridor flank route, the third layout places both bases next to each other, and spaces yellow marbles along the corridors on the outskirts of the layout. | ||
== Level information == | |||
*'''Theme''': Concrete | |||
*'''Enemies''': | |||
**{{icon|Female Sheargrub|y}} | |||
**{{icon|Shearwig|y}} (under marbles) | |||
**{{icon|Snow Bulborb|y}} | |||
*'''Obstacles''': | |||
**None | |||
*'''Treasures''': | |||
**None | |||
*'''Plants and fungi''': | |||
**{{icon|Pellet Posy|y}} | |||
*'''Others''': | |||
**None | |||
{{sublevel technical | |||
|2p = y | |||
|cave = vs_5_semai | |||
|enemymax = 45 | |||
|itemmax = 0 | |||
|gatemax = 0 | |||
|capmax = 0 | |||
|rooms = 3 | |||
|ctrratio = 0 | |||
|geyser = No | |||
|unitfile = vs_5_conc.txt | |||
|lightfile = normal_light_cha.ini | |||
|bg = | |||
|clog = No | |||
|hiddenfloor = 0 | |||
|units = | |||
{{!}} colspan = 6 style = "text-align: center;" {{!}} Layout 1 (1/3 chance) | |||
{{!}}- | |||
{{sublevel units | |||
|room_4x4a_4_conc|Room with 4 exits (× 2) | |||
|room_vs_hitode3x3m_5_conc|Room with 4 exits and 2 walls (× 1) | |||
}} | |||
{{!}} colspan = 6 style = "text-align: center;" {{!}} Layout 2 (1/3 chance) | |||
{{!}}- | |||
{{sublevel units | |||
|room_4x4a_4_conc|Room with 4 exits (×2) | |||
|room_4x4b_4_conc|Room with 4 exits (×1) | |||
|item_cap_pipe|Dead end with item (×2) | |||
|item_cap_conc|Dead end with item (×2) | |||
|wayl_pipe|Turning corridor (×3) | |||
|cap_conc|Dead end (×4) | |||
}} | |||
{{sublevel units | |||
|way4_conc|Four-way crossing (×1) | |||
}} | |||
{{!}} colspan = 6 style = "text-align: center;" {{!}} Layout 3 (1/3 chance) | |||
{{!}}- | |||
{{sublevel units | |||
|room_4x4b_4_conc|Room with 4 exits (×2) | |||
|item_cap_conc|Dead end with item (×2) | |||
|wayl_pipe|Turning corridor (×4) | |||
|way2_pipe|Corridor (×8) | |||
}} | |||
{{!}} colspan = 6 style = "text-align: center;" {{!}} Random units | |||
{{!}}- | |||
{{sublevel units | |||
|cap_conc|Dead end | |||
|item_cap_conc|Dead end with item | |||
|way3_conc|Three-way crossing | |||
|way4_conc|Four-way crossing | |||
|way2x2_conc|Straight corridor | |||
|item_cap_pipe|Dead end with item | |||
}} | |||
{{sublevel units | |||
|wayl_pipe|Turning corridor | |||
|way2_pipe|Corridor | |||
|room_4x4a_4_conc|'''Room with 4 exits''' | |||
|room_4x4b_4_conc|'''Room with 4 exits''' | |||
|room_vs_hitode3x3m_5_conc|'''Room with 4 exits and 2 walls''' | |||
}} | |||
}} | |||
== Strategies == | |||
This stage is good for quick battles. Try to lure your opponent away and steal their marble, or try your luck for a [[Pikmin Extinction]] with the roulette. | |||
If you're playing on a configuration where your opponent's base is very close to your own, you can attempt to make it more enjoyable just trying to steal your opponents marble. However, it is wiser to keep track of your own marble as if you go hunting for yellow marbles, your opponent may sneak in an attack and capture your marble. Leaving a group of 25-40 [[Pikmin family|Pikmin]] near your base may be helpful and should keep your enemies at bay. When you hear your Pikmin brawling, you know your opponent is attacking your base. Head back there and fend off the remaining enemy Pikmin. | |||
==Gallery== | |||
<gallery> | |||
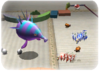
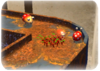
Image:War Path.png|Battle in the War Path. | |||
</gallery> | |||
==Names in other languages== | |||
{{foreignname | |||
|notes=y | |||
|SpaA=Senda Bélica | |||
|SpaAM=War Path | |||
|Ger=Kriegspfad | |||
{{ | |GerM=War Path | ||
|Ita=Via di guerra | |||
|ItaM=Path of war | |||
|ItaN=A literal translation of the English ''War Path'' that doesn't sound very natural. | |||
}} | |||
{{2PB}} | |||
Latest revision as of 16:43, June 14, 2024

War Path is the second 2-Player Battle stage in Pikmin 2. Unlike other stages, players start with only one of each spray type on this map, instead of two.
The cave is designed around tightly knit corridors, placing players' bases in close proximity to each other. Each layout makes use of concrete rooms and pipe corridors, scattering Snow Bulborbs and Female Sheargrubs along the map. The first layout connects both bases with a concrete corridor, the second layout connects both bases with a trapezoid-shaped room and an independent corridor flank route, the third layout places both bases next to each other, and spaces yellow marbles along the corridors on the outskirts of the layout.
Level information[edit]
- Theme: Concrete
- Enemies:
 Female Sheargrub
 Shearwig (under marbles)
 Snow Bulborb
- Obstacles:
- None
- Treasures:
- None
- Plants and fungi:
- Others:
- None
| Technical sublevel information | |||||
|---|---|---|---|---|---|
| Internal cave name | vs_5_semai | ||||
| "Main" object maximum (?) | 45 | ||||
| "Treasure" object maximum (?) | 0 | ||||
| "Gate" object maximum (?) | 0 | ||||
| Dead end unit probability (?) | 0 | ||||
| Number of rooms (?) | 3 | ||||
| Corridor-to-room ratio (?) | 0 | ||||
| Escape geyser (?) | No | ||||
| Clogged hole (?) | No | ||||
| Cave units file (?) | vs_5_conc.txt | ||||
| Lighting file (?) | normal_light_cha.ini | ||||
| Background (?) | None | ||||
| Cave units (?) | |||||
| Layout 1 (1/3 chance) | |||||
 |
 |
||||
| Room with 4 exits (× 2) | Room with 4 exits and 2 walls (× 1) | ||||
| Layout 2 (1/3 chance) | |||||
|
 |
 |
 |
 |
 |
| Room with 4 exits (×2) | Room with 4 exits (×1) | Dead end with item (×2) | Dead end with item (×2) | Turning corridor (×3) | Dead end (×4) |
 |
|||||
| Four-way crossing (×1) | |||||
| Layout 3 (1/3 chance) | |||||
|
|
|
 |
||
| Room with 4 exits (×2) | Dead end with item (×2) | Turning corridor (×4) | Corridor (×8) | ||
| Random units | |||||
|
|
 |
|
| |
| Dead end | Dead end with item | Three-way crossing | Four-way crossing | Straight corridor | Dead end with item |
|
|
|
|
|
|
| Turning corridor | Corridor | Room with 4 exits | Room with 4 exits | Room with 4 exits and 2 walls | |
Strategies[edit]
This stage is good for quick battles. Try to lure your opponent away and steal their marble, or try your luck for a Pikmin Extinction with the roulette.
If you're playing on a configuration where your opponent's base is very close to your own, you can attempt to make it more enjoyable just trying to steal your opponents marble. However, it is wiser to keep track of your own marble as if you go hunting for yellow marbles, your opponent may sneak in an attack and capture your marble. Leaving a group of 25-40 Pikmin near your base may be helpful and should keep your enemies at bay. When you hear your Pikmin brawling, you know your opponent is attacking your base. Head back there and fend off the remaining enemy Pikmin.
Gallery[edit]
Battle in the War Path.

Names in other languages[edit]
| Language | Name | Meaning | Notes |
|---|---|---|---|
| Kriegspfad | War Path | ||
| Via di guerra | Path of war | A literal translation of the English War Path that doesn't sound very natural. | |
| Senda Bélica | War Path |
| 2-Player Battle stages | ||||
|---|---|---|---|---|
 Battle Field |
 War Path |
 Carpet Plain |
 Angle Maze |
 Colosseum |
 Rusty Gulch |
 Brawl Yard |
 Tile Lands |
 Dim Labyrinth |
 Hostile Territory |