50 Pikmin challenge: Difference between revisions
m (Grammar check) |
Marxo Grouch (talk | contribs) (Technically redundant section. The link is already included in a proper reference.) |
||
| (37 intermediate revisions by 12 users not shown) | |||
| Line 1: | Line 1: | ||
{{game icons| | {{game icons|p=y}} | ||
A '''50 Pikmin challenge''' is a playthrough of ''[[Pikmin (game)|Pikmin]]'' with only 50 [[Pikmin family|Pikmin]], the minimum possible number. Like the [[6 day run]] or the [[zero death challenge]], it is recommended that players have completed the game at least once before attempting, due to its challenging nature. | |||
The [[Gluon Drive]] requires the most Pikmin to carry – a minimum of 50 Pikmin. This means that the main game is entirely beatable with only 50 Pikmin ever being sprouted. The minimum amount of time this has ever been completed is in 8 days. This was done by using a combination of tricks to collect the [[Positron Generator]] on day 2. That enabled the growth of Red Pikmin in preparation for day 3, in which [[The Forest of Hope]] was fully completed in 1 day.{{cite youtube|wVoEDeQpPXk|of the third day in an 8-day run}} The 9 day challenge is far more common due to its relative ease compared to the 8 day run. If the player wishes to only collect the 25 required [[ship parts]], 50 Pikmin are still required but the player must wait out all 30 days for the game to end. Due to the [[Secret Safe]] weighing 85 on the Japanese [[Region|version]], this challenge does not apply for that game version. | |||
The | |||
=== | ==9 day walkthrough== | ||
{{guide}} | |||
===Day | ===Day 1 - The Impact Site=== | ||
The | {{Location map | width = 350 | height = 338 | align = right | image = IS texture.png | bg = #111 | caption = Map of all ship parts to be collected, and the location of the ship, in The Impact Site. | icons = | ||
* | {{map icon | S.S. Dolphin | 275 | 238 | bg = none}} | ||
{{map icon | Main Engine | 259 | 110}} | |||
}} | |||
* Discover [[Red Pikmin]] and sprout 25 of them, allowing them to [[Maturity#In the main series|blossom]] before they are [[pluck]]ed. | |||
*Collect the [[ | * Collect the [[Main Engine]]. | ||
Pikmin count: 25 | |||
* 25 Reds | |||
* 0 Yellows | |||
* | * 0 Blues | ||
* | |||
* | |||
{{clear}} | |||
===Day | ===Day 2 - The Forest of Hope=== | ||
{{location map | width = 350 | height = 480 | align = right | image = FoH texture.png | bg = #111 | caption = Map of all ship parts to be collected, and the location of the ship, in The Forest of Hope. | icons = | |||
{{map icon | S.S. Dolphin | 155 | 248 | bg = none}} | |||
{{map icon | Whimsical Radar | 58 | 207}} | |||
{{map icon | Extraordinary Bolt | 75 | 159}} | |||
{{map icon | Nova Blaster | 269 | 170}} | |||
{{map icon | Shock Absorber | 282 | 241}} | |||
}} | |||
* | * Discover [[Yellow Pikmin]] and sprout 10 of them. | ||
* Collect the [[Shock Absorber]]. | |||
*Collect the [[ | * Collect the [[Nova Blaster]]. | ||
* | * Collect the [[Extraordinary Bolt]]. | ||
* Collect the [[Whimsical Radar]]. | |||
* | |||
*Collect the [[ | |||
Pikmin count: 35 | |||
* 25 Reds | |||
* 10 Yellows | |||
* 0 Blues | |||
* | |||
* | |||
* | |||
{{clear}} | |||
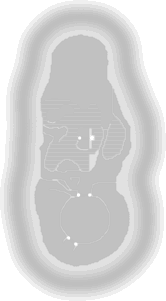
===Day | ===Day 3 - The Forest Navel=== | ||
The | {{location map | width = 350 | height = 443 | align = right | image = FN texture.png | bg = #111 | caption = Map of all ship parts to be collected, and the location of the ship, in The Forest Navel. | icons = | ||
* | {{map icon | S.S. Dolphin | 187 | 158 | bg = none}} | ||
* | {{map icon | {{icon | Number 1 Ionium Jet | n=#1 Ionium Jet || 32px}} | 143 | 97 | custom = y}} | ||
{{map icon | Gravity Jumper | 161 | 378}} | |||
*Kill | {{map icon | Automatic Gear | 118 | 226}} | ||
* | {{map icon | Space Float | 198 | 377}} | ||
}} | |||
*Collect the [[ | * Collect the [[Gravity Jumper]]. | ||
* | * Kill the [[Puffstool]] and [[Beady Long Legs]]. | ||
* Kill the [[Breadbug]] and collect the [[Space Float]]. | |||
* Discover [[Blue Pikmin]] and sprout 15 of them. | |||
* Collect the [[Automatic Gear]]. | |||
* Collect the [[Number 1 Ionium Jet|#1 Ionium Jet]]. | |||
Pikmin count: 50 | |||
* 25 Reds | |||
* | * 10 Yellows | ||
* | * 15 Blues | ||
{{clear}} | |||
===Day | ===Day 4 - The Forest of Hope=== | ||
{{location map | width = 350 | height = 480 | align = right | image = FoH texture.png | bg = #111 | caption = Map of all ship parts to be collected, and the location of the ship, in The Forest of Hope. | icons = | |||
{{map icon | S.S. Dolphin | 155 | 248 | bg = none}} | |||
{{map icon | Eternal Fuel Dynamo | 169 | 363}} | |||
{{map icon | Radiation Canopy | 236 | 85}} | |||
{{map icon | Geiger Counter | 153 | 382}} | |||
{{map icon | Sagittarius | 224 | 425}} | |||
}} | |||
* Collect the [[Geiger Counter]]. | |||
* Collect the [[Eternal Fuel Dynamo]]. | |||
* Collect the [[Radiation Canopy]]. | |||
* Collect the [[Sagittarius]]. | |||
* | |||
* | |||
* | |||
* | |||
Pikmin count: 50 | |||
* 25 Reds | |||
* | * 10 Yellows | ||
* | * 15 Blues | ||
{{clear}} | |||
===Day | ===Day 5 - The Distant Spring=== | ||
{{location map | width = 350 | height = 595 | align = right | image = DS texture.png | bg = #111 | caption = Map of all ship parts to be collected, and the location of the ship, in The Distant Spring. | icons = | |||
*Kill the | {{map icon | S.S. Dolphin | 198 | 280 | bg = none}} | ||
*Collect [[ | {{map icon | Repair-type Bolt | 314 | 330}} | ||
* | {{map icon | UV Lamp | 290 | 249}} | ||
* | {{map icon | Chronos Reactor | 220 | 38}} | ||
*Collect [[ | {{map icon | {{icon|Number 2 Ionium Jet|n=#2 Ionium Jet||32px}} | 155 | 38 | custom=y}} | ||
}} | |||
* Kill the two [[Swooping Snitchbug]]s and the [[Armored Cannon Beetle]]. | |||
* Collect the [[UV Lamp]]. | |||
* Using the [[Lapis Lazuli Candypop Bud]]s, convert 24 Red and 1 Yellow Pikmin into Blue Pikmin. | |||
* Collect the [[Chronos Reactor]]. | |||
* Collect the [[Number 2 Ionium Jet|#2 Ionium Jet]]. | |||
* Collect the [[Repair-type Bolt]]. | |||
Pikmin count: 50 | |||
* 1 Reds | |||
* 9 Yellows | |||
* 40 Blues | |||
* | |||
* | |||
* | |||
{{clear}} | |||
===Day | ===Day 6 - The Impact Site=== | ||
The | {{Location map | width = 350 | height = 338 | align = right | image = IS texture.png | bg = #111 | caption = Map of all ship parts to be collected, and the location of the ship, in The Impact Site. | icons = | ||
* | {{map icon | S.S. Dolphin | 275 | 238 | bg = none}} | ||
* | {{map icon | Positron Generator | 62 | 135}} | ||
}} | |||
* Collect the [[Positron Generator]]. | |||
* [[Maturity#In the main series|Blossom]] any leaf or bud Pikmin using [[nectar]]. | |||
Pikmin count: 50 | |||
* 1 Reds | |||
* | * 9 Yellows | ||
* | * 40 Blues | ||
== | {{clear}} | ||
* | |||
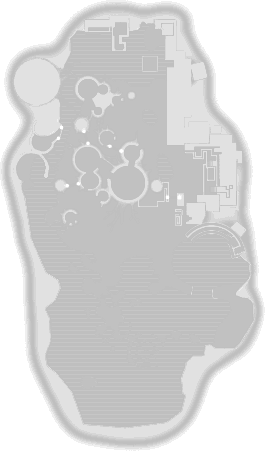
===Day 7 - The Distant Spring=== | |||
{{location map | width = 350 | height = 595 | align = right | image = DS texture.png | bg = #111 | caption = Map of all ship parts to be collected, and the location of the ship, in The Distant Spring. | icons = | |||
{{map icon | S.S. Dolphin | 198 | 280 | bg = none}} | |||
{{map icon | Massage Machine | 288 | 453}} | |||
{{map icon | Interstellar Radio | 203 | 519}} | |||
{{map icon | Gluon Drive | 33 | 212}} | |||
{{map icon | Zirconium Rotor | 55 | 188}} | |||
{{map icon | Pilot's Seat | 136 | 118}} | |||
{{map icon | Bowsprit | 169 | 241}} | |||
}} | |||
* Collect the [[Interstellar Radio]]. | |||
* Collect the [[Pilot's Seat]]. | |||
* Collect the [[Bowsprit]]. | |||
* Collect the [[Zirconium Rotor]]. | |||
* Collect the [[Gluon Drive]]. | |||
* Collect the [[Massage Machine]]. | |||
Pikmin count: 50 | |||
* 1 Reds | |||
* 9 Yellows | |||
* 40 Blues | |||
{{clear}} | |||
===Day 8 - The Forest Navel=== | |||
{{location map | width = 350 | height = 443 | align = right | image = FN texture.png | bg = #111 | caption = Map of all ship parts to be collected, and the location of the ship, in The Forest Navel. | icons = | |||
{{map icon | S.S. Dolphin | 187 | 158 | bg = none}} | |||
{{map icon | Anti-Dioxin Filter | 75 | 357}} | |||
{{map icon | Libra | 25 | 111}} | |||
{{map icon | Analog Computer | 188 | 49}} | |||
{{map icon | Omega Stabilizer | 316 | 342}} | |||
{{map icon | Guard Satellite | 325 | 230}} | |||
}} | |||
* Using the 40 Blue Pikmin, bring the [[Anti-Dioxin Filter]] out of the water. | |||
* Using the [[Golden Candypop Bud]]s, convert 6 Blue Pikmin into Yellow Pikmin. | |||
* Using Blue Pikmin, break the geyser near the [[Libra]] and bring the [[Analog Computer]] out of the water. | |||
* Using the [[Crimson Candypop Bud]]s, convert 14 Yellow and 33 Blue Pikmin into Red Pikmin. | |||
* Collect the [[Analog Computer]]. | |||
* Collect the [[Libra]]. | |||
* Collect the [[Omega Stabilizer]]. | |||
* Collect the [[Guard Satellite]]. | |||
* Collect the [[Anti-Dioxin Filter]]. | |||
Pikmin count: 50 | |||
* 48 Reds | |||
* 1 Yellows | |||
* 1 Blues | |||
{{clear}} | |||
===Day 9 - The Final Trial=== | |||
{{location map | width = 350 | height = 635 | align = right | image = FT texture.png | bg = #111 | caption = Map of all ship parts to be collected, and the location of the ship, in The Final Trial. | icons = | |||
{{map icon | S.S. Dolphin | 168 | 95 | bg = none}} | |||
{{map icon | Secret Safe | 179 | 462}} | |||
}} | |||
* Using the Golden Candypop Buds, convert 2 Red Pikmin into Yellow Pikmin (for faster [[bomb-rock]] collection). | |||
* Defeat the [[Emperor Bulblax]]. | |||
* Collect the [[Secret Safe]]. | |||
Pikmin count: 50 | |||
* 46 Reds | |||
* 3 Yellows | |||
* 1 Blues | |||
{{clear}} | |||
==See also== | |||
*[[Zero death challenge]] | |||
*[[101 Pikmin challenge]] | |||
*[[Challenge run]] | |||
==References== | |||
{{refs}} | |||
[[Category:Challenge runs]] | [[Category:Challenge runs]] | ||
Latest revision as of 17:38, October 27, 2023
A 50 Pikmin challenge is a playthrough of Pikmin with only 50 Pikmin, the minimum possible number. Like the 6 day run or the zero death challenge, it is recommended that players have completed the game at least once before attempting, due to its challenging nature.
The Gluon Drive requires the most Pikmin to carry – a minimum of 50 Pikmin. This means that the main game is entirely beatable with only 50 Pikmin ever being sprouted. The minimum amount of time this has ever been completed is in 8 days. This was done by using a combination of tricks to collect the Positron Generator on day 2. That enabled the growth of Red Pikmin in preparation for day 3, in which The Forest of Hope was fully completed in 1 day.[1] The 9 day challenge is far more common due to its relative ease compared to the 8 day run. If the player wishes to only collect the 25 required ship parts, 50 Pikmin are still required but the player must wait out all 30 days for the game to end. Due to the Secret Safe weighing 85 on the Japanese version, this challenge does not apply for that game version.
9 day walkthrough[edit]
|
The following article or section contains guides. |
Day 1 - The Impact Site[edit]
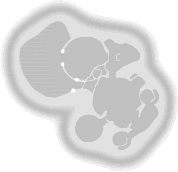
- Discover Red Pikmin and sprout 25 of them, allowing them to blossom before they are plucked.
- Collect the Main Engine.
Pikmin count: 25
- 25 Reds
- 0 Yellows
- 0 Blues
Day 2 - The Forest of Hope[edit]
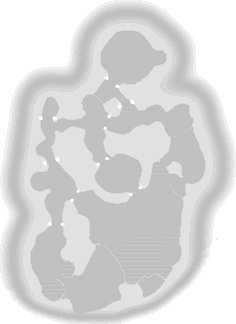
- Discover Yellow Pikmin and sprout 10 of them.
- Collect the Shock Absorber.
- Collect the Nova Blaster.
- Collect the Extraordinary Bolt.
- Collect the Whimsical Radar.
Pikmin count: 35
- 25 Reds
- 10 Yellows
- 0 Blues
[edit]

- Collect the Gravity Jumper.
- Kill the Puffstool and Beady Long Legs.
- Kill the Breadbug and collect the Space Float.
- Discover Blue Pikmin and sprout 15 of them.
- Collect the Automatic Gear.
- Collect the #1 Ionium Jet.
Pikmin count: 50
- 25 Reds
- 10 Yellows
- 15 Blues
Day 4 - The Forest of Hope[edit]
- Collect the Geiger Counter.
- Collect the Eternal Fuel Dynamo.
- Collect the Radiation Canopy.
- Collect the Sagittarius.
Pikmin count: 50
- 25 Reds
- 10 Yellows
- 15 Blues
Day 5 - The Distant Spring[edit]
- Kill the two Swooping Snitchbugs and the Armored Cannon Beetle.
- Collect the UV Lamp.
- Using the Lapis Lazuli Candypop Buds, convert 24 Red and 1 Yellow Pikmin into Blue Pikmin.
- Collect the Chronos Reactor.
- Collect the #2 Ionium Jet.
- Collect the Repair-type Bolt.
Pikmin count: 50
- 1 Reds
- 9 Yellows
- 40 Blues
Day 6 - The Impact Site[edit]
- Collect the Positron Generator.
- Blossom any leaf or bud Pikmin using nectar.
Pikmin count: 50
- 1 Reds
- 9 Yellows
- 40 Blues
Day 7 - The Distant Spring[edit]
- Collect the Interstellar Radio.
- Collect the Pilot's Seat.
- Collect the Bowsprit.
- Collect the Zirconium Rotor.
- Collect the Gluon Drive.
- Collect the Massage Machine.
Pikmin count: 50
- 1 Reds
- 9 Yellows
- 40 Blues
[edit]
- Using the 40 Blue Pikmin, bring the Anti-Dioxin Filter out of the water.
- Using the Golden Candypop Buds, convert 6 Blue Pikmin into Yellow Pikmin.
- Using Blue Pikmin, break the geyser near the Libra and bring the Analog Computer out of the water.
- Using the Crimson Candypop Buds, convert 14 Yellow and 33 Blue Pikmin into Red Pikmin.
- Collect the Analog Computer.
- Collect the Libra.
- Collect the Omega Stabilizer.
- Collect the Guard Satellite.
- Collect the Anti-Dioxin Filter.
Pikmin count: 50
- 48 Reds
- 1 Yellows
- 1 Blues
Day 9 - The Final Trial[edit]
- Using the Golden Candypop Buds, convert 2 Red Pikmin into Yellow Pikmin (for faster bomb-rock collection).
- Defeat the Emperor Bulblax.
- Collect the Secret Safe.
Pikmin count: 50
- 46 Reds
- 3 Yellows
- 1 Blues
See also[edit]
References[edit]
- ^ YouTube video of the third day in an 8-day run