Dim Labyrinth: Difference between revisions
No edit summary |
No edit summary |
||
| (45 intermediate revisions by 19 users not shown) | |||
| Line 1: | Line 1: | ||
[[ | {{game icons|p2=y}} | ||
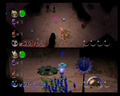
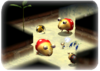
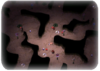
[[File:Dim Labyrinth preview.png|thumb|300px|Stage preview.]] | |||
The Dim Labyrinth is a | The '''Dim Labyrinth''' is a level in {{p2}}{{'s}} [[2-Player Battle]] mode. The level is a maze of winding corridors with dirt floors and walls. Uniquely among 2-Player Battle levels, its layout is randomly generated the same way [[cave]] sublevels are, instead of being chosen from a set list of patterns. There are few enemies, aside from the [[Breadbug]]s, which will try to steal anything, including marbles. A player may recover any marble being dragged by a Breadbug by overpowering it with Pikmin; otherwise, the marble and any Pikmin holding onto it will be dragged into its den. The taken marble may be claimed by a player once the Breadbug who captured it is defeated. One should be wary of the other Breadbugs wandering the area, however, as they may decide to claim any marbles that are unattended. Breadbugs will ignore any marble that is partially buried in the ground, only paying it any mind when it has been uprooted. | ||
The Dim Labyrinth is a dark and gloomy area, meaning the overview of the [[camera]] may be handy. Commonly, when playing in this area, some long passages will just lead to eggs. The Breadbugs are usually in this area trotting around. There can be several Breadbugs in a single configuration, up to around 6 Breadbugs. | |||
==Strategy== | |||
{{guide}} | |||
If your opponent's marble has been captured by a Breadbug, see which Breadbug routes go near their Onion and defeat them; the marble should reappear once the culprit is subdued, which is very useful if it is far from the opponent's base and they do not know where it is. | |||
Yellow marbles are scattered around the maze. Use your exploration skills to track them down if obtaining yellow marbles is how you plan to beat your opponent. If you're playing for just the opponent's marble, make sure you stay well hidden. For an alternate challenge, you and your opponent may uproot every yellow marble and allow the Breadbugs to drag them to their nests. | |||
One of the best things that can happen in this arena is having the Breadbug steal your marble because your opponent will be unable to capture it as long as it is in a Breadbug's den. They may decide to hunt down all the Breadbugs in the area. If they find the one with your marble held in its nest, you could be in dire straits. Still, it is always best to let the Breadbug drag away your marble as it is a good hiding spot. | |||
If you happen to get lost and are unable to find your way back to your Onion, get your Pikmin to carry an object and follow them back to your base. Alternately you may [[lie down]] and let them carry you, but remember that you won't bring idle Pikmin with you. Finally, you can also bring the camera to ground-level by holding {{button|gc|r|wii|padlr}}, as this makes it easier to spot the tall Onions. | |||
Having the ghost item activated when your opponent is nearby is ideal for hiding Pikmin in the darkness – hide them in hollow passages to give your enemy a shock when attempting to grab a marble or cherry. | |||
To get rid of the Breadbugs easily, allow them to pick up an object and then [[swarm]] it. Sheargrub carcasses are not preferred, as only a maximum of 1 Pikmin can carry them. Try carrying a yellow marble back and them hammer the beast with Pikmin after it has made it to the Onion. It should have very little [[HP|health]] then but note that once it has taken something back into its nest it will be fully regenerated the next time it reappears. | |||
==Level information== | |||
*'''Theme''': Soil | |||
*'''Treasures''': | |||
**None | |||
*'''Enemies''': | |||
**{{icon|Breadbug|y}} | |||
**{{icon|Female Sheargrub|y}} | |||
**{{icon|Shearwig|y}} (under marbles) | |||
*'''Obstacles''': | |||
**None | |||
*'''Plants and fungi''': | |||
**{{icon|Pellet Posy|y}} | |||
*'''Others''': | |||
**None | |||
== | {{sublevel technical | ||
|cave = vs_9_meiro | |||
|enemymax = 35 | |||
|itemmax = 0 | |||
{{ | |gatemax = 0 | ||
|capmax = 0 | |||
|rooms = 8 | |||
|ctrratio = 0.02 | |||
|geyser = No | |||
|unitfile = vs_9_tsuchi.txt | |||
|lightfile = muraon_light_lv4.ini | |||
|bg = | |||
|clog = No | |||
|hiddenfloor = 0 | |||
|units = | |||
{{sublevel units | |||
|cap_tsuchi|Dead end | |||
|way3_tsuchi|Three-way crossing | |||
|way4_tsuchi|Four-way crossing | |||
|wayl_tsuchi|Turning corridor | |||
|way2_tsuchi|Corridor | |||
|way2x2_tsuchi|Long corridor | |||
}} | |||
{{sublevel units | |||
|room_hitode1_5_tsuchi|'''Room with 5 exits''' | |||
|room_hitode2_5_tsuchi|'''Room with 5 exits''' | |||
|room_hitode3_4_tsuchi|'''Room with 4 exits''' | |||
|room_hitode4_4_tsuchi|'''Room with 4 exits''' | |||
}} | |||
}} | |||
==Gallery== | |||
<gallery> | |||
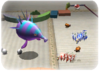
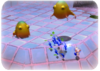
File:Dim Labyrinth.png|[[Breadbug]]s in the Dim Labyrinth. | |||
</gallery> | |||
==Names in other languages== | |||
{{Foreignname | |||
|Ger=Dämmerlabyrinth | |||
|GerM=Twilight Labyrinth | |||
|SpaA=Laberinto II | |||
|SpaAM=Labyrinth II | |||
|Ita=Dedalo buio | |||
|ItaM=Dark Maze | |||
}} | |||
{{2PB}} | |||
Latest revision as of 21:00, February 14, 2024

The Dim Labyrinth is a level in Pikmin 2's 2-Player Battle mode. The level is a maze of winding corridors with dirt floors and walls. Uniquely among 2-Player Battle levels, its layout is randomly generated the same way cave sublevels are, instead of being chosen from a set list of patterns. There are few enemies, aside from the Breadbugs, which will try to steal anything, including marbles. A player may recover any marble being dragged by a Breadbug by overpowering it with Pikmin; otherwise, the marble and any Pikmin holding onto it will be dragged into its den. The taken marble may be claimed by a player once the Breadbug who captured it is defeated. One should be wary of the other Breadbugs wandering the area, however, as they may decide to claim any marbles that are unattended. Breadbugs will ignore any marble that is partially buried in the ground, only paying it any mind when it has been uprooted.
The Dim Labyrinth is a dark and gloomy area, meaning the overview of the camera may be handy. Commonly, when playing in this area, some long passages will just lead to eggs. The Breadbugs are usually in this area trotting around. There can be several Breadbugs in a single configuration, up to around 6 Breadbugs.
Strategy[edit]
|
The following article or section contains guides. |
If your opponent's marble has been captured by a Breadbug, see which Breadbug routes go near their Onion and defeat them; the marble should reappear once the culprit is subdued, which is very useful if it is far from the opponent's base and they do not know where it is.
Yellow marbles are scattered around the maze. Use your exploration skills to track them down if obtaining yellow marbles is how you plan to beat your opponent. If you're playing for just the opponent's marble, make sure you stay well hidden. For an alternate challenge, you and your opponent may uproot every yellow marble and allow the Breadbugs to drag them to their nests.
One of the best things that can happen in this arena is having the Breadbug steal your marble because your opponent will be unable to capture it as long as it is in a Breadbug's den. They may decide to hunt down all the Breadbugs in the area. If they find the one with your marble held in its nest, you could be in dire straits. Still, it is always best to let the Breadbug drag away your marble as it is a good hiding spot.
If you happen to get lost and are unable to find your way back to your Onion, get your Pikmin to carry an object and follow them back to your base. Alternately you may lie down and let them carry you, but remember that you won't bring idle Pikmin with you. Finally, you can also bring the camera to ground-level by holding ![]() /
/ ![]() , as this makes it easier to spot the tall Onions.
, as this makes it easier to spot the tall Onions.
Having the ghost item activated when your opponent is nearby is ideal for hiding Pikmin in the darkness – hide them in hollow passages to give your enemy a shock when attempting to grab a marble or cherry.
To get rid of the Breadbugs easily, allow them to pick up an object and then swarm it. Sheargrub carcasses are not preferred, as only a maximum of 1 Pikmin can carry them. Try carrying a yellow marble back and them hammer the beast with Pikmin after it has made it to the Onion. It should have very little health then but note that once it has taken something back into its nest it will be fully regenerated the next time it reappears.
Level information[edit]
- Theme: Soil
- Treasures:
- None
- Enemies:
 Breadbug
 Female Sheargrub
 Shearwig (under marbles)
- Obstacles:
- None
- Plants and fungi:
- Others:
- None
| Technical sublevel information | |||||
|---|---|---|---|---|---|
| Internal cave name | vs_9_meiro | ||||
| "Main" object maximum (?) | 35 | ||||
| "Treasure" object maximum (?) | 0 | ||||
| "Gate" object maximum (?) | 0 | ||||
| Dead end unit probability (?) | 0 | ||||
| Number of rooms (?) | 8 | ||||
| Corridor-to-room ratio (?) | 0.02 | ||||
| Escape geyser (?) | No | ||||
| Clogged hole (?) | No | ||||
| Cave units file (?) | vs_9_tsuchi.txt | ||||
| Lighting file (?) | muraon_light_lv4.ini | ||||
| Background (?) | None | ||||
| Cave units (?) | |||||
 |
 |
 |
 |
 |
|
| Dead end | Three-way crossing | Four-way crossing | Turning corridor | Corridor | Long corridor |
 |
 |
 |
 |
||
| Room with 5 exits | Room with 5 exits | Room with 4 exits | Room with 4 exits | ||
Gallery[edit]
Breadbugs in the Dim Labyrinth.

Names in other languages[edit]
| Language | Name | Meaning |
|---|---|---|
| Dämmerlabyrinth | Twilight Labyrinth | |
| Dedalo buio | Dark Maze | |
| Laberinto II | Labyrinth II |
| 2-Player Battle stages | ||||
|---|---|---|---|---|
 Battle Field |
 War Path |
 Carpet Plain |
 Angle Maze |
 Colosseum |
 Rusty Gulch |
 Brawl Yard |
 Tile Lands |
 Dim Labyrinth |
 Hostile Territory |