
Buried Pond: Difference between revisions
m (→Layouts) |
m (Replaced P2 Marble icons with P3 equivalents.) |
||
| (40 intermediate revisions by 10 users not shown) | |||
| Line 1: | Line 1: | ||
{{game icons|p3=y}} | {{game icons|p3=y}} | ||
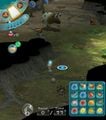
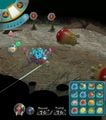
[[File:P3d - Buried Pond Gameplay.jpg|thumb|400px|Gameplay screenshot.]] | |||
Buried Pond is the ninth stage of ''[[Pikmin 3]]''<nowiki>'</nowiki>s [[Bingo Battle]]. | '''Buried Pond''' is the ninth stage of ''[[Pikmin 3]]''<nowiki> '</nowiki>s [[Bingo Battle]]. | ||
==Layouts== | ==Layouts== | ||
The layout unlock order, as explained [[Bingo Battle#Maps|here]], is B, A, C. | |||
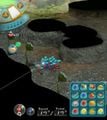
===Layout A=== | ===Layout A=== | ||
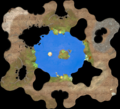
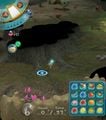
[[File:Map 25 buried pond a.jpg|thumb|400px|Layout A overview.]] | |||
This layout gives players [[Red Pikmin]] to start with, and [[Winged Pikmin]] can be found. | |||
*{{icon| | '''Enemies''': | ||
*{{icon| | {{columns|2| | ||
*{{icon| | *{{icon|Dwarf Bulborb|y|v=P3}} × 2 | ||
*{{icon| | *{{icon|Skitter Leaf|y|v=P3}} × 1 | ||
*{{icon| | *{{icon|Female Sheargrub|v=P3|y}} × 10 | ||
*{{icon| | *{{icon|Yellow Wollywog|v=P3|y}} × 2 | ||
* | *{{icon|Bulborb|v=P3|y}} × 2 | ||
*[[ | *{{icon|Desiccated Skitter Leaf|y}} × 1 | ||
*[[ | *{{icon|Male Sheargrub|v=P3|y}} × 2 (under flukeweeds) | ||
*{{icon| | }} | ||
* | |||
* | '''Fruits''': | ||
* | {{columns|2| | ||
* | *{{icon|Portable Sunset|y}} × 1 | ||
* | *{{icon|Sunseed Berry|y|v=FF}} × 1 | ||
*[[ | *{{icon|Golden Sunseed|y}} × 1 | ||
*[[ | *{{icon|Face Wrinkler|y}} × 1 | ||
*{{icon|Zest Bomb|y}} × 1 | |||
}} | |||
'''Marbles''': | |||
{{columns|2| | |||
*{{icon|Blue Marble|v=P3}} [[Crystallized Clairvoyance|Blue Marble]] × 1 | |||
*{{icon|Red Marble|v=P3}} [[Crystallized Telepathy|Red Marble]] × 1 | |||
*{{icon|Yellow Marble|v=P3}} [[Crystallized Telekinesis|Yellow Marble]] × 2 | |||
*{{icon|Lucky Marble|y}} × 1 | |||
}} | |||
'''Tools''': | |||
*{{icon|Flukeweed|y}} × 13 | |||
*{{icon|Lily pad|y}} × 3 | |||
'''Obstacles''': | |||
*{{icon|Bamboo gate|y}} × 4 | |||
*{{icon|Dirt wall|y}} × 2 | |||
*{{icon|Water body|y}} × 1 | |||
'''Plants and fungi''': | |||
*{{icon|Pellet Posy|v=P3}} [[Pellet Posy|1-Pellet-Posy]] × 16 | |||
*{{icon|Pellet Posy|v=P3}} [[Pellet Posy|5-Pellet-Posy]] × 2 | |||
===Layout B=== | ===Layout B=== | ||
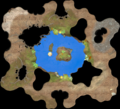
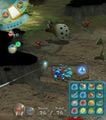
[[File: | [[File:Map 26 buried pond b.jpg|thumb|400px|Layout B overview.]] | ||
This layout gives players Red Pikmin to start with, and [[Blue Pikmin]] can be found. | |||
* | |||
* | '''Enemies''': | ||
* | {{columns|2| | ||
*{{icon|Toady Bloyster|y|v=P3}} × 1 | |||
* | *{{icon|Dwarf Bulborb|y|v=P3}} × 3 | ||
* | *{{icon|Yellow Wollywog|y|v=P3}} × 1 | ||
* | *{{icon|Whiptongue Bulborb|y}} × 1 | ||
* | *{{icon|Puckering Blinnow|y}} × 3 | ||
*[[Crystallized | *{{icon|Bulborb|y|v=P3}} × 6 | ||
*[[ | *{{icon|Desiccated Skitter Leaf|y}} × 8 | ||
*[[ | *{{icon|Female Sheargrub|y|v=P3}} × 10 | ||
* | }} | ||
*[[ | |||
'''Fruits''': | |||
*{{icon|Citrus Lump|y|v=FF}} × 1 | |||
*{{icon|Sunseed Berry|y|v=FF}} × 1 | |||
*{{icon|Golden Sunseed|y}} × 1 | |||
'''Marbles''': | |||
*{{icon|Blue Marble|v=P3}} [[Crystallized Clairvoyance|Blue Marble]] × 2 | |||
*{{icon|Red Marble|v=P3}} [[Crystallized Telepathy|Red Marble]] × 2 | |||
*{{icon|Yellow Marble|v=P3}} [[Crystallized Telekinesis|Yellow Marble]] × 2 | |||
'''Tools''': | |||
*{{icon|Lily pad|y}} × 3 | |||
'''Obstacles''': | |||
*{{icon|Dirt wall|y}} × 4 | |||
*{{icon|Water body|y}} × 1 | |||
'''Plants and fungi''': | |||
*{{icon|Pellet Posy|v=P3}} [[Pellet Posy|1-Pellet-Posy]] × 48 | |||
===Layout C=== | ===Layout C=== | ||
[[File: | [[File:Map 27 buried pond c.jpg|thumb|400px|Layout C overview.]] | ||
* | This layout gives players Red Pikmin to start with, and [[Winged Pikmin]] can be found. | ||
* | |||
* | '''Enemies''': | ||
*[[ | {{columns|2| | ||
*[[ | *{{icon|Bulborb|v=P3|y}} × 2 | ||
*[[ | *{{icon|Toady Bloyster|v=P3|y}} × 1 | ||
* | *{{icon|Yellow Wollywog|y|v=P3}} × 2 | ||
* | *{{icon|Dwarf Bulborb|y|v=P3}} × 4 | ||
* | *{{icon|Fiery Blowhog|y|v=P3}} × 2 | ||
*[[ | *{{icon|Female Sheargrub|y|v=P3}} × 12 | ||
* | }} | ||
'''Fruits''': | |||
*{{icon|Portable Sunset|y}} × 1 | |||
'''Marbles''': | |||
*{{icon|Blue Marble|v=P3}} [[Crystallized Clairvoyance|Blue Marble]] × 3 | |||
*{{icon|Red Marble|v=P3}} [[Crystallized Telepathy|Red Marble]] × 3 | |||
*{{icon|Yellow Marble|v=P3}} [[Crystallized Telekinesis|Yellow Marble]] × 3 | |||
'''Tools''': | |||
*{{icon|Flukeweed|y}} × 8 | |||
*{{icon|Bomb rock|y}} × 7 (4 in dirt mounds) | |||
*{{icon|Dirt mound|y}} × 2 (2 bomb rocks in each) | |||
'''Obstacles''': | |||
*{{icon|Dirt wall|y}} × 2 | |||
*{{icon|Water body|y}} × 1 | |||
'''Plants and fungi''': | |||
*{{icon|Pellet Posy|v=P3}} [[Pellet Posy|1-Pellet Posy]] × 24 | |||
'''Other objects''': | |||
*{{icon|Egg|v=P3|y}} × 8 | |||
==Gallery== | ==Gallery== | ||
<gallery> | <gallery> | ||
Buried Pond radar.png|Texture used on the [[radar]] for layouts A and B. | Buried Pond radar.png|Texture used on the [[radar]] for layouts A and B. | ||
Buried Pond C radar.png|Texture used on the [[radar]] for layout C. | Buried Pond C radar.png|Texture used on the [[radar]] for layout C. | ||
Buried Pond P3 Alph solo.jpg|Alph exploring a cave section without Pikmin. | |||
Buried Pond P3 Alph and Yellow Wollywog.jpg|Alph encountering a [[Yellow Wollywog]]. | |||
Buried Pond P3 Alph and Female Sheargrubs.jpg|Alph encountering several Female Sheargrubs. | |||
Buried Pond P3 dirt wall.jpg|Alph exploring near a dirt wall. | |||
Buried Pond P3 Red Team Onion.jpg|Olimar standing near his team's Onion. | |||
Buried Pond P3 Whiptongue Bulborb.jpg|Alph encountering a [[Whiptongue Bulborb]], having just defeated a [[Desiccated Skitter Leaf]]. | |||
Buried Pond P3 Bulborbs.jpg|Alph encountering two [[Bulborb]]s while having Red Pikmin and Blue Pikmin in his squad. | |||
Buried Pond P3 Pellet Posies.jpg|Alph with Red Pikmin and Blue Pikmin in his squad, approaching Pellet Posies. | |||
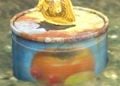
Persimmon can.jpg|The can near the center of the map. Notice the [[Portable Sunset]] on its side. | |||
</gallery> | </gallery> | ||
==Names in other languages== | |||
{{foreignname | |||
|Ger=Untergrundoase | |||
|GerM=Underground Oasis | |||
|Spa=Oasis Subterráneo | |||
|SpaM=Underground Oasis | |||
|Ita=Oasi sepolta | |||
|ItaM=Buried Oasis | |||
|Fra=Oasis souterraine | |||
|FraM=Underground Oasis | |||
}} | |||
==See also== | |||
* [[Twisted Cavern]] | |||
{{BB}} | {{BB}} | ||
Latest revision as of 21:02, March 12, 2024

Buried Pond is the ninth stage of Pikmin 3 's Bingo Battle.
LayoutsEdit
The layout unlock order, as explained here, is B, A, C.
Layout AEdit

This layout gives players Red Pikmin to start with, and Winged Pikmin can be found.
Enemies:
 Dwarf Bulborb × 2
 Skitter Leaf × 1
 Female Sheargrub × 10
 Yellow Wollywog × 2
 Bulborb × 2
 Desiccated Skitter Leaf × 1
 Male Sheargrub × 2 (under flukeweeds)
Fruits:
 Portable Sunset × 1
 Sunseed Berry × 1
 Golden Sunseed × 1
 Face Wrinkler × 1
 Zest Bomb × 1
Marbles:
 Blue Marble × 1
 Red Marble × 1
 Yellow Marble × 2
 Lucky Marble × 1
Tools:
Obstacles:
 Bamboo gate × 4
 Dirt wall × 2
 Water body × 1
Plants and fungi:
 1-Pellet-Posy × 16
- 5-Pellet-Posy × 2
Layout BEdit

This layout gives players Red Pikmin to start with, and Blue Pikmin can be found.
Enemies:
 Toady Bloyster × 1
- Dwarf Bulborb × 3
- Yellow Wollywog × 1
 Whiptongue Bulborb × 1
 Puckering Blinnow × 3
- Bulborb × 6
- Desiccated Skitter Leaf × 8
- Female Sheargrub × 10
Fruits:
 Citrus Lump × 1
- Sunseed Berry × 1
- Golden Sunseed × 1
Marbles:
- Blue Marble × 2
- Red Marble × 2
- Yellow Marble × 2
Tools:
 Lily pad × 3
Obstacles:
- Dirt wall × 4
- Water body × 1
Plants and fungi:
- 1-Pellet-Posy × 48
Layout CEdit

This layout gives players Red Pikmin to start with, and Winged Pikmin can be found.
Enemies:
- Bulborb × 2
- Toady Bloyster × 1
- Yellow Wollywog × 2
- Dwarf Bulborb × 4
 Fiery Blowhog × 2
- Female Sheargrub × 12
Fruits:
- Portable Sunset × 1
Marbles:
- Blue Marble × 3
- Red Marble × 3
- Yellow Marble × 3
Tools:
 Flukeweed × 8
 Bomb rock × 7 (4 in dirt mounds)
 Dirt mound × 2 (2 bomb rocks in each)
Obstacles:
- Dirt wall × 2
- Water body × 1
Plants and fungi:
- 1-Pellet Posy × 24
Other objects:
 Egg × 8
GalleryEdit
Texture used on the radar for layouts A and B.
Texture used on the radar for layout C.
Alph exploring a cave section without Pikmin.
Alph encountering a Yellow Wollywog.
Alph encountering several Female Sheargrubs.
Alph exploring near a dirt wall.
Olimar standing near his team's Onion.
Alph encountering a Whiptongue Bulborb, having just defeated a Desiccated Skitter Leaf.
Alph encountering two Bulborbs while having Red Pikmin and Blue Pikmin in his squad.
Alph with Red Pikmin and Blue Pikmin in his squad, approaching Pellet Posies.
The can near the center of the map. Notice the Portable Sunset on its side.


Names in other languagesEdit
| Language | Name | Meaning |
|---|---|---|
| Oasis souterraine | Underground Oasis | |
| Untergrundoase | Underground Oasis | |
| Oasi sepolta | Buried Oasis | |
| Oasis Subterráneo | Underground Oasis |