Jigsaw Colosseum: Difference between revisions
Phineas81707 (talk | contribs) mNo edit summary |
m (Replaced P2 Marble icons with P3 equivalents) |
||
| (31 intermediate revisions by 14 users not shown) | |||
| Line 1: | Line 1: | ||
{{game icons|p3=y}} | {{game icons|p3=y}} | ||
[[File:Jigsaw Colosseum.jpg|thumb| | [[File:P3d - Jigsaw Colosseum Gameplay.jpg|thumb|400px|Gameplay screenshot.]] | ||
{{stub}} | {{stub}} | ||
'''Jigsaw Colosseum''' is the twelfth and final stage of ''[[Pikmin 3]]'' | '''Jigsaw Colosseum''' is the twelfth and final stage of ''[[Pikmin 3]]''{{'s}} [[Bingo Battle]] mode. This level is large in size, and it is very easy to get lost. It is recommended to leave one [[leader]] at the Onion if playing with two leaders per player. This, [[Twisted Cavern]] and the [[Corroded Maze]] are the only places where [[White Pikmin]] can be found in Bingo Battle, and as such, was one of the only times where an [[Onion]] can be seen producing White Pikmin (with the use of the +5 Rare Pikmin item), until the discovery of the White Onion in {{p4}}. | ||
Each layout has two of the items on the bingo card in the center area, and walls blocking the way in. | Each layout has two of the items on the bingo card in the center area, and walls blocking the way in. | ||
==Layouts== | ==Layouts== | ||
The layout unlock order, as explained [[Bingo Battle#Maps|here]], is A, B, C. | |||
===Layout A=== | ===Layout A=== | ||
This | [[File:Map 34 jigsaw colosseum a.jpg|thumb|400px|Layout A overview.]] | ||
* | |||
* | This layout gives players [[Red Pikmin]] to start with, and [[White Pikmin]] can be found. | ||
* | |||
* | '''Enemies''': | ||
* | {{columns|2| | ||
* | *{{icon|Bulborb|y|v=P3}} × 2 | ||
* | *{{icon|Whiptongue Bulborb|y}} × 2 | ||
* | *{{icon|Yellow Wollywog|y|v=P3}}× 2 | ||
* | *{{icon|Medusal Slurker|y}} × 8 | ||
* | *{{icon|Dwarf Bulborb|y|v=P3}} × 14 | ||
* | }} | ||
*[[ | |||
*[[ | '''Fruits''': | ||
*[[Yellow | {{columns|2| | ||
*{{icon|Face Wrinkler|y}} × 1 | |||
*{{icon|Zest Bomb|y}} × 1 | |||
* | *{{icon|Sunseed Berry|y|v=FF}} × 2 | ||
*[[Pellet Posy]] | *{{icon|Golden Sunseed|y}} × 1 | ||
*[[ | *{{icon|Citrus Lump|y|v=FF}} × 2 | ||
* | *{{icon|Velvety Dreamdrop|y}} × 1 | ||
*{{icon|Portable Sunset|y}} × 2 | |||
*{{icon|Dapper Blob|y}} × 2 | |||
}} | |||
'''Marbles''': | |||
*{{icon|Blue Marble|v=P3}} [[Crystallized Clairvoyance|Blue Marble]] × 1 | |||
*{{icon|Red Marble|v=P3}} [[Crystallized Telepathy|Red Marble]] × 1 | |||
*{{icon|Yellow Marble|v=P3}} [[Crystallized Telekinesis|Yellow Marble]] × 2 | |||
'''Obstacles''': | |||
*{{icon|Dirt wall|y}} × 2 | |||
'''Plants and fungi''': | |||
*{{icon|Pellet Posy|v=P3}} [[Pellet Posy|1-Pellet Posy]] × 16 | |||
*{{icon|Pellet Posy|v=P3}} [[Pellet Posy|5-Pellet Posy]] × 2 | |||
'''Other objects''': | |||
*{{icon|Egg|y|v=P3}} × 12 | |||
===Layout B=== | ===Layout B=== | ||
[[File:Map 35 jigsaw colosseum b.jpg|thumb|400px|Layout B overview.]] | |||
* | This layout gives players Red Pikmin to start with, and [[Rock Pikmin]] can be found. | ||
* | |||
* | '''Enemies''': | ||
* | {{columns|2| | ||
* | *{{icon|Bulborb|y|v=P3}} × 3 | ||
* | *{{icon|Whiptongue Bulborb|y}} × 2 | ||
* | *{{icon|Orange Bulborb|y|v=P3}} × 2 | ||
*{{icon|Spotty Bulbear|y|v=P3}} × 2 | |||
*{{icon|Dwarf Bulborb|y|v=P3}} × 8 | |||
*{{icon|Dwarf Bulbear|y|v=P3}} × 4 | |||
*[[ | }} | ||
*[[ | |||
*[[ | '''Fruits''': | ||
* | {{columns|2| | ||
*[[Pellet Posy]] | *{{icon|Insect Condo|y|v=FF}} × 2 | ||
*{{icon|Sunseed Berry|y|v=FF}} × 2 | |||
* | *{{icon|Citrus Lump|y|v=FF}} × 2 | ||
*{{icon|Stellar Extrusion|y}} × 1 | |||
*{{icon|Disguised Delicacy|y|v=FF}} × 1 | |||
*{{icon|Velvety Dreamdrop|y}} × 2 | |||
*{{icon|Face Wrinkler|y}} × 2 | |||
}} | |||
'''Marbles''': | |||
*{{icon|Blue Marble|v=P3}} [[Crystallized Clairvoyance|Blue Marble]] × 2 | |||
*{{icon|Red Marble|v=P3}} [[Crystallized Telepathy|Red Marble]] × 2 | |||
*{{icon|Yellow Marble|v=P3}} [[Crystallized Telekinesis|Yellow Marble]] × 2 | |||
'''Obstacles''': | |||
*{{icon|Crystal wall|y}} × 2 | |||
*{{icon|Large crystal|y}} × 8 | |||
'''Plants and fungi''': | |||
*{{icon|Pellet Posy|v=P3}} [[Pellet Posy|1-Pellet Posy]] × 16 | |||
'''Other objects''': | |||
*{{icon|Egg|y|v=P3}} × 10 | |||
===Layout C=== | ===Layout C=== | ||
[[File:Map 36 jigsaw colosseum c.jpg|thumb|400px|Layout C overview.]] | |||
* | This layout gives players Rock Pikmin to start with, and [[Yellow Pikmin]] can be found. | ||
* | |||
* | '''Enemies''': | ||
* | *{{icon|Calcified Crushblat|y}} × 1 | ||
* | *{{icon|Bulborb|y|v=P3}} × 2 | ||
* | *{{icon|Bearded Amprat|y}} × 2 | ||
* | |||
* | '''Fruits''': | ||
* | {{columns|2| | ||
* | *{{icon|Delectable Bouquet|y}} × 1 | ||
* | *{{icon|Dapper Blob|y}} × 1 | ||
* | *{{icon|Portable Sunset|y}} × 1 | ||
*[[Crystallized Clairvoyance|Blue Marble]] | *{{icon|Citrus Lump|y|v=FF}} × 1 | ||
*[[Crystallized Telepathy|Red Marble]] | *{{icon|Velvety Dreamdrop|y}} × 1 | ||
* | *{{icon|Insect Condo|y|v=FF}} × 1 | ||
* | *{{icon|Heroine's Tear|y}} × 1 | ||
* | *{{icon|Zest Bomb|y}} × 1 | ||
* | *{{icon|Face Wrinkler|y}} × 1 | ||
*[[ | *{{icon|Golden Sunseed|y}} × 2 | ||
*{{icon|Sunseed Berry|y|v=FF}} × 2 | |||
* | }} | ||
'''Marbles''': | |||
*{{icon|Blue Marble|v=P3}} [[Crystallized Clairvoyance|Blue Marble]] × 2 | |||
*{{icon|Red Marble|v=P3}} [[Crystallized Telepathy|Red Marble]] × 2 | |||
*{{icon|Lucky Marble|y}} × 2 | |||
'''Tools''': | |||
*{{icon|Bomb rock|y}} × 12 | |||
*{{icon|Mine|y}} × 4 | |||
'''Obstacles''': | |||
*{{icon|Electric gate|v=P3|y}} × 4 | |||
*{{icon|Crystal wall|y}} × 8 | |||
*{{icon|Large crystal|y}} × 8 | |||
'''Plants and fungi''': | |||
*{{icon|Pellet Posy|v=P3}} [[Pellet Posy|1-Pellet Posy]] × 24 | |||
'''Other objects''': | |||
*{{icon|Egg|y|v=P3}} × 8 | |||
===Names in other languages=== | |||
{{foreignname | |||
|Ger = Holzlabyrinth | |||
|GerM = Wooden Labyrinth | |||
|Spa = Laberinto de Madera | |||
|SpaM = Wood Maze | |||
|Fra = Labyrinthe de bois | |||
|FraM = Wooden Labyrinth | |||
|Ita = Labirinto legnoso | |||
|ItaM = Woody Maze | |||
}} | |||
==Gallery== | |||
<gallery> | <gallery> | ||
Jigsaw Colosseum.jpg|Another overview of layout A. | |||
Jigsaw Colosseum radar.png|Texture used on the [[radar]]. | Jigsaw Colosseum radar.png|Texture used on the [[radar]]. | ||
</gallery> | </gallery> | ||
==See also== | |||
*[[Jigsaw Fortress]] | |||
{{BB}} | {{BB}} | ||
Latest revision as of 21:18, March 12, 2024

|
This article is a stub. You can help Pikipedia by expanding it. |
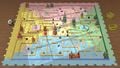
Jigsaw Colosseum is the twelfth and final stage of Pikmin 3's Bingo Battle mode. This level is large in size, and it is very easy to get lost. It is recommended to leave one leader at the Onion if playing with two leaders per player. This, Twisted Cavern and the Corroded Maze are the only places where White Pikmin can be found in Bingo Battle, and as such, was one of the only times where an Onion can be seen producing White Pikmin (with the use of the +5 Rare Pikmin item), until the discovery of the White Onion in Pikmin 4.
Each layout has two of the items on the bingo card in the center area, and walls blocking the way in.
Layouts[edit]
The layout unlock order, as explained here, is A, B, C.
Layout A[edit]

This layout gives players Red Pikmin to start with, and White Pikmin can be found.
Enemies:
 Bulborb × 2
 Whiptongue Bulborb × 2
 Yellow Wollywog× 2
 Medusal Slurker × 8
 Dwarf Bulborb × 14
Fruits:
 Face Wrinkler × 1
 Zest Bomb × 1
 Sunseed Berry × 2
 Golden Sunseed × 1
 Citrus Lump × 2
 Velvety Dreamdrop × 1
 Portable Sunset × 2
 Dapper Blob × 2
Marbles:
 Blue Marble × 1
 Red Marble × 1
 Yellow Marble × 2
Obstacles:
 Dirt wall × 2
Plants and fungi:
 1-Pellet Posy × 16
- 5-Pellet Posy × 2
Other objects:
 Egg × 12
Layout B[edit]

This layout gives players Red Pikmin to start with, and Rock Pikmin can be found.
Enemies:
- Bulborb × 3
- Whiptongue Bulborb × 2
 Orange Bulborb × 2
 Spotty Bulbear × 2
- Dwarf Bulborb × 8
 Dwarf Bulbear × 4
Fruits:
 Insect Condo × 2
- Sunseed Berry × 2
- Citrus Lump × 2
 Stellar Extrusion × 1
 Disguised Delicacy × 1
- Velvety Dreamdrop × 2
- Face Wrinkler × 2
Marbles:
- Blue Marble × 2
- Red Marble × 2
- Yellow Marble × 2
Obstacles:
 Crystal wall × 2
 Large crystal × 8
Plants and fungi:
- 1-Pellet Posy × 16
Other objects:
- Egg × 10
Layout C[edit]

This layout gives players Rock Pikmin to start with, and Yellow Pikmin can be found.
Enemies:
 Calcified Crushblat × 1
- Bulborb × 2
 Bearded Amprat × 2
Fruits:
 Delectable Bouquet × 1
- Dapper Blob × 1
- Portable Sunset × 1
- Citrus Lump × 1
- Velvety Dreamdrop × 1
- Insect Condo × 1
 Heroine's Tear × 1
- Zest Bomb × 1
- Face Wrinkler × 1
- Golden Sunseed × 2
- Sunseed Berry × 2
Marbles:
- Blue Marble × 2
- Red Marble × 2
 Lucky Marble × 2
Tools:
Obstacles:
 Electric gate × 4
- Crystal wall × 8
- Large crystal × 8
Plants and fungi:
- 1-Pellet Posy × 24
Other objects:
- Egg × 8
Names in other languages[edit]
| Language | Name | Meaning |
|---|---|---|
| Labyrinthe de bois | Wooden Labyrinth | |
| Holzlabyrinth | Wooden Labyrinth | |
| Labirinto legnoso | Woody Maze | |
| Laberinto de Madera | Wood Maze |
Gallery[edit]
Another overview of layout A.

Texture used on the radar.

