Colosseum: Difference between revisions
m (s/2-Player Mode/2-Player Battle.) |
No edit summary |
||
| (23 intermediate revisions by 10 users not shown) | |||
| Line 1: | Line 1: | ||
{{game icons|p2=y}} | {{game icons|p2=y}} | ||
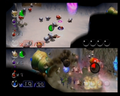
[[File:Colosseum preview.png|thumb|300px|Stage preview.]] | |||
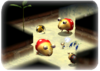
[[ | '''Colosseum''' is a [[2-Player Battle]] stage in {{p2}}. The stage has a snowy theme, similar to some cave sublevels in the [[Valley of Repose]]. It is home to a large number of [[Dwarf Red Bulborb]]s and [[Snow Bulborb]]s, as well as a few [[Armored Cannon Beetle Larva]]e. | ||
'''Colosseum''' is | |||
==Level information== | ==Level information== | ||
*'''Theme''': Snow | *'''Theme''': Snow | ||
*'''Treasures''': | |||
**{{icon|Crystallized Telekinesis|y}} inside some Dwarf Red Bulborbs | |||
*'''Enemies''': | *'''Enemies''': | ||
** | **{{icon|Armored Cannon Larva|y|n=Armored Cannon Beetle Larva}} | ||
**{{icon|Dwarf Bulborb|y|n=Dwarf Red Bulborb}} | |||
** | **{{icon|Snow Bulborb|y}} | ||
* | *'''Obstacles''': | ||
* | |||
*''' | |||
**None | **None | ||
*'''Plants and fungi''': | |||
**{{icon|Pellet Posy|y}} | |||
*'''Others''': | *'''Others''': | ||
** | **{{icon|Egg|y}} | ||
{{sublevel technical | {{sublevel technical | ||
| Line 28: | Line 26: | ||
|capmax = 50 | |capmax = 50 | ||
|rooms = 4 | |rooms = 4 | ||
|ctrratio = 0 | |||
|geyser = No | |geyser = No | ||
|unitfile = vs_2_snow.txt | |unitfile = vs_2_snow.txt | ||
|lightfile = vs_2_light.ini | |lightfile = vs_2_light.ini | ||
|bg = | |bg = | ||
|clog = No | |clog = No | ||
|hiddenfloor = 0 | |hiddenfloor = 0 | ||
|units = | |units = | ||
{{!}} colspan = 6 style = "text-align: center;" {{!}} | {{!}} colspan = 6 style = "text-align: center;" {{!}} Layout 1 (1/3 chance) | ||
{{!}}- | {{!}}- | ||
{{sublevel units | {{sublevel units | ||
|room_saka1_1_snow|Room with trunk in center ( | |room_saka1_1_snow|Room with trunk in center (×2) | ||
|room_block1_3_snow|Room with hole in wall ( | |room_block1_3_snow|Room with hole in wall (×2) | ||
|room_vs_saka2_2_snow|Room with large trunk ( | |room_vs_saka2_2_snow|Room with large trunk (×1) | ||
}} | }} | ||
{{!}} colspan = 6 style = "text-align: center;" {{!}} | {{!}} colspan = 6 style = "text-align: center;" {{!}} Layout 2 (1/3 chance) | ||
{{!}}- | {{!}}- | ||
{{sublevel units | {{sublevel units | ||
|room_vs_ike3_2_snow|Room with ramp to thin edge ( | |room_vs_ike3_2_snow|Room with ramp to thin edge (×2) | ||
|room_vs_saka2_2_snow|Room with large trunk ( | |room_vs_saka2_2_snow|Room with large trunk (×2) | ||
|way2_snow|Corridor ( | |way2_snow|Corridor (×10) | ||
|wayl_snow|Turning corridor ( | |wayl_snow|Turning corridor (×4) | ||
}} | }} | ||
{{!}} colspan = 6 style = "text-align: center;" {{!}} | {{!}} colspan = 6 style = "text-align: center;" {{!}} Layout 3 (1/3 chance) | ||
{{!}}- | {{!}}- | ||
{{sublevel units | {{sublevel units | ||
|room_hitode2_5_snow|Room with 5 exits ( | |room_hitode2_5_snow|Room with 5 exits (×2) | ||
|room_vs_saka2_2_snow|Room with large trunk ( | |room_vs_saka2_2_snow|Room with large trunk (×2) | ||
|room_vs_ike3_2_snow|Room with ramp to thin edge ( | |room_vs_ike3_2_snow|Room with ramp to thin edge (×1) | ||
|way2_snow|Corridor ( | |way2_snow|Corridor (×2) | ||
|item_cap_snow|Dead end with item ( | |item_cap_snow|Dead end with item (×8) | ||
}} | |||
{{!}} colspan = 6 style = "text-align: center;" {{!}} Random units | |||
{{!}}- | |||
{{sublevel units | |||
|cap_tsuchi|Dead end | |||
|item_cap_tsuchi|Dead end with item | |||
|way3_tsuchi|Three-way crossing | |||
|way4_tsuchi|Four-way crossing | |||
|wayl_tsuchi|Turning corridor | |||
|way2_tsuchi|Straight corridor | |||
}} | |||
{{sublevel units | |||
|way2x2_tsuchi|Straight corridor | |||
|item_cap_snow|Dead end with item | |||
|way3_snow|Three-way crossing | |||
|way4_snow|Four-way crossing | |||
|wayl_snow|Turning corridor | |||
|way2_snow|Corridor | |||
}} | |||
{{sublevel units | |||
|way2x2_snow|Straight corridor | |||
|room_north_1_snow|'''Circular room with one exit''' | |||
|room_uzu1_1_snow|'''Circular room with a spiral''' | |||
|room_saka1_1_snow|'''Room with trunk in center''' | |||
|room_vs_saka2_2_snow|'''Room with large trunk''' | |||
|room_vs_ike3_2_snow|'''Room with ramp to thin edge''' | |||
}} | |||
{{sublevel units | |||
|room_block1_3_snow|'''Room with hole in wall''' | |||
|room_hitode2_5_snow|'''Room with 5 exits''' | |||
|room_hitode3_4_snow|'''Room with 4 exits''' | |||
}} | }} | ||
}} | }} | ||
== | ==Strategies== | ||
The number of Armored Cannon Beetle Larvae in the area depends on | {{guide}} | ||
The number of Armored Cannon Beetle Larvae in the area depends on which of the 3 layouts is randomly picked. Usually, the Cannon Beetles rest close by at least one of the player's [[Onion]]s, and if you're low on [[Pikmin family|Pikmin]] you may want to carry these to the Onion for a boost. You can also use the Beetles to kill the Dwarf Red Bulborbs, as a single rock can instantly defeat any one of them. | |||
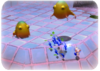
There are a lot of Dwarf Bulborbs in the arena. Some of them hold yellow marbles, but note that the number of those that do depends on the layout. Be careful though, many of them are close enough together that you will have to fight them all at the same time. | |||
The passageways can get narrow, and Armored Cannon Beetle Larvae found in them can be very annoying to kill. This also makes it harder to avoid the [[Volatile Dweevil]] from the roulette wheel. | |||
This stage contains many eggs, meaning more [[nectar]] for your Pikmin or sometimes, quite rarely, some [[Ultra-spicy spray|ultra-spicy]]/[[ultra-bitter spray|bitter sprays]]. It is recommended to break all of the eggs to get the sprays and nectar before your opponent can. | |||
==Gallery== | |||
{{image}} | |||
<gallery> | |||
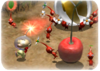
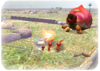
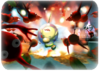
Colosseum.png|An Armored Cannon Larva expelling a boulder. | |||
</gallery> | |||
==Names in other languages== | |||
{{Foreignname | |||
|Ger=Kolosseum | |||
|GerM=Colosseum | |||
|SpaA=Coliseo | |||
|SpaAM=Colosseum | |||
|Ita=Arena | |||
|ItaM=Arena | |||
}} | |||
==Trivia== | |||
*Before the release of {{p3d}} which added [[Olimar's Assignment]], Colosseum was the only area or side mode stage in the entire ''Pikmin'' series to have a single-word name. | |||
==See also== | |||
*[[Frontier Cavern]] | |||
*[[Jigsaw Colosseum]] | |||
{{ | {{2PB}} | ||
Latest revision as of 20:52, February 14, 2024

Colosseum is a 2-Player Battle stage in Pikmin 2. The stage has a snowy theme, similar to some cave sublevels in the Valley of Repose. It is home to a large number of Dwarf Red Bulborbs and Snow Bulborbs, as well as a few Armored Cannon Beetle Larvae.
Level information[edit]
- Theme: Snow
- Treasures:
 Crystallized Telekinesis inside some Dwarf Red Bulborbs
- Enemies:
- Obstacles:
- None
- Plants and fungi:
- Others:
| Technical sublevel information | |||||
|---|---|---|---|---|---|
| Internal cave name | vs_2_ujyaujya | ||||
| "Main" object maximum (?) | 60 | ||||
| "Treasure" object maximum (?) | 0 | ||||
| "Gate" object maximum (?) | 0 | ||||
| Dead end unit probability (?) | 50 | ||||
| Number of rooms (?) | 4 | ||||
| Corridor-to-room ratio (?) | 0 | ||||
| Escape geyser (?) | No | ||||
| Clogged hole (?) | No | ||||
| Cave units file (?) | vs_2_snow.txt | ||||
| Lighting file (?) | vs_2_light.ini | ||||
| Background (?) | None | ||||
| Cave units (?) | |||||
| Layout 1 (1/3 chance) | |||||
 |
 |
 |
|||
| Room with trunk in center (×2) | Room with hole in wall (×2) | Room with large trunk (×1) | |||
| Layout 2 (1/3 chance) | |||||
 |
|
 |
 |
||
| Room with ramp to thin edge (×2) | Room with large trunk (×2) | Corridor (×10) | Turning corridor (×4) | ||
| Layout 3 (1/3 chance) | |||||
 |
|
|
|
 |
|
| Room with 5 exits (×2) | Room with large trunk (×2) | Room with ramp to thin edge (×1) | Corridor (×2) | Dead end with item (×8) | |
| Random units | |||||
 |
 |
 |
 |
 |
 |
| Dead end | Dead end with item | Three-way crossing | Four-way crossing | Turning corridor | Straight corridor |
|
 |
 |
|
| |
| Straight corridor | Dead end with item | Three-way crossing | Four-way crossing | Turning corridor | Corridor |
 |
 |
|
|
| |
| Straight corridor | Circular room with one exit | Circular room with a spiral | Room with trunk in center | Room with large trunk | Room with ramp to thin edge |
|
|
 |
|||
| Room with hole in wall | Room with 5 exits | Room with 4 exits | |||
Strategies[edit]
|
The following article or section contains guides. |
The number of Armored Cannon Beetle Larvae in the area depends on which of the 3 layouts is randomly picked. Usually, the Cannon Beetles rest close by at least one of the player's Onions, and if you're low on Pikmin you may want to carry these to the Onion for a boost. You can also use the Beetles to kill the Dwarf Red Bulborbs, as a single rock can instantly defeat any one of them.
There are a lot of Dwarf Bulborbs in the arena. Some of them hold yellow marbles, but note that the number of those that do depends on the layout. Be careful though, many of them are close enough together that you will have to fight them all at the same time.
The passageways can get narrow, and Armored Cannon Beetle Larvae found in them can be very annoying to kill. This also makes it harder to avoid the Volatile Dweevil from the roulette wheel.
This stage contains many eggs, meaning more nectar for your Pikmin or sometimes, quite rarely, some ultra-spicy/bitter sprays. It is recommended to break all of the eggs to get the sprays and nectar before your opponent can.
Gallery[edit]
|
This article or section is in need of more images. |
An Armored Cannon Larva expelling a boulder.

Names in other languages[edit]
| Language | Name | Meaning |
|---|---|---|
| Kolosseum | Colosseum | |
| Arena | Arena | |
| Coliseo | Colosseum |
Trivia[edit]
- Before the release of Pikmin 3 Deluxe which added Olimar's Assignment, Colosseum was the only area or side mode stage in the entire Pikmin series to have a single-word name.
See also[edit]
| 2-Player Battle stages | ||||
|---|---|---|---|---|
 Battle Field |
 War Path |
 Carpet Plain |
 Angle Maze |
 Colosseum |
 Rusty Gulch |
 Brawl Yard |
 Tile Lands |
 Dim Labyrinth |
 Hostile Territory |