Hostile Territory: Difference between revisions
m (New template behavior.) |
mNo edit summary |
||
| Line 41: | Line 41: | ||
{{!}}- | {{!}}- | ||
{{sublevel units | {{sublevel units | ||
|room_vs_hitode4x4_6_metal|Room with rusty hatch ( | |room_vs_hitode4x4_6_metal|Room with rusty hatch (×2) | ||
|room_hitode4x4_3_metal|Circular room with raised corner ( | |room_hitode4x4_3_metal|Circular room with raised corner (×2) | ||
|room_cent_4_metal|Circular room with 4 exits ( | |room_cent_4_metal|Circular room with 4 exits (×1) | ||
|item_cap_metal|Dead end with item ( | |item_cap_metal|Dead end with item (×2) | ||
|way2x2_metal|Long corridor ( | |way2x2_metal|Long corridor (×4) | ||
|wayl_metal|Turning corridor ( | |wayl_metal|Turning corridor (×2) | ||
}} | }} | ||
{{sublevel units | {{sublevel units | ||
|way3_metal|Three-way crossing ( | |way3_metal|Three-way crossing (×2) | ||
|way2_metal|Corridor ( | |way2_metal|Corridor (×2) | ||
}} | }} | ||
{{!}} colspan = 6 style = "text-align: center;" {{!}} Pattern 2 | {{!}} colspan = 6 style = "text-align: center;" {{!}} Pattern 2 | ||
{{!}}- | {{!}}- | ||
{{sublevel units | {{sublevel units | ||
|room_mid2_3_metal|Y-shaped room ( | |room_mid2_3_metal|Y-shaped room (×2) | ||
|room_vs_hitode4x4_6_metal|Room with rusty hatch ( | |room_vs_hitode4x4_6_metal|Room with rusty hatch (×2) | ||
|item_cap_metal|Dead end with item ( | |item_cap_metal|Dead end with item (×10) | ||
|wayl_metal|Turning corridor ( | |wayl_metal|Turning corridor (×4) | ||
|way2_metal|Corridor ( | |way2_metal|Corridor (×2) | ||
}} | }} | ||
{{!}} colspan = 6 style = "text-align: center;" {{!}} Pattern 3 | {{!}} colspan = 6 style = "text-align: center;" {{!}} Pattern 3 | ||
{{!}}- | {{!}}- | ||
{{sublevel units | {{sublevel units | ||
|room_hitode4x4_7_metal|Room with blue circles ( | |room_hitode4x4_7_metal|Room with blue circles (×2) | ||
|room_mid2_3_metal|Y-shaped room ( | |room_mid2_3_metal|Y-shaped room (×2) | ||
|item_cap_metal|Dead end with item ( | |item_cap_metal|Dead end with item (×5) | ||
|way3_metal|Three-way crossing ( | |way3_metal|Three-way crossing (×1) | ||
|way2_metal|Corridor ( | |way2_metal|Corridor (×5) | ||
|wayl_metal|Turning corridor ( | |wayl_metal|Turning corridor (×1) | ||
}} | }} | ||
}} | }} | ||
Revision as of 09:07, November 3, 2014
|
This page is part of the merge with Pikmin Wiki, and needs resolving. Please bear with us as we do so. Before the import, this subject had a page both on Pikipedia and Pikmin Wiki. You are currently reading the Pikipedia version, and the Pikmin Wiki version can be found here. Both versions need to be manually merged together and placed on the current page. |

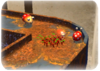
Hostile Territory is a Pikmin 2 arena for 2-player battle. It is arguably the hardest area, with a large number of enemies and bomb-rocks. Bomb-rocks in this area can be picked up and thrown by captains.
Level information
- Theme: Metal
- Enemies:
- Careening Dirigibugs
- Fiery Blowhogs
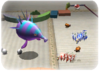
- Watery Blowhogs
- Anode Beetles
- Shearwigs (under marbles)
- Hazards:
- Treasures:
- Crystallized Telekinesis inside the Careening Dirigibugs
- Plants:
- None
- Others:
| Technical sublevel information | |||||
|---|---|---|---|---|---|
| Internal cave name | vs_4_karakuchi | ||||
| "Main" object maximum (?) | 50 | ||||
| "Treasure" object maximum (?) | 0 | ||||
| "Gate" object maximum (?) | 0 | ||||
| Dead end unit probability (?) | 70 | ||||
| Number of rooms (?) | 4 | ||||
| Corridor-to-room ratio (?) | {{{ctrratio}}} | ||||
| Escape geyser (?) | No | ||||
| Clogged hole (?) | No | ||||
| Cave units file (?) | vs_4_metal.txt | ||||
| Lighting file (?) | metal_light_cha.ini | ||||
| Background (?) | build ( | ||||
| Cave units (?) | |||||
| Pattern 1 | |||||
 |
 |
 |
 |
 | |
| Room with rusty hatch (×2) | Circular room with raised corner (×2) | Circular room with 4 exits (×1) | Dead end with item (×2) | Long corridor (×4) | Turning corridor (×2) |
 |
 |
||||
| Three-way crossing (×2) | Corridor (×2) | ||||
| Pattern 2 | |||||
 |
|
|
|
|
|
| Y-shaped room (×2) | Room with rusty hatch (×2) | Dead end with item (×10) | Turning corridor (×4) | Corridor (×2) | |
| Pattern 3 | |||||
 |
|
|
|
|
|
| Room with blue circles (×2) | Y-shaped room (×2) | Dead end with item (×5) | Three-way crossing (×1) | Corridor (×5) | Turning corridor (×1) |
Tips
These are the majority of the enemies which appear in this arena. Only very rarely, some boulders may fall from the sky while you are in a remote area, so be careful when you are trekking in an area filled with Anode Beetles, bomb-rocks and Watery Blowhogs. Usually, if this is to happen, it will happen next to one of the three yellow marbles, to hinder you in your path. Take caution as if your player gets damaged by the boulders, some nearby enemies may squeeze in an attack while your character is stunned, so make sure you can make a hasty retreat.
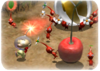
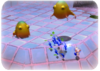
There is a small area that is enclosed by three electrical nodes near one of the players' bases. If you are lucky, this area will generate cherries every 10 seconds, giving you a seemingly unlimited supply of cherries.
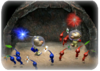
Sometimes three Careening Dirigibugs may appear in the same small circular area. This is a great opportunity to stock up on yellow marbles as every Dirigibug on the field contains a yellow marble. This would be an amazing way to win, especially if they were located near your own Onion.
Be sure not to get bombarded into walls by Roulette enemies such as the Volatile Dweevil, otherwise you may get a Pikmin Extinction, and your space suit may be severely damaged. However, if you manage to escape, meaning a few Pikmin sacrifices may have to be chosen, lure it to a gang of enemies grouped together, preferably not Anode Beetles as they will not be damaged by the explosion due to their hard wings. Try using it on Blowhogs next to each other to remove at least half or completely all their health, which means you can pass by without any worries or discomforts.
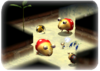
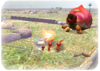
This is also the only area where bomb-rocks appear, meaning you can pick them up, unlike story mode. Just walk into them to pick them up. Throw by pressing A / A, and put it down by pressing B / B. No matter which method is used, the bomb will become active, so make sure your Pikmin are out of the Explosion's vicinity. A questionable and dangerous strategy involves activating bomb-rocks, picking them up again, and chasing your enemy while they have a large amount of pikmin following them, and letting the bomb-rock explode in your hands. This will do a good deal of damage to you, but if you are lucky, it will take out many of your enemy's pikmin.
There is a rare glitch involving the Careening Dirigibugs. As soon as they notice you, they normally excrete a bomb-rock from their tiny mouths. As soon as they release it from its mouth, punch the air, and the bomb may become active, but mostly it depends on where the player is standing. Then, the Dirigibug will have an active bomb in its hands. Often times it will still throw it to the ground, but on rarer occasions the Dirigibug will keep hold of the bomb-rock, even when it explodes. This means the dirigibug will still do the carrying animation, and when it comes to the throwing animation, nothing will be dropped. This is a very weird glitch, and it can also distract players, also taking their mind off gameplay whilst the opponent is taking their marble.
Bomb-rock Strategies
Unlike the single player game, you can pick up large bomb-rocks by simply walking into them. Press A / A to throw one, or B / B to set one down. In both cases, the bomb will be activated. This makes it possible to use them as weapons.
- When your opponent is occupied and cannot react, you can get rid of a number of their Pikmin by throwing a bomb-rock at a group of idle Pikmin. Note that bomb-rocks are thrown further than the pointer's reach.
- You can also lure enemy Pikmin into attacking you and then detonate a bomb-rock near yourself, killing all the offending Pikmin and leaving you damaged but still alive, that is assuming you haven't taken too much damage already.
- If your opponent is being accompanied by a large number of Pikmin, you can strike a bomb-rock to start the countdown, then pick it up and chase him or her, allowing the bomb-rock to explode in your hands and eliminating a chunk of the opponent's army.
- Note that you can use an Ultra-Bitter Spray on a live bomb-rock to stop its countdown for eight seconds.
- If you're occupied helping your Pikmin fight, you can throw a bomb-rock at enemy Pikmin trying to carry your marble away.
| 2-Player Battle stages | ||||
|---|---|---|---|---|
 Battle Field |
 War Path |
 Carpet Plain |
 Angle Maze |
 Colosseum |
 Rusty Gulch |
 Brawl Yard |
 Tile Lands |
 Dim Labyrinth |
 Hostile Territory |