Brawl Yard: Difference between revisions
Jump to navigation
Jump to search
Greenpickle (talk | contribs) mNo edit summary |
No edit summary |
||
| (54 intermediate revisions by 27 users not shown) | |||
| Line 1: | Line 1: | ||
[[ | {{game icons|p2=y}} | ||
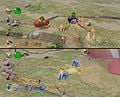
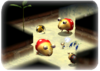
[[File:Brawl Yard preview.png|thumb|300px|Stage preview.]] | |||
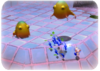
'''Brawl Yard''' is a [[2-Player Battle]] stage in ''[[Pikmin 2]]'', and as its name suggests, it is a yard setting, similar to sublevel 2 of the [[Snagret Hole]]. [[Decorated Cannon Beetle]]s populate the stage, and must be defeated to access some of the marbles. | |||
A [[Glitches in Pikmin 2#Leave boundaries|glitch]] allows a leader to go out of bounds and steal the opponent's marble from behind. This is a risky strategy, however. | |||
== Level information == | |||
*'''Theme''': Garden | |||
*'''Treasures''': | |||
**{{icon|Crystallized Telekinesis|y}} inside the Decorated Cannon Beetles | |||
*'''Enemies''': | |||
**{{icon|Cloaking Burrow-nit|y}} | |||
**{{icon|Decorated Cannon Beetle|y}} | |||
**{{icon|Female Sheargrub|y}} | |||
**{{icon|Skitter Leaf|y}} | |||
**{{icon|Shearwig|y}} (under marbles) | |||
*'''Obstacles''': | |||
**None | |||
*'''Plants and fungi''': | |||
**{{icon|Clover|y}} | |||
**{{icon|Dandelion|y}} | |||
**{{icon|Margaret|y}} | |||
**{{icon|Pellet Posy|y}} | |||
*'''Others''': | |||
**None | |||
{{sublevel technical | |||
|2p = y | |||
|cave = vs_7_nobinobi | |||
|enemymax = 40 | |||
|itemmax = 0 | |||
|gatemax = 0 | |||
|capmax = 80 | |||
|rooms = 3 | |||
|ctrratio = 0 | |||
|geyser = No | |||
|unitfile = vs_7_kusachi.txt | |||
|lightfile = vs_7_light.ini | |||
|bg = hiroba | |||
|clog = No | |||
|hiddenfloor = 1 | |||
|units = | |||
{{!}} colspan = 6 style = "text-align: center;" {{!}} Layout 1 (26.(6)% chance) | |||
{{!}}- | |||
{{sublevel units | |||
|room_vs_mid_kusachi|Large three-way crossing (×2) | |||
|room_vs_big_kusachi|Room with upside-down bucket (×1) | |||
|item_cap_kusachi|Dead end with item (×7) | |||
}} | |||
{{!}} colspan = 6 style = "text-align: center;" {{!}} Layout 2 (26.(6)% chance) | |||
{{!}}- | |||
{{sublevel units | |||
|room_vs_mid_kusachi|Large three-way crossing (×1) | |||
|room_vs_big2_kusachi|Room with 5 exits (×1) | |||
|room_vs_5x5a_2_kusachi|Room with 2 circling paths (×1) | |||
|item_cap_kusachi|Dead end with item (×4) | |||
|way2x2_kusachi|Long corridor (×3) | |||
|wayl_kusachi|Turning corridor (×1) | |||
}} | |||
{{sublevel units | |||
|way2_kusachi|Corridor (×1) | |||
}} | |||
{{!}} colspan = 6 style = "text-align: center;" {{!}} Layout 3 (26.(6)% chance) | |||
{{!}}- | |||
{{sublevel units | |||
|room_vs_5x5a_2_kusachi|Room with 2 circling paths (×2) | |||
|room_vs_mid_kusachi|Large three-way crossing (×2) | |||
|way2_kusachi|Corridor (×4) | |||
|item_cap_kusachi|Dead end with item (×2) | |||
}} | |||
{{!}} colspan = 6 style = "text-align: center;" {{!}} Random units | |||
{{!}}- | |||
{{sublevel units | |||
|item_cap_kusachi|Dead end with item | |||
|way3_kusachi|Three-way crossing | |||
|way4_kusachi|Four-way crossing | |||
|wayl_kusachi|Turning corridor | |||
|way2_kusachi|Corridor | |||
|way2x2_kusachi|Long corridor | |||
}} | |||
{{sublevel units | |||
|room_vs_mid_kusachi|'''Large three-way crossing''' | |||
|room_vs_big_kusachi|'''Room with upside-down bucket''' | |||
|room_vs_5x5a_2_kusachi|'''Room with 2 circling paths''' | |||
|room_vs_big2_kusachi|'''Room with 5 exits''' | |||
}} | |||
}} | |||
==Gallery== | |||
<gallery> | |||
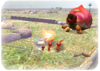
Brawl Yard.jpg|The Brawl Yard in-game. | |||
</gallery> | |||
==Names in other languages== | |||
{{Foreignname | |||
|Ger=Prügelhof | |||
|GerM=Brawl Yard | |||
|SpaA=Picnic Salvaje | |||
|SpaAM=Wild Picnic | |||
|Ita=Corte di scontro | |||
|ItaM=Court of battle | |||
|ItaN=A literal translation of the English name that doesn't sound very natural. | |||
}} | |||
==Trivia== | |||
*Brawl Yard has a 20% chance of generating randomly, not using any of its 3 preset layouts. No other stage does this, either using preset layouts only, or always generating randomly. | |||
==See also== | |||
*[[Creator's Garden]] | |||
{{2PB}} | |||
Revision as of 20:56, February 14, 2024

Brawl Yard is a 2-Player Battle stage in Pikmin 2, and as its name suggests, it is a yard setting, similar to sublevel 2 of the Snagret Hole. Decorated Cannon Beetles populate the stage, and must be defeated to access some of the marbles.
A glitch allows a leader to go out of bounds and steal the opponent's marble from behind. This is a risky strategy, however.
Level information
- Theme: Garden
- Treasures:
 Crystallized Telekinesis inside the Decorated Cannon Beetles
- Enemies:
 Cloaking Burrow-nit
 Decorated Cannon Beetle
 Female Sheargrub
 Skitter Leaf
 Shearwig (under marbles)
- Obstacles:
- None
- Plants and fungi:
- Others:
- None
| Technical sublevel information | |||||
|---|---|---|---|---|---|
| Internal cave name | vs_7_nobinobi | ||||
| "Main" object maximum (?) | 40 | ||||
| "Treasure" object maximum (?) | 0 | ||||
| "Gate" object maximum (?) | 0 | ||||
| Dead end unit probability (?) | 80 | ||||
| Number of rooms (?) | 3 | ||||
| Corridor-to-room ratio (?) | 0 | ||||
| Escape geyser (?) | No | ||||
| Clogged hole (?) | No | ||||
| Cave units file (?) | vs_7_kusachi.txt | ||||
| Lighting file (?) | vs_7_light.ini | ||||
| Background (?) | hiroba ( | ||||
| Cave units (?) | |||||
| Layout 1 (26.(6)% chance) | |||||
 |
 |
 |
|||
| Large three-way crossing (×2) | Room with upside-down bucket (×1) | Dead end with item (×7) | |||
| Layout 2 (26.(6)% chance) | |||||
|
 |
 |
|
 | |
| Large three-way crossing (×1) | Room with 5 exits (×1) | Room with 2 circling paths (×1) | Dead end with item (×4) | Long corridor (×3) | Turning corridor (×1) |
 |
|||||
| Corridor (×1) | |||||
| Layout 3 (26.(6)% chance) | |||||
|
|
|
|
||
| Room with 2 circling paths (×2) | Large three-way crossing (×2) | Corridor (×4) | Dead end with item (×2) | ||
| Random units | |||||
|
 |
 |
|
|
|
| Dead end with item | Three-way crossing | Four-way crossing | Turning corridor | Corridor | Long corridor |
|
|
|
|
||
| Large three-way crossing | Room with upside-down bucket | Room with 2 circling paths | Room with 5 exits | ||
Gallery
The Brawl Yard in-game.

Names in other languages
| Language | Name | Meaning |
|---|---|---|
| Prügelhof | Brawl Yard | |
| Corte di scontro | Court of battle | |
| Picnic Salvaje | Wild Picnic |
Trivia
- Brawl Yard has a 20% chance of generating randomly, not using any of its 3 preset layouts. No other stage does this, either using preset layouts only, or always generating randomly.
See also
| 2-Player Battle stages | ||||
|---|---|---|---|---|
 Battle Field |
 War Path |
 Carpet Plain |
 Angle Maze |
 Colosseum |
 Rusty Gulch |
 Brawl Yard |
 Tile Lands |
 Dim Labyrinth |
 Hostile Territory |