Blooming Terrace: Difference between revisions
m (→Layout C) |
m (Replaced P2 Marble icons with P3 equivalents.) |
||
| (15 intermediate revisions by 8 users not shown) | |||
| Line 1: | Line 1: | ||
{{game icons|p3=y}} | {{game icons|p3=y}} | ||
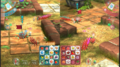
[[File:Blooming Terrace | [[File:P3d - Blooming Terrace Gameplay.jpg|thumb|400px|Gameplay screenshot.]] | ||
The '''Blooming Terrace''' is the seventh stage of ''[[Pikmin 3]]''{{'s}} [[Bingo Battle]]. The textures are just like those of the [[Shaded Terrace]]; the entire stage appears to be within a garden. It is one of the smaller and simpler stages, but has some unique characteristics. This is the only place in Bingo Battle where Purple [[Candypop Bud]]s are found. This, along with the [[Arid Metropolis]], are the only places where it is possible to see an [[Onion]] eject [[Purple Pikmin]] seeds, with the use of a +5 Rare Pikmin item. | |||
The '''Blooming Terrace''' is the seventh stage of ''[[Pikmin 3]]''{{'s}} [[Bingo Battle]]. The textures are just like those of the [[Shaded Terrace]]; the entire stage appears to be within a garden. It is one of the smaller and simpler stages, but has some unique characteristics. This is the only place in Bingo Battle where [[ | |||
==Layouts== | ==Layouts== | ||
The layout unlock order, as explained [[Bingo Battle#Maps|here]], is C, B, A. | |||
===Layout A=== | ===Layout A=== | ||
[[File:Map 19 blooming | [[File:Map 19 blooming terrace a.jpg|thumb|400px|Layout A overview.]] | ||
This layout gives players [[Yellow Pikmin]] to start with, and no other Pikmin can be found. | |||
====Fruits=== | '''Enemies''': | ||
{{columns|2| | |||
*{{icon|Bulborb|y|v=P3}} × 4 | |||
*{{icon|Bearded Amprat|y}} × 2 | |||
*{{icon|Dwarf Bulborb|y|v=P3}} × 8 | |||
*{{icon|Female Sheargrub|y|v=P3}} × 10 | |||
*{{icon|Red Spectralids|y}} × 1 | |||
*{{icon|White Spectralids|y}} × 1 | |||
*{{icon|Yellow Spectralids|y}} × 2 | |||
*{{icon|Iridescent Flint Beetle|v=P3|y}} × 2 | |||
}} | |||
'''Fruits''': | |||
*{{icon|Citrus Lump|v=FF|y}} × 1 | |||
*{{icon|Face Wrinkler|y}} × 2 (inside Bulborb and Amprat) | |||
*{{icon|Golden Sunseed|y}} × 2 (inside Bulborb and Amprat) | |||
*{{icon|Insect Condo|y|v=FF}} × 1 | |||
*{{icon|Sunseed Berry|y|v=FF}} × 2 | |||
*{{icon| | '''Marbles''': | ||
*{{icon| | *{{icon|Blue Marble|v=P3}} [[Crystallized Clairvoyance|Blue Marble]] × 1 | ||
*{{icon|Red Marble|v=P3}} [[Crystallized Telepathy|Red Marble]] × 1 | |||
*{{icon|Yellow Marble|v=P3}} [[Crystallized Telekinesis|Yellow Marble]] × 2 | |||
*{{icon| | |||
'''Tools''': | |||
*{{icon|Dirt mound|y}} × 2 (contain 3 nectar each) | |||
'''Obstacles''': | |||
*{{icon|Dirt wall|y}} × 2 | *{{icon|Dirt wall|y}} × 2 | ||
*{{icon|Electric gate|y|v=P3}} × 3 | *{{icon|Electric gate|y|v=P3}} × 3 | ||
'''Plants and fungi''': | |||
*{{icon|Pellet Posy|v=P3}} [[Pellet Posy|1-Pellet Posy]] × 26 | |||
*{{icon|Pellet Posy|v=P3}} [[Pellet Posy|5-Pellet Posy]] × 2 | |||
===Layout B=== | |||
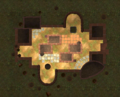
[[File:Map 20 blooming terrace b.jpg|thumb|400px|Layout B overview.]] | |||
This layout gives players Yellow Pikmin to start with, and [[Purple Pikmin]] can be found. | |||
'''Enemies''': | |||
{{columns|2| | {{columns|2| | ||
*{{icon|Bearded Amprat|y}} × 1 | *{{icon|Bearded Amprat|y}} × 1 | ||
*{{icon|Dwarf | *{{icon|Bulborb|y|v=P3}} × 2 | ||
*{{icon|Dwarf Bulborb|y|v=P3}} × 6 | |||
*{{icon|Female Sheargrub|y|v=P3}} × 8 | |||
*{{icon|Male Sheargrub|y|v=P3}} × 8 | |||
*{{icon|Medusal Slurker|y}} × 2 | |||
*{{icon|Whiptongue Bulborb|y}} × 1 | *{{icon|Whiptongue Bulborb|y}} × 1 | ||
*{{icon|Yellow | *{{icon|Yellow Spectralids|y}} × 2 | ||
*{{icon| | *{{icon|Iridescent Flint Beetle|v=P3|y}} × 2 | ||
}} | }} | ||
'''Fruits''': | |||
{{columns|2| | {{columns|2| | ||
*{{icon|Insect Condo|y|v=FF}} × 1 | *{{icon|Insect Condo|y|v=FF}} × 1 | ||
| Line 66: | Line 72: | ||
*{{icon|Citrus Lump|y|v=FF}} × 1 | *{{icon|Citrus Lump|y|v=FF}} × 1 | ||
}} | }} | ||
*{{icon| | '''Marbles''': | ||
*{{icon| | *{{icon|Blue Marble|v=P3}} [[Crystallized Clairvoyance|Blue Marble]] × 2 | ||
*{{icon|Red Marble|v=P3}} [[Crystallized Telepathy|Red Marble]] × 2 | |||
*{{icon|Yellow Marble|v=P3}} [[Crystallized Telekinesis|Yellow Marble]] × 1 | |||
{{ | '''Plants and fungi''': | ||
*{{icon|Pellet Posy|v=P3}} [[Pellet Posy|1-Pellet posy]] × 16 | |||
*{{icon|Candypop Bud|v=P3 purple|y}} (Purple) × 4 | |||
===Layout C=== | ===Layout C=== | ||
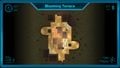
[[File:Map 21 blooming terrace c.jpg|thumb|Layout C.]] | [[File:Map 21 blooming terrace c.jpg|thumb|400px|Layout C overview.]] | ||
*{{icon|Red | This layout gives players [[Red Pikmin]], and no other Pikmin can be found. | ||
*{{icon|Citrus Lump | |||
'''Enemies''': | |||
{{columns|2| | |||
*{{icon|Bulborb|v=P3|y}} × 6 | |||
*{{icon|Dwarf Bulborb|v=P3|y}} × 8 | |||
*{{icon|Female Sheargrub|v=P3|y}} × 5 | |||
*{{icon|Male Sheargrub|v=P3|y}} × 5 | |||
*{{icon|Skitter Leaf|v=P3|y}} × 6 | |||
*{{icon|Yellow Wollywog|v=P3|y}} × 2 | |||
*{{icon|Red Spectralids|y}} × 3 | |||
*{{icon|White Spectralids|y}} × 3 | |||
*{{icon|Yellow Spectralids|y}} × 3 | |||
*{{icon|Iridescent Flint Beetle|v=P3|y}} × 2 | |||
}} | |||
'''Fruits''': | |||
{{columns|2| | |||
*{{icon|Citrus Lump|v=FF|y}} × 1 | |||
*{{icon|Dapper Blob|y}} × 1 | *{{icon|Dapper Blob|y}} × 1 | ||
*{{icon|Heroine's Tear|y}} × 1 | *{{icon|Heroine's Tear|y}} × 1 | ||
*{{icon|Insect Condo | *{{icon|Insect Condo|v=FF|y}} × 1 | ||
*{{icon|Sunseed Berry|v=FF|y}} × 1 | *{{icon|Sunseed Berry|v=FF|y}} × 1 | ||
*{{icon| | }} | ||
*{{icon| | |||
*{{icon| | '''Marbles''': | ||
*{{icon| | *{{icon|Blue Marble|v=P3}} [[Crystallized Clairvoyance|Blue Marble]] × 1 | ||
*{{icon|Red Marble|v=P3}} [[Crystallized Telepathy|Red Marble]] × 1 | |||
'''Plants and fungi''': | |||
*{{icon|Pellet Posy|v=P3}} [[Pellet Posy|1-Pellet posy]] × 20 | |||
*{{icon|Pellet Posy|v=P3}} [[Pellet Posy|5-Pellet posy]] × 2 | |||
==Gallery== | ==Gallery== | ||
<gallery> | <gallery> | ||
File:Blooming Terrace P3 gameplay.png|A battle at the Blooming Terrace. | |||
Blooming Terrace radar.png|Texture used on the [[radar]]. | Blooming Terrace radar.png|Texture used on the [[radar]]. | ||
Blooming Terrace (Gamepad).jpg|The GamePad's view for the Blooming Terrace. | Blooming Terrace (Gamepad).jpg|The GamePad's view for the Blooming Terrace. | ||
</gallery> | </gallery> | ||
==Names in other languages== | |||
{{foreignname | |||
|Ger=Blühender Garten | |||
|GerM=Blooming Garden | |||
|Spa=Jardín Primaveral | |||
|SpaM=Spring Garden | |||
|Fra=Jardin fleuri | |||
|FraM=Flowery Garden | |||
|Ita=Giardino rigoglioso | |||
|ItaM=Luxuriant Garden | |||
}} | |||
==See also== | |||
* [[Shaded Terrace]] | |||
{{BB}} | {{BB}} | ||
Latest revision as of 20:56, March 12, 2024

The Blooming Terrace is the seventh stage of Pikmin 3's Bingo Battle. The textures are just like those of the Shaded Terrace; the entire stage appears to be within a garden. It is one of the smaller and simpler stages, but has some unique characteristics. This is the only place in Bingo Battle where Purple Candypop Buds are found. This, along with the Arid Metropolis, are the only places where it is possible to see an Onion eject Purple Pikmin seeds, with the use of a +5 Rare Pikmin item.
Layouts[edit]
The layout unlock order, as explained here, is C, B, A.
Layout A[edit]

This layout gives players Yellow Pikmin to start with, and no other Pikmin can be found.
Enemies:
 Bulborb × 4
 Bearded Amprat × 2
 Dwarf Bulborb × 8
 Female Sheargrub × 10
 Red Spectralids × 1
 White Spectralids × 1
 Yellow Spectralids × 2
 Iridescent Flint Beetle × 2
Fruits:
 Citrus Lump × 1
 Face Wrinkler × 2 (inside Bulborb and Amprat)
 Golden Sunseed × 2 (inside Bulborb and Amprat)
 Insect Condo × 1
 Sunseed Berry × 2
Marbles:
 Blue Marble × 1
 Red Marble × 1
 Yellow Marble × 2
Tools:
 Dirt mound × 2 (contain 3 nectar each)
Obstacles:
 Dirt wall × 2
 Electric gate × 3
Plants and fungi:
 1-Pellet Posy × 26
- 5-Pellet Posy × 2
Layout B[edit]

This layout gives players Yellow Pikmin to start with, and Purple Pikmin can be found.
Enemies:
- Bearded Amprat × 1
- Bulborb × 2
- Dwarf Bulborb × 6
- Female Sheargrub × 8
 Male Sheargrub × 8
 Medusal Slurker × 2
 Whiptongue Bulborb × 1
- Yellow Spectralids × 2
- Iridescent Flint Beetle × 2
Fruits:
- Insect Condo × 1
- Sunseed Berry × 1
- Face Wrinkler × 1
- Golden Sunseed × 2
- Citrus Lump × 1
Marbles:
- Blue Marble × 2
- Red Marble × 2
- Yellow Marble × 1
Plants and fungi:
- 1-Pellet posy × 16
 Candypop Bud (Purple) × 4
Layout C[edit]

This layout gives players Red Pikmin, and no other Pikmin can be found.
Enemies:
- Bulborb × 6
- Dwarf Bulborb × 8
- Female Sheargrub × 5
- Male Sheargrub × 5
 Skitter Leaf × 6
 Yellow Wollywog × 2
- Red Spectralids × 3
- White Spectralids × 3
- Yellow Spectralids × 3
- Iridescent Flint Beetle × 2
Fruits:
- Citrus Lump × 1
 Dapper Blob × 1
 Heroine's Tear × 1
- Insect Condo × 1
- Sunseed Berry × 1
Marbles:
- Blue Marble × 1
- Red Marble × 1
Plants and fungi:
- 1-Pellet posy × 20
- 5-Pellet posy × 2
Gallery[edit]
A battle at the Blooming Terrace.
Texture used on the radar.
The GamePad's view for the Blooming Terrace.


.jpg)
Names in other languages[edit]
| Language | Name | Meaning |
|---|---|---|
| Jardin fleuri | Flowery Garden | |
| Blühender Garten | Blooming Garden | |
| Giardino rigoglioso | Luxuriant Garden | |
| Jardín Primaveral | Spring Garden |