Cavern of Confusion: Difference between revisions
(Created page with "{{infobox area |screenshot = |map = |image = |size = |caption = |sector = 1 |area_letter = B |tre...") |
No edit summary |
||
| (39 intermediate revisions by 6 users not shown) | |||
| Line 1: | Line 1: | ||
{{game icons|hp=y}} | |||
{{infobox area | {{infobox area | ||
|screenshot = | |screenshot = | ||
|map = | |map = | ||
|image = | |image = Cavern of Confusion 1.jpg | ||
|size = | |size = 320px | ||
|caption = | |caption = | ||
|sector = 1 | |sector = 1 | ||
|area_letter = B | |area_letter = B | ||
|treasures = 3 | |treasures = 3 | ||
|obstacles = | |obstacles = {{dirt block}} {{fragments}} {{ledge}} {{wooden stake}} | ||
|hazards = | |hazards = {{icon|poison}} | ||
|pikmin = [[Yellow Pikmin]] | |pikmin = [[Yellow Pikmin]] | ||
|pikmin_discovered = [[Yellow Pikmin]] | |pikmin_discovered = [[Yellow Pikmin]] | ||
|requirements = Complete [[First Expedition| | |requirements = Complete [[First Expedition]] | ||
|music = | |next = [[Mushroom Valley]] (normal exit)<br>[[Cherrystone Pass]] ([[secret exit]]) | ||
|music = ''[[Music in Hey! Pikmin#Underground area|Underground area]]''<br>''[[Music in Hey! Pikmin#Underground area - back side|Underground area - back side]]'' | |||
}} | }} | ||
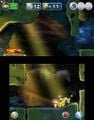
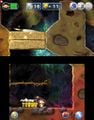
'''Cavern of Confusion''' is the second area in {{hp}}. It takes place inside a cave with shifting parts, and introduces the player to [[Yellow Pikmin]] and their ability to be [[throw]]n high. | '''Cavern of Confusion''' ({{j|まいごの どうくつ|Maigo no dōkutsu|Cave of lost people}}) is the second area in {{hp}}. It takes place inside a cave with shifting parts, and introduces the player to [[Yellow Pikmin]] and their ability to be [[throw]]n high. Near the end, there is a large [[wooden stake]] that blocks the way to the [[secret exit]] that leads to the [[Cherrystone Pass]]. If the player doesn't have enough Pikmin to stomp down the stake, they will have to take the standard exit to the [[Mushroom Valley]]. | ||
== Description == | |||
This area takes place in a big cavern. Right at the start, there is a bush, that serves as a nest for [[Yellow Pikmin]]. After going down a [[vine]], Olimar finds some Yellow Pikmin that are threatened by a [[Spornet]]. In this area, the player has to be very cautious with those enemies, because there are a lot of them. The area is also made up of patches of ground that go up and down when stepped on. There are also wooden stakes, that need to be pushed down into the ground in order to progress in the cavern. The first treasure to be found in this area is the [[Consolation Prize]], alongside two [[Mockiwi]]s. Not too long after that, the [[Ultra Sealed Aquarium]] can be taken. | |||
As the player progresses in the area, there are more and more Spornets, thus making it through the cavern harder without losing Pikmin. Some fragments have to be retrieved, in order to make a [[bridge]] and continue the cave. Just after the bridge, the [[Peace Missile]] can be brought back to Olimar. | |||
== | == Cutscenes == | ||
{ | {| class="wikitable" | ||
! Cutscene || Screenshot || Trigger || Description | |||
|- | |||
! Yellow Pikmin introduction | |||
| [[File:Cavern of Confusion first Yellows.jpg|200px]] | |||
| The player [[whistle]]s the Pikmin hiding behind leaves at the start of the area. | |||
| The four Yellow Pikmin hiding behind the leaves pop out with backflips and perform a pose. | |||
|- | |||
! Spornet attack | |||
| [[File:Cavern of Confusion scared Yellows.jpg|200px]] | |||
| The player enters the room after the first [[vine]]. | |||
| Four Yellow Pikmin appear running away from a [[Spornet]]'s shot, right to left, then left to right, and then right to left again. The Spornet leaves after this third time. | |||
|- | |||
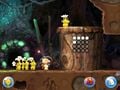
! Crumbug tube | |||
| [[File:Cavern of Confusion tube cutscene.jpg|200px]] | |||
| The player walks a bit forward after the doorway beyond the [[bridge]] room. | |||
| Four Yellow Pikmin idle by a colorful tube. One crawls inside, and a bit after, quickly scurries back out. It stops some distance away from the tube, looks back in horror, and the three wonder what's wrong. A [[Crumbug]] then crawls out of the same tube. The four Pikmin run away as the Crumbug tries to bite them, before turning the opposite direction and walking off. | |||
|} | |||
== | == Pikmin locations == | ||
{ | {| class = "wikitable sortable" | ||
|- | |||
! Spot || Location || Pikmin || Requirements || Notes | |||
|- | |||
| In a bush || Right at the start of the area || 4 Yellow Pikmin || Have less than 4 Yellow Pikmin || Mandatory to break the [[dirt block]] | |||
|- | |||
| Threaten by a [[Spornet]] || After the vine and a [[Crumbug]] || 4 Yellow Pikmin || First time only || | |||
|- | |||
| In a bush || Right under a Spornet and a vine || 4 Yellow Pikmin || Have less than 4 Yellow Pikmin || | |||
|- | |||
| In a bush || Right before a [[Mockiwi]] || 4 Yellow Pikmin || Have less than 4 Yellow Pikmin || | |||
|- | |||
| In a bush || After the [[Consolation Prize]] || 4 Yellow Pikmin || Have less than 8 Yellow Pikmin || Mandatory to bury the [[wooden stake]] | |||
|- | |||
| In a bush || Next to the entrance to a doorway || 4 Yellow Pikmin || Have less than 4 Yellow Pikmin || | |||
|- | |||
| In a bush || After a crew of Spornets, under a Heart || 4 Yellow Pikmin || Have less than 4 Yellow Pikmin || | |||
|- | |||
| In a bush || After the doorway || 4 Yellow Pikmin || Have less than 8 Yellow Pikmin || | |||
|- | |||
| Crawling in a tube || Right next to the previous bush || 4 Yellow Pikmin || First time only || | |||
|- | |||
| In a bush || After the two Crumbugs || 4 Yellow Pikmin || Have less than 8 Yellow Pikmin || | |||
|} | |||
== Objects == | == Objects == | ||
=== Treasures === | === Treasures === | ||
* | * {{icon|Consolation Prize|y}} ("Blues Eradicator" in Europe) | ||
* | * {{icon|Ultra-Sealed Aquarium|y}} | ||
* | * {{icon|Peace Missile|y}} | ||
=== Enemies === | |||
* {{icon|Crumbug|y}} × 6 | |||
* {{icon|Mockiwi|y}} × 3 | |||
* {{icon|Spornet|y}} × 7 | |||
=== Obstacles === | |||
* {{icon|Dirt block|y}} × 5 | |||
* {{icon|Fragment|y}} × 5 | |||
* {{icon|Wooden stake|y}} (small) × 3 | |||
* {{icon|Wooden stake|y}} (large) × 1 | |||
=== Plants === | |||
*{{icon|Vine|y}} × 3 | |||
=== Others === | |||
* {{icon|Sparklium Seed|n|n=Yellow Sparklium Seed}} × 30 (6 of them come from Mockiwis) | |||
* {{icon|Sparklium Seed|n|v=red|n=Red Spaklium Seed}} × 7 | |||
* {{icon|Sparklium flower|y}} (small) × 1 | |||
* {{icon|Heart|y}} (small) × 4 | |||
== Guide == | == Guide == | ||
| Line 42: | Line 102: | ||
== Gallery == | == Gallery == | ||
{{ | <gallery> | ||
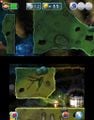
Cavern of Confusion 2.jpg|A sleeping [[Mockiwi]] and the [[Consolation Prize]]. | |||
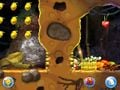
Cavern of Confusion 3.jpg|One of the shafts with a collapsible floor. | |||
Cavern of Confusion 4.jpg|The path to the right of the shaft in the previous image, with the [[Ultra-Sealed Aquarium]]. | |||
Cavern of Confusion 5.jpg|A passageway to a secret room. | |||
Cavern of Confusion 6.jpg|The [[bridge]] room. | |||
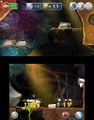
Cavern of Confusion 7.jpg|The room with the [[Peace Missile]]. | |||
Cavern of Confusion 8.jpg|The wooden stake that blocks the [[secret exit]]. | |||
</gallery> | |||
==Names in other languages== | |||
{{foreignname | |||
|Jap=まいごの どうくつ | |||
|JapR=Maigo no dōkutsu | |||
|JapM=Cave of lost people | |||
|Dut=Chaosgrot | |||
|DutM=Chaos cave | |||
|Fra=Grotte du désarroi | |||
|FraM=Cave of disarray | |||
|Ger=Die verwinkelte Höhle | |||
|GerM=The perplexing Cave | |||
|Ita=Grotta del caos | |||
|ItaM=Chaos cave | |||
|SpaA=Caverna de la confusión | |||
|SpaAM=Cavern of confusion | |||
|SpaE=Caverna de la Confusión | |||
|SpaEM=Cavern of Confusion | |||
}} | |||
== See also == | == See also == | ||
*[[Wooden stake]] | |||
{{ | {{Brilliant Garden}} | ||
Latest revision as of 14:26, April 27, 2023
| Cavern of Confusion Sector 1 – Area B | |
|---|---|

| |
| Treasures | 3 |
| Pikmin available | Yellow Pikmin |
| Pikmin discovered | Yellow Pikmin |
| Requirements | Complete First Expedition |
| Next area | Mushroom Valley (normal exit) Cherrystone Pass (secret exit) |
| Music | Underground area Underground area - back side |
Cavern of Confusion (まいごの どうくつ?, lit.: "Cave of lost people") is the second area in Hey! Pikmin. It takes place inside a cave with shifting parts, and introduces the player to Yellow Pikmin and their ability to be thrown high. Near the end, there is a large wooden stake that blocks the way to the secret exit that leads to the Cherrystone Pass. If the player doesn't have enough Pikmin to stomp down the stake, they will have to take the standard exit to the Mushroom Valley.
Description[edit]
This area takes place in a big cavern. Right at the start, there is a bush, that serves as a nest for Yellow Pikmin. After going down a vine, Olimar finds some Yellow Pikmin that are threatened by a Spornet. In this area, the player has to be very cautious with those enemies, because there are a lot of them. The area is also made up of patches of ground that go up and down when stepped on. There are also wooden stakes, that need to be pushed down into the ground in order to progress in the cavern. The first treasure to be found in this area is the Consolation Prize, alongside two Mockiwis. Not too long after that, the Ultra Sealed Aquarium can be taken. As the player progresses in the area, there are more and more Spornets, thus making it through the cavern harder without losing Pikmin. Some fragments have to be retrieved, in order to make a bridge and continue the cave. Just after the bridge, the Peace Missile can be brought back to Olimar.
Cutscenes[edit]
| Cutscene | Screenshot | Trigger | Description |
|---|---|---|---|
| Yellow Pikmin introduction | 
|
The player whistles the Pikmin hiding behind leaves at the start of the area. | The four Yellow Pikmin hiding behind the leaves pop out with backflips and perform a pose. |
| Spornet attack | 
|
The player enters the room after the first vine. | Four Yellow Pikmin appear running away from a Spornet's shot, right to left, then left to right, and then right to left again. The Spornet leaves after this third time. |
| Crumbug tube | 
|
The player walks a bit forward after the doorway beyond the bridge room. | Four Yellow Pikmin idle by a colorful tube. One crawls inside, and a bit after, quickly scurries back out. It stops some distance away from the tube, looks back in horror, and the three wonder what's wrong. A Crumbug then crawls out of the same tube. The four Pikmin run away as the Crumbug tries to bite them, before turning the opposite direction and walking off. |
Pikmin locations[edit]
| Spot | Location | Pikmin | Requirements | Notes |
|---|---|---|---|---|
| In a bush | Right at the start of the area | 4 Yellow Pikmin | Have less than 4 Yellow Pikmin | Mandatory to break the dirt block |
| Threaten by a Spornet | After the vine and a Crumbug | 4 Yellow Pikmin | First time only | |
| In a bush | Right under a Spornet and a vine | 4 Yellow Pikmin | Have less than 4 Yellow Pikmin | |
| In a bush | Right before a Mockiwi | 4 Yellow Pikmin | Have less than 4 Yellow Pikmin | |
| In a bush | After the Consolation Prize | 4 Yellow Pikmin | Have less than 8 Yellow Pikmin | Mandatory to bury the wooden stake |
| In a bush | Next to the entrance to a doorway | 4 Yellow Pikmin | Have less than 4 Yellow Pikmin | |
| In a bush | After a crew of Spornets, under a Heart | 4 Yellow Pikmin | Have less than 4 Yellow Pikmin | |
| In a bush | After the doorway | 4 Yellow Pikmin | Have less than 8 Yellow Pikmin | |
| Crawling in a tube | Right next to the previous bush | 4 Yellow Pikmin | First time only | |
| In a bush | After the two Crumbugs | 4 Yellow Pikmin | Have less than 8 Yellow Pikmin |
Objects[edit]
Treasures[edit]
 Consolation Prize ("Blues Eradicator" in Europe)
 Ultra-Sealed Aquarium
 Peace Missile
Enemies[edit]
Obstacles[edit]
 Dirt block × 5
 Fragment × 5
 Wooden stake (small) × 3
- Wooden stake (large) × 1
Plants[edit]
Others[edit]
 Yellow Sparklium Seed × 30 (6 of them come from Mockiwis)
 Red Spaklium Seed × 7
 Sparklium flower (small) × 1
 Heart (small) × 4
Guide[edit]
|
The following article or section contains guides. |
|
To do: Add a guide on how to clear the area. |
Gallery[edit]

A sleeping Mockiwi and the Consolation Prize.
One of the shafts with a collapsible floor.
The path to the right of the shaft in the previous image, with the Ultra-Sealed Aquarium.
A passageway to a secret room.
The bridge room.
The room with the Peace Missile.
The wooden stake that blocks the secret exit.


![[icon]](/index.php?title=Special:Upload&wpDestFile=Vine_icon.png)
Names in other languages[edit]
| Language | Name | Meaning |
|---|---|---|
| まいごの どうくつ? Maigo no dōkutsu |
Cave of lost people | |
| Chaosgrot | Chaos cave | |
| Grotte du désarroi | Cave of disarray | |
| Die verwinkelte Höhle | The perplexing Cave | |
| Grotta del caos | Chaos cave | |
| Caverna de la confusión | Cavern of confusion | |
| Caverna de la Confusión | Cavern of Confusion |
See also[edit]
| Sector 1: Brilliant Garden | |
|---|---|
| Normal areas | 1-A: First Expedition • 1-B: Cavern of Confusion • 1-C: Mushroom Valley • 1-D: Back-and-Forth Road • 1-E: The Shadow in the Brush |
| Extra areas | 1-X: Cherrystone Pass • Secret Spot 1 • Secret Spot 2 • Secret Spot 3 • Secret Spot 4 • Sparklium Springs |