Rusty Gulch: Difference between revisions
m (s/2-Player Mode/2-Player Battle.) |
No edit summary |
||
| (20 intermediate revisions by 7 users not shown) | |||
| Line 1: | Line 1: | ||
{{game icons|p2=y}} | {{game icons|p2=y}} | ||
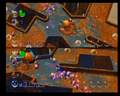
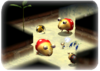
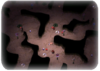
[[ | [[File:Rusty Gulch preview.png|thumb|300px|Stage preview.]] | ||
The '''Rusty Gulch''' is a map in the [[2-Player Battle]] of ''[[Pikmin 2]]''. | The '''Rusty Gulch''' is a map in the [[2-Player Battle]] mode of ''[[Pikmin 2]]''. It is constructed out of rusty metal pathways held by large pillars. Certain spots have odd colored "sand", and the entire stage is floating over a [[Pit|bottomless void]] in which Pikmin die when [[throw]]n, and may be home to a [[Gatling Groink]]. One of the layouts that the stage can have bears great resemblance to that of [[Subterranean Complex]], sublevel 5 and [[Dream Den]], sublevel 4, featuring multiple ramps with a high area at the center. | ||
==Level information== | ==Level information== | ||
*'''Theme''': Metal | *'''Theme''': Metal | ||
*'''Treasures''': | *'''Treasures''': | ||
**None | **None | ||
*''' | *'''Enemies''': | ||
**{{icon|Dwarf Bulborb|y|n=Dwarf Red Bulborb}} | |||
**{{icon|Female Sheargrub|y}} | |||
**{{icon|Gatling Groink|y}} (stationary) | |||
**{{icon|Honeywisp|y}} | |||
**{{icon|Male Sheargrub|y}} | |||
**{{icon|Shearwig|y}} (under marbles) | |||
*'''Obstacles''': | |||
**None | **None | ||
*'''Plants and fungi''': | |||
**{{icon|Pellet Posy|y}} | |||
*'''Others''': | *'''Others''': | ||
** | **{{icon|Egg|y}} | ||
{{sublevel technical | {{sublevel technical | ||
| Line 30: | Line 29: | ||
|capmax = 50 | |capmax = 50 | ||
|rooms = 4 | |rooms = 4 | ||
|ctrratio = 0.1 | |||
|geyser = No | |geyser = No | ||
|unitfile = vs_6_nobo_metal.txt | |unitfile = vs_6_nobo_metal.txt | ||
|lightfile = vs_6_light.ini | |lightfile = vs_6_light.ini | ||
|bg = | |bg = build | ||
|clog = No | |clog = No | ||
|hiddenfloor = 0 | |hiddenfloor = 0 | ||
|units = | |units = | ||
{{!}} colspan = 6 style = "text-align: center;" {{!}} | {{!}} colspan = 6 style = "text-align: center;" {{!}} Layout 1 (1/3 chance) | ||
{{!}}- | {{!}}- | ||
{{sublevel units | {{sublevel units | ||
|room_vs_nobo2_4_metal|Zigzagging corridors ( | |room_vs_nobo2_4_metal|Zigzagging corridors (×1) | ||
|room_vs_north_1_metal|Circular room with 1 exit ( | |room_vs_north_1_metal|Circular room with 1 exit (×2) | ||
|item_cap_metal|Dead end with item ( | |item_cap_metal|Dead end with item (×2) | ||
}} | }} | ||
{{!}} colspan = 6 style = "text-align: center;" {{!}} | {{!}} colspan = 6 style = "text-align: center;" {{!}} Layout 2 (1/3 chance) | ||
{{!}}- | {{!}}- | ||
{{sublevel units | {{sublevel units | ||
|room_vs_hitode2x3_5_metal|X-shaped room ( | |room_vs_hitode2x3_5_metal|X-shaped room (×1) | ||
|room_hitode3x3_5_metal|Room with raised corner ( | |room_hitode3x3_5_metal|Room with raised corner (×2) | ||
|cap_metal|Dead end ( | |cap_metal|Dead end (×4) | ||
|way2_metal|Corridor ( | |way2_metal|Corridor (×14) | ||
|way2x2_metal|Long corridor ( | |way2x2_metal|Long corridor (×4) | ||
|wayl_metal|Turning corridor ( | |wayl_metal|Turning corridor (×11) | ||
}} | }} | ||
{{sublevel units | {{sublevel units | ||
|way3_metal|Three-way crossing ( | |way3_metal|Three-way crossing (×7) | ||
|item_cap_metal|Dead end with item ( | |item_cap_metal|Dead end with item (×2) | ||
}} | }} | ||
{{!}} colspan = 6 style = "text-align: center;" {{!}} | {{!}} colspan = 6 style = "text-align: center;" {{!}} Layout 3 (1/3 chance) | ||
{{!}}- | {{!}}- | ||
{{sublevel units | {{sublevel units | ||
|room_hitode4x4_tower_3_metal|Circular room with raised corner ( | |room_hitode4x4_tower_3_metal|Circular room with raised corner (×2) | ||
|room_cent_4_metal|Circular room with 4 exits ( | |room_cent_4_metal|Circular room with 4 exits (×2) | ||
|way2x2_metal|Long corridor ( | |way2x2_metal|Long corridor (×3) | ||
|cap_metal|Dead end ( | |cap_metal|Dead end (×4) | ||
|wayl_metal|Turning corridor ( | |wayl_metal|Turning corridor (×10) | ||
|way2_metal|Corridor ( | |way2_metal|Corridor (×8) | ||
}} | |||
{{!}} colspan = 6 style = "text-align: center;" {{!}} Random units | |||
{{!}}- | |||
{{sublevel units | |||
|cap_metal|Dead end | |||
|item_cap_metal|Dead end with item | |||
|way3_metal|Three-way crossing | |||
|way4_metal|Four-way crossing | |||
|wayl_metal|Turning corridor | |||
|way2_metal|Corridor | |||
}} | |||
{{sublevel units | |||
|way2x2_metal|Long corridor | |||
|room_vs_nobo2_4_metal|'''Zigzagging corridors''' | |||
|room_cent_4_metal|'''Circular room with 4 exits''' | |||
|room_vs_north_1_metal|'''Circular room with 1 exit''' | |||
|room_vs_hitode2x3_5_metal|'''X-shaped room''' | |||
|room_hitode3x3_5_metal|'''Room with raised corner''' | |||
}} | |||
{{sublevel units | |||
|room_hitode4x4_tower_3_metal|'''Circular room with raised corner''' | |||
}} | }} | ||
}} | }} | ||
| Line 73: | Line 94: | ||
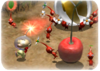
One very interesting strategy involving the [[Gatling Groink]]s in this area is to actually have a Gatling Groink guard your base and marble from opponents. First, find a Gatling Groink, preferably close to your base. "Kill" it, then have your Pikmin start bringing it back to your Onion. Right before they bring it to the Onion, call them back. After a bit, the Groink will fully regenerate in your base. This is a good strategy if you don't play by getting yellow marbles, but remember the Groink will attack anyone's Pikmin, so be careful when carrying items back to your base. | One very interesting strategy involving the [[Gatling Groink]]s in this area is to actually have a Gatling Groink guard your base and marble from opponents. First, find a Gatling Groink, preferably close to your base. "Kill" it, then have your Pikmin start bringing it back to your Onion. Right before they bring it to the Onion, call them back. After a bit, the Groink will fully regenerate in your base. This is a good strategy if you don't play by getting yellow marbles, but remember the Groink will attack anyone's Pikmin, so be careful when carrying items back to your base. | ||
If you do play by getting yellow marbles, another way is to intercept the opponent whilst carrying a [[Gatling Groink]] near | If you do play by getting yellow marbles, another way is to intercept the opponent whilst carrying a [[Gatling Groink]] near their base, and make sure the Groink revives. This means that you can gather yellow marbles faster while the opponent fumbles around with the Gatling Groink. This strategy is more effective for getting yellow marbles and making your opponent slow down. | ||
== | ==Gallery== | ||
<gallery> | |||
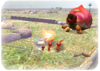
File:Rusty Gulch.png|Attacking a Gatling Groink. | |||
</gallery> | |||
==Names in other languages== | |||
{{Foreignname | |||
|Ger=Rostschlucht | |||
|GerM=Rusty Gulch | |||
|SpaA=Mole de Orín | |||
|SpaAM=Rusty Mass | |||
|Ita=Burrone scuro | |||
|ItaM=Dark ravine | |||
}} | |||
{{ | {{2PB}} | ||
Latest revision as of 20:54, February 14, 2024

The Rusty Gulch is a map in the 2-Player Battle mode of Pikmin 2. It is constructed out of rusty metal pathways held by large pillars. Certain spots have odd colored "sand", and the entire stage is floating over a bottomless void in which Pikmin die when thrown, and may be home to a Gatling Groink. One of the layouts that the stage can have bears great resemblance to that of Subterranean Complex, sublevel 5 and Dream Den, sublevel 4, featuring multiple ramps with a high area at the center.
Level information[edit]
- Theme: Metal
- Treasures:
- None
- Enemies:
 Dwarf Red Bulborb
 Female Sheargrub
 Gatling Groink (stationary)
 Honeywisp
 Male Sheargrub
 Shearwig (under marbles)
- Obstacles:
- None
- Plants and fungi:
- Others:
| Technical sublevel information | |||||
|---|---|---|---|---|---|
| Internal cave name | vs_6_hiyahiya | ||||
| "Main" object maximum (?) | 35 | ||||
| "Treasure" object maximum (?) | 0 | ||||
| "Gate" object maximum (?) | 0 | ||||
| Dead end unit probability (?) | 50 | ||||
| Number of rooms (?) | 4 | ||||
| Corridor-to-room ratio (?) | 0.1 | ||||
| Escape geyser (?) | No | ||||
| Clogged hole (?) | No | ||||
| Cave units file (?) | vs_6_nobo_metal.txt | ||||
| Lighting file (?) | vs_6_light.ini | ||||
| Background (?) | build ( | ||||
| Cave units (?) | |||||
| Layout 1 (1/3 chance) | |||||
 |
 |
 |
|||
| Zigzagging corridors (×1) | Circular room with 1 exit (×2) | Dead end with item (×2) | |||
| Layout 2 (1/3 chance) | |||||
 |
 |
 |
 |
 | |
| X-shaped room (×1) | Room with raised corner (×2) | Dead end (×4) | Corridor (×14) | Long corridor (×4) | Turning corridor (×11) |
 |
|
||||
| Three-way crossing (×7) | Dead end with item (×2) | ||||
| Layout 3 (1/3 chance) | |||||
 |
 |
|
|
| |
| Circular room with raised corner (×2) | Circular room with 4 exits (×2) | Long corridor (×3) | Dead end (×4) | Turning corridor (×10) | Corridor (×8) |
| Random units | |||||
|
|
|
 |
|
|
| Dead end | Dead end with item | Three-way crossing | Four-way crossing | Turning corridor | Corridor |
|
|
|
|
| |
| Long corridor | Zigzagging corridors | Circular room with 4 exits | Circular room with 1 exit | X-shaped room | Room with raised corner |
|
|||||
| Circular room with raised corner | |||||
Gatling Groink strategies[edit]
One very interesting strategy involving the Gatling Groinks in this area is to actually have a Gatling Groink guard your base and marble from opponents. First, find a Gatling Groink, preferably close to your base. "Kill" it, then have your Pikmin start bringing it back to your Onion. Right before they bring it to the Onion, call them back. After a bit, the Groink will fully regenerate in your base. This is a good strategy if you don't play by getting yellow marbles, but remember the Groink will attack anyone's Pikmin, so be careful when carrying items back to your base.
If you do play by getting yellow marbles, another way is to intercept the opponent whilst carrying a Gatling Groink near their base, and make sure the Groink revives. This means that you can gather yellow marbles faster while the opponent fumbles around with the Gatling Groink. This strategy is more effective for getting yellow marbles and making your opponent slow down.
Gallery[edit]
Attacking a Gatling Groink.

Names in other languages[edit]
| Language | Name | Meaning |
|---|---|---|
| Rostschlucht | Rusty Gulch | |
| Burrone scuro | Dark ravine | |
| Mole de Orín | Rusty Mass |
| 2-Player Battle stages | ||||
|---|---|---|---|---|
 Battle Field |
 War Path |
 Carpet Plain |
 Angle Maze |
 Colosseum |
 Rusty Gulch |
 Brawl Yard |
 Tile Lands |
 Dim Labyrinth |
 Hostile Territory |