Brawl Yard: Difference between revisions
Jump to navigation
Jump to search
mNo edit summary Tag: Mobile edit |
(Updating cave unit generation info. Thanks Drought Ender!) |
||
| Line 3: | Line 3: | ||
'''Brawl Yard''' is a [[2-Player Battle]] arena in ''[[Pikmin 2]]'', and as its name suggests, it is a yard setting, similar to the second sublevel in [[Snagret Hole]]. An overturned bucket is in the middle of the stage, which can be used as shelter from the [[Decorated Cannon Beetle]]s. | '''Brawl Yard''' is a [[2-Player Battle]] arena in ''[[Pikmin 2]]'', and as its name suggests, it is a yard setting, similar to the second sublevel in [[Snagret Hole]]. An overturned bucket is in the middle of the stage, which can be used as shelter from the [[Decorated Cannon Beetle]]s. | ||
A [[Glitches in Pikmin 2#Leave boundaries|glitch]] allows a leader to go out of bounds and steal the opponent's marble from behind. This is however, risky | A [[Glitches in Pikmin 2#Leave boundaries|glitch]] allows a leader to go out of bounds and steal the opponent's marble from behind. This is, however, risky. | ||
== Level information == | == Level information == | ||
| Line 43: | Line 41: | ||
|hiddenfloor = 1 | |hiddenfloor = 1 | ||
|units = | |units = | ||
{{!}} colspan = 6 style = "text-align: center;" {{!}} | {{!}} colspan = 6 style = "text-align: center;" {{!}} Layout 1 (26.(6)% chance) | ||
{{!}}- | {{!}}- | ||
{{sublevel units | {{sublevel units | ||
| Line 50: | Line 48: | ||
|item_cap_kusachi|Dead end with item (×7) | |item_cap_kusachi|Dead end with item (×7) | ||
}} | }} | ||
{{!}} colspan = 6 style = "text-align: center;" {{!}} | {{!}} colspan = 6 style = "text-align: center;" {{!}} Layout 2 (26.(6)% chance) | ||
{{!}}- | {{!}}- | ||
{{sublevel units | {{sublevel units | ||
| Line 63: | Line 61: | ||
|way2_kusachi|Corridor (×1) | |way2_kusachi|Corridor (×1) | ||
}} | }} | ||
{{!}} colspan = 6 style = "text-align: center;" {{!}} | {{!}} colspan = 6 style = "text-align: center;" {{!}} Layout 3 (26.(6)% chance) | ||
{{!}}- | {{!}}- | ||
{{sublevel units | {{sublevel units | ||
| Line 70: | Line 68: | ||
|way2_kusachi|Corridor (×4) | |way2_kusachi|Corridor (×4) | ||
|item_cap_kusachi|Dead end with item (×2) | |item_cap_kusachi|Dead end with item (×2) | ||
}} | |||
{{!}} colspan = 6 style = "text-align: center;" {{!}} Random units | |||
{{!}}- | |||
{{sublevel units | |||
|item_cap_kusachi|Dead end with item | |||
|way3_kusachi|Three-way crossing | |||
|way4_kusachi|Four-way crossing | |||
|wayl_kusachi|Turning corridor | |||
|way2_kusachi|Corridor | |||
|way2x2_kusachi|Long corridor | |||
}} | |||
{{sublevel units | |||
|room_vs_mid_kusachi|'''Large three-way crossing''' | |||
|room_vs_big_kusachi|'''Room with upside-down bucket''' | |||
|room_vs_5x5a_2_kusachi|'''Room with 2 circling paths''' | |||
|room_vs_big2_kusachi|'''Room with 5 exits''' | |||
}} | }} | ||
}} | }} | ||
Revision as of 18:33, August 13, 2022

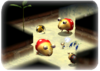
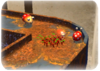
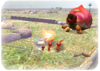
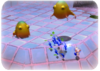
Brawl Yard is a 2-Player Battle arena in Pikmin 2, and as its name suggests, it is a yard setting, similar to the second sublevel in Snagret Hole. An overturned bucket is in the middle of the stage, which can be used as shelter from the Decorated Cannon Beetles.
A glitch allows a leader to go out of bounds and steal the opponent's marble from behind. This is, however, risky.
Level information
- Theme: Garden
- Treasures:
 Crystallized Telekinesis inside the Decorated Cannon Beetles
- Enemies:
 Cloaking Burrow-nit
 Decorated Cannon Beetle
 Female Sheargrub
 Skitter Leaf
 Shearwig (under marbles)
- Obstacles:
- None
- Plants and fungi:
- Others:
- None
| Technical sublevel information | |||||
|---|---|---|---|---|---|
| Internal cave name | vs_7_nobinobi | ||||
| "Main" object maximum (?) | 40 | ||||
| "Treasure" object maximum (?) | 0 | ||||
| "Gate" object maximum (?) | 0 | ||||
| Dead end unit probability (?) | 80 | ||||
| Number of rooms (?) | 3 | ||||
| Corridor-to-room ratio (?) | 0 | ||||
| Escape geyser (?) | No | ||||
| Clogged hole (?) | No | ||||
| Cave units file (?) | vs_7_kusachi.txt | ||||
| Lighting file (?) | vs_7_light.ini | ||||
| Background (?) | hiroba ( | ||||
| Cave units (?) | |||||
| Layout 1 (26.(6)% chance) | |||||
 |
 |
 |
|||
| Large three-way crossing (×2) | Room with upside-down bucket (×1) | Dead end with item (×7) | |||
| Layout 2 (26.(6)% chance) | |||||
|
 |
 |
|
 | |
| Large three-way crossing (×1) | Room with 5 exits (×1) | Room with 2 circling paths (×1) | Dead end with item (×4) | Long corridor (×3) | Turning corridor (×1) |
 |
|||||
| Corridor (×1) | |||||
| Layout 3 (26.(6)% chance) | |||||
|
|
|
|
||
| Room with 2 circling paths (×2) | Large three-way crossing (×2) | Corridor (×4) | Dead end with item (×2) | ||
| Random units | |||||
|
 |
 |
|
|
|
| Dead end with item | Three-way crossing | Four-way crossing | Turning corridor | Corridor | Long corridor |
|
|
|
|
||
| Large three-way crossing | Room with upside-down bucket | Room with 2 circling paths | Room with 5 exits | ||
Gallery
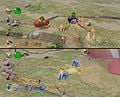
The Brawl Yard in-game.

| 2-Player Battle stages | ||||
|---|---|---|---|---|
 Battle Field |
 War Path |
 Carpet Plain |
 Angle Maze |
 Colosseum |
 Rusty Gulch |
 Brawl Yard |
 Tile Lands |
 Dim Labyrinth |
 Hostile Territory |