Formidable Oak Remix: Difference between revisions
En Passant (talk | contribs) mNo edit summary |
Phineas81707 (talk | contribs) mNo edit summary |
||
| Line 25: | Line 25: | ||
The player starts off as [[Alph]] in a small room in the middle of the stage, accompanied by 10 [[Blue Pikmin]]. In front of him, there is a sleeping [[Orange Bulborb]]. Past it is a path leading to a [[paper bag]] connecting the lower and upper levels. The path then splits up, with each side being filled with [[Dwarf Orange Bulborb]]s. If the player goes on the path towards the south, they will come into a room with 2 Orange Bulborbs and an [[iron ball]]. In the same room off to the side is [[Brittany]] with 10 additional Blue Pikmin. The iron ball goes down the path with the Dwarf Orange Bulborbs, killing most of them, breaking a [[Gate#Crystal wall|crystal wall]] into a room north of this. | The player starts off as [[Alph]] in a small room in the middle of the stage, accompanied by 10 [[Blue Pikmin]]. In front of him, there is a sleeping [[Orange Bulborb]]. Past it is a path leading to a [[paper bag]] connecting the lower and upper levels. The path then splits up, with each side being filled with [[Dwarf Orange Bulborb]]s. If the player goes on the path towards the south, they will come into a room with 2 Orange Bulborbs and an [[iron ball]]. In the same room off to the side is [[Brittany]] with 10 additional Blue Pikmin. The iron ball goes down the path with the Dwarf Orange Bulborbs, killing most of them, breaking a [[Gate#Crystal wall|crystal wall]] into a room north of this. | ||
Inside this room is a cluster of 3 [[Red Bulborb|Bulborbs]] and 6 [[Dwarf Red Bulborb|Dwarf Bulborbs]]. Most of them should be killed off by the iron ball. In the room are some [[Gray Candypop Bud|Gray]] and [[Crimson Candypop Bud]]s. There is also a stack of hay connecting that room to the one south of it. There is also a [[geyser]] which sends the player back up to the starting location. To the northwest is a [[Gate#Dirt Wall|dirt wall]] which encloses off another path. At the end of it is a small room closed off by a [[Gate#Crystal wall|crystal wall]] that houses 1 lone Dwarf Bulborb. It also contains a [[dirt mound]] with 2 [[Bomb | Inside this room is a cluster of 3 [[Red Bulborb|Bulborbs]] and 6 [[Dwarf Red Bulborb|Dwarf Bulborbs]]. Most of them should be killed off by the iron ball. In the room are some [[Gray Candypop Bud|Gray]] and [[Crimson Candypop Bud]]s. There is also a stack of hay connecting that room to the one south of it. There is also a [[geyser]] which sends the player back up to the starting location. To the northwest is a [[Gate#Dirt Wall|dirt wall]] which encloses off another path. At the end of it is a small room closed off by a [[Gate#Crystal wall|crystal wall]] that houses 1 lone Dwarf Bulborb. It also contains a [[dirt mound]] with 2 [[Bomb rock]]s inside. To the east is a path filled with Dwarf Bulborbs, and an iron ball at the end, which can be pushed down to kill them all in 1 fell swoop. | ||
Back near the starting location, the player will be greeted by a [[Whiptongue Bulborb]], with two Dwarf Orange Bulborbs south of it. Nearby those two is some [[Nectar Egg]]s and a dirt mound housing two more bomb rocks. To the north, the player will see a [[Crystal#Large crystal|large crystal]] with two more bomb rocks inside. Further north of that is a tin box. Pikmin and leaders can then be thrown up to another Whiptongue Bulborb's lair from that tin box. To the east lies a Dirt wall, which closes off a [[Spotty Bulbear]] and many [[Dwarf Bulbear]]s. Inside the room is yet another dirt mound with 2 | Back near the starting location, the player will be greeted by a [[Whiptongue Bulborb]], with two Dwarf Orange Bulborbs south of it. Nearby those two is some [[Nectar Egg]]s and a dirt mound housing two more bomb rocks. To the north, the player will see a [[Crystal#Large crystal|large crystal]] with two more bomb rocks inside. Further north of that is a tin box. Pikmin and leaders can then be thrown up to another Whiptongue Bulborb's lair from that tin box. To the east lies a Dirt wall, which closes off a [[Spotty Bulbear]] and many [[Dwarf Bulbear]]s. Inside the room is yet another dirt mound with 2 bomb rocks. | ||
==Pikmin== | ==Pikmin== | ||
Revision as of 10:18, November 23, 2015
|
This article or section is in need of more images. Particularly: |
| Formidable Oak Remix Battle Enemies! | |||||||||||||||
|---|---|---|---|---|---|---|---|---|---|---|---|---|---|---|---|
| Starting Pikmin | |||||||||||||||
| |||||||||||||||
| Requirements | |||||||||||||||
| |||||||||||||||
| Time limit | 5:55 | ||||||||||||||
| Music | {{{music}}} | ||||||||||||||
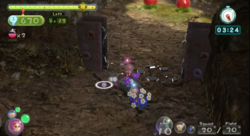
The Formidable Oak Remix is the tenth stage in Pikmin 3's Battle enemies! mode. The layout is just like that of the Formidable Oak, only with areas like the cave and the outer area blocked off. The icon shown from the stage selection screen shows an Orange Bulborb. This fits the actual level, which is populated by only Bulborbs, and all sorts of them. This stage is the shortest of all missions, regardless of mode, giving the player only 5:55, and a mere 30 Pikmin with no Onion, all of them starting off as Blues. This stage is notorious for being a map that relies on strategy to get the Platinum Medal.
Like how the Formidable Oak works in the Story mode, killed enemies simply dissolve into Plasm instead of leaving behind their corpses. Combined with the lack of an Onion, this is the only map in the entirety of Mission Mode (save for the Defeat Bosses! section) where it is impossible to carry anything back to either the Onion or the SPERO.
Terrain
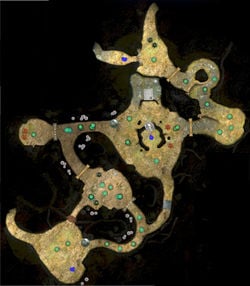
The player starts off as Alph in a small room in the middle of the stage, accompanied by 10 Blue Pikmin. In front of him, there is a sleeping Orange Bulborb. Past it is a path leading to a paper bag connecting the lower and upper levels. The path then splits up, with each side being filled with Dwarf Orange Bulborbs. If the player goes on the path towards the south, they will come into a room with 2 Orange Bulborbs and an iron ball. In the same room off to the side is Brittany with 10 additional Blue Pikmin. The iron ball goes down the path with the Dwarf Orange Bulborbs, killing most of them, breaking a crystal wall into a room north of this.
Inside this room is a cluster of 3 Bulborbs and 6 Dwarf Bulborbs. Most of them should be killed off by the iron ball. In the room are some Gray and Crimson Candypop Buds. There is also a stack of hay connecting that room to the one south of it. There is also a geyser which sends the player back up to the starting location. To the northwest is a dirt wall which encloses off another path. At the end of it is a small room closed off by a crystal wall that houses 1 lone Dwarf Bulborb. It also contains a dirt mound with 2 Bomb rocks inside. To the east is a path filled with Dwarf Bulborbs, and an iron ball at the end, which can be pushed down to kill them all in 1 fell swoop.
Back near the starting location, the player will be greeted by a Whiptongue Bulborb, with two Dwarf Orange Bulborbs south of it. Nearby those two is some Nectar Eggs and a dirt mound housing two more bomb rocks. To the north, the player will see a large crystal with two more bomb rocks inside. Further north of that is a tin box. Pikmin and leaders can then be thrown up to another Whiptongue Bulborb's lair from that tin box. To the east lies a Dirt wall, which closes off a Spotty Bulbear and many Dwarf Bulbears. Inside the room is yet another dirt mound with 2 bomb rocks.
Pikmin
 Blue Pikmin × 30
Flora
Enemies
- [icon] Dwarf Bulborb × 15
 Dwarf Orange Bulborb × 9
 Dwarf Bulbear × 6
 Bulborb × 3
 Orange Bulborb × 3
 Whiptongue Bulborb × 3
 Spotty Bulbear × 1
Obstacles
 Dirt wall × 3
 Reinforced wall × 3
 Crystal wall × 3
 Dirt mound × 3
 Iron ball × 2
 Geyser × 2
 Large crystal × 1 (Contains two Bomb Rocks)

