Stagnant Sea: Difference between revisions
(The article is complete, but I wanted to add an image for the first layout.) |
GreenPikmin (talk | contribs) (This probably needs better organization) |
||
| Line 12: | Line 12: | ||
*{{icon|Orange Bulborb|y|v=P3}} × 1 | *{{icon|Orange Bulborb|y|v=P3}} × 1 | ||
*{{icon|Red Bulborb|y|v=P3}} × 2 | *{{icon|Red Bulborb|y|v=P3}} × 2 | ||
*{{icon|Skitter Leaf|y|v=P3}} × | *{{icon|Skitter Leaf|y|v=P3}} × 3 | ||
*{{icon|Swooping Snitchbug|y|v=P3}} × 1 | *{{icon|Swooping Snitchbug|y|v=P3}} × 1 | ||
*{{icon|Whiptongue Bulborb|y}} × 1 | *{{icon|Whiptongue Bulborb|y}} × 1 | ||
| Line 19: | Line 19: | ||
}} | }} | ||
====Plants and fungi==== | ====Plants and fungi==== | ||
*{{icon|Pellet Posy| | *{{icon|Pellet Posy}} [[Pellet Posy|1-Pellet Posy]] × 16 | ||
*{{icon|Pellet Posy}} [[Pellet Posy|5-Pellet Posy]] × 2 | |||
====Fruit==== | ====Fruit==== | ||
{{columns|2| | {{columns|2| | ||
| Line 25: | Line 26: | ||
*{{icon|Dusk Pustules|y}} × 1 | *{{icon|Dusk Pustules|y}} × 1 | ||
*{{icon|Face Wrinkler|y}} × 1 | *{{icon|Face Wrinkler|y}} × 1 | ||
*{{icon|Golden Sunseed|y}} × 1 | |||
*{{icon|Insect Condo|y|v=FF}} × 1 | *{{icon|Insect Condo|y|v=FF}} × 1 | ||
}} | }} | ||
==== | ====Marbles==== | ||
*{{icon|Crystallized Telepathy}} [[Crystallized Telepathy|Red Marble]] × 1 | |||
*{{icon|Crystallized Clairvoyance}} [[Crystallized Clairvoyance|Blue Marble]] × 1 | *{{icon|Crystallized Clairvoyance}} [[Crystallized Clairvoyance|Blue Marble]] × 1 | ||
*{{icon|Crystallized Telekinesis}} [[Crystallized Telekinesis|Yellow Marble]] × 2 | *{{icon|Crystallized Telekinesis}} [[Crystallized Telekinesis|Yellow Marble]] × 2 | ||
====Obstacles==== | ====Obstacles==== | ||
*{{dirt wall}} [[Obstacles|Dirt Wall]] × 2 | *{{dirt wall}} [[Obstacles|Dirt Wall]] × 2 | ||
*Red Bridge × 2 | |||
*Red Bridge Fragments × 4 (4 groups of 10) | |||
====Other objects==== | |||
*Buried Pikmin × 20 (2 groups of 10 per team) | |||
*{{icon|Egg}} [[Nectar Egg]] × 8 | |||
===Layout B=== | ===Layout B=== | ||
| Line 40: | Line 47: | ||
{{columns|2| | {{columns|2| | ||
*{{icon|Desiccated Skitter Leaf|y}} × 4 | *{{icon|Desiccated Skitter Leaf|y}} × 4 | ||
*{{icon|Female Sheargrub|y|v=P3}} × 10 | *{{icon|Female Sheargrub|y|v=P3}} × 10 (2 groups of 5) | ||
*{{icon|Hermit Crawmad|y|v=P3}} × 2 | *{{icon|Hermit Crawmad|y|v=P3}} × 2 | ||
*{{icon|Medusal Slurker|y}} × 2 | *{{icon|Medusal Slurker|y}} × 2 | ||
| Line 50: | Line 57: | ||
}} | }} | ||
====Plants and fungi==== | ====Plants and fungi==== | ||
*{{icon|Pellet Posy | *{{icon|Pellet Posy}} [[Pellet Posy|1-Pellet Posy]] × 22 | ||
====Fruit==== | ====Fruit==== | ||
{{columns|2| | {{columns|2| | ||
| Line 58: | Line 65: | ||
*{{icon|Zest Bomb|y}} × 1 | *{{icon|Zest Bomb|y}} × 1 | ||
}} | }} | ||
==== | ====Marbles==== | ||
*{{icon|Crystallized Telepathy}} [[Crystallized Telepathy|Red Marble]] × 1 | |||
*{{icon|Crystallized Clairvoyance}} [[Crystallized Clairvoyance|Blue Marble]] × 1 | *{{icon|Crystallized Clairvoyance}} [[Crystallized Clairvoyance|Blue Marble]] × 1 | ||
*{{icon|Crystallized Telekinesis}} [[Crystallized Telekinesis|Yellow Marble]] × 2 | *{{icon|Crystallized Telekinesis}} [[Crystallized Telekinesis|Yellow Marble]] × 2 | ||
====Obstacles==== | ====Obstacles==== | ||
*{{dirt wall}} [[Obstacles|Dirt Wall]] × 2 | *{{dirt wall}} [[Obstacles|Dirt Wall]] × 2 | ||
*Red Bridge × 2 | |||
*Red Bridge Fragments × 4 (4 groups of 10) | |||
*Large Crystal × 4 | |||
====Other objects==== | |||
*Buried Pikmin × 30 (2 groups of 5 per team, 2 groups of 10 per team) | |||
*Skutterchuck Crystal × 6 | |||
===Layout C=== | ===Layout C=== | ||
| Line 79: | Line 92: | ||
}} | }} | ||
====Plants and fungi==== | ====Plants and fungi==== | ||
*{{icon|Pellet Posy | *{{icon|Pellet Posy}} [[Pellet Posy|1-Pellet Posy]] × 16 | ||
====Fruit==== | ====Fruit==== | ||
{{columns|2| | {{columns|2| | ||
| Line 89: | Line 102: | ||
*{{icon|Zest Bomb|y}} × 1 | *{{icon|Zest Bomb|y}} × 1 | ||
}} | }} | ||
==== | ====Marbles==== | ||
*{{icon|Crystallized Telepathy}} [[Crystallized Telepathy|Red Marble]] × 1 | |||
*{{icon|Crystallized Clairvoyance}} [[Crystallized Clairvoyance|Blue Marble]] × 1 | *{{icon|Crystallized Clairvoyance}} [[Crystallized Clairvoyance|Blue Marble]] × 1 | ||
*{{icon|Crystallized Telekinesis}} [[Crystallized Telekinesis|Yellow Marble]] × 2 | *{{icon|Crystallized Telekinesis}} [[Crystallized Telekinesis|Yellow Marble]] × 2 | ||
====Obstacles==== | |||
*Red Bridge × 2 | |||
====Other objects==== | |||
*{{icon|Egg}} [[Nectar Egg]] × 4 | |||
==Gallery== | ==Gallery== | ||
Revision as of 05:37, May 14, 2016
Stagnant Sea is a stage in Pikmin 3's Bingo Battle. Like the name suggests, the stage is mostly water-based. It is littered with objects such as boots, tires, and metal pipes, and it has three main land masses, with bridges connecting them. It is possible to get Red Pikmin, Blue Pikmin, and Rock Pikmin in this stage.
Layouts
Layout A

This layout gives you Red Pikmin to start with, and Blue Pikmin can be found.
Enemies
- [icon] Dwarf Red Bulborb × 4
 Orange Bulborb × 1
 Red Bulborb × 2
 Skitter Leaf × 3
 Swooping Snitchbug × 1
 Whiptongue Bulborb × 1
 Wogpole × 16
 Yellow Wollywog × 2
Plants and fungi
 1-Pellet Posy × 16
- 5-Pellet Posy × 2
Fruit
 Citrus Lump × 1
 Dusk Pustules × 1
 Face Wrinkler × 1
 Golden Sunseed × 1
 Insect Condo × 1
Marbles
 Red Marble × 1
 Blue Marble × 1
 Yellow Marble × 2
Obstacles
 Dirt Wall × 2
- Red Bridge × 2
- Red Bridge Fragments × 4 (4 groups of 10)
Other objects
- Buried Pikmin × 20 (2 groups of 10 per team)
 Nectar Egg × 8
Layout B

This layout gives you Blue Pikmin to start with, and Rock Pikmin can be found.
Enemies
 Desiccated Skitter Leaf × 4
 Female Sheargrub × 10 (2 groups of 5)
 Hermit Crawmad × 2
 Medusal Slurker × 2
 Skeeterskate × 2
 Skutterchuck × 2
 Water Dumple × 4
- Wogpole × 4
- Yellow Wollywog × 1
Plants and fungi
- 1-Pellet Posy × 22
Fruit
- Face Wrinkler × 1
- Golden Sunseed × 1
 Sunseed Berry × 1
 Zest Bomb × 1
Marbles
- Red Marble × 1
- Blue Marble × 1
- Yellow Marble × 2
Obstacles
- Dirt Wall × 2
- Red Bridge × 2
- Red Bridge Fragments × 4 (4 groups of 10)
- Large Crystal × 4
Other objects
- Buried Pikmin × 30 (2 groups of 5 per team, 2 groups of 10 per team)
- Skutterchuck Crystal × 6
Layout C

This layout gives you Blue Pikmin to start with, but no other Pikmin can be found.
Enemies
- [icon] Dwarf Red Bulborb × 4
- Hermit Crawmad × 2
- Medusal Slurker × 1
- Red Bulborb × 3
- Skeeterskate × 2
- Wogpole × 9
- Yellow Wollywog × 2
Plants and fungi
- 1-Pellet Posy × 16
Fruit
- Citrus Lump × 1
- Face Wrinkler × 1
- Insect Condo × 1
 Portable Sunset × 1
 Velvety Dreamdrop × 1
- Zest Bomb × 1
Marbles
- Red Marble × 1
- Blue Marble × 1
- Yellow Marble × 2
Obstacles
- Red Bridge × 2
Other objects
- Nectar Egg × 4
Gallery
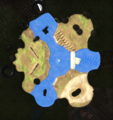
Texture used on the radar.
- Stagnent Sea (Gamepad).jpg
GamePad view of Stagnant Sea.
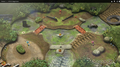
Another view of Layout C, in the E3 2013 stage demo.
- Thirsty Desert - Collect Treasure Screen Shot 2014-06-25 04-08-57.png
A Medusal Slurker above the beam connecting the two team's sides.
- Thirsty Desert - Collect Treasure Screen Shot 2014-06-25 04-08-55.png
The same beam, with a Face Wrinkler encased in crystal.
- Thirsty Desert - Collect Treasure Screen Shot 2014-06-25 04-06-56.png
A Medusal Slurker above the landmass separate from the two teams.
- Thirsty Desert - Collect Treasure Screen Shot 2014-06-25 04-06-51.png
Another view of that landmass.
- Thirsty Desert - Collect Treasure Screen Shot 2014-06-25 04-06-49.png
Another view of the landmass, with Rock Pikmin buried for both teams.
- Thirsty Desert - Collect Treasure Screen Shot 2014-06-25 04-06-46.png
The pink team's Onion.
- Thirsty Desert - Collect Treasure Screen Shot 2014-06-25 04-06-08.png
The back of the landmass with tire tracks on it.
- Thirsty Desert - Collect Treasure Screen Shot 2014-06-25 04-06-02.png
Several Pellet Posies growing in the same area.
- Thirsty Desert - Collect Treasure Screen Shot 2014-06-25 04-05-56.png
A dirt wall in the landmass with tire tracks.
- Thirsty Desert - Collect Treasure Screen Shot 2014-06-25 04-05-53.png
Another view of the dirt wall. The tire tracks run the length of the landmass.
- Thirsty Desert - Collect Treasure Screen Shot 2014-06-25 04-05-44.png
Water Dumples and a boot off the shore of the tire-tracked landmass.
- Thirsty Desert - Collect Treasure Screen Shot 2014-06-25 04-05-41.png
Another view of the same boot.
- Thirsty Desert - Collect Treasure Screen Shot 2014-06-25 04-05-38.png
A Red Marble in the sole of the same boot. Items are normally hidden inside it.
- Thirsty Desert - Collect Treasure Screen Shot 2014-06-25 04-05-35.png
Viewing the boot from the landmass separate from the two teams' sides.
- Thirsty Desert - Collect Treasure Screen Shot 2014-06-25 04-05-31.png
Foliage in the separate landmass, along with crystal nodules.
- Thirsty Desert - Collect Treasure Screen Shot 2014-06-25 04-05-27.png
Buried Rock Pikmin for the pink team.
- Thirsty Desert - Collect Treasure Screen Shot 2014-06-25 04-05-01.png
The opposite side of the map, containing an upright boot.
- Thirsty Desert - Collect Treasure Screen Shot 2014-06-25 04-04-50.png
One team's sandier landmass, without tire tracks. An encased Sunseed Berry lies just behind the Onion.
- Thirsty Desert - Collect Treasure Screen Shot 2014-06-25 04-04-39.png
The back of the sandy landmass, with Pellet Posies growing, and construction equipment and a boot print in the background.
- Thirsty Desert - Collect Treasure Screen Shot 2014-06-25 04-04-25.png
Fragments on the sandy landmass.
- Thirsty Desert - Collect Treasure Screen Shot 2014-06-25 04-04-17.png
A better view of the encased Sunseed Berry.


![[icon]](/index.php?title=Special:Upload&wpDestFile=Dwarf_Red_Bulborb_P3_icon.png)