Thirsty Desert: Difference between revisions
(Column sorting.) |
m (Consistency.) |
||
| Line 42: | Line 42: | ||
*{{icon|Pyroclasmic Slooch|y}} × 1 | *{{icon|Pyroclasmic Slooch|y}} × 1 | ||
}} | }} | ||
{{columns|0|''' | {{columns|0|'''Treasure''' | ||
*{{icon|Cupid's Grenade|v=FF|y}} × 8 | *{{icon|Cupid's Grenade|v=FF|y}} × 8 | ||
*{{icon|Sunseed Berry|v=FF|y}} × 6 | *{{icon|Sunseed Berry|v=FF|y}} × 6 | ||
Revision as of 21:11, December 1, 2015

Thirsty Desert is a map in Pikmin 3's Mission Mode. As its name implies, it is a desert with many cacti surrounding the area. Ironically, there are pools of water in places.
Collect Treasure!
| Thirsty Desert Collect Treasure! | |||||||||||||||
|---|---|---|---|---|---|---|---|---|---|---|---|---|---|---|---|

| |||||||||||||||
| Starting Pikmin | |||||||||||||||
| |||||||||||||||
| Requirements | |||||||||||||||
| |||||||||||||||
| Time limit | 10:00 | ||||||||||||||
| Music | {{{music}}} | ||||||||||||||
Terrain
The explorers start in a small area to the left of the stage. In this area, there are multiple spots with red Pikmin planted. Cupid's Grenades and Golden Sunseeds litter this area. To the south of this area is a Dirt Wall. Beyond this is a small area with a few Golden Grenades. A small creek is past that. At the bottom right corner of the stage is an elevated area that can only be reached by a bridge. In that area is a pile of Nuggets, a Face Wrinkler, a Golden Sunseed, and an Insect Condo, all guarded by a lone Pyroclasmic Slooch.
The fragments to build the bridge to access this area is found to the left of the creek. Past that is a Dwarf Bulborb, and a split path. The right path leads to a Bamboo Gate, which leads directly back to the SPERO. To the left is a Dirt Wall. Also on the same path is another Dwarf Bulborb. 2 huge rocks are also found on the path. The first of which can be climbed by a slope leading up to it. At the top is an assortment of treasures, a pile of Nuggets, a group of planted red Pikmin, and a Violet Candypop Bud. The second rock can only be accessed by throwing a leader from the first rock. On the second rock is an Insect Condo, a Golden Sunseed, and a Face Wrinkler.
Past the Dirt Wall is another Dwarf Bulborb, and a pile of Nuggets. Further down the path is a Sunseed Berry and a Ivory Candypop Bud, guarded by a Dwarf Bulborb. There is a small path with treasures littered throughout which leads to a group of winged Pikmin. Past there is a small creek. Afterwards, a large ring of land is found. On that ring, various Candypop Buds, a few enemies, and treasures are littered throughout it. In the center of the ring is a pile of Fragments, used to cross the small creek. To the northeast is another small ring of treasures, Nuggets, and winged Pikmin, with an Insect Condo in the middle. To the south of there is an Iridescent Flint Beetle, which is located right outside of the starting area.
Pikmin
Flora |
Enemies
|
Treasure
|
Obstacles
|
Battle Enemies!
| Thirsty Desert Battle Enemies! | |||||||||||||||
|---|---|---|---|---|---|---|---|---|---|---|---|---|---|---|---|

| |||||||||||||||
| Starting Pikmin | |||||||||||||||
| |||||||||||||||
| Requirements | |||||||||||||||
| |||||||||||||||
| Time limit | 8:00 | ||||||||||||||
| Music | {{{music}}} | ||||||||||||||
Terrain
All 3 leaders are available in this mission. The player starts out as Charlie in the middle of a small pond with 5 blue Pikmin and the blue Onion. In the pond are a few Wogpoles. A Dirt Wall is nearby, with a group of 7 Shearwigs guarding it. Past that dirt wall is a lone Spotty Bulbear, with 2 more Wogpoles in the small pond nearby. Around the blue Onion is a few Desiccated Skitter Leaves and 3 blue Pellet Posies. North of the blue Onion is a dirt wall, enclosing an area where a Whiptongue Bulborb resides.
Further north is where Brittany and the rock Pikmin, along with their Onion, is located. Near the Onion is a pile of Fragments, used to create a bridge over the body of water. This body of water contains 2 more Wogpoles as well as a Yellow Wollywog. Outside the body of water is a lone Dwarf Bulborb. Right beyond the bridge to the rock Onion is a cluster of 3 Dwarf Bulborbs. Further south is a split path. The path leading east leads to the Whiptongue Bulborb, and the path leading south is where Alph and the red Onion are located.
Nearby the red Onion are 3 red Pellet Posies. North of the red Onion is a geyser, which leads to a large rock on which a Bulborb is sleeping. Nearby that geyser are some encased geysers that can only be broken by rock Pikmin. To the east of the red Onion is a sleeping Orange Bulborb, which should be taken out using a large squad or a bomb rock. South of the Orange Bulborb is a Crystal Wall, blocking the path to a pile of Fragments and a large group of Desiccated Skitter Leaves. These Fragments are used to build a bridge down the path from the family of Desiccated Skitter Leaves. Nearby are 3 Dwarf Bulborbs, and 2 Water Dumples in the small creek. The bridge leads back to the blue Onion.
Pikmin
Flora
|
Enemies
|
Obstacles
|
Gallery
|
This article or section is in need of more images. |
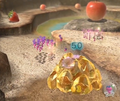
A pile of Nuggets in the Collect treasure! version of the stage.

![[icon]](/index.php?title=Special:Upload&wpDestFile=Dwarf_Red_Bulborb_P3_icon.png)