Pikipedia:Sandbox: Difference between revisions
(Testing a clickable Hey! Pikmin sector map.) |
No edit summary Tags: Mobile edit Advanced mobile edit |
||
| (32 intermediate revisions by 13 users not shown) | |||
| Line 16: | Line 16: | ||
===''Pikmin''=== | ===''Pikmin''=== | ||
The only dynamic light is sunlight, that shades all objects but does not actually calculate shadows. This light moves throughout the day, beginning foggy and bright in the morning, clear and at average brightness for the majority of the day, and fading to yellow to orange and finally to very little light as [[Day#Sunset|sunset]] approaches (except in [[The Forest Navel]]; sunlight is still present there but does not move or change color). All objects in an area have shading based on this light, but none of the scenery casts real moving shadows based on this light. To help players perceive Pikmin locations, up to 50 Pikmin will cast soft shadows that move throughout the day, even when there is no sunlight. In order to optimize processing power, shadows cast by Pikmin are not drawn if more than 51 Pikmin are on the field; instead, they will all have faint shadows directly underneath them. Enemies always have this sort of faint shadow, except for the [[Beady Long Legs]]. Environmental objects like [[Vegetation|plants]] never move on the map, so one large texture accounts for all their shadows. The exception is [[Pellet Posies]], which cast soft dynamic shadows just like Pikmin. | The only dynamic light is sunlight, that shades all objects but does not actually calculate shadows. This light moves throughout the day, beginning foggy and bright in the morning, clear and at average brightness for the majority of the day, and fading to yellow to orange and finally to very little light as [[Day#Sunset|sunset]] approaches (except in [[The Forest Navel]]; sunlight is still present there but does not move or change color). All objects in an area have shading based on this light, but none of the scenery casts real moving shadows based on this light. To help players perceive Pikmin locations, up to 50 Pikmin will cast soft shadows that move throughout the day, even when there is no sunlight. In order to optimize processing power, shadows cast by Pikmin are not drawn if more than 51 Pikmin are on the field; instead, they will all have faint shadows directly underneath them. Enemies always have this sort of faint shadow, except for the [[Beady Long Legs]]. Environmental objects like [[Vegetation|plants]] never move on the map, so one large texture accounts for all their shadows. The exception is [[Pellet Posies]], which cast soft dynamic shadows just like Pikmin. | ||
| Line 32: | Line 31: | ||
===''Pikmin 2''=== | ===''Pikmin 2''=== | ||
Sunlight in [[Pikmin 2|''Pikmin 2'']] behaves very similarly to that in the previous game, except the color of sunlight varies by area, and fog is generally less pronounced. Around noon, the brightness of the sunlight generally increases, and toward the end of the day it dramatically decreases and turns orange. Yet at any point in the day, when a leader approaches an incomplete [[cave]] from above ground, the lighting always mixes a very foggy green color to its current color. All objects are shaded by this sunlight, but most of them (including static objects) do not cast accurate shadows. Instead, most moving objects cast circular shadows directly beneath them, and those shadows never move. However, unlike the shadows in ''Pikmin'', these circular shadows can actually dim other objects, and their simple shape allows many shadows to be rendered at once. Several objects have uniquely shaped shadows for specific reasons, such as: | Sunlight in [[Pikmin 2|''Pikmin 2'']] behaves very similarly to that in the previous game, except the color of sunlight varies by area, and fog is generally less pronounced. Around noon, the brightness of the sunlight generally increases, and toward the end of the day it dramatically decreases and turns orange. Yet at any point in the day, when a leader approaches an incomplete [[cave]] from above ground, the lighting always mixes a very foggy green color to its current color. All objects are shaded by this sunlight, but most of them (including static objects) do not cast accurate shadows. Instead, most moving objects cast circular shadows directly beneath them, and those shadows never move. However, unlike the shadows in ''Pikmin'', these circular shadows can actually dim other objects, and their simple shape allows many shadows to be rendered at once. Several objects have uniquely shaped shadows for specific reasons, such as: | ||
| Line 43: | Line 41: | ||
[[Areas]] have background shadows that are large textures, just like in the previous game, and these shadows sway but do not effect shading in any way. However, now that plants either cast their own shadows or none at all, background shadows do not have to account for the locations of plants in the area, and can add more interest to the look of the environment. | [[Areas]] have background shadows that are large textures, just like in the previous game, and these shadows sway but do not effect shading in any way. However, now that plants either cast their own shadows or none at all, background shadows do not have to account for the locations of plants in the area, and can add more interest to the look of the environment. | ||
In [[cave]]s, light is very limited, and sometimes completely absent beyond a certain distance, due to very dark distance fog. Objects are still shaded by some dynamic light to give them depth, but they are barely or not visible until a [[leader]] comes close enough with the static area light around them. This static light's radius, color, and brightness vary by sublevel, depending on what mood is being set. Once the [[ | {{game help|p2|Confirm if the Solar System truly has no effect on the final sublevel of Dream Den.}} | ||
In [[cave]]s, light is very limited, and sometimes completely absent beyond a certain distance, due to very dark distance fog. Objects are still shaded by some dynamic light to give them depth, but they are barely or not visible until a [[leader]] comes close enough with the static area light around them. This static light's radius, color, and brightness vary by sublevel, depending on what mood is being set. Once the [[Solar System]] is obtained, however, caves are always fully illuminated and everything is visible. Some sublevels behave this way anyway, such as metal or outdoor areas where backgrounds are visible, and the [[Glutton's Kitchen#Sublevel 6|final sublevel of the Glutton's Kitchen]]. The Solar System does not affect the final sublevel of the [[Dream Den]], and actually darkens the final sublevel of the [[Cavern of Chaos]] as explained [[Gear#Cavern of Chaos 10|here]]. | |||
The [[Piklopedia (Pikmin 2)|Piklopedia]] in ''Pikmin 2'' is unique in that it simulates a full continuous cycle of lighting including nighttime. During night lighting, ambient light is very dim and darkly blue. Objects still remain shaded and cast simple shadows, but generally colors are darker and duller. Once morning comes around sunlight gradually increases fog color advances from blue to purple back to a faint green, when sunlight finally brings the color balance back to its usual daylight look. | The [[Piklopedia (Pikmin 2)|Piklopedia]] in ''Pikmin 2'' is unique in that it simulates a full continuous cycle of lighting including nighttime. During night lighting, ambient light is very dim and darkly blue. Objects still remain shaded and cast simple shadows, but generally colors are darker and duller. Once morning comes around sunlight gradually increases fog color advances from blue to purple back to a faint green, when sunlight finally brings the color balance back to its usual daylight look. | ||
| Line 60: | Line 59: | ||
===''Pikmin 3''=== | ===''Pikmin 3''=== | ||
The [[Wii U]] can process a great deal more data about lighting 3D objects than the [[GameCube]], and so [[Pikmin 3|''Pikmin 3'']] presents a much more accurate representation of physical lighting. All objects in ''Pikmin 3'' cast accurately shaped shadows, including the terrain itself. However, these shadows and lights do not follow the sun depicted in the sky; instead, shadows stay directly under objects for a majority of the day, so that object locations (particularly with airborne objects) can more easily be perceived. A new innovation ''Pikmin 3'' brings is that background shadows, while they are still large textures, actually ''do'' affect the shading of other objects, even as they sway throughout the day. This minor detail greatly enhances the realistic look of the environment. | The [[Wii U]] can process a great deal more data about lighting 3D objects than the [[GameCube]], and so [[Pikmin 3|''Pikmin 3'']] presents a much more accurate representation of physical lighting. All objects in ''Pikmin 3'' cast accurately shaped shadows, including the terrain itself. However, these shadows and lights do not follow the sun depicted in the sky; instead, shadows stay directly under objects for a majority of the day, so that object locations (particularly with airborne objects) can more easily be perceived. A new innovation ''Pikmin 3'' brings is that background shadows, while they are still large textures, actually ''do'' affect the shading of other objects, even as they sway throughout the day. This minor detail greatly enhances the realistic look of the environment. | ||
| Line 82: | Line 80: | ||
P3 Cardboard Box Screenshot.png|Cardboard is a notably diffuse substance. | P3 Cardboard Box Screenshot.png|Cardboard is a notably diffuse substance. | ||
Bulborb Fight.jpg|Diffuse skin on Bulborbs in ''Pikmin''. | Bulborb Fight.jpg|Diffuse skin on Bulborbs in ''Pikmin''. | ||
Five-man Napsack.jpg|Diffuse cloth in ''Pikmin 2''. | P2 Five-man Napsack Treasure Hoard.jpg|Diffuse cloth in ''Pikmin 2''. | ||
Armored Cannon Larva ND screenshot.png|A diffuse [[Armored Cannon Larva]] and rock in ''Pikmin 3''. | Armored Cannon Larva ND screenshot.png|A diffuse [[Armored Cannon Larva]] and rock in ''Pikmin 3''. | ||
Pocked Airhead Garden of Hope.jpg|Rough stone, dirt, and grass surfaces. | Pocked Airhead Garden of Hope.jpg|Rough stone, dirt, and grass surfaces. | ||
</gallery> | </gallery> | ||
{{clear}} | {{clear}} | ||
| Line 175: | Line 172: | ||
|} | |} | ||
</div> | </div> | ||
=Notes= | =Notes= | ||
| Line 554: | Line 201: | ||
: {{transcript|This red bruiser gobbles up Pikmin like candy. The standard approach is to attack from behind while it's still asleep. That may seem callous, but it would do the same to you if it could. Stow those feelings and strike!}} | : {{transcript|This red bruiser gobbles up Pikmin like candy. The standard approach is to attack from behind while it's still asleep. That may seem callous, but it would do the same to you if it could. Stow those feelings and strike!}} | ||
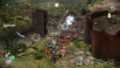
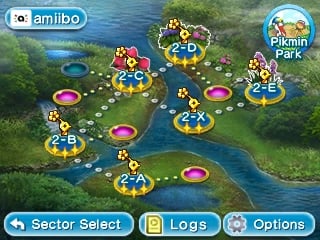
=Clickable sector map= | |||
<imagemap> | <imagemap> | ||
File: | File:Verdant Waterfront complete no deaths.jpg|320px | ||
poly 108 150 158 150 158 200 108 200 [[Foaming Lake]] | poly 108 150 158 150 158 200 108 200 [[Foaming Lake]] | ||
poly 40 111 90 111 90 161 40 161 [[Serene Stream]] | poly 40 111 90 111 90 161 40 161 [[Serene Stream]] | ||
| Line 577: | Line 224: | ||
''Click an area on the image.'' | ''Click an area on the image.'' | ||
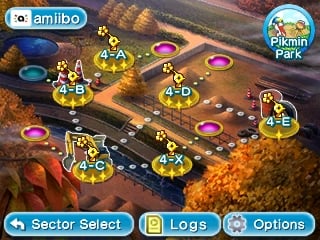
<imagemap> | |||
File:Ravaged Rustworks complete no deaths.jpg|320px | |||
poly 93 24 143 24 143 74 93 74 [[The Lonely Tower]] | |||
poly 43 59 93 59 93 109 43 109 [[Steel Pipe Forest]] | |||
poly 66 135 116 135 116 185 66 185 [[Pollution Pool]] | |||
poly 152 61 202 61 202 111 152 111 [[Space of Silence]] | |||
poly 254 92 304 92 304 142 254 142 [[Flashes of Fear]] | |||
poly 146 131 196 131 196 181 146 181 [[Drenchnozzle Den]] | |||
poly 148 39 183 39 183 59 148 59 [[Secret Spot 13]] | |||
poly 18 123 53 123 53 143 18 143 [[Secret Spot 14]] | |||
poly 202 52 237 52 237 72 202 72 [[Secret Spot 15]] | |||
poly 191 118 217 118 217 138 191 138 [[Secret Spot 16]] | |||
poly 15 63 50 63 50 83 15 83 [[Sparklium Springs#Ravaged Rustworks]] | |||
poly 5 8 88 8 88 32 5 32 [[amiibo]] | |||
poly 266 8 312 8 312 58 266 58 [[Pikmin Park]] | |||
poly 5 213 134 213 134 236 5 236 [[Sector selection menu]] | |||
poly 140 213 220 213 220 236 140 236 [[Hey! Pikmin logs]] | |||
poly 224 213 315 213 315 236 224 236 [[Options menu]] | |||
desc none | |||
</imagemap> | |||
''Click an area on the image.'' | |||
=Speeds= | |||
{|class="wikitable sortable" | |||
!What | |||
!In ''Pikmin 2'' | |||
|- | |||
| Standard leaf Pikmin running || 120 | |||
|- | |||
| Standard bud Pikmin running || 140 | |||
|- | |||
| Standard flower Pikmin running || 170 | |||
|- | |||
| Leaf Purple Pikmin running || 96 | |||
|- | |||
| Bud Purple Pikmin running || 112 | |||
|- | |||
| Flower Purple Pikmin running || 136 | |||
|- | |||
| Leaf White Pikmin running || 144 | |||
|- | |||
| Bud White Pikmin running || 168 | |||
|- | |||
| Flower White Pikmin running || 204 | |||
|- | |||
| Any spicy Pikmin running || 190 | |||
|- | |||
| Any Pikmin carrying a [[Cupid's Grenade]] in [[2-Player Battle]] || 120 | |||
|- | |||
| Leader running without [[Rush Boots]] || 160 | |||
|- | |||
| Leader running with Rush Boots || 205 | |||
|} | |||
Credit to asheevee_#0962. ''Where do I put this'' | |||
== Timeline == | |||
{| | |||
|- | |||
| || || || O || || || Thing | |||
|- | |||
| || || / || || \ || || | |||
|- | |||
| Also thing || O || || || || O || Other thing | |||
|} | |||
= How to Obtain (Test Sample) = | |||
{| class="wikitable sortable" | |||
! Icon || Name || Category || In-game condition || Difficulty || How to obtain || Notes | |||
|- | |||
| [[File:Badge 01 newhorizons.png|120px]] || New Horizons || Story || {{transcript|Clear the first day on PNF-404.}} || Very Easy || This should be your very first badge you obtain, simply by starting a new file and play through the first day. || | |||
|- | |||
| [[File:Badge 02 bearingfruit.png|120px]] || Bearing Fruit || Story || {{transcript|Retrieve a fruit in Story mode.}} || Very Easy || Play through the [[Garden of Hope]] as normal. Then after playing/skipping a cutscene, throw at least three (3) Pikmin at the [[strawberry]]. You can skip it, but it'll make your adventures harder to advance unless you plan way ahead to ensure stable juice supply. || | |||
|- | |||
| [[File:Badge 03 fruitfulendeavor.png|120px]] || Fruitful Endeavor || Story || {{transcript|Retrieve 20 fruits in Story mode.}} || Easy || Play until you have gathered 20 fruits. With good plannings, this should happen in no time. || This badge will be lost if the player leaves the day without saving. | |||
|- | |||
| [[File:Badge 04 fruitforce.png|120px]] || Fruit Force || Story || {{transcript|Retrieve 30 fruits in Story mode.}} || Medium || You will naturally obtain this after spending a reasonable amount of time gathering fruits, so long as you don't run out of juice. || This badge will be lost if the player leaves the day without saving. Additionally, how many fruits you have gathered will affect the ending narration, detailed [[Pikmin 3#Endings|here]]. | |||
|- | |||
| [[File:Badge 05 fruitballad.png|120px]] || Fruit Ballad || Story || {{transcript|Retrieve a total of 66 fruits in Story mode.}} || Hard || This achievement will happen naturally after enough time playing through the entire game. Make use of your KopPad to scout for fruits, grow whatever types of Pikmin you desired, and plan ahead to ensure a minimum amount of causalities. || The number goes up the second the fruit is beamed up by the [[S.S. Drake]]. | |||
|- | |||
| [[File:Badge 06 efficiencyexpert.png|120px]] || Efficiency Expert || Story || {{transcript|Collect 30 days' worth of juice.}} || Easy || You will naturally obtain this after spending a reasonable amount of time gathering fruits. || | |||
|- | |||
| [[File:Badge 07 animalannotator.png|120px]] || Animal Annotator || Story || {{transcript|Log 10 Piklopedia entries.}} || Easy || This will come naturally after defeating at least 10 enemies, including the Female Sheargrubs, Pellet Posies, White Spectralid, Drawf Bulborb, Red Bulborb, Medusal Slurker, Skutterchuck, Fiery Blowhog, Yellow Wollywog, and Armored Mawdad, in the order you'll most likely encountered. || | |||
|- | |||
| [[File:Badge 08 shutterbug.png|120px]] || Shutterbug || Story || {{transcript|Use the camera to take a photo.}} || Very Easy || After exploring the Garden of Hope, open up your KopPad and go to the Camera function (on the very right of the screen). Then take a photo of anything you want. You will earn this badge. || This badge will be lost if the player leaves the day without saving. | |||
|- | |||
| [[File:Badge 09 intelligentlife.png|120px]] || Intelligent Life? || Story || {{transcript|Retrieve 15 exploration notes.}} || Easy || A few of them are naturally encountered by reaching certain points in the game, while others, particularly the [[Secret File|secret notes]], are much harder to find. Your first 15 notes are often ones you would natually encountered, so you should have no problems reaching them. || | |||
|- | |||
|} | |||
[[credits]] | |||
Latest revision as of 19:12, March 18, 2024
Lighting[edit]
Lighting is the arrangement or effect of objects that produce light, in order to depict a lit environment with depth and color. In video games, this specifically refers to any calculated light source that illuminates and shades 3D objects, as well as fog that obscures distant objects. In the Pikmin series, lighting is extremely important to achieving realistic-looking environments and objects, as the designers try to create as much realism in the Pikmin world as possible.
In this article:
- "Light" is any object, seen or unseen, that illuminates an environment.
- "Dynamic" lights are lights that move or cause visible highlights or reflections on objects, while
- "Static" lights are lights that simply add brightness to an area without interacting with other objects.
- "Shading" is the contrast of color on an object because one side of it is illuminated by a light.
- "Shadows" are shapes of low light on a surface, created when an object stands in between light rays and that surface.
- "Materials" are the compositions of objects that interact with light in different ways.
Light sources[edit]
Sunlight is the primary source of light in the Pikmin series, and plays an important role in conveying the passage of a day. When a day begins, the color and brightness of a landscape try to suggest morning. As the day progresses, the sun gets brighter and the environment more colorful, until late in the day when it begins setting and colors become more orange as in a sunset. Each game in the series has a unique way of handling sunlight and the shadows it casts, and as the games progress, this arrangement gets closer to simulating real sunlight.
Pikmin[edit]
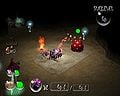
The only dynamic light is sunlight, that shades all objects but does not actually calculate shadows. This light moves throughout the day, beginning foggy and bright in the morning, clear and at average brightness for the majority of the day, and fading to yellow to orange and finally to very little light as sunset approaches (except in The Forest Navel; sunlight is still present there but does not move or change color). All objects in an area have shading based on this light, but none of the scenery casts real moving shadows based on this light. To help players perceive Pikmin locations, up to 50 Pikmin will cast soft shadows that move throughout the day, even when there is no sunlight. In order to optimize processing power, shadows cast by Pikmin are not drawn if more than 51 Pikmin are on the field; instead, they will all have faint shadows directly underneath them. Enemies always have this sort of faint shadow, except for the Beady Long Legs. Environmental objects like plants never move on the map, so one large texture accounts for all their shadows. The exception is Pellet Posies, which cast soft dynamic shadows just like Pikmin.
All other forms of light, such as Common Glowcaps, the light beams coming from the Onions, and even the light around Captain Olimar in The Forest Navel, are static lights. They do not cast any shading or shadows on objects, but simply brighten the area around them to aid visibility or provide light effects, such as the powerful exhaust from the S.S. Dolphin.
Typical passage of sunlight on a day in Pikmin.
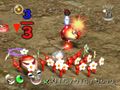
Leaders and Pikmin cast directional shadows, while enemies cast simple soft shadows.
With 51 or more Pikmin, shadow directions are not calculated.
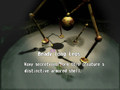
The unique shadow of the Beady Long Legs.
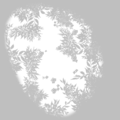
A texture for shadows in The Impact Site. The small separated shadows are for the plants in the area.


.png)

Pikmin 2[edit]
Sunlight in Pikmin 2 behaves very similarly to that in the previous game, except the color of sunlight varies by area, and fog is generally less pronounced. Around noon, the brightness of the sunlight generally increases, and toward the end of the day it dramatically decreases and turns orange. Yet at any point in the day, when a leader approaches an incomplete cave from above ground, the lighting always mixes a very foggy green color to its current color. All objects are shaded by this sunlight, but most of them (including static objects) do not cast accurate shadows. Instead, most moving objects cast circular shadows directly beneath them, and those shadows never move. However, unlike the shadows in Pikmin, these circular shadows can actually dim other objects, and their simple shape allows many shadows to be rendered at once. Several objects have uniquely shaped shadows for specific reasons, such as:
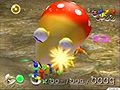
 Boulders, as they fall from the sky and use a growing shadow.
 Segmented Crawbster, for the same reason.
 Empress Bulblax, since it has a long body of circular segments, has multiple circular shadows.
- Arachnorbs, Snavians, and the Titan Dweevil, since they have extremities that reach beyond their usual shadow.
 Waterwraith, since its rollers appear from the sky before its body.
Areas have background shadows that are large textures, just like in the previous game, and these shadows sway but do not effect shading in any way. However, now that plants either cast their own shadows or none at all, background shadows do not have to account for the locations of plants in the area, and can add more interest to the look of the environment.
|
The following article or section is in need of assistance from someone who plays Pikmin 2. |
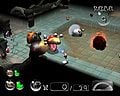
In caves, light is very limited, and sometimes completely absent beyond a certain distance, due to very dark distance fog. Objects are still shaded by some dynamic light to give them depth, but they are barely or not visible until a leader comes close enough with the static area light around them. This static light's radius, color, and brightness vary by sublevel, depending on what mood is being set. Once the Solar System is obtained, however, caves are always fully illuminated and everything is visible. Some sublevels behave this way anyway, such as metal or outdoor areas where backgrounds are visible, and the final sublevel of the Glutton's Kitchen. The Solar System does not affect the final sublevel of the Dream Den, and actually darkens the final sublevel of the Cavern of Chaos as explained here.
The Piklopedia in Pikmin 2 is unique in that it simulates a full continuous cycle of lighting including nighttime. During night lighting, ambient light is very dim and darkly blue. Objects still remain shaded and cast simple shadows, but generally colors are darker and duller. Once morning comes around sunlight gradually increases fog color advances from blue to purple back to a faint green, when sunlight finally brings the color balance back to its usual daylight look.
Typical passage of sunlight on a day in Pikmin 2.
The simple shadows leaders and Pikmin cast in Pikmin 2.

The texture for background shadows in the Valley of Repose. This no longer accounts for the shadows of plants in the area.
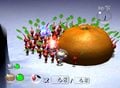
Sunlight and fog color change when the active leader is near an incomplete cave.
Visibility is poor or impossible beyond a leader's radius in caves.

Caves with metallic layouts are more visible, since they have illuminated backgrounds.
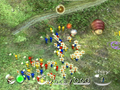
With the Solar System, most dark sublevels become fully illuminated.


Pikmin 3[edit]
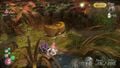
The Wii U can process a great deal more data about lighting 3D objects than the GameCube, and so Pikmin 3 presents a much more accurate representation of physical lighting. All objects in Pikmin 3 cast accurately shaped shadows, including the terrain itself. However, these shadows and lights do not follow the sun depicted in the sky; instead, shadows stay directly under objects for a majority of the day, so that object locations (particularly with airborne objects) can more easily be perceived. A new innovation Pikmin 3 brings is that background shadows, while they are still large textures, actually do affect the shading of other objects, even as they sway throughout the day. This minor detail greatly enhances the realistic look of the environment.
In caves, shadows are also directly under all objects. During rainy days, sunlight is generally darker, and rough surfaces have sharper highlights and smooth surfaces are glossy, to simulate wetness.
Although no other lights in the game than sunlight cast shadows, almost all other light sources are dynamic. Electrodes highlight cave surfaces, leaders' beacons and whistles dimly illuminate a radius around them, and most lighting effects (such as bomb rock explosions) throw accurate light onto other objects. Once again, all these effects give Pikmin 3 a photorealistic edge while still not seriously detracting from gameplay or visibility.

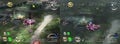
Typical passage of sunlight on a day in Pikmin 3.
An example of how shadows behave in the Twilight River.
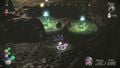
Most lights are dynamic in Pikmin 3; casting highlights even in caves. Shadows in caves are always directly below objects.
Darker colors and glossier surfaces during rain in Pikmin 3.


Materials[edit]
The Pikmin series's in-game objects are made real-world materials, or at least materials similar to those in real life. As such, they try to emulate the interactions with light real-world materials would have. Although these properties are more often faked than accurately calculated, materials allow players a sense of how in-game objects would feel, which gives them more thematic identity. Below is a list of material properties simulated in Pikmin materials, and some prominent examples.
Diffuse reflection[edit]
Diffuse surfaces have visibly or even microscopically rough imperfections, so that when light rays hit the surface, it bounce off in many directions instead of one, diffusing the illumination over a large area. Due to the limits of the GameCube's power, most organic objects in Pikmin and Pikmin 2 (such as Pikmin and most enemies) have a smooth, matte-like material that does not reflect light sharply. In Pikmin 3, materials meant to look rubbery, dirty, or skin-like will look diffuse.
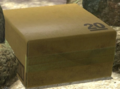
Cardboard is a notably diffuse substance.
Diffuse skin on Bulborbs in Pikmin.
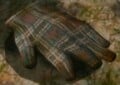
Diffuse cloth in Pikmin 2.
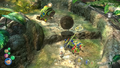
A diffuse Armored Cannon Larva and rock in Pikmin 3.
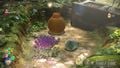
Rough stone, dirt, and grass surfaces.


Full area map test[edit]

Flowchart styles[edit]
| Style 1 | |||||||||||||||
|---|---|---|---|---|---|---|---|---|---|---|---|---|---|---|---|
| |||||||||||||||
| Style 2 | |||||||||||||||
| |||||||||||||||
| Style 3 | |||||||||||||||
| |||||||||||||||
| Style 4 | |||||||||||||||
|
Prima Guide section banners[edit]
(Pretend the P is the Prima logo.)
Proposal 1[edit]
|
The following information comes from Prima Guides. |
Proposal 2[edit]
|
The following information is not found in any canon media, and comes from Prima Guides. |
Proposal 3[edit]
|
The following information can only be found in Prima Guides, so it counts as debatable canon. |
Size chart[edit]
—
|
100 mm
|
—
|
||
| 200 mm (with stem) | 100 mm |
Notes[edit]
Notes[edit]
- Pikmin – enemy reel
- “This nocturnal hunter feeds mostly on small animals returning to their nests at night.”
- Pikmin 2 – Olimar's notes – GameCube version
- “This large organism has the familiar mandibles and cranial morphology of the grub-dog family, as well as the characteristic bulging eyes. As with most grub-dogs, the creature's cranium comprises half of its total length and girth. Showing a scarlet abdomen with white spots, this creature is primarily nocturnal, choosing to prey upon smaller creatures returning to their nests. Originally classified as the spotty bulborb, further research has reclassified this species as the red bulborb. Subspecies of varied colors have recently been discovered, but academics are divided into two rival camps over how to handle their classification.”
- Pikmin 2 – Olimar's notes – Wii version
- “This large organism has the familiar mandibles and cranial morphology of the grub-dog family, as well as the characteristic bulging eyes. As with most grub-dogs, the creature's cranium comprises half of its total length and girth. Showing a scarlet abdomen with white spots, this creature is primarily nocturnal, choosing to prey upon smaller creatures returning to their nests. Originally classified as the spotty bulborb, further research has reclassified this species as the red bulborb. Subspecies of varied colors have recently been discovered, but academics are divided into two rival camps over how to handle their classification.”
- Pikmin 2 – Louie's notes – GameCube US version
- “Plump specimens are best spit-roasted whole, stuffed with a lime and a slab of bacon. Baste frequently to ensure a magnificently moist haunch.”
- Pikmin 2 – Louie's notes – GameCube European version
- “Plump specimens are best spit-roasted whole, stuffed with a lime and a slab of bacon. Baste frequently to ensure a magnificently moist haunch.”
- Pikmin 2 – Louie's notes – Wii US version
- “Plump specimens are best spit-roasted whole, stuffed with a lime and a slab of bacon. Baste frequently to ensure a magnificently moist haunch.”
- Pikmin 2 – Louie's notes – Wii European version
- “Plump specimens are best spit-roasted whole, stuffed with a lime and a slab of bacon. Baste frequently to ensure a magnificently moist haunch.”
- Hey! Pikmin – logs
- “The S.S. Dolphin II said it sleeps during the day, but the one I met was awake. I pointed this out and the ship said, "I meant during the day on Hocotate." After defeating it, we found an object rich in Sparklium. It's possible that the creature considers such objects a delicacy.”
- Pikmin 3 Deluxe – Alph's comment
- “Structural flaws: eyestalks, back / Weight: 10 / Only a very confident designer would waive through issues like bright red warning coloration and a tendency to sleep in broad daylight. There's no way a frontal assault on this thing would work, so we have to get creative. I'm thinking we should hit its back hard while it sleeps, or maybe targeting those thin-looking eyestalks.”
- Pikmin 3 Deluxe – Brittany's comment
- “The white polka dots on red is quite a look. Something about it is familiar, but where- Ah. Right. It reminds me of the captain. Not the polka dots- I mean the way it snores as it naps in the sun.”
- Pikmin 3 Deluxe – Charlie's comment – US version
- “This red bruiser gobbles up Pikmin like candy. The standard approach is to attack from behind while it's still asleep. That may seem callous, but it would do the same to you if it could. Stow those feelings and strike!”
- Pikmin 3 Deluxe – Charlie's comment – European version
- “This red bruiser gobbles up Pikmin like candy. The standard approach is to attack from behind while it's still asleep. That may seem callous, but it would do the same to you if it could. Stow those feelings and strike!”
Clickable sector map[edit]
Click an area on the image.
Click an area on the image.
Speeds[edit]
| What | In Pikmin 2 |
|---|---|
| Standard leaf Pikmin running | 120 |
| Standard bud Pikmin running | 140 |
| Standard flower Pikmin running | 170 |
| Leaf Purple Pikmin running | 96 |
| Bud Purple Pikmin running | 112 |
| Flower Purple Pikmin running | 136 |
| Leaf White Pikmin running | 144 |
| Bud White Pikmin running | 168 |
| Flower White Pikmin running | 204 |
| Any spicy Pikmin running | 190 |
| Any Pikmin carrying a Cupid's Grenade in 2-Player Battle | 120 |
| Leader running without Rush Boots | 160 |
| Leader running with Rush Boots | 205 |
Credit to asheevee_#0962. Where do I put this
Timeline[edit]
| O | Thing | |||||
| / | \ | |||||
| Also thing | O | O | Other thing |
How to Obtain (Test Sample)[edit]
| Icon | Name | Category | In-game condition | Difficulty | How to obtain | Notes |
|---|---|---|---|---|---|---|
 |
New Horizons | Story | “Clear the first day on PNF-404.” | Very Easy | This should be your very first badge you obtain, simply by starting a new file and play through the first day. | |
 |
Bearing Fruit | Story | “Retrieve a fruit in Story mode.” | Very Easy | Play through the Garden of Hope as normal. Then after playing/skipping a cutscene, throw at least three (3) Pikmin at the strawberry. You can skip it, but it'll make your adventures harder to advance unless you plan way ahead to ensure stable juice supply. | |
 |
Fruitful Endeavor | Story | “Retrieve 20 fruits in Story mode.” | Easy | Play until you have gathered 20 fruits. With good plannings, this should happen in no time. | This badge will be lost if the player leaves the day without saving. |
 |
Fruit Force | Story | “Retrieve 30 fruits in Story mode.” | Medium | You will naturally obtain this after spending a reasonable amount of time gathering fruits, so long as you don't run out of juice. | This badge will be lost if the player leaves the day without saving. Additionally, how many fruits you have gathered will affect the ending narration, detailed here. |
 |
Fruit Ballad | Story | “Retrieve a total of 66 fruits in Story mode.” | Hard | This achievement will happen naturally after enough time playing through the entire game. Make use of your KopPad to scout for fruits, grow whatever types of Pikmin you desired, and plan ahead to ensure a minimum amount of causalities. | The number goes up the second the fruit is beamed up by the S.S. Drake. |
 |
Efficiency Expert | Story | “Collect 30 days' worth of juice.” | Easy | You will naturally obtain this after spending a reasonable amount of time gathering fruits. | |
 |
Animal Annotator | Story | “Log 10 Piklopedia entries.” | Easy | This will come naturally after defeating at least 10 enemies, including the Female Sheargrubs, Pellet Posies, White Spectralid, Drawf Bulborb, Red Bulborb, Medusal Slurker, Skutterchuck, Fiery Blowhog, Yellow Wollywog, and Armored Mawdad, in the order you'll most likely encountered. | |
 |
Shutterbug | Story | “Use the camera to take a photo.” | Very Easy | After exploring the Garden of Hope, open up your KopPad and go to the Camera function (on the very right of the screen). Then take a photo of anything you want. You will earn this badge. | This badge will be lost if the player leaves the day without saving. |
 |
Intelligent Life? | Story | “Retrieve 15 exploration notes.” | Easy | A few of them are naturally encountered by reaching certain points in the game, while others, particularly the secret notes, are much harder to find. Your first 15 notes are often ones you would natually encountered, so you should have no problems reaching them. |