Titan Dweevil
| |||
|---|---|---|---|
| |||
| Appears in | Pikmin 2 | ||
| Scientific name | Mandarachnia gargantium | ||
| Family | Dweevil | ||
| Areas | None | ||
| Caves | Dream Den | ||
| Challenge Mode stages | None | ||
| 2-Player Battle stages | None | ||
| Attacks | Blows fire, sprays water, discharges electricity, emits poison | ||


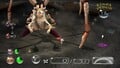
The Titan Dweevil (ヘラクレスオオヨロヒグモ?, lit.: "Giant Armored Herculean Spider") is the final boss in Pikmin 2. It is the largest member of the Dweevil family, and one of the largest creatures in the game. Unlike other Dweevils, its only natural attack is to lash out with its pincers, which does no damage and is only an attempt to get Pikmin off it; the real danger this creature has comes from the weapons it utilizes.
At the very bottom of the last cave in the game, the Dream Den, Olimar and the President find Louie sitting atop a mound of treasure. When they approach the mound, however, it reveals itself as the body of the Titan Dweevil. The enormous monster then proceeds to attack the player, triggering the boss fight. Louie is found on top of it the first time the Titan Dweevil is battled; the sales pitch on him as a treasure suggests that he may somehow be in control of the Dweevil, although if the dungeon is revisited and the boss is fought after rescuing Louie, it will still attack the leaders if the weapons weren't collected last time.
Despite being the final boss of Pikmin 2, defeating the Titan Dweevil does not necessarily lead to the end of the game, unlike the final bosses of Pikmin and Pikmin 3. It can be fought before many other bosses and recovering Louie will not yield any special ending unless the treasures are the last to be collected in the game. However, new e-mails will be received once Louie is found.
Stats[edit]
| Weight | Max. carriers |
Seeds | Value | Health | Regen. |
|---|---|---|---|---|---|
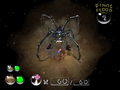
| N/A | N/A | N/A | N/A | 5000 | 1.5 HP/s |
Note that 5000 HP is the creature's health. Each weapon has 6000 HP.
Weapons[edit]
The Titan Dweevil has four weapons at its disposal: the Flare Cannon, the Shock Therapist, the Monster Pump, and the Comedy Bomb. Each of these can be knocked out of the beast's possession and salvaged as a treasure, worth ![]() × 1000.
× 1000.
Pikmin must be thrown at a weapon, either while it is mounted on the Dweevil's hide or on its hands, to damage it. Each weapon has 6000 HP, and after its health has been depleted, it will detach and cannot be picked up by the boss again, provided the player does not leave and re-enter the cave before carrying said part to the pod.
When it's time to attack, the Titan Dweevil chooses a remaining weapon to use at random. It is more likely to select weapons that have taken more damage - they are all equally likely if they have the same amount of HP remaining, while a weapon at 1 HP is about twice as likely to be picked than one at full HP, and the probability scales linearly for all values in between.[1] In addition, once a weapon reaches half HP or below, its attack becomes slightly different and more potent. Since these damaged weapons are more likely to be picked to attack again, this incentivizes finishing them off instead of whittling them all down equally.
Weapons deal the matching type of elemental damage, so leaders naturally take no damage from two of them (water and poison), and can be rendered immune to the other two (fire and electricity) via Gear. But unlike every other attack or hazard in the game, weapons are still capable of knocking down leaders even if they are immune to the element. As this wastes precious time of being able to save Pikmin from the attack, the weapons remain dangerous to leaders even if they do not actually deal damage.
It is interesting to note that each of these weapons causes different versions of Titan Dweevil's music to play when used; the Titan Dweevil has the most unique boss themes of any boss in the game series. Right before using the attack, the creature will turn into the color that symbolizes the hazard of the chosen weapon.
Flare Cannon[edit]
- Main article: Flare Cannon.
The Flare Cannon is the easiest weapon to avoid; it simply sprays flames in a set radius, as it rotates back and forth in a rough 180-degree motion. When this weapon is damaged, it will spray more of the area than normal. The Red Pikmin are immune to this weapon.
Shock Therapist[edit]
- Main article: Shock Therapist.
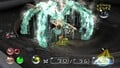
Possibly the toughest weapon to avoid (unless the player is using the Yellow Pikmin-only strategy), it's the only weapon that kills on contact with the attack. When used, it will spit out eight electrical "nodes" that will activate after a delay and form multiple arcs of electricity between them that electrocute all Pikmin that touch them. Keep the Pikmin in a tight group to avoid getting electrified. When this weapon is damaged, the nodes will activate the moment they are released and may move while activated.
This weapon may actually reach a bit beyond the Titan Dweevil's arena on rare occasions, sometimes even hitting and bouncing on the exit geyser, so it is advised to keep the Pikmin beyond the geyser. The Yellow Pikmin are immune to this weapon.
Monster Pump[edit]
- Main article: Monster Pump.
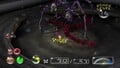
When this weapon is used, it shoots out blasts of water that will get latched onto the Pikmin's heads and suffocate them. When the weapon is damaged, it will shoot out water at a faster rate. This weapon's range extends beyond the circular arena where the Titan Dweevil is fought, so be sure to protect the Pikmin that are not fighting. Because of this, the player should get rid of this one first. The Blue Pikmin are immune to this weapon. Each bubble casts a shadow, making it easier to tell where it will land.
Comedy Bomb[edit]
- Main article: Comedy Bomb.
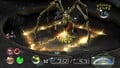
When this weapon is used, it will spray three streams of poisonous gas, pointing in different ways, and are at equal distances from each other. The streams move at a constant speed and direction, so standing in between them at all times should be no problem. When it is damaged, it will spray four streams that may change direction spontaneously and randomly. The streams do not reach the ramp that makes up the arena's perimeter, so staying there is advised. The White Pikmin are immune to this weapon.
After the weapons[edit]

After all weapons have been broken off, it will lose its armor and turn tan, but will still have Louie on its head. All that must be done now is throwing Pikmin at its body. It does not have any counterattacks at this stage other than shaking off Pikmin and making them lose their flowers, but it does have a substantial amount of health. Purple Pikmin are recommended to make this portion faster. When defeated, the Titan Dweevil will seemingly melt into a bubbly, bluish goop, leaving only Louie. The weapons and Louie can be picked up as treasures. If the player decides to fight this beast again, it will be without any armor or weapons (that is, if the treasures were collected, otherwise it will still have them). As a bonus, if the Titan Dweevil is defeated when it is petrified, it will drop 10 random sprays, which is great for spray-farming.
Notes
Olimar's notes
Louie's notes
Pikmin 2 Nintendo Player's Guide[edit]
Strategy[edit]
|
The following article or section contains guides. |
This boss has a rather complex way to defeating it. It has four weapons which double as treasures after it's defeated; the Flare Cannon, Shock Therapist, Monster Pump and Comedy Bomb, representing the game's four elemental hazards. It will stomp around and act like the various Arachnorb family members, stopping to rest after two or three stomp cycles(likewise, it will only react to attacks after finishing an in progress stomp cycle), except that it doesn't crush Pikmin because it has no large "feet". However, swarming the feet will cause Pikmin to go idle, which is extremely dangerous if the Titan is attacking. When running away, swarm around the legs. After it bobs its head down, it will grab two weapons, but only use one. The color it glows and which arm it raises will indicate the weapon it will use, however. The main point is to attack the weapons. If a weapon gets damaged, it will start smoking and will behave differently when used. The weapon will break off when it receives enough damage. Each weapon has 6,000 HP, and there are four weapons, so the total amount of HP for all the weapons is 24,000 HP. Despite the fact that the leaders should be immune to all hazards by the time the boss is fought, the weapons can still stun them, but do not hurt them. The Dweevil is a reactionary attacker, and will mostly only attack if being attacked itself. When attacked, it will finish the current action (be it a stomp cycle, kneeling, or using a weapon) and then prepare its weapon. If a weapon is knocked off while in use, the Titan will immediately attack with another weapon.
If the Titan Dweevil is sprayed with an ultra-bitter spray when it's using a weapon, the weapon will keep firing while the Dweevil is frozen. This increases the length of time the weapon's effect lasts, and the boss is much harder to damage while encased in stone, so petrifying it is not recommended until the very end, in an attempt to obtain multiple sprays.
Each weapon can be counterattacked, or make another weapon vulnerable. Counterattacking the Titan Dweevil can deal massive damage. The Flare Cannon can be attacked from behind while in use, the Comedy Bomb while it's being lifted, and the Monster Pump and Shock Therapist can be attacked while in use. Pikmin are still vulnerable to hazards while latched on, making it wise to only attack in use weapons with the Pikmin immune to it. The Monster Pump can hit Pikmin latched onto it as well, though this only happens when close by. The remaining two weapons can't hit latched Pikmin, but are otherwise dangerous. Attacking the Shock Therapist with a full group of Pikmin should only be considered while the weapon's health isn't low enough to cause the electric nodes it spits out to bounce around wildly.
When the Monster Pump or Shock Therapist are in use the other weapons are vulnerable as well. When the Flare Cannon is used, the vulnerable weapon will depend on where the player was facing the Dweevil, as it always attacks in a radius where the player was when the attack started. The Comedy Bomb is problematic, due to it filling the entire pit the battle is fought in, meaning counterattacking is not as effective.
Quick-kill strategy[edit]
This strategy is only semi-consistent, but is easily the quickest way to kill The Titan Dweevil if you are skilled enough. Though it is possible without, only Yellow Pikmin should be brought into the fight due to their resistance to electricity, and as soon as the Titan Dweevil starts emerging the player should throw all of their Yellow Pikmin onto the Shock Therapist. The goal is to get it to its "third phase" where its electric orbs bounce without breaking it off of the Dweevil's body.
The Titan Dweevil prioritizes using weapons with less health than the other ones it carries, meaning that it will most likely use the attack which the player's Pikmin are immune to and has the hardest time trapping the active leader in an in-actionable state. Due to how easy the Shock Therapist's attacks are avoided, the player's Yellow Pikmin can easily be thrown onto the other weapons, quickly depleting their health especially with ultra-spicy sprays, quickly leaving the Titan Dweevil defenseless.
Any Pikmin latched onto any of the Titan Dweevil's weapons will be completely safe from harm until whistled or shaken off, allowing the fight to also go a bit faster if you are getting particularly bad luck.
Yellow-only strategy[edit]
100 Yellow Pikmin are brought into the Dream Den. All treasures are ignored, and the player works their way right to the Titan Dweevil. This will help avoid loss of Pikmin from trying to get other treasures. Some sublevels have rocks over the holes that will require skill in order to get the Pikmin to these, as there are many hazards the Yellow Pikmin are not immune to. The reason to use Yellow Pikmin is due to the fact that they can easily reach the weapons even if the Dweevil isn't using them, and are immune to the only attack that instantly kills any Pikmin. The leaders should always be kept away from the Flare Cannon. If the active one gets hit, he won't be able to escape the attack, and there'll be no saving the Pikmin.
The Monster Pump should be destroyed first. When it is used, the Pikmin should be huddled close together and continually whistled at. Attacking the Shock Therapist to the degree that it smokes but does not fall off ensures that the enemy will use the harmless electric attacks more often, then attacking the Monster Pump. Once the Pump has fallen off, the Flare Cannon should be attacked, then the Comedy Bomb.
Do not underestimate the power of the ultra-spicy spray when attacking. Since it's likely that the player will only have about 20-25 Yellow Pikmin, spraying them before launching an attack increases the chance to break off the weapon. The player can gather lots of ultra-spicy spray berries in the Awakening Wood.
Keeping the inactive leader separated from the active one makes it possible to resort to the former in case the active leader is knocked down. However, although directly under the Dweevil is the most handy location to place the inactive one, he will suffer from the blasts made by the Comedy Bomb.
Two-time strategy[edit]
This strategy involves going through the Dream Den and obtaining all treasures, then, when the player reaches the Titan Dweevil, only knocking off one weapon, then spraying the Titan Dweevil with ultra-bitter spray to immobilize it and prevent it from using its weapons while the Pikmin carry the treasure back to the Research Pod. The next time the player enters the Dream Den, they do not have to worry about obtaining the treasures and can work their way to the Titan Dweevil. Each time the player fights the Titan Dweevil, they only knock off one weapon, petrify the Titan Dweevil, and exit via the geyser. This continues until the Dweevil has no weapons left and turns pale yellow. (Consult the above section "After The Weapons"). Although this strategy takes a long time, it is useful for zero-death runs.
Technical information[edit]
| Pikmin 2 technical information (?) | |||
|---|---|---|---|
| Internal name | bigtreasure
| ||
| Global properties (List) | |||
| ID | Japanese comment | Property | Value |
| s000 | friction(not used) | Friction | 0.5 |
| s001 | wallReflection | Unknown (wall bounce speed multiplier?) | 0.5 |
| s002 | faceDirAdjust | Unknown | 0.25 |
| s003 | accel | Acceleration | 0.1 |
| s004 | bounceFactor | Unknown (bounce when it hits the ground?) | 0.3 |
| fp00 | ライフ | HP | 5000 |
| fp01 | マップとの当り | Unknown (related to slopes) | 10 |
| fp02 | ダメージスケールXZ | Horizontal damage scale | 0.1 |
| fp03 | ダメージスケールY | Vertical damage scale | 0.1 |
| fp04 | ダメージフレーム | Damage scale duration | 0.5 |
| fp05 | 質量 | Unknown (weight?) | 0.0001 |
| fp06 | 速度 | Move speed | 100 |
| fp08 | 回転速度率 | Rotation acceleration | 0.2 |
| fp09 | テリトリー | Territory radius | 250 |
| fp10 | ホーム範囲 | "Home" radius | 75 |
| fp11 | プライベート距離 | "Private" radius | 100 |
| fp12 | 視界距離 | Sight radius | 300 |
| fp13 | 視界角度 | FOV | 180 |
| fp14 | 探索距離 | Unknown (exploration radius?) | 300 |
| fp15 | 探索角度 | Unknown (exploration angle?) | 90 |
| fp16 | 振り払い率 | Successful shake rate | 1 |
| fp17 | 振り払い力 | Shake knockback | 100 |
| fp18 | 振り払いダメージ | Shake damage | 0 |
| fp19 | 振り払い範囲 | Shake range | 25 |
| fp20 | 攻撃可能範囲 | Unknown (shock attack max range?) | 75 |
| fp21 | 攻撃可能角度 | Unknown (shock attack max angle?) | 25 |
| fp22 | 攻撃ヒット範囲 | Unknown (attack hit range?) | 75 |
| fp23 | 攻撃ヒット角度 | Unknown (attack hit angle?) | 25 |
| fp24 | 攻撃力 | Attack damage | 10 |
| fp25 | 視界高 | Unknown (height visibility?) | 50 |
| fp26 | 探索高 | Unknown (exploration height?) | 50 |
| fp27 | ライフの高さ | HP wheel height | 75 |
| fp28 | 回転最大速度 | Rotation speed | 60 |
| fp29 | 警戒時間 | Unknown (warning time?) | 15 |
| fp30 | 警戒ライフ | Unknown | 50 |
| fp31 | ライフ回復率 | Regeneration rate | 0.00001 |
| fp32 | LOD半径 | Off-camera radius | 275 |
| fp33 | マップとのあたりポリゴンの選定 | Collision processing radius | 275 |
| fp34 | ピクミンとのあたり | Pikmin damage radius | 25 |
| fp35 | 石化時間 | Petrification duration | 1 |
| fp36 | ヒップドロップダメージ | Purple Pikmin drop damage | 50 |
| fp37 | 地震気絶確立 | Purple Pikmin stun chance | 0 (0%) |
| fp38 | 地震気絶時間 | Purple Pikmin stun time | 5 |
| ip01 | 振り払い打撃A | Shake mode 1 – hit count | 6 |
| ip02 | 振り払い張付1 | Shake mode 1 – Pikmin requirement | 5 |
| ip03 | 振り払い打撃B | Shake mode 2 – hit count | 12 |
| ip04 | 振り払い張付2 | Shake mode 2 – Pikmin requirement | 10 |
| ip05 | 振り払い打撃C | Shake mode 3 – hit count | 17 |
| ip06 | 振り払い張付3 | Shake mode 3 – Pikmin requirement | 20 |
| ip07 | 振り払い打撃D | Shake mode 4 – hit count | 22 |
| Specific properties | |||
| ID | Japanese comment | Property | Value |
| fp01 | ベース係数 | Unknown (base coefficient?) | 3 |
| fp02 | 上げ減速係数 | Unknown | -0.2 |
| fp03 | 下げ加速係数 | Unknown | 0.5 |
| fp04 | 最低減加速係数 | Unknown | -2 |
| fp05 | 最高減加速係数 | Unknown | 10 |
| fp06 | 足の振り上げ | Unknown (feet swing?) | 120 |
| fp10 | 予備時間(電気) | Unknown (time between pulling out and using Shock Therapist?) | 2.5 |
| fp11 | 予備時間(火:1) | Unknown (time between pulling out and using Flare Cannon?) | 2.8 |
| fp31 | 予備時間(火:2) | Unknown (time between pulling out and using Flare Cannon?) | 2.5 |
| fp12 | 予備時間(ガス) | Unknown (time between pulling out and using Comedy Bomb?) | 2.5 |
| fp13 | 予備時間(水) | Unknown (time between pulling out and using Monster Pump?) | 2.5 |
| fp20 | 攻撃時間(電気) | Unknown (Shock Therapist attack duration?) | 5 |
| fp21 | 攻撃時間(火) | Unknown (Flare Cannon attack duration?) | 5 |
| fp22 | 攻撃時間(ガス) | Unknown (Comedy Bomb attack duration?) | 5 |
| fp23 | 攻撃時間(水) | Unknown (Monster Pump attack duration?) | 5 |
| fe00 | 跳返係数(1-1) | Unknown | 0.75 |
| fe01 | 摩擦係数(1-1) | Unknown (friction coefficient?) | 0.65 |
| fe02 | XZ初速Base(1-1) | Unknown | 100 |
| fe03 | XZ初速Rand(1-1) | Unknown | 220 |
| fe04 | Y初速Base(1-1) | Unknown | 170 |
| fe05 | Y初速Rand(1-1) | Unknown | 200 |
| fe06 | 放電開始(1-1) | Unknown (electrical node start?) | 2.7 |
| fe08 | 連鎖間隔(1-1) | Unknown (spacing between electrical nodes?) | 0.02 |
| fe07 | 放電数(1-1) | Unknown (number of electrical nodes?) | 10 |
| fe10 | 跳返係数(1-2) | Unknown | 0.7 |
| fe11 | 摩擦係数(1-2) | Unknown | 0.65 |
| fe12 | XZ初速Base(1-2) | Unknown | 80 |
| fe13 | XZ初速Rand(1-2) | Unknown | 250 |
| fe14 | Y初速Base(1-2) | Unknown | 350 |
| fe15 | Y初速Rand(1-2) | Unknown | 100 |
| fe16 | 放電開始(1-2) | Unknown (electrical node start?) | 4.5 |
| fe18 | 連鎖間隔(1-2) | Unknown (spacing between electrical nodes?) | 0.02 |
| fe17 | 放電数(1-2) | Unknown (number of electrical nodes?) | 12 |
| fe20 | 跳返係数(2-1) | Unknown | 0.97 |
| fe21 | 摩擦係数(2-1) | Unknown | 0.75 |
| fe22 | XZ初速Base(2-1) | Unknown | 60 |
| fe23 | XZ初速Rand(2-1) | Unknown | 70 |
| fe24 | Y初速Base(2-1) | Unknown | 350 |
| fe25 | Y初速Rand(2-1) | Unknown | 100 |
| fe26 | 放電開始(2-1) | Unknown (electrical node start?) | 0.5 |
| fe28 | 連鎖間隔(2-1) | Unknown (spacing between electrical nodes?) | 0.25 |
| fe27 | 放電数(2-1) | Unknown (number of electrical nodes?) | 8 |
| fe30 | 跳返係数(2-2) | Unknown | 0.2 |
| fe31 | 摩擦係数(2-2) | Unknown | 0.985 |
| fe32 | XZ初速Base(2-2) | Unknown | 100 |
| fe33 | XZ初速Rand(2-2) | Unknown | 90 |
| fe34 | Y初速Base(2-2) | Unknown | 70 |
| fe35 | Y初速Rand(2-2) | Unknown | 20 |
| fe36 | 放電開始(2-2) | Unknown (electrical node start?) | 0.2 |
| fe38 | 連鎖間隔(2-2) | Unknown (spacing between electrical nodes?) | 0.15 |
| fe37 | 放電数(2-2) | Unknown (number of electrical nodes?) | 14 |
| fe99 | パターンチェック | Unknown (pattern check?) | 0 |
| ff00 | 火炎スケール(1) | Unknown (Flare Cannon scale?) | 1 |
| ff10 | 火炎スケール(2) | Unknown (Flare Cannon scale?) | 1.25 |
| fg99 | パターンチェック | Unknown (pattern check?) | 0 |
| fg00 | 回転スピード(1) | Unknown (rotation speed?) | 0.015 |
| fg10 | 回転スピード(2) | Unknown (rotation speed?) | 0.02 |
| fg30 | 反転時間(2-1) | Unknown (inversion time?) | 30 |
| fg40 | 反転時間(2-2) | Unknown (inversion time?) | 2 |
| fg99 | パターンチェック | Unknown (pattern check?) | 0 |
| fw00 | 放水間隔(1) | Monster Pump water drop interval | 0.5 |
| fw01 | ランダム角度(1) | Unknown (Monster Pump random angle?) | 0.5 |
| fw02 | ランダム距離(1) | Unknown (Monster Pump random distance?) | 100 |
| fw10 | 放水間隔(2) | Unknown (drainage interval?) | 0.25 |
| fw11 | ランダム角度(2) | Unknown (random angle?) | 0.4 |
| fw12 | ランダム距離(2) | Unknown (random distance?) | 50 |
| fw99 | パターンチェック | Unknown (pattern check?) | 0 |
Other information[edit]
- Size: Leg span: 322mm, as per the e-card
- Pikmin 2 Piklopedia number: #81
- Musical theme: Titan Dweevil
Naming[edit]
- See more: Dweevil family#Naming.
- Common name: Titan Dweevil. The word "titan" means "giant", referring to the Dweevil's massive size.
- Japanese nickname: ヘラクレスオオヨロヒグモ?. ヘラクレス? means "Hercules" and オオ? means "giant", both referring to its size, ヨロヒ? is similar to ヨロイ?, which in turn means "armor", perhaps relating to its high durability and how it is invulnerable until its treasures are torn off, and finally, グモ? means "spider". So, its full translated name could be Giant Armored Herculean Spider.
- Japanese name: ヤタシオオヨロヒグモ?. ヤタシ? doesn't seem to have a proper translation. It could be a stem of 八咫? meaning "Eight Ata," an old unit of measurement in Japan. The rest of the name is the same as above.
- Scientific name: Mandarachnia gargantium. Gargantium is similar to the English word "gargantuan", which means "gigantic", referencing its large size.
- Internal names: Its internal name is
bigtreasure.bignaturally refers to its size, buttreasureis the English translation of the word used in the internal name of other Dweevils, which isotakara. - Prerelease: None.
Names in other languages[edit]
| Language | Name | Meaning | Notes |
|---|---|---|---|
| ヘラクレスオオヨロヒグモ? Herakuresu Ō Yorohi Gumo |
Giant Armored Herculean Spider | ||
| Araknéak titan | Titan dweevil | ||
| Araknéak Titan (GameCube and Wii) Araknéak titan (Switch) |
Titan Dweevil (GameCube and Wii) Titan dweevil (Switch) |
||
| Titanarak | Titan Dweevil | From Titan and Arak (the German name for the Dweevil family) | |
| Opiliode Titano | Titan Dweevil | ||
| 헤라클레스 거대갑옷거미 Helakeulleseu Geodaegab-Osgeomi |
Giant Armored Herculean Spider | ||
| Araña titán | Titan spider |
Gallery[edit]
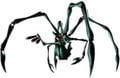
Artwork of the Titan Dweevil.
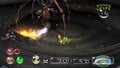
The Titan Dweevil using the Flare Cannon.
The Titan Dweevil using the Shock Therapist.
The Titan Dweevil using the Comedy Bomb.

The Titan Dweevil using the Monster Pump.
The Titan Dweevil without any of its weapons.
The Titan Dweevil dissolving as it dies.
The Titan Dweevil as seen from above, in an unused cave.

The Piklopedia icon of the Titan Dweevil in the Nintendo Switch version of Pikmin 2.
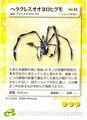
The Titan Dweevil's e-card, #43 (20th yellow card).


Trivia[edit]

- In an official Japanese poll, the Titan Dweevil was ranked as the most popular non-Bulborb enemy in Pikmin 2.
- Using an ultra-bitter spray or pausing the game the instant before the Dweevil uses a weapon will result in the musical cue scripted to play at this moment to loop. It will continue until the game is unpaused, or the Titan Dweevil breaks out of petrification.
- Though compared to spiders, the Titan Dweevil may be designed after the Japanese spider crab, a crab famous in Japan for having the largest leg span of all crab species. The Titan Dweevil possesses a similar body structure with its round torso, long legs, and small pincers, and its vulnerable form shows a crab-like exoskeleton.
- Japanese spider crabs are closely related to decorator crabs, which collect surrounding material and attach it to their carapaces. The Titan Dweevil, and subsequently all other Dweevils, may all get their habit of carrying loose objects from these crabs.
- Surrounding the Titan Dweevil, there are unknown firefly-like creatures flying about (pictured right). No information about them is known, however. They are coded to spawn specifically with the Titan Dweevil[2], and around the beast's spawn point.
- The Titan Dweevil, the Giant Breadbug, and the Waterwraith, are the only bosses in Pikmin 2 that have their own boss themes.
- The Titan Dweevil bizarrely does not appear to have a soul; when defeated, one does not rise from its corpse. While there exist other enemies that similarly don't have souls, they explicitly are only incapacitated when defeated, unlike the Titan Dweevil, which is clearly dead. This oddity is shared with the Empress Bulblax, Toady Bloyster (both only exhibiting this anomaly in Pikmin 2), and Ranging Bloyster, along with all members of the arachnorb family and the Lesser Spotted and Greater Spotted Jellyfloats regardless of game.
- Unlike the creatures who are missing souls in Pikmin 2 despite dropping corpses, it's possible that it may be an intentional decision for the Titan Dweevil. Throughout the Pikmin series creatures always only release souls when their death animations finish, which could look odd with the Titan Dweevil since that means that its soul would be appearing out of thin air.
See also[edit]
- Dweevil family
- Beady Long Legs
- Man-at-Legs
- Raging Long Legs
- Emperor Bulblax
- Plasm Wraith
- Ancient Sirehound
References[edit]
- ^ From instruction
0x802ddd34to0x802dded8of the US Demo 17 Pikmin 2 DOL; functionGame::BigTreasure::Obj::setTreasureAttackwith debugging symbols. Each weapon has a base score of 6000, and increases one-to-one as its health is depleted, up to 11999 with 1 HP. - ^ YouTube video demonstrating the Titan Dweevil in the Valley of Repose, published on July 6th, 2021, retrieved on March 18th, 2023