Rusted Labyrinth: Difference between revisions
(→Names in other languages: added the French and italian Name and translation) |
m (Replaced P2 Marble icons with P3 equivalents.) |
||
| (8 intermediate revisions by 4 users not shown) | |||
| Line 1: | Line 1: | ||
{{game icons|p3=y}} | {{game icons|p3=y}} | ||
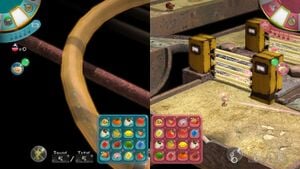
[[File:Rusted Labyrinth gameplay.jpg|thumb|300px|Gameplay on the stage.]] | |||
[[File:Rusted Labyrinth gameplay.jpg|thumb| | |||
The '''Rusted Labyrinth''' is the fifth stage of ''[[Pikmin 3]]''<nowiki>'</nowiki>s [[Bingo Battle]] mode. The stage is themed after modern plumbing and utilities, and includes pipe slides, metal plating platforms, and [[electric gate]]s. | |||
==Layouts== | ==Layouts== | ||
The variation unlock order, as explained [[Bingo Battle#Maps|here]], is B, A, C. | |||
===Layout A=== | ===Layout A=== | ||
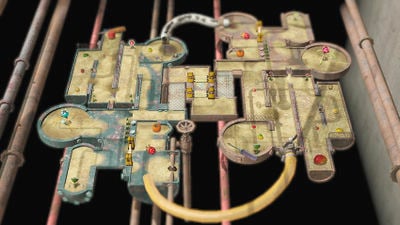
[[File:Map 13 rusted labyrinth a.jpg|thumb| | [[File:Map 13 rusted labyrinth a.jpg|thumb|400px|Layout A.]] | ||
This layout gives players [[Yellow Pikmin]] to start with, and | |||
This layout gives players [[Yellow Pikmin]] to start with, and [[Red Pikmin]] can be found. | |||
'''Enemies''': | |||
{{columns|2| | {{columns|2| | ||
*{{icon|Bearded Amprat|y}} × 2 | *{{icon|Bearded Amprat|y}} × 2 | ||
*{{icon|Bulborb|y|v=P3}} × 2 | |||
*{{icon|Dwarf Bulborb|y|v=P3}} × 4 | |||
*{{icon|Female Sheargrub|y|v=P3}} × 12 | *{{icon|Female Sheargrub|y|v=P3}} × 12 | ||
*{{icon|Yellow Wollywog|y|v=P3}} × 2 | |||
}} | }} | ||
'''Fruits''': | |||
{{columns|2| | {{columns|2| | ||
*{{icon|Face Wrinkler|y}} × 1 | |||
*{{icon|Golden Sunseed|y}} × 1 | |||
*{{icon|Heroine's Tear|y}} × 1 | |||
*{{icon|Insect Condo|y|v=FF}} × 1 | *{{icon|Insect Condo|y|v=FF}} × 1 | ||
*{{icon| | *{{icon|Portable Sunset|y}} × 1 | ||
*{{icon|Sunseed Berry|y|v=FF}} × 1 | *{{icon|Sunseed Berry|y|v=FF}} × 1 | ||
*{{icon|Zest Bomb|y}} × 1 | *{{icon|Zest Bomb|y}} × 1 | ||
}} | }} | ||
*{{icon| | '''Marbles''': | ||
*{{icon| | *{{icon|Blue Marble|v=P3}} [[Crystallized Clairvoyance|Blue Marble]] × 1 | ||
*{{icon| | *{{icon|Red Marble|v=P3}} [[Crystallized Telepathy|Red Marble]] × 1 | ||
*{{icon|Yellow Marble|v=P3}} [[Crystallized Telekinesis|Yellow Marble]] × 2 | |||
{{ | |||
'''Tools''': | |||
*{{icon|Geyser|y}} × 2 | |||
'''Obstacles''': | |||
*{{icon|Electric gate|v=P3|y}} × 4 | *{{icon|Electric gate|v=P3|y}} × 4 | ||
*{{icon|Fire geyser|y}} × 12 | *{{icon|Fire geyser|y}} × 12 | ||
}} | |||
{{ | '''Plants and fungi''': | ||
*{{icon|Pellet Posy|v=P3}} [[Pellet Posy|1-Pellet Posy]] × 16 | |||
*{{icon|Pellet Posy|v=P3}} [[Pellet Posy|5-Pellet Posy]] × 2 | |||
'''Other objects''': | |||
*{{icon|Egg|v=P3|y}} × 4 | |||
===Layout B=== | ===Layout B=== | ||
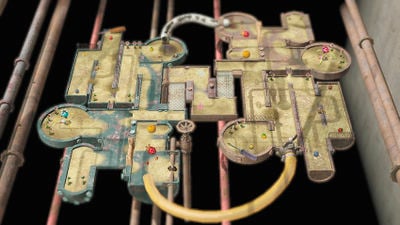
[[File:Map 14 rusted labyrinth b.jpg|thumb| | [[File:Map 14 rusted labyrinth b.jpg|thumb|400px|Layout B.]] | ||
This layout gives players Red Pikmin to start with, and [[Winged Pikmin]] can be found. | |||
'''Enemies''': | |||
{{columns|2| | {{columns|2| | ||
*{{icon|Dwarf | *{{icon|Bulborb|y|v=P3}} × 2 | ||
*{{icon| | *{{icon|Dwarf Bulborb|y|v=P3}} × 4 | ||
*{{icon|Female Sheargrub|y|v=P3}} × 4 | |||
*{{icon|Male Sheargrub|y|v=P3}} × 4 | *{{icon|Male Sheargrub|y|v=P3}} × 4 | ||
*{{icon|Pyroclasmic Slooch|y}} × 2 | *{{icon|Pyroclasmic Slooch|y}} × 2 | ||
*{{icon|Shearwig|y|v=P3}} × 4 | *{{icon|Shearwig|y|v=P3}} × 4 | ||
*{{icon|Yellow Wollywog|y|v=P3}} × 2 | |||
}} | }} | ||
'''Fruits''' | |||
*{{icon|Citrus Lump|y|v=FF}} × 2 | *{{icon|Citrus Lump|y|v=FF}} × 2 | ||
*{{icon|Golden Sunseed|y}} × 1 | *{{icon|Golden Sunseed|y}} × 1 | ||
*{{icon|Sunseed Berry|y|v=FF}} × 1 | *{{icon|Sunseed Berry|y|v=FF}} × 1 | ||
'''Marbles''': | |||
*{{icon| | *{{icon|Blue Marble|v=P3}} [[Crystallized Clairvoyance|Blue Marble]] × 2 | ||
*{{icon| | *{{icon|Red Marble|v=P3}} [[Crystallized Telepathy|Red Marble]] × 2 | ||
*{{icon| | *{{icon|Yellow Marble|v=P3}} [[Crystallized Telekinesis|Yellow Marble]] × 2 | ||
{{ | '''Tools''': | ||
*{{icon|Geyser|y}} × 2 | |||
'''Obstacles''': | |||
*{{icon|Dirt wall|y}} × 2 | *{{icon|Dirt wall|y}} × 2 | ||
*{{icon|Fire geyser|y}} × 30 | *{{icon|Fire geyser|y}} × 30 | ||
{{ | '''Plants and fungi''': | ||
*{{icon|Pellet Posy|v=P3}} [[Pellet Posy|1-Pellet Posy]] × 22 | |||
===Layout C=== | ===Layout C=== | ||
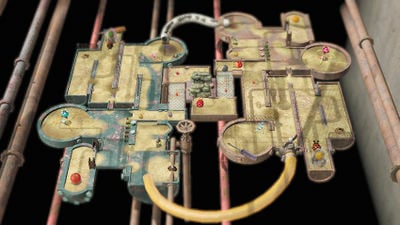
[[File:Map 15 rusted labyrinth c.jpg|thumb| | [[File:Map 15 rusted labyrinth c.jpg|thumb|400px|Layout C.]] | ||
This layout gives players Red Pikmin to start with, and | |||
This layout gives players Red Pikmin to start with, and [[Rock Pikmin]] can be found. | |||
'''Enemies''': | |||
{{columns|2| | {{columns|2| | ||
*{{icon|Dwarf | *{{icon|Bulborb|y|v=P3}} × 2 | ||
*{{icon|Dwarf Bulborb|y|v=P3}} × 3 | |||
*{{icon|Male Sheargrub|y|v=P3}} × 8 | *{{icon|Male Sheargrub|y|v=P3}} × 8 | ||
*{{icon|Orange Bulborb|y|v=P3}} × 2 | *{{icon|Orange Bulborb|y|v=P3}} × 2 | ||
}} | }} | ||
'''Fruits''': | |||
{{columns|2| | {{columns|2| | ||
*{{icon| | *{{icon|Citrus Lump|v=FF|y}} × 1 | ||
*{{icon|Face Wrinkler|y}} × 1 | *{{icon|Face Wrinkler|y}} × 1 | ||
*{{icon|Golden Sunseed|y}} × 1 | *{{icon|Golden Sunseed|y}} × 1 | ||
| Line 96: | Line 109: | ||
*{{icon|Zest Bomb|y}} × 1 | *{{icon|Zest Bomb|y}} × 1 | ||
}} | }} | ||
*{{icon| | '''Marbles''': | ||
*{{icon| | {{columns|2| | ||
*{{icon| | *{{icon|Blue Marble|v=P3}} [[Crystallized Clairvoyance|Blue Marble]] × 1 | ||
*{{icon|Red Marble|v=P3}} [[Crystallized Telepathy|Red Marble]] × 1 | |||
*{{icon|Yellow Marble|v=P3}} [[Crystallized Telekinesis|Yellow Marble]] × 2 | |||
*{{icon|Lucky Marble|y}} × 1 | |||
}} | |||
'''Tools''': | |||
{{columns|2| | {{columns|2| | ||
*{{icon|Dirt mound|y}} × 2 | *{{icon|Dirt mound|y}} × 2 | ||
*{{icon|Geyser|y}} × 2 | |||
*{{icon|Iron ball|y}} × 1 | *{{icon|Iron ball|y}} × 1 | ||
*{{icon|Mine|y}} × 6 (in | *{{icon|Mine|y}} × 6 (3 in each dirt mound) | ||
}} | |||
'''Obstacles''': | |||
*{{icon|Crystal wall|y}} × 2 | |||
*{{icon|Large crystal|y}} × 2 | *{{icon|Large crystal|y}} × 2 | ||
*{{icon| | |||
*{{icon| | '''Plants and fungi''': | ||
*{{icon|Pellet Posy|v=P3}} [[Pellet Posy|1-Pellet Posy]] × 10 | |||
*{{icon|Pellet Posy|v=P3}} [[Pellet Posy|5-Pellet Posy]] × 2 | |||
==Out of bounds== | ==Out of bounds== | ||
| Line 130: | Line 153: | ||
==Gallery== | ==Gallery== | ||
{{image}} | |||
<gallery> | <gallery> | ||
Rusted Labyrinth radar.png|Texture used on the [[radar]]. | Rusted Labyrinth radar.png|Texture used on the [[radar]]. | ||
</gallery> | </gallery> | ||
==See also== | |||
* [[Corroded Maze]] | |||
==References== | ==References== | ||
Latest revision as of 20:49, March 12, 2024
The Rusted Labyrinth is the fifth stage of Pikmin 3's Bingo Battle mode. The stage is themed after modern plumbing and utilities, and includes pipe slides, metal plating platforms, and electric gates.
Layouts[edit]
The variation unlock order, as explained here, is B, A, C.
Layout A[edit]
This layout gives players Yellow Pikmin to start with, and Red Pikmin can be found.
Enemies:
 Bearded Amprat × 2
 Bulborb × 2
 Dwarf Bulborb × 4
 Female Sheargrub × 12
 Yellow Wollywog × 2
Fruits:
 Face Wrinkler × 1
 Golden Sunseed × 1
 Heroine's Tear × 1
 Insect Condo × 1
 Portable Sunset × 1
 Sunseed Berry × 1
 Zest Bomb × 1
Marbles:
 Blue Marble × 1
 Red Marble × 1
 Yellow Marble × 2
Tools:
 Geyser × 2
Obstacles:
 Electric gate × 4
 Fire geyser × 12
Plants and fungi:
 1-Pellet Posy × 16
 5-Pellet Posy × 2
Other objects:
 Egg × 4
Layout B[edit]
This layout gives players Red Pikmin to start with, and Winged Pikmin can be found.
Enemies:
 Bulborb × 2
 Dwarf Bulborb × 4
 Female Sheargrub × 4
 Male Sheargrub × 4
 Pyroclasmic Slooch × 2
 Shearwig × 4
 Yellow Wollywog × 2
Fruits
 Citrus Lump × 2
 Golden Sunseed × 1
 Sunseed Berry × 1
Marbles:
 Blue Marble × 2
 Red Marble × 2
 Yellow Marble × 2
Tools:
 Geyser × 2
Obstacles:
 Dirt wall × 2
 Fire geyser × 30
Plants and fungi:
 1-Pellet Posy × 22
Layout C[edit]
This layout gives players Red Pikmin to start with, and Rock Pikmin can be found.
Enemies:
 Bulborb × 2
 Dwarf Bulborb × 3
 Male Sheargrub × 8
 Orange Bulborb × 2
Fruits:
 Citrus Lump × 1
 Face Wrinkler × 1
 Golden Sunseed × 1
 Insect Condo × 1
 Sunseed Berry × 1
 Zest Bomb × 1
Marbles:
 Blue Marble × 1
 Red Marble × 1
 Yellow Marble × 2
 Lucky Marble × 1
Tools:
 Dirt mound × 2
 Geyser × 2
 Iron ball × 1
 Mine × 6 (3 in each dirt mound)
Obstacles:
 Crystal wall × 2
 Large crystal × 2
Plants and fungi:
 1-Pellet Posy × 10
 5-Pellet Posy × 2
Out of bounds[edit]
It is possible to throw a leader onto a section of the stage that is out of bounds. In order to do this, players have to have two leaders on their side. From the circular sandy room on the red team's side (northeast when looking at the radar), one leader must throw their partner directly to the east. There is a wall in the distance, and far below it is a tube. With a throw, leaders and Pikmin can actually land on it. Additionally, the player can throw a leader onto the barrier and dodge to the pipe. Whilst there, leaders and Pikmin can walk around along the wall, but they can't stop hugging the wall, due to the tube's slant. Walking too far to the north or south will eventually place the leader's icon on the radar out of view, and walking a bit further will make the leader or Pikmin go through the tube, touch the abyss, and reappear on the stage as normal.[1] It is also not possible to dodge while on the tube.
Naming[edit]
Names in other languages[edit]
| Language | Name | Meaning |
|---|---|---|
| Entre ciel et terre | Between Heaven and Earth | |
| Rostschlucht | Rust Ravine | |
| Gola rugginosa | Rusty Throat | |
| Cuidadela Oxidada | Rusty Citadel |
Gallery[edit]
|
This article or section is in need of more images. |
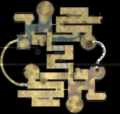
Texture used on the radar.
See also[edit]
References[edit]
- ^ YouTube video showing how to get leaders out of bounds
