Switch

- For the console, see Nintendo Switch and Nintendo Switch 2.
Switches[1][2] are tools in Pikmin 3 and Pikmin 4. They can be pressed by throwing a Pikmin, leader or pikpik carrot onto them or by jumping onto them with Oatchi. When pressed, they can affect obstacles and tools such as fans, switch gates, iron fences, and several other obstacles, allowing progress through the area.
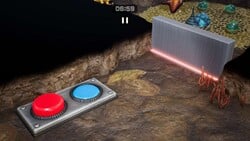
Switches appear in two forms: a square white button, which becomes deactivated after pressed and permanently affects whatever it's linked to, and a panel with two circular buttons, which can be toggled between freely. In Pikmin 4, the color of the two-button switch varies depending on the context it is used in, however in Pikmin 3 the two buttons are always yellow and blue.
Conveyor switch[edit]
In Pikmin 3, switches are referred to as conveyor switches and they are used to reverse the flow of all of the conveyor belts in the area.[3] When one of the two buttons is pressed, it will start to emit a light of its color, which can also be seen on the side of the conveyor belts, and will synchronize all of the switches in the area, causing the same button to be pressed in all of them.
Locations[edit]
- Pikmin 3
- Clockwork Chasm
- Collect Treasure! × 4
- Battle Enemies! × 5
- Pikmin 4
- Sun-Speckled Terrace (does not appear above ground)
- Aquiferous Summit
- Sublevel 2 × 1
- Industrial Maze
- Sublevel 1 × 1
- Aquiferous Summit
- Blossoming Arcadia (does not appear above ground)
- Kingdom of Beasts
- Sublevel 4 × 1
- Sublevel 5 × 1
- Kingdom of Beasts
- Serene Shores (does not appear above ground)
- Seafloor Resort
- Sublevel 2 × 1
- Sublevel 3 × 1
- Subzero Sauna
- Sublevel 2 × 1
- Below-Grade Discotheque
- Sublevel 2 × 1
- Sublevel 3 × 1
- Sublevel 4 × 1
- Engulfed Castle
- Sublevel 1 × 1
- Sublevel 2 × 1
- Sublevel 3 × 1
- Seafloor Resort
- Hero's Hideaway × 3
- Doppelgänger's Den
- Sublevel 2 × 1
- Sublevel 3 × 1
- Doppelgänger's Den
- Hero's Hideaway (Olimar's Shipwreck Tale) ×, 1
- Giant's Hearth (does not appear above ground)
- Ultimate Testing Range
- Sublevel 2 × 1
- Sublevel 4 × 1
- Ultimate Testing Range
- Dandori Challenges
- Trial of the Sage Leaf 6th Story: Gimmick Gambit × 4
Gallery[edit]
|
This article or section is in need of more images. |
Trivia[edit]
- Conveyor switches are the only objects in Pikmin 3 that can be locked-on that are exclusive to Mission Mode, and conveyor belts only appear here too. Every other interactable object from Mission Mode appears at least once in Story Mode.
See also[edit]
References[edit]
- ^ “A mechanized incinerator that reaches high into the sky. Burn the straw, and secure the switch for the moving walkway.” – {{{2}}} in {{{3}}}
- ^ “A dojo for Dandori mastery, where secret training is carried out day and night. Every time you push the switch, gates open.” – {{{2}}} in {{{3}}}
- ^ YouTube video of the stage around the time of a switch press.
| Tools |
|---|
|
|
| Minor tools |