Automatic Gear: Difference between revisions
No edit summary |
Chazmatron (talk | contribs) m (added category) |
||
| (43 intermediate revisions by 18 users not shown) | |||
| Line 1: | Line 1: | ||
{{Infobox ship part | {{Infobox ship part | ||
|name = Automatic Gear | |name = Automatic Gear | ||
|image = | |image = P1 Automatic Gear Artwork.jpg | ||
|size = 250x250px | |size = 250x250px | ||
|icon = Automatic Gear icon.png | |icon = Automatic Gear icon.png | ||
| Line 8: | Line 8: | ||
|max_pikmin = 25 | |max_pikmin = 25 | ||
|location = The Forest Navel | |location = The Forest Navel | ||
|pikmin1 = y | |||
}} | }} | ||
{{Infobox ship part | |||
|name = Automatic Gear | |||
|image = | |||
|size = | |||
|icon = Automatic Gear P4 icon.png | |||
|weight = 15 | |||
|max_pikmin = | |||
|location = [[Sun-Speckled Terrace]], [[Blossoming Arcadia]], [[Serene Shores]], [[Hero's Hideaway]] | |||
|pikmin4 = y | |||
}} | |||
The '''Automatic Gear''' ({{j|オートマチック・ギア|Ōtomachikku Gia|Automatic Gear}}) is a [[ship part]] in ''[[Pikmin (game)|Pikmin]]''. It chugs along at its own pace and it makes piloting easier, giving [[Captain Olimar]] time to concentrate on finer points of space travel. When collected, this part does not change the [[S.S. Dolphin]]'s appearance. | |||
In {{p4}}, 6 Automatic Gears must be collected across the four areas of [[Olimar's Shipwreck Tale]]. | |||
==Collecting the part== | ==Collecting the part== | ||
{{Guide}} | |||
{{ | |||
The Automatic Gear is found in [[The Forest Navel]], on a ledge near the landing site, where | ===In ''Pikmin''=== | ||
{{location map | width = 350 | height = 443 | image = FN texture.png | bg = #111 | caption = Location of the Automatic Gear. | icons = | |||
{{map icon | Automatic Gear | 118 | 226}} | |||
}} | |||
The Automatic Gear is found in [[The Forest Navel]], on a ledge near the landing site, where a [[climbing stick]] must be built to get to it. As it is in a high place, Pikmin can lose their [[Maturity|flowers]] when they fall off the edge while carrying it. The [[Glitches in Pikmin#Tilted objects|tilted ship part glitch]] can also occur due to the long drop. | |||
To avoid your Pikmin getting deflowered, you can call them back just as they are walking off the | To avoid your Pikmin getting deflowered, you can call them back just as they are walking off the edge. Another useful method is to simply walk away. If the Pikmin are out of the view of the [[camera]], they will not get deflowered. This technique is also useful for getting other ship parts in the game. Due to several [[Shearwig]]s being in the area where the Pikmin fall, you must take precautions to ensure [[Zero-death run|no Pikmin deaths]]. | ||
[[Fiery Blowhog]]s can also wander into the drop point of the part later in the day, so it may be a good idea to use [[Red Pikmin]]. If doing a [[speedrun]], have your Pikmin work on collecting this part while you discover the [[Blue Pikmin]], as the [[Blue Onion]] and the part are very close together. | [[Fiery Blowhog]]s can also wander into the drop point of the part later in the day, so it may be a good idea to use [[Red Pikmin]]. If doing a [[speedrun]], have your Pikmin work on collecting this part while you discover the [[Blue Pikmin]], as the [[Blue Onion]] and the part are very close together. | ||
===In ''Pikmin 4''=== | |||
====Sun-Speckled Terrace==== | |||
The Automatic Gear is in the north of the area, inside an [[Arachnode]] web. You can reach the Arachnode from either direction, but before you kill it, make sure to also dispatch a nearby [[Puffy Blowhog]]. | |||
The carrying path for this part depends greatly on which structures you have built or destroyed so far in the Terrace. Predict the path carefully and kill any enemies that might threaten your Pikmin along the way. | |||
====Blossoming Arcadia==== | |||
The Automatic Gear is in a niche south of the Misshapen Pond landing site. From the opposite edge of the nearby [[mud]] pit, go along the blue pipe and you will find the part inside a stack of toy blocks. Throw 15 Pikmin to dig it up. It is easiest to retrieve the part using [[Yellow Pikmin]], but any type can reach it if you position Olimar or [[Moss]] on top of the mound near the toy blocks. | |||
====Serene Shores==== | |||
There are three Automatic Gears in this area. | |||
{{See also|Bug-Eyed Crawmad#Strategy|t1=Bug-Eyed Crawmad strategy}} | |||
For the first gear, go to the beach near the Water's Edge landing site and proceed left into a flooded passage. This corridor leads to a [[Bug-Eyed Crawmad]] which has an Automatic Gear in its stomach. To ensure the Pikmin's safety as they carry the part back, it is recommended to kill the [[Aristocrab Offspring]]s on the previously mentioned beach. | |||
{{See also|Masterhop#Strategy|t1=Masterhop strategy}} | |||
For the second, go west into an open space where a [[Yellow Wollyhop]] and a [[Masterhop]] reside. Kill these enemies and proceed until you find a buried Automatic Gear in the right corner. | |||
For the third, go to The Sand Keep landing site and kill the [[Sovereign Bulblax]]. Once the boss is dead, build the [[climbing wall]] a bit to the east. It is recommended to move your base to The Sand Keep for two reasons: doing so creates a much shorter path for your Pikmin to retrieve necessary [[raw material]] from the [[S.S. Dolphin]], and eases retrieval of the [[Secret Safe]] which the Bulblax drops upon death. Beyond the climbing wall, an Automatic Gear lies amid a few [[bubble geyser]]s. Destroy the geysers with any Pikmin type before you let them carry the part. | |||
====Hero's Hideaway==== | |||
After you have defeated the area's [[Gildemander]], push down the two [[cardboard box]]es leading from the eastern section of the area to the left. Kill the [[Tusked Blowhog]] between said boxes and the Feasting Centre landing site, and move your base there. | |||
Having completed these tasks, take out at least 30 Pikmin for Olimar. Leave Moss behind and go through a hole in the wall next to the landing site mentioned previously. The tunnel leads to a moving platform that takes Olimar down to a raised desk. On the far end of this desk, an Automatic Gear lies near a [[Miniature Snootwhacker]]. Moss cannot go through the hole with Olimar, so the best option here is to stun the enemy with an item such as a [[Bomb Rock]] or [[Ice Blast]]. If no such items are available, distract the enemy with Olimar while your Pikmin carry the part. | |||
{{clear}} | {{clear}} | ||
| Line 26: | Line 69: | ||
==Gallery== | ==Gallery== | ||
<gallery> | <gallery> | ||
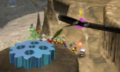
P1 Automatic Gear Screenshot.png|The Automatic Gear on the high ledge it is found on. | |||
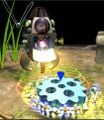
Automatic Gear 2.jpg|The part being retrieved to the S.S. Dolphin. | |||
</gallery> | </gallery> | ||
==Trivia== | ==Trivia== | ||
[[File:Early Omega Flywheel icon.png|thumb | [[File:Early Omega Flywheel icon.png|thumb|The icon.]] | ||
*A very early [[Treasure Hoard]] icon for the [[Omega Flywheel]] resembles the Automatic Gear, but is yellow instead.{{cite web|http://tcrf.net/Pikmin_2/Unused_%26_Early_Treasures/Earliest_Treasure_Graphics|Pikmin 2/Unused Early Treasures/Earliest Treasure Graphics|The Cutting Room Floor}} | *A very early [[Treasure Hoard]] icon for the [[Omega Flywheel]] resembles the Automatic Gear, but is yellow instead.{{cite web|http://tcrf.net/Pikmin_2/Unused_%26_Early_Treasures/Earliest_Treasure_Graphics|Pikmin 2/Unused Early Treasures/Earliest Treasure Graphics|The Cutting Room Floor}} | ||
**Interestingly, the Automatic Gear in {{p4}} is yellow and gray, making it moreso resemble the early Omega Flywheel. | |||
==Names in other languages== | ==Names in other languages== | ||
{{ | {{foreignname | ||
|FraE=Boîte Automatique | |Jap = オートマチック・ギア | ||
|FraEM=Automatic Box | |JapR = Ōtomachikku Gia | ||
|JapM = Automatic Gear | |||
|ChiTrad = 自動式齒輪 | |||
|ChiTradR = Zìdòng-shì Chǐlún | |||
|ChiTradM = Automatic-Type Gear | |||
|ChiSimp = 自动式齿轮 | |||
|ChiSimpR = Zìdòng-shì Chǐlún | |||
|ChiSimpM = Automatic-Type Gear | |||
|Dut = Turbotandwiel | |||
|DutM = Turbo gear | |||
|FraA = Engrenage de vitesses automatique (in-game)<br>Engrenage (final results screen) | |||
|FraAM = Automatic speed gears<br>Gear | |||
|FraE = Boîte Automatique | |||
|FraEM = Automatic Box | |||
|Ger = Autom. Getriebe | |||
|GerM = Automatic Gear | |||
|Ita = Autonavigatore | |||
|ItaM = Automatic navigator | |||
|Kor = 오토매틱 기어 | |||
|KorR = Otomaetik Gieo | |||
|KorM = Automatic Gear | |||
|Spa = Transmisión | |||
|SpaM = Transmission | |||
|Por = Transmissão automática | |||
|PorM = Automatic transmission | |||
}} | }} | ||
| Line 45: | Line 113: | ||
{{The Forest Navel}} | {{The Forest Navel}} | ||
{{Ship parts}} | {{Ship parts}} | ||
[[Category:Olimar's Shipwreck Tale]] | |||
[[Category:Mandatory ship parts]] | |||
[[Category:Boss rewards]] | |||
Latest revision as of 09:42, December 20, 2023
| |||
|---|---|---|---|

| |||
| This ship part is required for the S.S. Dolphin to escape the planet. | |||
| Weight | 15 | ||
| Max. carriers | 25 Pikmin | ||
| Location | The Forest Navel | ||
| |||
|---|---|---|---|
| Weight | 15 | ||
| Location | Sun-Speckled Terrace, Blossoming Arcadia, Serene Shores, Hero's Hideaway | ||
The Automatic Gear (オートマチック・ギア?, lit.: "Automatic Gear") is a ship part in Pikmin. It chugs along at its own pace and it makes piloting easier, giving Captain Olimar time to concentrate on finer points of space travel. When collected, this part does not change the S.S. Dolphin's appearance.
In Pikmin 4, 6 Automatic Gears must be collected across the four areas of Olimar's Shipwreck Tale.
Collecting the part[edit]
|
The following article or section contains guides. |
In Pikmin[edit]

The Automatic Gear is found in The Forest Navel, on a ledge near the landing site, where a climbing stick must be built to get to it. As it is in a high place, Pikmin can lose their flowers when they fall off the edge while carrying it. The tilted ship part glitch can also occur due to the long drop.
To avoid your Pikmin getting deflowered, you can call them back just as they are walking off the edge. Another useful method is to simply walk away. If the Pikmin are out of the view of the camera, they will not get deflowered. This technique is also useful for getting other ship parts in the game. Due to several Shearwigs being in the area where the Pikmin fall, you must take precautions to ensure no Pikmin deaths.
Fiery Blowhogs can also wander into the drop point of the part later in the day, so it may be a good idea to use Red Pikmin. If doing a speedrun, have your Pikmin work on collecting this part while you discover the Blue Pikmin, as the Blue Onion and the part are very close together.
In Pikmin 4[edit]
Sun-Speckled Terrace[edit]
The Automatic Gear is in the north of the area, inside an Arachnode web. You can reach the Arachnode from either direction, but before you kill it, make sure to also dispatch a nearby Puffy Blowhog.
The carrying path for this part depends greatly on which structures you have built or destroyed so far in the Terrace. Predict the path carefully and kill any enemies that might threaten your Pikmin along the way.
Blossoming Arcadia[edit]
The Automatic Gear is in a niche south of the Misshapen Pond landing site. From the opposite edge of the nearby mud pit, go along the blue pipe and you will find the part inside a stack of toy blocks. Throw 15 Pikmin to dig it up. It is easiest to retrieve the part using Yellow Pikmin, but any type can reach it if you position Olimar or Moss on top of the mound near the toy blocks.
Serene Shores[edit]
There are three Automatic Gears in this area.
- See also: Bug-Eyed Crawmad strategy.
For the first gear, go to the beach near the Water's Edge landing site and proceed left into a flooded passage. This corridor leads to a Bug-Eyed Crawmad which has an Automatic Gear in its stomach. To ensure the Pikmin's safety as they carry the part back, it is recommended to kill the Aristocrab Offsprings on the previously mentioned beach.
- See also: Masterhop strategy.
For the second, go west into an open space where a Yellow Wollyhop and a Masterhop reside. Kill these enemies and proceed until you find a buried Automatic Gear in the right corner.
For the third, go to The Sand Keep landing site and kill the Sovereign Bulblax. Once the boss is dead, build the climbing wall a bit to the east. It is recommended to move your base to The Sand Keep for two reasons: doing so creates a much shorter path for your Pikmin to retrieve necessary raw material from the S.S. Dolphin, and eases retrieval of the Secret Safe which the Bulblax drops upon death. Beyond the climbing wall, an Automatic Gear lies amid a few bubble geysers. Destroy the geysers with any Pikmin type before you let them carry the part.
Hero's Hideaway[edit]
After you have defeated the area's Gildemander, push down the two cardboard boxes leading from the eastern section of the area to the left. Kill the Tusked Blowhog between said boxes and the Feasting Centre landing site, and move your base there.
Having completed these tasks, take out at least 30 Pikmin for Olimar. Leave Moss behind and go through a hole in the wall next to the landing site mentioned previously. The tunnel leads to a moving platform that takes Olimar down to a raised desk. On the far end of this desk, an Automatic Gear lies near a Miniature Snootwhacker. Moss cannot go through the hole with Olimar, so the best option here is to stun the enemy with an item such as a Bomb Rock or Ice Blast. If no such items are available, distract the enemy with Olimar while your Pikmin carry the part.
Notes
Olimar's monologs
“I've found the Automatic Gear!
This thing chugs right along at its own pace. It makes piloting much easier, giving me time to concentrate on the finer points of space travel.
It has thin cracks running through it. I tried to fill them with dirt... I hope it will be all right.”
Gallery[edit]
The Automatic Gear on the high ledge it is found on.
The part being retrieved to the S.S. Dolphin.


Trivia[edit]
- A very early Treasure Hoard icon for the Omega Flywheel resembles the Automatic Gear, but is yellow instead.[1]
- Interestingly, the Automatic Gear in Pikmin 4 is yellow and gray, making it moreso resemble the early Omega Flywheel.
Names in other languages[edit]
| Language | Name | Meaning |
|---|---|---|
| オートマチック・ギア? Ōtomachikku Gia |
Automatic Gear | |
(traditional) |
自動式齒輪 Zìdòng-shì Chǐlún |
Automatic-Type Gear |
(simplified) |
自动式齿轮 Zìdòng-shì Chǐlún |
Automatic-Type Gear |
| Turbotandwiel | Turbo gear | |
| Engrenage de vitesses automatique (in-game) Engrenage (final results screen) |
Automatic speed gears Gear | |
| Boîte Automatique | Automatic Box | |
| Autom. Getriebe | Automatic Gear | |
| Autonavigatore | Automatic navigator | |
| 오토매틱 기어 Otomaetik Gieo |
Automatic Gear | |
| Transmissão automática | Automatic transmission | |
| Transmisión | Transmission |
References[edit]
- ^ Pikmin 2/Unused Early Treasures/Earliest Treasure Graphics on The Cutting Room Floor
| The Forest Navel | ||||||||||
|---|---|---|---|---|---|---|---|---|---|---|
|
Click an object |
| |||||||||