Distant Tundra: Difference between revisions
(Policy.) |
|||
| Line 1: | Line 1: | ||
{{game icons|p3=y}} | {{game icons|p3=y}} | ||
{{infobox area | {{infobox area | ||
| | |screnshot = 03 Site Distant Tundra.png | ||
|map = Distant Tundra Map.jpg | |||
|fruits = 16 | |fruits = 16 | ||
|hazards = {{fire}} {{electricity}} {{water}} | |hazards = {{fire}} {{electricity}} {{water}} | ||
| Line 7: | Line 8: | ||
|pikmin = [[Yellow Pikmin|Yellow]] | |pikmin = [[Yellow Pikmin|Yellow]] | ||
|requirements = Collect the [[Data Glutton]] | |requirements = Collect the [[Data Glutton]] | ||
|music = ''[[Music in Pikmin 3#Distant Tundra|Distant Tundra]]'' | |music = ''[[Music in Pikmin 3#Distant Tundra|Distant Tundra]]'' | ||
}} | }} | ||
'''Distant Tundra''' is | '''Distant Tundra''' is the third [[area]] in ''[[Pikmin 3]]''. The overall layout of the level is a flat, snowy environment with small areas containing exposed grass and dirt. The level is divided by a small river that cuts through the middle. The landing site is near the river. [[Captain Charlie]] crash lands here, but is later rescued by [[Alph]] and [[Brittany]]. There are 16 fruits that can be found here. | ||
==Plot== | ==Plot== | ||
After the crash in the epilogue, the scene goes to [[Captain Charlie]], who landed on this area. The player takes control of him for a bit as he discovers [[Yellow Pikmin]], but this section of the game stops when he enters a cave and defeats some [[Phosbat]]s, as an unknown creature – later revealed to be the [[Vehemoth Phosbat]] – ambushes him. | |||
Later on in the story, when [[Alph]] and [[Brittany]] first reunite, and when they land on the Distant Tundra for the first time, the [[S.S. Drake]] flies too low to the ground and hits a rock, accidentally ejecting [[Brittany]] into the cave below. In this cave, she discovers the Yellow Pikmin and their [[Onion]]. Upon using the new Yellow Pikmin to open an entry to the outside, she discovers that she and [[Alph]] are separated by a river, which must be overcome by two bridges, which each leader must help each other build. Until the player reunites the two leaders, Brittany will not be able to return to the Drake at the end of the day and will go unfed until reunited. | |||
Eventually, the two explorers make it to the area in which Charlie had crash landed. Any [[obstacle]]s that Charlie destroyed on the first day will not reappear. They make it into the cave in which he was captured, light it up, and the Vehemoth Phosbat retreats. They begin to fight the boss, and upon defeating it, rescue Charlie, unlocking him as a playable leader. | |||
==Enemies== | ==Overview== | ||
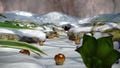
[[File:Are1.jpg|thumb|250px|An overview of part of the area.]] | |||
The Distant Tundra is a large wintery landscape, with most of the terrain covered in snow and ice. Its structure is quite complex, mostly due to the assortment of walls, ramps, twists and turns in the terrain. Regardless, most parts are quite open. In addition, there is a large amount of water throughout the stage. Because of the cold climate, many enemies that cannot be found in other areas are found here, such as the Bearded Amprat or the Arctic Cannon Larva. | |||
==Key sections== | |||
The main portion of the area is quite big, and is split in two due to the river that crosses the middle. On the following list, all but the first two sections refer to a different sub-area, meaning that there is a transition when they are entered or left. | |||
;Southern half: | |||
The southern half of the main area is where the landing site is. The site is circular with an exit to the south, and a eastern ramp leading to the river's shoreline. From the south exit, there is a perpendicular path that splits in two when going east: one end dips down and leads to the shore, the other has a bridge that leads to higher ground, where the [[Dodge Whistle]] can be reached with a nearby [[Bouncy Mushroom]]. | |||
On the aforementioned path split, when taking the dipping path, it's possible to go under the bridge on the other path, and enter a room with [[Pyroplasmic Slooch]]es. This room is surrounded by high walls from other parts of the stage. To the east, there is a bit of terrain near the Dodge Whistle. [[Leader]]s and [[Pikmin family|Pikmin]] can be thrown to the portion at the south of the room, which has a chain of Bouncy Mushrooms that in turn provide access to the western ledge. That ledge has a pathway that shrinks further down to the west until the [[Zest Bomb]] – the purpose is to make it harder to dodge the [[Arctic Cannon Larva]]'s snowballs. | |||
;Northern half: | |||
The center of this half of the area is a bit open, and leads to the river's shore on the west. This shore has a protrusion that points to a similar, smaller protrusion on the other side; this allows the leaders to swap Pikmin. From the center, there are two ways to reach the eastern portion: through a one-way slide in the middle or a curving long path to the north. This semi-open zone has a vase in the middle and a ledge to a slide that takes one back to the southern half of the area; a leader must be thrown by another to get here. A bit more to the east is a ledge with a [[Face Wrinkler]]. | |||
The northwestern corner of the main area consists of three high steps. The first is crossed with a [[geyser]], and the second can be overcome with another geyser or by taking the eastern path. Up at the top, there is an inlet of land at the north, with a tunnel blocked by an [[iron ball]] facing the south; one leader must throw another in order to get here. To the northwest of the topmost high step is a slide that goes all the way to the bottom. | |||
To note is that the river cannot be crossed from one shore to the other right away, given that there are two underwater [[gate]]s in the river itself blocking access. | |||
;Charlie's crash site: | |||
This section starts at a dead end, and is mostly linear, with slight zigzagging. Midway through, it splits into two, with the northern exit leading to the Spotty Bulbear cave, but blocked off by a [[crystal]], and the eastern path leading to the large wooden bridge. | |||
;Large bridge: | |||
This large, wooden bridge provides a path between Charlie's crash site and the cave section that leads into the Vehemoth Phosbat's den. The [[camera]] in this sub-area faces to the side, and the only movement possible is two-dimensional. | |||
;Vehemoth Phosbat arena access: | |||
This cave segment is mostly linear, but has a gap that can only be overcome with [[Bloominous Stemple]]s. The exit on the other side leads to the boss' arena. | |||
;Vehemoth Phosbat arena: | |||
The arena is quite large and open. [[Electrode]]s are scattered about the southeastern wall. To the southwest is a slightly raised ledge that also has an electrode. To the northeast is a small cliff and an incline, and to the northwest is a large battery on a raised platform, accessible with a bridge. There is an exit that leads into a path on the main area near the Dodge Whistle. | |||
;Yellow Pikmin cave: | |||
This is where Brittany crash lands on the first day on this area. The main portion of the cave is roughly circular and is where the [[Yellow Pikmin]] are first found. To the west is a small room with two halves of a [[Disguised Delicacy]] inside a [[crystal]], and to the east is an incline that leads further down. On this level, there is an exit, blocked off by stone bricks. A slide on the top level also leads here, and the [[iron ball]] on top of it is needed to clear the blockade. Finally, at the start, there is also a path to the Shaggy Long Legs's arena, but a leader can only get here if tosssed by another. | |||
;Spotty Bulbear cave: | |||
This cave is made up of two sections. The starting one has exits leading to the northwest of the main area and to the branch on Charlie's crash site. There are [[Pyroplasmic Slooch]]es, [[water]] puddles and [[fire geyser]]s, as well as a small gap that can be covered with open [[Bloominous Stemple]]s. | |||
A [[bamboo gate]] blocks the second portion. This dark room has a roaming [[Spotty Bulbear]] and an [[Astringent Clump]]. | |||
;Shaggy Long Legs's arena: | |||
The main entrance is through the Yellow Pikmin cave, but it is possible to access this sub-area through the east end of the river, underwater, although a [[bamboo gate]] needs to be lifted. This arena only has two parts: one bit of solid terrain, and one lake; the boss walks back and forth between the two. | |||
==Objects== | |||
===Fruit=== | |||
{{columns|2| | |||
*{{icon|Astringent Clump|y}} × 1 | |||
*{{icon|Citrus Lump|v=FF|y}} × 2 | |||
*{{icon|Cupid's Grenade|v=FF|y}} × 2 | |||
*{{icon|Face Wrinkler|y}} × 1 | |||
*{{icon|Dawn Pustules|y}} × 1 (20 pieces) | |||
*{{icon|Dapper Blob|y}} × 1 | |||
*{{icon|Disguised Delicacy|v=FF|y}} × 1 (2 halves) | |||
*{{icon|Dusk Pustules|y}} × 1 (20 pieces) | |||
*{{icon|Heroine's Tear|y}} × 1 | |||
*{{icon|Portable Sunset|y}} × 1 | |||
*{{icon|Stellar Extrusion|y}} × 1 (2 halves) | |||
*{{icon|Sunseed Berry|v=FF|y}} × 1 | |||
*{{icon|Velvety Dreamdrop|y}} × 1 | |||
*{{icon|Zest Bomb|y}} × 1 | |||
}} | |||
===Enemies=== | |||
{{columns|2| | |||
*{{icon|Arctic Cannon Larva|y}} × 3 | |||
*{{icon|Bearded Amprat|y}} × 2 | |||
*{{icon|Desiccated Skitter Leaf|y}} × 3 | |||
*{{icon|Dwarf Bulbear|v=P3|y}} × 10 | |||
*{{icon|Fiery Blowhog|v=P3|y}} × 3 | |||
*{{icon|Joustmite|y}} × 4 | |||
*{{icon|Phosbat|y}} × ∞ (As long as Phosbat Pod is active) | |||
*{{icon|Pyroclasmic Slooch|y}} × 4 | |||
*{{icon|Shaggy Long Legs|y}} – '''Mini-boss''' | |||
*{{icon|Skeeterskate|y}} × 3 | |||
*{{icon|Spotty Bulbear|v=P3|y}} × 1 | |||
*{{icon|Swooping Snitchbug|v=P3|y}} × 3 | |||
*{{icon|Vehemoth Phosbat|y}} – '''Boss''' | |||
*{{icon|Water Dumple|v=P3|y}} × 4 | |||
*{{icon|Whiptongue Bulborb|y}} × 1 | |||
*{{icon|Wogpole|v=P3|y}} × 5 | |||
}} | |||
===Plants and fungi=== | |||
{{todo|Get the exact amount of plants in the area.}} | {{todo|Get the exact amount of plants in the area.}} | ||
* | {{columns|2| | ||
*{{icon|Burgeoning Spiderwort|y}} × 2 | |||
* | *{{icon|Crimson Candypop Bud|y}} | ||
* | *{{icon|Flukeweed|y}} | ||
* | *{{icon|Golden Candypop Bud|y}} | ||
* | *{{icon|Pellet Posy|y}} | ||
* | *{{icon|Spotcap|y}} | ||
}} | |||
===Other=== | |||
* | *{{icon|Anti-Electrifier|y}} | ||
* | *{{icon|Dodge Whistle|y}} | ||
==Guide== | |||
{{guide}} | |||
== | ===Basic guide=== | ||
{{stub}} | |||
== | ===Speed completion=== | ||
{{stub}} | |||
==Quotes== | |||
{{stub}} | |||
==Pikmin drawings== | |||
{{main|Pikmin drawing}} | |||
{{spoiler section| | |||
<gallery> | |||
Distant Tundra drawing leaf.jpg|On the tin can near a [[Bouncy Mushroom]] and a [[Bearded Amprat]]. | |||
Distant Tundra drawing bud.jpg|Inside the [[tunnel]] on the landing site. | |||
Distant Tundra drawing flower.jpg|On one of the metal sheets surrounding the [[Bloominous Stemple]]s, on the cave with [[Pyroclasmic Slooch]]es. | |||
</gallery> | |||
|the secret drawings in the area|collapsed=y}} | |||
==Gallery== | ==Gallery== | ||
| Line 74: | Line 148: | ||
</gallery> | </gallery> | ||
{{see more|:Category:Distant Tundra images|l1=Distant Tundra images}} | |||
{{ | |||
Distant Tundra | |||
Distant Tundra | |||
==Trivia== | ==Trivia== | ||
*Part of this level's music is a remix of the music from the [[Valley of Repose]]. | [[File:Syacho.png|thumb|The original location of the Cupid's Grenade.]] | ||
*Part of [[Music in Pikmin 3#Distant Tundra|this level's music]] is a remix of the music from the [[Valley of Repose]]. | |||
*This location's continental shape is based on a more elevated Indonesia mixed with Asia. | *This location's continental shape is based on a more elevated Indonesia mixed with Asia. | ||
*This is the only area | *This is the only area in ''Pikmin 3'' where rain never falls. However, it sometimes snows in this area, also making it the only area where snow can fall. | ||
* | *The Cupid's Grenade near the sculpture of the President was originally going to be on top of it. | ||
{{clear}} | {{clear}} | ||
| Line 97: | Line 164: | ||
*[[Valley of Repose]] | *[[Valley of Repose]] | ||
{{P3 areas|ffeecc|772200|772200}} | {{P3 areas|ffeecc|772200|772200}} | ||
Revision as of 10:32, August 5, 2015
| Distant Tundra | |
|---|---|
| File:Distant Tundra Map.jpg | |
| Fruits | 16 |
| Pikmin available | Yellow |
| Requirements | Collect the Data Glutton |
| Music | Distant Tundra |
Distant Tundra is the third area in Pikmin 3. The overall layout of the level is a flat, snowy environment with small areas containing exposed grass and dirt. The level is divided by a small river that cuts through the middle. The landing site is near the river. Captain Charlie crash lands here, but is later rescued by Alph and Brittany. There are 16 fruits that can be found here.
Plot
After the crash in the epilogue, the scene goes to Captain Charlie, who landed on this area. The player takes control of him for a bit as he discovers Yellow Pikmin, but this section of the game stops when he enters a cave and defeats some Phosbats, as an unknown creature – later revealed to be the Vehemoth Phosbat – ambushes him.
Later on in the story, when Alph and Brittany first reunite, and when they land on the Distant Tundra for the first time, the S.S. Drake flies too low to the ground and hits a rock, accidentally ejecting Brittany into the cave below. In this cave, she discovers the Yellow Pikmin and their Onion. Upon using the new Yellow Pikmin to open an entry to the outside, she discovers that she and Alph are separated by a river, which must be overcome by two bridges, which each leader must help each other build. Until the player reunites the two leaders, Brittany will not be able to return to the Drake at the end of the day and will go unfed until reunited.
Eventually, the two explorers make it to the area in which Charlie had crash landed. Any obstacles that Charlie destroyed on the first day will not reappear. They make it into the cave in which he was captured, light it up, and the Vehemoth Phosbat retreats. They begin to fight the boss, and upon defeating it, rescue Charlie, unlocking him as a playable leader.
Overview
The Distant Tundra is a large wintery landscape, with most of the terrain covered in snow and ice. Its structure is quite complex, mostly due to the assortment of walls, ramps, twists and turns in the terrain. Regardless, most parts are quite open. In addition, there is a large amount of water throughout the stage. Because of the cold climate, many enemies that cannot be found in other areas are found here, such as the Bearded Amprat or the Arctic Cannon Larva.
Key sections
The main portion of the area is quite big, and is split in two due to the river that crosses the middle. On the following list, all but the first two sections refer to a different sub-area, meaning that there is a transition when they are entered or left.
- Southern half
The southern half of the main area is where the landing site is. The site is circular with an exit to the south, and a eastern ramp leading to the river's shoreline. From the south exit, there is a perpendicular path that splits in two when going east: one end dips down and leads to the shore, the other has a bridge that leads to higher ground, where the Dodge Whistle can be reached with a nearby Bouncy Mushroom.
On the aforementioned path split, when taking the dipping path, it's possible to go under the bridge on the other path, and enter a room with Pyroplasmic Slooches. This room is surrounded by high walls from other parts of the stage. To the east, there is a bit of terrain near the Dodge Whistle. Leaders and Pikmin can be thrown to the portion at the south of the room, which has a chain of Bouncy Mushrooms that in turn provide access to the western ledge. That ledge has a pathway that shrinks further down to the west until the Zest Bomb – the purpose is to make it harder to dodge the Arctic Cannon Larva's snowballs.
- Northern half
The center of this half of the area is a bit open, and leads to the river's shore on the west. This shore has a protrusion that points to a similar, smaller protrusion on the other side; this allows the leaders to swap Pikmin. From the center, there are two ways to reach the eastern portion: through a one-way slide in the middle or a curving long path to the north. This semi-open zone has a vase in the middle and a ledge to a slide that takes one back to the southern half of the area; a leader must be thrown by another to get here. A bit more to the east is a ledge with a Face Wrinkler.
The northwestern corner of the main area consists of three high steps. The first is crossed with a geyser, and the second can be overcome with another geyser or by taking the eastern path. Up at the top, there is an inlet of land at the north, with a tunnel blocked by an iron ball facing the south; one leader must throw another in order to get here. To the northwest of the topmost high step is a slide that goes all the way to the bottom.
To note is that the river cannot be crossed from one shore to the other right away, given that there are two underwater gates in the river itself blocking access.
- Charlie's crash site
This section starts at a dead end, and is mostly linear, with slight zigzagging. Midway through, it splits into two, with the northern exit leading to the Spotty Bulbear cave, but blocked off by a crystal, and the eastern path leading to the large wooden bridge.
- Large bridge
This large, wooden bridge provides a path between Charlie's crash site and the cave section that leads into the Vehemoth Phosbat's den. The camera in this sub-area faces to the side, and the only movement possible is two-dimensional.
- Vehemoth Phosbat arena access
This cave segment is mostly linear, but has a gap that can only be overcome with Bloominous Stemples. The exit on the other side leads to the boss' arena.
- Vehemoth Phosbat arena
The arena is quite large and open. Electrodes are scattered about the southeastern wall. To the southwest is a slightly raised ledge that also has an electrode. To the northeast is a small cliff and an incline, and to the northwest is a large battery on a raised platform, accessible with a bridge. There is an exit that leads into a path on the main area near the Dodge Whistle.
- Yellow Pikmin cave
This is where Brittany crash lands on the first day on this area. The main portion of the cave is roughly circular and is where the Yellow Pikmin are first found. To the west is a small room with two halves of a Disguised Delicacy inside a crystal, and to the east is an incline that leads further down. On this level, there is an exit, blocked off by stone bricks. A slide on the top level also leads here, and the iron ball on top of it is needed to clear the blockade. Finally, at the start, there is also a path to the Shaggy Long Legs's arena, but a leader can only get here if tosssed by another.
- Spotty Bulbear cave
This cave is made up of two sections. The starting one has exits leading to the northwest of the main area and to the branch on Charlie's crash site. There are Pyroplasmic Slooches, water puddles and fire geysers, as well as a small gap that can be covered with open Bloominous Stemples.
A bamboo gate blocks the second portion. This dark room has a roaming Spotty Bulbear and an Astringent Clump.
- Shaggy Long Legs's arena
The main entrance is through the Yellow Pikmin cave, but it is possible to access this sub-area through the east end of the river, underwater, although a bamboo gate needs to be lifted. This arena only has two parts: one bit of solid terrain, and one lake; the boss walks back and forth between the two.
Objects
Fruit
 Astringent Clump × 1
 Citrus Lump × 2
 Cupid's Grenade × 2
 Face Wrinkler × 1
 Dawn Pustules × 1 (20 pieces)
 Dapper Blob × 1
 Disguised Delicacy × 1 (2 halves)
 Dusk Pustules × 1 (20 pieces)
 Heroine's Tear × 1
 Portable Sunset × 1
 Stellar Extrusion × 1 (2 halves)
 Sunseed Berry × 1
 Velvety Dreamdrop × 1
 Zest Bomb × 1
Enemies
 Arctic Cannon Larva × 3
 Bearded Amprat × 2
 Desiccated Skitter Leaf × 3
 Dwarf Bulbear × 10
 Fiery Blowhog × 3
 Joustmite × 4
 Phosbat × ∞ (As long as Phosbat Pod is active)
 Pyroclasmic Slooch × 4
 Shaggy Long Legs – Mini-boss
 Skeeterskate × 3
 Spotty Bulbear × 1
 Swooping Snitchbug × 3
 Vehemoth Phosbat – Boss
 Water Dumple × 4
 Whiptongue Bulborb × 1
 Wogpole × 5
Plants and fungi
|
To do: Get the exact amount of plants in the area. |
Other
Guide
|
The following article or section contains guides. |
Basic guide
|
This article is a stub. You can help Pikipedia by expanding it. |
Speed completion
|
This article is a stub. You can help Pikipedia by expanding it. |
Quotes
|
This article is a stub. You can help Pikipedia by expanding it. |
Pikmin drawings
- Main article: Pikmin drawing.
|
Warning: the following text contains major spoilers about the secret drawings in the area.
|
|---|
|


Gallery
- Distant Tundra Map.jpg
A full map of the Distant Tundra.
An overview of an area containing many Spotcaps and a 5 Pellet Posy.
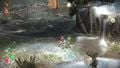
An area of the Distant Tundra.
- 640px-Ice Area.jpg
A Whiptongue Bulborb in a early version of the Distant Tundra (this Whiptongue Bulborb was moved to the top of the sloped area in the final version).
- ZlCfzR4zpSIwVJHV3a.jpg
Spatial view of Distant Tundra.
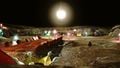
A high view of the Phosbat cave from the electric box.


- See more: [[::Category:Distant Tundra images|:Category:Distant Tundra images]].
Trivia

![[icon]](/index.php?title=Special:Upload&wpDestFile=Burgeoning_Spiderwort_icon.png)
- Part of this level's music is a remix of the music from the Valley of Repose.
- This location's continental shape is based on a more elevated Indonesia mixed with Asia.
- This is the only area in Pikmin 3 where rain never falls. However, it sometimes snows in this area, also making it the only area where snow can fall.
- The Cupid's Grenade near the sculpture of the President was originally going to be on top of it.
See also
| Pikmin 3 areas |
|---|
 Click an area on the image Tropical Wilds • Garden of Hope • Distant Tundra • Twilight River • Formidable Oak |