The Rustyard: Difference between revisions
(Mission Mode icon.) |
No edit summary |
||
| (16 intermediate revisions by 12 users not shown) | |||
| Line 1: | Line 1: | ||
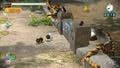
[[File:TheRustyardElectricHazard.jpeg|thumb|250px|Some Dusk Pustules in the level.]] | [[File:TheRustyardElectricHazard.jpeg|thumb|250px|Some Dusk Pustules in the level.]] | ||
'''The Rustyard''' is a | '''The Rustyard''' is a [[Mission Mode]] stage in {{p3}}. It is a small abandoned construction site, with various tools and electrical equipment scattered around, and is playable in the Collect Treasure! and Battle Enemies! modes. In the original ''Pikmin 3'', it was released as [[downloadable content]] on {{date|2|December|2013}}, while in {{p3d}}, it is part of the base game and can be unlocked in each of the 2 modes by completing the first 10 stages in that mode. | ||
{{stub|<br> | {{stub|<br> | ||
*Add an Overview and Key sections sections, like on the area article policy. | *Add an Overview and Key sections sections, like on the area article policy. | ||
*Add guides. | *Add guides. | ||
}} | }} | ||
| Line 12: | Line 10: | ||
{{infobox mission | {{infobox mission | ||
|map=RustyardCollectTreasureMap.jpg | |map=RustyardCollectTreasureMap.jpg | ||
|rock = 26 | |rock = {{tt|26|26 leaf}} | ||
|yellow = 27 | |yellow = {{tt|27|27 leaf}} | ||
|time = 7:00 | |time = 7:00 | ||
|bronze = 1100 | |bronze = 1100 | ||
|silver = | |silver = 1400 | ||
|gold = 1700 | |gold = 1700 | ||
|platinum = 1950 | |platinum = 1950 | ||
| Line 30: | Line 28: | ||
{{clear}} | {{clear}} | ||
===Objects=== | ===Objects=== | ||
;Leaders | |||
*{{icon|Alph|y|v=neutral}} (player 1's starting leader) | |||
*{{icon|Brittany|y|v=neutral}} (player 2's starting leader) | |||
;Starting Pikmin | ;Starting Pikmin | ||
{| class="wikitable sortable" | |||
! class="unsortable" | Icon | |||
!Type | |||
!Amount | |||
! class="unsortable" | Location(s) | |||
|- | |||
|[[File:Rock Pikmin P3 icon.png|32px]] | |||
|[[Rock Pikmin]] | |||
|26 | |||
|6 leaf Pikmin standing right of [[Brittany]].<br>6 leaf Pikmin standing under a lid.<br>6 leaf Pikmin standing inside an alcove.<br>8 leaf Pikmin standing at the center of the map. | |||
|- | |||
|[[File:Yellow Pikmin P3 icon.png|32px]] | |||
|[[Yellow Pikmin]] | |||
|27 | |||
|6 leaf Pikmin standing in a patch of grass right to the [[SPERO]].<br>5 leaf Pikmin standing in a patch of grass left to the SPERO.<br>3 leaf Pikmin standing behind a [[Face Wrinkler]] on a high edge.<br>5 leaf Pikmin standing inside an alcove.<br>8 leaf Pikmin standing after a small bridge. | |||
|} | |||
;Treasures | ;Treasures and Enemies | ||
{ | {| class="wikitable sortable" | ||
! class="unsortable" | Icon | |||
!Name | |||
!Amount | |||
!Value | |||
!Total value | |||
|- | |||
|[[File:Face Wrinkler icon.png|32px]] | |||
|[[Face Wrinkler]] | |||
|2 | |||
|[[File:Poko P3 icon.png|12px]] × 70 | |||
{{ | |[[File:Poko P3 icon.png|12px]] × 140 | ||
|- | |||
|[[File:Sunseed Berry FF icon.png|32px]] | |||
|[[Sunseed Berry]] | |||
|5 | |||
|[[File:Poko P3 icon.png|12px]] × 50 | |||
|[[File:Poko P3 icon.png|12px]] × 250 | |||
|- | |||
|[[File:Golden Sunseed icon.png|32px]] | |||
|[[Golden Sunseed]] | |||
|3 | |||
|[[File:Poko P3 icon.png|12px]] × 200 | |||
|[[File:Poko P3 icon.png|12px]] × 600 | |||
|- | |||
|[[File:Cupid's Grenade FF icon.png|32px]] | |||
|[[Cupid's Grenade]] | |||
|4 | |||
|[[File:Poko P3 icon.png|12px]] × 20 | |||
|[[File:Poko P3 icon.png|12px]] × 80 | |||
|- | |||
|[[File:Insect Condo FF icon.png|32px]] | |||
|[[Insect Condo]] | |||
|1 | |||
|[[File:Poko P3 icon.png|12px]] × 100 | |||
|[[File:Poko P3 icon.png|12px]] × 100 | |||
|- | |||
|[[File:Dapper Blob icon.png|32px]] | |||
|[[Dapper Blob]] | |||
|2 | |||
|[[File:Poko P3 icon.png|12px]] × 50 | |||
|[[File:Poko P3 icon.png|12px]] × 100 | |||
|- | |||
|[[File:Dusk Pustules icon.png|32px]] | |||
|[[Dusk Pustules]] | |||
|20 | |||
|[[File:Poko P3 icon.png|12px]] × 200 <small>(Whole fruit)</small><br>[[File:Poko P3 icon.png|12px]] × 10 <small>(Each part)</small> | |||
|[[File:Poko P3 icon.png|12px]] × 200 | |||
|- | |||
|[[File:Spirit BE enemy icon.png|32px]] | |||
|[[Enemy]] | |||
|1 <small>({{icon|Bearded Amprat|y}})</small><br>2 <small>({{icon|Dwarf Orange Bulborb|v=P3|y}})</small><br>2 <small>({{icon|Skutterchuck|y}})</small><br>1 <small>({{icon|Swooping Snitchbug|v=P3|y}})</small><br>2 <small>({{icon|Yellow Wollywog|v=P3|y}})</small> | |||
|[[File:Poko P3 icon.png|12px]] × 50 <small>([[Bearded Amprat]])</small><br>[[File:Poko P3 icon.png|12px]] × 15 <small>([[Dwarf Orange Bulborb]])</small><br>[[File:Poko P3 icon.png|12px]] × 5 <small>([[Skutterchuck]])</small><br>[[File:Poko P3 icon.png|12px]] × 30 <small>([[Swooping Snitchbug]])</small><br>[[File:Poko P3 icon.png|12px]] × 30 <small>([[Yellow Wollywog]])</small> | |||
|[[File:Poko P3 icon.png|12px]] × 180 | |||
|} | |||
;Obstacles | ;Obstacles | ||
{{columns|2| | {{columns|2| | ||
*{{icon|Electric gate|v=P3|y}} × 1 | *{{icon|Electric gate|v=P3|y}} × 1 | ||
*{{icon|Electrode|y}} × 1 | |||
*{{icon|Large crystal|y}} × 4 | |||
*{{icon|Reinforced wall|v=P3|y}} × 1 | *{{icon|Reinforced wall|v=P3|y}} × 1 | ||
*{{icon|Small crystal|y}} × 2 | *{{icon|Small crystal|y}} × 2 | ||
}} | }} | ||
;Tools | |||
*{{icon|Bridge|v=P3|y}} (Cyan) {{icon|fragment}} × 20 | |||
*{{icon|Geyser|y}} × 3 (two encased by small crystals) | |||
;Other | |||
*{{icon|Iridescent Flint Beetle|v=P3|y}} × 1 | |||
==Battle Enemies!== | ==Battle Enemies!== | ||
| Line 71: | Line 129: | ||
|be = y | |be = y | ||
|map = RustyardBattleEnemiesMap.jpg | |map = RustyardBattleEnemiesMap.jpg | ||
|rock = 10 | |rock = {{tt|10|5 flower, 5 leaf}} | ||
|blue = 10 | |blue = {{tt|10|10 flower}} | ||
|time = 6:00 | |time = 6:00 | ||
|bronze = 220 | |bronze = 220 | ||
|silver = | |silver = 260 | ||
|gold = 300 | |gold = 300 | ||
|platinum = 345 | |platinum = 345 | ||
| Line 91: | Line 149: | ||
{{clear}} | {{clear}} | ||
===Objects=== | ===Objects=== | ||
;Leaders | |||
*{{icon|Alph|y|v=neutral}} (player 1's starting leader) | |||
*{{icon|Brittany|y|v=neutral}} (player 2's starting leader) | |||
;Starting Pikmin | ;Starting Pikmin | ||
{| class="wikitable sortable" | |||
! class="unsortable" | Icon | |||
!Type | |||
!Amount | |||
! class="unsortable" | Location(s) | |||
|- | |||
|[[File:Rock Pikmin P3 icon.png|32px]] | |||
|[[Rock Pikmin]] | |||
|10 | |||
|5 flower Pikmin buried left of the [[Rock Onion]].<br>5 leaf Pikmin buried inside a small alcove. | |||
|- | |||
|[[File:Blue Pikmin P3 icon.png|32px]] | |||
|[[Blue Pikmin]] | |||
|10 | |||
|5 flower Pikmin buried left of the [[Blue Onion]].<br>5 flower Pikmin between a group of [[Shearwig]]s and a pair of [[Skutterchuck]]s. | |||
|} | |||
;Enemies | ;Enemies | ||
{ | {| class="wikitable sortable" | ||
! class="unsortable" | Icon | |||
!Name | |||
!Amount | |||
!Value | |||
!Total value | |||
|- | |||
|[[File:Shearwig P3 icon.png|32px]] | |||
|[[Shearwig]] | |||
|4 | |||
|[[File:Spirit BE enemy icon.png|12px]] × 5 | |||
|[[File:Spirit BE enemy icon.png|12px]] × 20 | |||
|- | |||
|[[File:Skutterchuck icon.png|32px]] | |||
|[[Skutterchuck]] | |||
|4 | |||
|[[File:Spirit BE enemy icon.png|12px]] × 5 | |||
|[[File:Spirit BE enemy icon.png|12px]] × 20 | |||
|- | |||
|[[File:Skeeterskate icon.png|32px]] | |||
|[[Skeeterskate]] | |||
|2 | |||
|[[File:Spirit BE enemy icon.png|12px]] × 5 | |||
|[[File:Spirit BE enemy icon.png|12px]] × 10 | |||
|- | |||
|[[File:Dwarf Orange Bulborb P3 icon.png|32px]] | |||
|[[Dwarf Orange Bulborb]] | |||
|3 | |||
|[[File:Spirit BE enemy icon.png|12px]] × 15 | |||
|[[File:Spirit BE enemy icon.png|12px]] × 45 | |||
|- | |||
|[[File:Medusal Slurker icon.png|32px]] | |||
|[[Medusal Slurker]] | |||
|2 | |||
|[[File:Spirit BE enemy icon.png|12px]] × 15 | |||
|[[File:Spirit BE enemy icon.png|12px]] × 30 | |||
|- | |||
|[[File:Toady Bloyster P3 icon.png|32px]] | |||
|[[Toady Bloyster]] | |||
|1 | |||
|[[File:Spirit BE enemy icon.png|12px]] × 50 | |||
|[[File:Spirit BE enemy icon.png|12px]] × 50 | |||
|- | |||
|[[File:Calcified Crushblat icon.png|32px]] | |||
|[[Calcified Crushblat]] | |||
|1 | |||
|[[File:Spirit BE enemy icon.png|12px]] × 70 | |||
|[[File:Spirit BE enemy icon.png|12px]] × 70 | |||
|- | |||
|[[File:Peckish Aristocrab icon.png|32px]] | |||
|[[Peckish Aristocrab]] | |||
|1 | |||
|[[File:Spirit BE enemy icon.png|12px]] × 100 | |||
|[[File:Spirit BE enemy icon.png|12px]] × 100 | |||
|} | |||
;Obstacles | ;Obstacles | ||
{{ | *{{icon|Crystal wall|y}} × 1 | ||
*{{icon|Dirt wall|y}} × 1 | *{{icon|Dirt wall|y}} × 1 | ||
*{{icon| | *{{icon|Large crystal|y}} × 2 (both contain 5 blue pellets) | ||
*{{icon|Small crystal|y}} × 1 | |||
;Tools | |||
*{{icon|Dirt mound|y}} × 1 | *{{icon|Dirt mound|y}} × 1 | ||
*{{icon|Geyser|y}} × 3 (one encased in a small crystal) | *{{icon|Geyser|y}} × 3 (one encased in a small crystal) | ||
==World records== | ==World records== | ||
{{world records | date = {{date|20|June|2016}} | cts = 8550 | ctc = 8970 | bes = 2745 | bec = 2635}} | {{world records | date = {{date|20|June|2016}} | cts = 8550 | ctc = 8970 | bes = 2745 | bec = 2635 | p3 = y}} | ||
{{world records | date = {{date|27|June|2022}} | cts = 9390 | ctc = 8820 | bes = 3175 | bec = 3205 | p3d = y}} | |||
== Gallery == | == Gallery == | ||
| Line 124: | Line 246: | ||
The Rustyard CT icon.png|Collect Treasure! icon. | The Rustyard CT icon.png|Collect Treasure! icon. | ||
The Rustyard BE icon.png|Battle Enemies! icon. | The Rustyard BE icon.png|Battle Enemies! icon. | ||
The Rustyard P3 fruit.jpg|An Insect Condo and Golden Sunseed from Collect Treasure! mode. | |||
TheRustyardRockShortcut.jpg|Rock Pikmin can be thrown up onto the ledge to give to Alph. | TheRustyardRockShortcut.jpg|Rock Pikmin can be thrown up onto the ledge to give to Alph. | ||
TheRustyardTrappedGeyser.jpg|A geyser blocked by a reinforced wall. | TheRustyardTrappedGeyser.jpg|A geyser blocked by a reinforced wall. | ||
| Line 130: | Line 252: | ||
Pikmin3 RustyardScene.png|Alph fighting a Peckish Aristocrab in Battle Enemies! Mode. | Pikmin3 RustyardScene.png|Alph fighting a Peckish Aristocrab in Battle Enemies! Mode. | ||
</gallery> | </gallery> | ||
==Trivia== | |||
*The Rustyard is the only stage in Collect Treasure! to contain no [[nugget]]s whatsoever. | |||
*This map bears resemblance to the [[Parched Brook]] stage in [[Bingo Battle]]. | |||
==Names in other languages== | ==Names in other languages== | ||
{{Foreignname | {{Foreignname | ||
|Jap=工事現場ドリーム | |||
|JapR=Kōji Genba Dorīmu | |||
|JapM=Work Zone Dream | |||
|Fra=Chantier des rêves | |Fra=Chantier des rêves | ||
|FraM=Construction site of dreams | |FraM=Construction site of dreams | ||
|Ita=Giungla cemento | |||
|ItaM=Cement jungle | |||
|SpaE=Jungla de Cemento | |SpaE=Jungla de Cemento | ||
|SpaEM=Cement Jungle | |SpaEM=Cement Jungle | ||
|Ger=Betonwüste | |Ger=Betonwüste | ||
|GerM=Concrete desert | |||
}} | }} | ||
{{DEFAULTSORT:Rustyard, The}} | |||
{{missions}} | {{missions}} | ||
[[Category:Downloadable content]] | [[Category:Downloadable content]] | ||
Latest revision as of 03:23, June 21, 2024

The Rustyard is a Mission Mode stage in Pikmin 3. It is a small abandoned construction site, with various tools and electrical equipment scattered around, and is playable in the Collect Treasure! and Battle Enemies! modes. In the original Pikmin 3, it was released as downloadable content on December 2nd, 2013, while in Pikmin 3 Deluxe, it is part of the base game and can be unlocked in each of the 2 modes by completing the first 10 stages in that mode.
|
This article is a stub. You can help Pikipedia by expanding it.
|
Collect Treasure![edit]
| The Rustyard Collect Treasure! | |||||||||
|---|---|---|---|---|---|---|---|---|---|

| |||||||||
| Starting Pikmin | |||||||||
| |||||||||
| Requirements | |||||||||
| |||||||||
| Time limit | 7:00 | ||||||||
| Music | Mission Mode (Levels 12-15) | ||||||||
Layout[edit]
Alph and Brittany begin on opposite "shores" of the area, Alph with the SPERO in the south and Brittany on the other side in the north. For Brittany, six idle Rock Pikmin are immediately visible, and six more are hiding under a metal plate to the north. East of Brittany's beginning area are two Dapper Blobs — one encased in crystal — and a Dwarf Orange Bulborb. Heading northwest from Brittany's starting point is a raised area with a Swooping Snitchbug, a path to Alph's side blocked by an electric gate, and furthest north a group of six Rock Pikmin in a traffic cone. Heading northeast from Brittany's starting point is a glove acting as a ramp to a raised area with a Bearded Amprat, which guards a crystal-bound Golden Sunseed and an Insect Condo. The northernmost path connecting these two corners of the map is lined with two Cupid's Grenades and a Sunseed Berry.
Heading south of Brittany's starting point leads down to a dried moat between the two sides of the area. It contains two Yellow Wollywogs which themselves contain 2 Sunseed Berries each. South of them is a blocked geyser leading up to Alph's ledge and a group of eight idle Rock Pikmin. Heading west leads to a small peninsula containing Dusk Pustules, blocked off by two wires creating an electric arc: only Yellow Pikmin can collect the Dusk Pustules. Heading back to the far east reveals another peninsula with an Iridescent Flint Beetle and a Face Wrinkler. Farthest east is a wood plank bridge to an alcoved group of eight Yellow Pikmin.
Meanwhile, Alph begins in a flat area with two groups of 5 Yellow Pikmin idling in clover patches. Immediately to his south is a crystal-blocked geyser that leads to the raised ground further south. To Alph's north is a ledge with one semicircular platform blocked by a reinforced wall. This platform contains a geyser that leads to a similar ledge on Brittany's side. Further to the east is an accessible raised area. North of here is an incomplete bridge to Brittany's side (specifically the arena with the Bearded Amprat) and a Cupid's Grenade. Heading south from here is a group of the remaining fragments for the bridge encased in crystal, and a raised path leading west. Following this path west leads first to a Dwarf Orange Bulborb, and three Yellow Pikmin and a Face Wrinkler above the southern wall (on a sewer lid). Continuing west there is a Cupid's Grenade, and then a corner arena with five Yellow Pikmin in a pipe, two Skutterchucks, and a dirt mound containing three bomb rocks. The inner ledge of this area contains a crystallized Golden Sunseed that blocks a drop back down to the SPERO. North of the arena is a metal bridge across the moat to Brittany's side — the path blocked on Brittany's end by an electric gate.
Objects[edit]
- Leaders
- Starting Pikmin
| Icon | Type | Amount | Location(s) |
|---|---|---|---|
| Rock Pikmin | 26 | 6 leaf Pikmin standing right of Brittany. 6 leaf Pikmin standing under a lid. 6 leaf Pikmin standing inside an alcove. 8 leaf Pikmin standing at the center of the map. | |
| Yellow Pikmin | 27 | 6 leaf Pikmin standing in a patch of grass right to the SPERO. 5 leaf Pikmin standing in a patch of grass left to the SPERO. 3 leaf Pikmin standing behind a Face Wrinkler on a high edge. 5 leaf Pikmin standing inside an alcove. 8 leaf Pikmin standing after a small bridge. |
- Treasures and Enemies
| Icon | Name | Amount | Value | Total value |
|---|---|---|---|---|
| Face Wrinkler | 2 | |||
| Sunseed Berry | 5 | |||
| Golden Sunseed | 3 | |||
| Cupid's Grenade | 4 | |||
| Insect Condo | 1 | |||
| Dapper Blob | 2 | |||
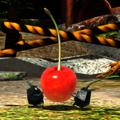
| Dusk Pustules | 20 | |||
| Enemy | 1 ( 2 ( 2 ( 1 ( 2 ( |
- Obstacles
 Electric gate × 1
 Electrode × 1
 Large crystal × 4
 Reinforced wall × 1
 Small crystal × 2
- Tools
- Other
Battle Enemies![edit]
| The Rustyard Battle Enemies! | |||||||||
|---|---|---|---|---|---|---|---|---|---|

| |||||||||
| Starting Pikmin | |||||||||
| |||||||||
| Requirements | |||||||||
| |||||||||
| Time limit | 6:00 | ||||||||
| Music | Mission Mode (Levels 12-15) | ||||||||
Layout[edit]
Once again the two leaders Brittany and Alph begin on opposite sides of the map, but this time, Alph is in the north and Brittany is in the south.. Alph begins by the Rock Onion on the wide northern platform. To the east on this platform are five Rock Pikmin sprouts and a dirt mound containing grey 1 pellets, and to the west there is a Dwarf Orange Bulborb. North of this platform is a raised ledge accessible from ramps on either side; the ledge contains, from west to east: two Skutterchucks, five more Rock Pikmin sprouts in a traffic cone, a Dwarf Orange Bulborb in the northernmost passageway, and two Medusal Slurkers in the eastern arena. South of the passageway are two options: an eastern geyser leading to the south shore (blocked by a crystal wall), or a western ramp leading into the moat.
The moat is completely waterlogged, and contains four enemies. Two Skeeterskates dart about the center of the map, a Peckish Aristocrab guards the ramp from the north, and an elusive Toady Bloyster and a blue 10 pellet rest in the far west, completely underwater.
Meanwhile, Brittany begins on the south landmass, in the widest platform with a Blue Onion. To her east are five Blue Pikmin sprouts and two crystals, one holding a blue 5 pellet (and blocking a ledge from further raised terrain) and one blocking a geyser leading to the southernmost raised terrain. To the west is another crystal containing a blue 5 pellet and a Dwarf Orange Bulborb, plus a northern ledge with a geyser leading to Alph's side — specifically to the semicircular platform blocked with a crystal gate. Continuing east on Brittany's side leads to 4 Shearwigs that guard a drop into the moat, and a path along the southernmost raised terrain. This path, from east to west, contains five more Blue Pikmin sprouts, two Dwarf Orange Bulborbs, and the southwest corner arena with a Calcified Crushblat. North of the Crushblat's arena is a half-demolished dirt wall, blocking the metal bridge that leads back to Alph's side.
Objects[edit]
- Leaders
- Starting Pikmin
| Icon | Type | Amount | Location(s) |
|---|---|---|---|
| Rock Pikmin | 10 | 5 flower Pikmin buried left of the Rock Onion. 5 leaf Pikmin buried inside a small alcove. | |
| Blue Pikmin | 10 | 5 flower Pikmin buried left of the Blue Onion. 5 flower Pikmin between a group of Shearwigs and a pair of Skutterchucks. |
- Enemies
| Icon | Name | Amount | Value | Total value |
|---|---|---|---|---|
| Shearwig | 4 | |||
| Skutterchuck | 4 | |||
| Skeeterskate | 2 | |||
| Dwarf Orange Bulborb | 3 | |||
| Medusal Slurker | 2 | |||
| Toady Bloyster | 1 | |||
| Calcified Crushblat | 1 | |||
| Peckish Aristocrab | 1 |
- Obstacles
 Crystal wall × 1
 Dirt wall × 1
- Large crystal × 2 (both contain 5 blue pellets)
- Small crystal × 1
- Tools
 Dirt mound × 1
 Geyser × 3 (one encased in a small crystal)
World records[edit]
In Pikmin 3, these are the world records for the challenge, as obtained from the in-game global rankings feature. The following scores were retrieved on June 20th, 2016. Since the in-game leaderboards have been compromised, it is impossible to obtain more up-to-date legitimate records from the game, though players may have obtained higher scores since.
- Collect Treasure!
- Solo:
 × 8550
 - Co-op: × 8970
- Solo:
- Battle Enemies!
- Solo:
 × 2745
 - Co-op: × 2635
- Solo:
In Pikmin 3 Deluxe, these are the world records for the challenge, as obtained from the in-game global rankings feature. The following scores were retrieved on June 27th, 2022.
- Collect Treasure!
- Solo: × 9390
- Co-op: × 8820
- Solo:
- Battle Enemies!
- Solo: × 3175
- Co-op: × 3205
- Solo:
Gallery[edit]
Collect Treasure! icon.
Battle Enemies! icon.
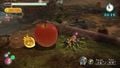
An Insect Condo and Golden Sunseed from Collect Treasure! mode.
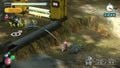
Rock Pikmin can be thrown up onto the ledge to give to Alph.
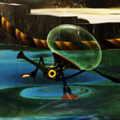
A geyser blocked by a reinforced wall.
Only Yellow Pikmin can safely reach the Dusk Pustules.
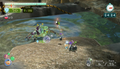
Alph fighting a Peckish Aristocrab in Battle Enemies! Mode.


Trivia[edit]
- The Rustyard is the only stage in Collect Treasure! to contain no nuggets whatsoever.
- This map bears resemblance to the Parched Brook stage in Bingo Battle.
Names in other languages[edit]
| Language | Name | Meaning |
|---|---|---|
| 工事現場ドリーム? Kōji Genba Dorīmu |
Work Zone Dream | |
| Chantier des rêves | Construction site of dreams | |
| Betonwüste | Concrete desert | |
| Giungla cemento | Cement jungle | |
| Jungla de Cemento | Cement Jungle |