101 Pikmin challenge: Difference between revisions
KawaiiKiwii (talk | contribs) (added better images and made them interactable) |
Marxo Grouch (talk | contribs) (→8 day run outline: Editing the maps to include only the caves to be explored and treasure to be collected on those specific days. Doing this to mirror the 50 Pikmin challenge page.) |
||
| (3 intermediate revisions by 3 users not shown) | |||
| Line 3: | Line 3: | ||
A '''101 Pikmin challenge''' is a [[challenge run]] where a player collects all [[treasure]]s in {{p2}} using only 101 [[Pikmin family|Pikmin]], the known minimum amount possible. This challenge contains [[Zero death challenge|no deaths]], and uses [[Candypop family|Candypop Buds]] to switch Pikmin types when necessary. 100 Purple Pikmin are needed to lift the [[Doomsday Apparatus]], plus one [[Red Pikmin]], to avoid an [[Pikmin extinction|extinction]]. Unlike the previous known minimum of 103, there is no need for one [[Yellow Pikmin|Yellow]] or [[Blue Pikmin]] because their Onions are never considered "discovered", although those Pikmin types are still obtained. This challenge can be completed in 8 days. | A '''101 Pikmin challenge''' is a [[challenge run]] where a player collects all [[treasure]]s in {{p2}} using only 101 [[Pikmin family|Pikmin]], the known minimum amount possible. This challenge contains [[Zero death challenge|no deaths]], and uses [[Candypop family|Candypop Buds]] to switch Pikmin types when necessary. 100 Purple Pikmin are needed to lift the [[Doomsday Apparatus]], plus one [[Red Pikmin]], to avoid an [[Pikmin extinction|extinction]]. Unlike the previous known minimum of 103, there is no need for one [[Yellow Pikmin|Yellow]] or [[Blue Pikmin]] because their Onions are never considered "discovered", although those Pikmin types are still obtained. This challenge can be completed in 8 days. | ||
103 Pikmin is the minimum number of Pikmin possible in a run that does not use any exploits. To simply repay the debt, 35 Pikmin is the minimum amount, given that it is possible to obtain money repeatedly from [[enemies]] defeated in [[cave]]s, but in order to reach the first cave, 35 Pikmin are needed for the [[ | 103 Pikmin is the minimum number of Pikmin possible in a run that does not use any exploits. To simply repay the debt, 35 Pikmin is the minimum amount, given that it is possible to obtain money repeatedly from [[enemies]] defeated in [[cave]]s, but in order to reach the first cave, 35 Pikmin are needed for the [[bag]] at the [[Valley of Repose]]. However, if one uses the Dwarf Bulborb clip and day 1 extinction [[Glitches in Pikmin 2|glitches]] to get to the Emergence Cave early, they can open the bag with as few as 5 Pikmin. This allows for the debt to be repaid with only five Pikmin. In theory, it would also be possible to repay the debt with only 2 Pikmin, however this would involve doing the Dwarf Bulborb clip hundreds of times, which is not humanely plausible. | ||
==General idea== | ==General idea== | ||
Normally, 103 Pikmin would be the minimum required amount. It is mandatory to grow 35 Pikmin in order to continue with the second [[day]], since there is a [[ | Normally, 103 Pikmin would be the minimum required amount. It is mandatory to grow 35 Pikmin in order to continue with the second [[day]], since there is a [[bag]] on the Valley of Repose that requires the weight of 35 Red Pikmin (the only available type at the time) before even the [[Emergence Cave]] can be discovered. From there, the player may use Candypop Buds from various [[cave]]s to change Pikmin types when needed. The task that requires the most amount of Pikmin is 100 [[Purple Pikmin]], which are needed to carry the [[Doomsday Apparatus]], meaning a total of 100 Pikmin is the minimum necessary, task-wise. By the time that treasure can be collected, Red, Yellow, and Blue Pikmin are already part of the player's arsenal, but because one cannot convert all Reds, Yellows, and Blues into Purples, since doing so would trigger a [[Pikmin extinction]], at least one of each of those three types must be alive, raising the total minimum to 103 (100 Purples + 3 of each basic color). | ||
However, the Pikmin extinction will only take effect if the respective type's [[Onion]] has been considered "discovered" by the game. If it hasn't, the Pikmin count for that type can reach 0 and no extinction will take place. The only way to do this is and still be able to use that Pikmin type is to convince the wild Pikmin to join [[Captain Olimar]]'s side without interfering with the Onions. This is only possible for the Yellow and Blue Pikmin, since Reds are obligatorily obtained the "proper" way on the first day. To do this, the player must use exploits to get to the wild Pikmin without triggering the usual discovery [[cutscene]]s, and then using the [[leader]]s and Pikmin at their disposal to drag an idle wild Pikmin towards a patch of [[nectar weed]], since wild Pikmin cannot be called to the group but can be pushed around. Once near, the Pikmin will begin working on the nectar weed, and at this point, the Pikmin still can't be used, but if it finishes the task, the game will change its status from "wild idle" to "friendly idle", meaning it can now be used by the leaders. | However, the Pikmin extinction will only take effect if the respective type's [[Onion]] has been considered "discovered" by the game. If it hasn't, the Pikmin count for that type can reach 0 and no extinction will take place. The only way to do this is and still be able to use that Pikmin type is to convince the wild Pikmin to join [[Captain Olimar]]'s side without interfering with the Onions. This is only possible for the Yellow and Blue Pikmin, since Reds are obligatorily obtained the "proper" way on the first day. To do this, the player must use exploits to get to the wild Pikmin without triggering the usual discovery [[cutscene]]s, and then using the [[leader]]s and Pikmin at their disposal to drag an idle wild Pikmin towards a patch of [[nectar weed]], since wild Pikmin cannot be called to the group but can be pushed around. Once near, the Pikmin will begin working on the nectar weed, and at this point, the Pikmin still can't be used, but if it finishes the task, the game will change its status from "wild idle" to "friendly idle", meaning it can now be used by the leaders. | ||
| Line 27: | Line 27: | ||
{{location map | width = 246 | height = 411 | align = right | image = VoR texture.png | bg = #111 | caption = Map of all treasure and caves, along with the location of the ship, in the Valley of Repose. | icons = | {{location map | width = 246 | height = 411 | align = right | image = VoR texture.png | bg = #111 | caption = Map of all treasure and caves, along with the location of the ship, in the Valley of Repose. | icons = | ||
{{map icon | Hocotate ship | 138 | 313 | bg=none}} | {{map icon | Hocotate ship | 138 | 313 | bg=none}} | ||
{{map icon | cave | 135 | 210 | {{map icon | cave | 135 | 210 | l=Emergence Cave}} | ||
{{map icon | Utter Scrap | 58 | 232 | bg = rgba(0,0,128,0.5)}} | {{map icon | Utter Scrap | 58 | 232 | bg = rgba(0,0,128,0.5)}} | ||
}} | }} | ||
| Line 43: | Line 35: | ||
* Enter and clear the [[Emergence Cave]] 3 times. | * Enter and clear the [[Emergence Cave]] 3 times. | ||
** Converting 29 Red Pikmin into [[Purple Pikmin]] on [[Emergence Cave#Sublevel 2|sublevel 2]]. This is done by not collecting the final treasure, as that ends the day, and plucking 10, 9, 10 Purple Pikmin in your 3 trips. | ** Converting 29 Red Pikmin into [[Purple Pikmin]] on [[Emergence Cave#Sublevel 2|sublevel 2]]. This is done by not collecting the final treasure, as that ends the day, and plucking 10, 9, 10 Purple Pikmin in your 3 trips. | ||
Pikmin count: 59 | Pikmin count: 59 | ||
| Line 58: | Line 49: | ||
{{location map | width = 242 | height = 334 | align = right | image = AW texture.png | bg = #111 | caption = Map of all treasure and caves, along with the location of the ship, in the Awakening Wood. | icons = | {{location map | width = 242 | height = 334 | align = right | image = AW texture.png | bg = #111 | caption = Map of all treasure and caves, along with the location of the ship, in the Awakening Wood. | icons = | ||
{{map icon | Hocotate ship | 165 | 208 | bg=none}} | {{map icon | Hocotate ship | 165 | 208 | bg=none}} | ||
{{map icon | cave | 54 | 113}} | {{map icon | cave | 54 | 113 | l=Hole of Beasts}} | ||
{{map icon | cave | 157 | 121}} | {{map icon | cave | 157 | 121 | l=White Flower Garden}} | ||
{{map icon | cave | 160 | 155}} | {{map icon | cave | 160 | 155 | l=Bulblax Kingdom}} | ||
{{map icon | cave | 91 | 324}} | {{map icon | cave | 91 | 324 | l=Snagret Hole}} | ||
{{map icon | Sunseed Berry | v=TH | 100 | 262 | bg = rgba(0,0,128,0.5)}} | {{map icon | Sunseed Berry | v=TH | 100 | 262 | bg = rgba(0,0,128,0.5)}} | ||
{{map icon | Chance Totem | 212 | 170| bg = rgba(0,0,128,0.5)}} | {{map icon | Chance Totem | 212 | 170| bg = rgba(0,0,128,0.5)}} | ||
| Line 67: | Line 58: | ||
{{map icon | Geographic Projection | 40 | 188 | bg = rgba(0,0,128,0.5)}} | {{map icon | Geographic Projection | 40 | 188 | bg = rgba(0,0,128,0.5)}} | ||
{{map icon | Healing Cask | 115 | 151 | bg = rgba(0,0,128,0.5)}} | {{map icon | Healing Cask | 115 | 151 | bg = rgba(0,0,128,0.5)}} | ||
{{map icon | Air Brake | 44 | 306 | bg = rgba(0,0,128,0.5)}} | {{map icon | Air Brake | 44 | 306 | bg = rgba(0,0,128,0.5)}} | ||
}} | }} | ||
| Line 96: | Line 86: | ||
{{location map | width = 272 | height = 428 | align = right | image = PP texture.png | bg = #111 | caption = Map of all treasure and caves, along with the location of the ship, in the Perplexing Pool. | icons = | {{location map | width = 272 | height = 428 | align = right | image = PP texture.png | bg = #111 | caption = Map of all treasure and caves, along with the location of the ship, in the Perplexing Pool. | icons = | ||
{{map icon | Hocotate ship | 139 | 305 | bg=none}} | {{map icon | Hocotate ship | 139 | 305 | bg=none}} | ||
{{map icon | cave | 76 | 226}} | {{map icon | cave | 76 | 226 | l=Citadel of Spiders}} | ||
{{map icon | cave | 109 | 98 | {{map icon | cave | 109 | 98 | l=Glutton's Kitchen}} | ||
{{map icon | Impediment Scourge | 164 | 194 | bg = rgba(0,0,128,0.5)}} | {{map icon | Impediment Scourge | 164 | 194 | bg = rgba(0,0,128,0.5)}} | ||
}} | }} | ||
| Line 130: | Line 112: | ||
{{location map | width = 242 | height = 334 | align = right | image = AW texture.png | bg = #111 | caption = Map of all treasure and caves, along with the location of the ship, in the Awakening Wood. | icons = | {{location map | width = 242 | height = 334 | align = right | image = AW texture.png | bg = #111 | caption = Map of all treasure and caves, along with the location of the ship, in the Awakening Wood. | icons = | ||
{{map icon | Hocotate ship | 165 | 208 | bg=none}} | {{map icon | Hocotate ship | 165 | 208 | bg=none}} | ||
{{map icon | cave | 91 | 324 | l=Snagret Hole}} | |||
{{map icon | cave | 91 | 324 | |||
{{map icon | Decorative Goo | 163 | 68 | bg = rgba(0,0,128,0.5)}} | {{map icon | Decorative Goo | 163 | 68 | bg = rgba(0,0,128,0.5)}} | ||
}} | }} | ||
* Open the gate to the Blue Pikmin and drag one of them, once it is idle, all the way to the patch of nectar weed near the landing site, to the southeast of the Pilgrim Bulb. Once it finishes, whistle them. | * Open the gate to the Blue Pikmin and drag one of them, once it is idle, all the way to the patch of nectar weed near the landing site, to the southeast of the Pilgrim Bulb. Once it finishes, whistle them. | ||
** Using [[ | ** Using [[ultra-bitter spray]] on the [[Wogpole]]s will help the group of wild Pikmin defeat them and leave them idle. | ||
* Enter the Snagret Hole, and on [[Snagret Hole#Sublevel 3|sublevel 3]], have a Swooping Snitchbug bury the Blue Pikmin, Just like the Yellow Pikmin. Pluck it and leave the cave. | * Enter the Snagret Hole, and on [[Snagret Hole#Sublevel 3|sublevel 3]], have a Swooping Snitchbug bury the Blue Pikmin, Just like the Yellow Pikmin. Pluck it and leave the cave. | ||
* Enter the Snagret Hole twice more and convert 70 Yellow Pikmin into 10 Purple, 30 White and 30 Blue Pikmin using the Candypop Buds on [[Snagret Hole#Sublevel 3|sublevels 2]], [[Snagret Hole#Sublevel 3|3]] [[Snagret Hole#Sublevel 3| and 6]]. | * Enter the Snagret Hole twice more and convert 70 Yellow Pikmin into 10 Purple, 30 White and 30 Blue Pikmin using the Candypop Buds on [[Snagret Hole#Sublevel 3|sublevels 2]], [[Snagret Hole#Sublevel 3|3]] [[Snagret Hole#Sublevel 3| and 6]]. | ||
| Line 164: | Line 137: | ||
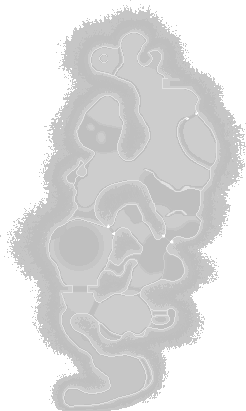
{{location map | width = 246 | height = 411 | align = right | image = VoR texture.png | bg = #111 | caption = Map of all treasure and caves, along with the location of the ship, in the Valley of Repose. | icons = | {{location map | width = 246 | height = 411 | align = right | image = VoR texture.png | bg = #111 | caption = Map of all treasure and caves, along with the location of the ship, in the Valley of Repose. | icons = | ||
{{map icon | Hocotate ship | 138 | 313 | bg=none}} | {{map icon | Hocotate ship | 138 | 313 | bg=none}} | ||
{{map icon | cave | 200 | 143 | l=Subterranean Complex}} | |||
{{map icon | cave | 200 | 143}} | {{map icon | cave | 103 | 58 | l=Frontier Cavern}} | ||
{{map icon | cave | 103 | 58 | |||
{{map icon | Fossilized Ursidae | 71 | 177 | bg = rgba(0,0,128,0.5)}} | {{map icon | Fossilized Ursidae | 71 | 177 | bg = rgba(0,0,128,0.5)}} | ||
{{map icon | Pink Menace | 118 | 269 | bg = rgba(0,0,128,0.5)}} | {{map icon | Pink Menace | 118 | 269 | bg = rgba(0,0,128,0.5)}} | ||
| Line 173: | Line 144: | ||
{{map icon | Temporal Mechanism | 109 | 102 | bg = rgba(0,0,128,0.5)}} | {{map icon | Temporal Mechanism | 109 | 102 | bg = rgba(0,0,128,0.5)}} | ||
{{map icon | Unspeakable Wonder | 144 | 57 | bg = rgba(0,0,128,0.5)}} | {{map icon | Unspeakable Wonder | 144 | 57 | bg = rgba(0,0,128,0.5)}} | ||
}} | }} | ||
| Line 196: | Line 166: | ||
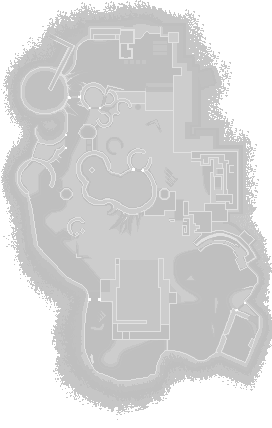
{{location map | width = 272 | height = 428 | align = right | image = PP texture.png | bg = #111 | caption = Map of all treasure and caves, along with the location of the ship, in the Perplexing Pool. | icons = | {{location map | width = 272 | height = 428 | align = right | image = PP texture.png | bg = #111 | caption = Map of all treasure and caves, along with the location of the ship, in the Perplexing Pool. | icons = | ||
{{map icon | Hocotate ship | 139 | 305 | bg=none}} | {{map icon | Hocotate ship | 139 | 305 | bg=none}} | ||
{{map icon | cave | 109 | 98 | l=Glutton's Kitchen}} | |||
{{map icon | cave | 109 | 98}} | {{map icon | cave | 239 | 339 | l=Shower Room}} | ||
{{map icon | cave | 239 | 339}} | {{map icon | cave | 160 | 48 | l=Submerged Castle}} | ||
{{map icon | cave | 160 | 48}} | |||
{{map icon | Gherkin Gate | 227 | 197 | bg = rgba(0,0,128,0.5)}} | {{map icon | Gherkin Gate | 227 | 197 | bg = rgba(0,0,128,0.5)}} | ||
{{map icon | Aquatic Mine | 214 | 271 | bg = rgba(0,0,128,0.5)}} | {{map icon | Aquatic Mine | 214 | 271 | bg = rgba(0,0,128,0.5)}} | ||
{{map icon | Fortified Delicacy | 211 | 347 | bg = rgba(0,0,128,0.5)}} | {{map icon | Fortified Delicacy | 211 | 347 | bg = rgba(0,0,128,0.5)}} | ||
| Line 231: | Line 199: | ||
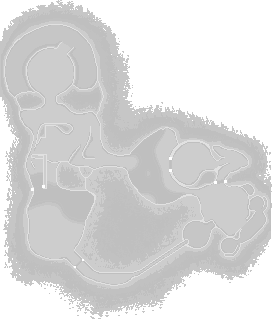
{{location map | width = 272 | height = 319 | align = right | image = WW texture.png | bg = #111 | caption = Location of the cave. | icons = | {{location map | width = 272 | height = 319 | align = right | image = WW texture.png | bg = #111 | caption = Location of the cave. | icons = | ||
{{map icon | Hocotate ship | 58 | 63 | bg=none}} | {{map icon | Hocotate ship | 58 | 63 | bg=none}} | ||
{{map icon | cave | 50 | 129}} | {{map icon | cave | 50 | 129 | l=Cavern of Chaos}} | ||
{{map icon | cave | 196 | 234}} | {{map icon | cave | 196 | 234 | l=Hole of Heroes}} | ||
{{map icon | cave | 238 | 160}} | {{map icon | cave | 238 | 160 | l=Dream Den}} | ||
{{map icon | Doomsday Apparatus | 26 | 118 | bg = rgba(0,0,128,0.5)}} | {{map icon | Doomsday Apparatus | 26 | 118 | bg = rgba(0,0,128,0.5)}} | ||
{{map icon | Seed of Greed | 211 | 165 | bg = rgba(0,0,128,0.5)}} | {{map icon | Seed of Greed | 211 | 165 | bg = rgba(0,0,128,0.5)}} | ||
Latest revision as of 21:08, October 28, 2023
A 101 Pikmin challenge is a challenge run where a player collects all treasures in Pikmin 2 using only 101 Pikmin, the known minimum amount possible. This challenge contains no deaths, and uses Candypop Buds to switch Pikmin types when necessary. 100 Purple Pikmin are needed to lift the Doomsday Apparatus, plus one Red Pikmin, to avoid an extinction. Unlike the previous known minimum of 103, there is no need for one Yellow or Blue Pikmin because their Onions are never considered "discovered", although those Pikmin types are still obtained. This challenge can be completed in 8 days.
103 Pikmin is the minimum number of Pikmin possible in a run that does not use any exploits. To simply repay the debt, 35 Pikmin is the minimum amount, given that it is possible to obtain money repeatedly from enemies defeated in caves, but in order to reach the first cave, 35 Pikmin are needed for the bag at the Valley of Repose. However, if one uses the Dwarf Bulborb clip and day 1 extinction glitches to get to the Emergence Cave early, they can open the bag with as few as 5 Pikmin. This allows for the debt to be repaid with only five Pikmin. In theory, it would also be possible to repay the debt with only 2 Pikmin, however this would involve doing the Dwarf Bulborb clip hundreds of times, which is not humanely plausible.
General idea[edit]
Normally, 103 Pikmin would be the minimum required amount. It is mandatory to grow 35 Pikmin in order to continue with the second day, since there is a bag on the Valley of Repose that requires the weight of 35 Red Pikmin (the only available type at the time) before even the Emergence Cave can be discovered. From there, the player may use Candypop Buds from various caves to change Pikmin types when needed. The task that requires the most amount of Pikmin is 100 Purple Pikmin, which are needed to carry the Doomsday Apparatus, meaning a total of 100 Pikmin is the minimum necessary, task-wise. By the time that treasure can be collected, Red, Yellow, and Blue Pikmin are already part of the player's arsenal, but because one cannot convert all Reds, Yellows, and Blues into Purples, since doing so would trigger a Pikmin extinction, at least one of each of those three types must be alive, raising the total minimum to 103 (100 Purples + 3 of each basic color).
However, the Pikmin extinction will only take effect if the respective type's Onion has been considered "discovered" by the game. If it hasn't, the Pikmin count for that type can reach 0 and no extinction will take place. The only way to do this is and still be able to use that Pikmin type is to convince the wild Pikmin to join Captain Olimar's side without interfering with the Onions. This is only possible for the Yellow and Blue Pikmin, since Reds are obligatorily obtained the "proper" way on the first day. To do this, the player must use exploits to get to the wild Pikmin without triggering the usual discovery cutscenes, and then using the leaders and Pikmin at their disposal to drag an idle wild Pikmin towards a patch of nectar weed, since wild Pikmin cannot be called to the group but can be pushed around. Once near, the Pikmin will begin working on the nectar weed, and at this point, the Pikmin still can't be used, but if it finishes the task, the game will change its status from "wild idle" to "friendly idle", meaning it can now be used by the leaders.
Still, it will be impossible to grow any more Pikmin of that type until that species is considered "discovered" by the game. This can happen when the first Pikmin seed of that type is plucked, meaning that a Swooping Snitchbug or Mamuta can be used to bury the lone Pikmin so that a leader may then pluck it out. From there on out, it is possible to use Yellow and Blue Pikmin like normal, but their Onion will never be considered "discovered" by the game, which will stop the Pikmin extinction checks from happening.
8 day run outline[edit]
|
The following article or section contains guides. |
The following is a brief outline of what needs to be done for an 8 day run, excluding day 1, which plays the same as any normal run.
Notes[edit]
- On day 1, you may want to wait for the Pikmin to grow flowers so that they will be more helpful in the next days.
- When entering a cave, try to obtain the most sprays you can, using the double sprays glitch, and if you want, restarting the game so that eggs give out sprays most of the time.
- You may unlock sprays at any time, but it is recommended to do so on day 3. There are carrying path oversights that allow you to reach the ultra-bitter berries in the Awakening Wood at this point in the game.
Day 2 - Valley of Repose[edit]
- Cultivate 59 Red Pikmin.
- Collect the Utter Scrap.
- Enter and clear the Emergence Cave 3 times.
- Converting 29 Red Pikmin into Purple Pikmin on sublevel 2. This is done by not collecting the final treasure, as that ends the day, and plucking 10, 9, 10 Purple Pikmin in your 3 trips.
Pikmin count: 59
- 30 Reds
- 29 Purples
- 0 Whites
- 0 Yellows
- 0 Blues
Day 3 - Awakening Wood[edit]

- Collect the Sunseed Berry.
- Enter and clear the White Flower Garden twice.
- Converting 29 Red and 1 Purple Pikmin into White Pikmin on sublevel 3.
- Enter and clear the Bulblax Kingdom using a carrying path oversight.
- Converting 5 Purple Pikmin into White Pikmin on sublevel 3.
- Enter and clear the Hole of Beasts.
- Collect the Geographic Projection, Chance Totem, Pilgrim Bulb, and Air Brake.
- Collect the Healing Cask (US) / Hypnotic Platter (Europe) / Seat of Enlightenment (Japan) by exploiting the high ledge glitch.
- Trigger the wild Blue Pikmin sighting cutscene by getting close to the electric gate.
- Enter and clear the Snagret Hole three times.
- Converting all 23 Purple Pikmin into White Pikmin on sublevels 3 and 6.
Pikmin count: 59
- 1 Reds
- 0 Purples
- 58 Whites
- 0 Yellows
- 0 Blues
Day 4 - Perplexing Pool[edit]
- Using a carrying path oversight, get to the wild Yellow Pikmin and push one into the nearby patch of nectar weed. Once it finishes, whistle them.
- Enter and clear the Citadel of Spiders.
- On sublevel 3, allow a Swooping Snitchbug to bury the Yellow Pikmin, and then Pluck it. This will cause a glitched version of the Yellow Pikmin introduction cutscene.
- Enter and clear the Glutton's Kitchen using a carrying path oversight.
- Enter a total of 10 times, converting 54 White Pikmin into 95 Yellow Pikmin. This can be done by using 49 White Pikmin in 10 Golden Candypop Buds and 5 White Pikmin in 5 Queen Candypop Buds. They can be found on sublevels 3 and 5 respectively.
- Collect the Impediment Scourge (US and Europe) / Lightning Bolt (Japan).
- Enter a cave and make sure that some Yellow Pikmin stay in the overworld. This will force them to go to the Onion, which will be forced to move into the landing site, in an activated/inactivated hybrid state.
Pikmin count: 59
- 1 Reds
- 0 Purples
- 4 Whites
- 95 Yellows
- 0 Blues
Day 5 - Awakening Wood[edit]
- Open the gate to the Blue Pikmin and drag one of them, once it is idle, all the way to the patch of nectar weed near the landing site, to the southeast of the Pilgrim Bulb. Once it finishes, whistle them.
- Using ultra-bitter spray on the Wogpoles will help the group of wild Pikmin defeat them and leave them idle.
- Enter the Snagret Hole, and on sublevel 3, have a Swooping Snitchbug bury the Blue Pikmin, Just like the Yellow Pikmin. Pluck it and leave the cave.
- Enter the Snagret Hole twice more and convert 70 Yellow Pikmin into 10 Purple, 30 White and 30 Blue Pikmin using the Candypop Buds on sublevels 2, 3 and 6.
- Do not use the Queen Candypop Buds.
- Collect the Decorative Goo.
- As with the Yellow Pikmin, enter a cave and make sure that some Blue Pikmin stay in the overworld. This will force them to go to the Onion, which will be forced to move into the landing site, in an activated/inactivated hybrid state.
Pikmin count: 101
- 1 Reds
- 10 Purples
- 34 Whites
- 25 Yellows
- 31 Blues
Day 6 - Valley of Repose[edit]
- Retrieve all but the 1 Red Pikmin from their respective Onion/Compartment.
- Collect the Fossilized Ursidae.
- Enter and clear the Frontier Cavern.
- Collect the Unspeakable Wonder, Pink Menace, Temporal Mechanism, and Spiny Alien Treat.
- Enter and clear the Subterranean Complex three times.
- Converting 31 White, 8 Yellow and 1 Blue Pikmin into 40 Purple Pikmin on sublevel 8.
Pikmin count: 101
- 1 Reds
- 50 Purples
- 3 Whites
- 17 Yellows
- 30 Blues
Day 7 - Perplexing Pool[edit]
- Collect the Onion Replica and Massage Girdle.
- Enter and clear the Submerged Castle.
- Converting 10 Blue Pikmin into Purple Pikmin on sublevel 5.
- Enter and clear the Shower Room.
- Converting 5 Blue Pikmin into Purple Pikmin on sublevel 5.
- Collect the Aquatic Mine, Fortified Delicacy, Gherkin Gate (US and Europe) / Idea Assistant (Japan), and the Optical Illustration (US) / Abstract Masterpiece (Europe) / Yell Battery (Japan).
- Enter the Shower Room once again and convert 5 Blue Pikmin into Purple Pikmin on sublevel 5.
- Enter the Glutton's Kitchen again and convert 2 Blue and 2 White Pikmin into Yellow Pikmin on sublevel 3.
Pikmin count: 101
- 1 Reds
- 70 Purples
- 1 Whites
- 21 Yellows
- 8 Blues
Day 8 - Wistful Wild[edit]
- Enter and clear the Cavern of Chaos.
- Converting 5 Blue Pikmin into 5 Purple Pikmin on sublevel 5.
- Collect the Conifer Spire, Seed of Greed, Anti-hiccup Fungus, and Armored Nut.
- Enter and clear both the Hole of Heroes and Dream Den.
- Due to the lack of Blue Pikmin, alignment of the Lesser Spotted Jellyfloat's corpse, on sublevel 10 of the Dream Den, is needed so that the Talisman of Life does not land in the water.
- Enter the Cavern of Chaos a further 5 times to convert the remaining 25 White, Yellow and Blue Pikmin into Purple Pikmin on sublevel 5.
- Using the 100 Purple Pikmin, collect the Doomsday Apparatus.
Pikmin count: 101
- 1 Reds
- 100 Purples
- 0 Whites
- 0 Yellows
- 0 Blues
See also[edit]
- Challenge run
- Zero death challenge
- 50 Pikmin challenge
- 42 Pikmin challenge
- Archived 103 Pikmin challenge page