Hole of Heroes
| Hole of Heroes | |
|---|---|

| |
| Location | Wistful Wild |
| Sublevels | 15 |
| Treasures | 13 |
| Hazards | |
|
The following article or section contains guides. |
The Hole of Heroes (百戦錬磨の穴?, lit.: "Hole of Veterans") is a cave in Pikmin 2, found in the Wistful Wild, the game's fourth and last area. It is the longest cave in the game with 15 sublevels but only 13 treasures, and of a difficulty comparable to the other Wistful Wild caves. The later sublevels are based around repeats of encounters with all the bosses from the previous areas in Pikmin 2 except the Giant Breadbug and the Waterwraith. The final boss is the Raging Long Legs. In the US version of this cave, there is ![]() × 2205 worth of treasure. In the European version, there is
× 2205 worth of treasure. In the European version, there is ![]() × 2235 worth of treasure. In the Japanese version, there is
× 2235 worth of treasure. In the Japanese version, there is ![]() × 2135 worth of treasure. Compared to the Cavern of Chaos and the Dream Den, the sublevel themes do not follow a particular order.
× 2135 worth of treasure. Compared to the Cavern of Chaos and the Dream Den, the sublevel themes do not follow a particular order.
How to reach[edit]
From the landing site, you should head forward. Destroy the gate guarded by the Hermit Crawmad, and remove the clog on that water. Use Yellow Pikmin to destroy the electric gate, and then go around the Conifer Spire and the Armored Cannon Beetle Larva to reach the cave.
All Pikmin types are relevant. Focus on Red and Purple Pikmin, as this dungeon focuses on combat above other elements. Also remember to bring a healthy amount of Blue Pikmin for the water-logged sublevel, and the two arachnorb rematches.
Notes
Ship's dialogs
“I am detecting the howls of countless creatures in the hole ahead. It is nearly deafening!
Sound analysis indicate a wide variety of creatures nesting here. It is a melting pot of life!
Mr. President, be extremely careful! Olimar, your job is to protect his life at all costs!”Sublevel 1[edit]
- Theme: Garden
- Music: Grass
- Treasures:
- Enemies:
 Cloaking Burrow-nit × 2
 Creeping Chrysanthemum × 2
 Dwarf Orange Bulborb × 4
 Female Sheargrub × 5
 Male Sheargrub × 5
 Mitite (group of 10) × 0 - 3 (from eggs)
 Shearwig × 5
 Skitter Leaf × 4
- Obstacles:
- None
- Vegetation:
- Others:
 Egg × 3
Whatever hopes you had of having a gentle first sublevel are ruined here. Creeping Chrysanthemums, Sheargrubs, Shearwigs, Skitter Leafs, and Cloaking Burrow-nits are littered across the scenic maze. Purple Pikmin are the best choice, but be weary of the Dwarf Orange Bulborbs that fall from the sky. Because of this, it is recommended you keep the camera zoomed out above you.
It's advised that you escort whatever loads your Pikmin are carrying back to the Research Pod. Aside from the Corpulent Nut, the only other items worth grabbing are nectar or sprays, so keep an eye out for eggs.
| Technical sublevel information | |||||
|---|---|---|---|---|---|
| Internal cave name | last_2 | ||||
| "Main" object maximum (?) | 23 | ||||
| "Treasure" object maximum (?) | 1 | ||||
| "Gate" object maximum (?) | 0 | ||||
| Dead end unit probability (?) | 1 | ||||
| Number of rooms (?) | 1 | ||||
| Corridor-to-room ratio (?) | 0 | ||||
| Escape geyser (?) | No | ||||
| Clogged hole (?) | No | ||||
| Cave units file (?) | 1_units_big2_kusachi.txt | ||||
| Lighting file (?) | hiroba_toy_light_cha.ini | ||||
| Background (?) | hiroba ( | ||||
| Cave units (?) | |||||
 |
 |
 |
 |
 |
|
| Dead end with item | Three-way crossing | Four-way crossing | Turning corridor | Corridor | Long corridor |
 |
|||||
| Room with 5 exits | |||||
| Detailed object list | ||||
|---|---|---|---|---|
| The game spawns these "main" objects: | ||||
| ID | Object | Amount | Fall method | Spawn location |
| 1 | 2 | None | "Special" enemy spots | |
| 2 | 2 | None | "Hard" enemy spots | |
| 3 | 2 | Falls from the sky | "Hard" enemy spots | |
| 4 | 5 | None | "Easy" enemy spots | |
| 5 | 5 | None | "Easy" enemy spots | |
| 6 | 5 | None | "Easy" enemy spots | |
| 8 | 2 | None | "Hard" enemy spots | |
| Then it spawns these "decoration" objects: | ||||
| ID | Object | Amount | Fall method | Spawn location |
| 7 | 4 | None | Plant spots | |
| 9 | 2 | None | Plant spots | |
| 10 | 2 | None | Plant spots | |
| Then it spawns these "treasure" objects: | ||||
| ID | Object | Amount | Fall method | Spawn location |
| 11 | 1 | None | Treasure spots | |
| Then it spawns these "dead end" objects: | ||||
| ID | Object | Amount | Fall method | Spawn location |
| 12 | 3 | None | Dead ends | |
| 13 | 2 | Falls from the sky | Dead ends | |
- For details on how objects are spawned, and how some may fail to spawn, see here.
Sublevel 2[edit]
- Theme: Concrete
- Music: Concrete 2
- Treasures:
 Essence of True Love (fully buried)
- Enemies:
 Anode Beetle × 6
 Antenna Beetle × 1
 Bumbling Snitchbug × 1
 Careening Dirigibug × 2
- Mitite (group of 10) × 0 - 3 (from eggs)
 Swooping Snitchbug × 2
- Obstacles:
 Bomb-rock × 2
- Vegetation:
- Others:
Both Bumbling Snitchbugs, and Swooping Snitchbugs live down here, along with Anode Beetles, some Careening Dirigibugs, and an Antenna Beetle. There are a lot of bug enemies here. If this isn't enough all together, bomb-rocks drop just like the Dwarf Bulborbs in the last sublevel. Take extreme caution and try to get all of the bombs down with a leader before bringing your troops in. The Essence of True Love is buried; dig it up with White Pikmin.
| Technical sublevel information | |||||
|---|---|---|---|---|---|
| Internal cave name | last_2 | ||||
| "Main" object maximum (?) | 12 | ||||
| "Treasure" object maximum (?) | 1 | ||||
| "Gate" object maximum (?) | 5 | ||||
| Dead end unit probability (?) | 80 | ||||
| Number of rooms (?) | 4 | ||||
| Corridor-to-room ratio (?) | 0 | ||||
| Escape geyser (?) | No | ||||
| Clogged hole (?) | No | ||||
| Cave units file (?) | 4_ABE_a_b_e_m_conc.txt | ||||
| Lighting file (?) | normal_light_lv1.ini | ||||
| Background (?) | None | ||||
| Cave units (?) | |||||
 |
 |
 |
 |
 | |
| Dead end with item | Three-way crossing | Four-way crossing | Long corridor | Dead end | Turning corridor |
 |
 |
 |
 |
 |
|
| Corridor | Room with 4 exits | Room with 4 exits | Room with 4 exits and C-shaped wall | Room with 5 exits and 2 walls | |
| Detailed object list | ||||
|---|---|---|---|---|
| The game spawns these "main" objects: | ||||
| ID | Object | Amount | Fall method | Spawn location |
| 1 | 1 | None | "Hard" enemy spots | |
| 2 | 2 | None | "Hard" enemy spots | |
| 3 | 2 | None | "Hard" enemy spots | |
| 4 | 1 | None | "Hard" enemy spots | |
| 5 | 6 | None | "Easy" enemy spots | |
| Then it spawns these "decoration" objects: | ||||
| ID | Object | Amount | Fall method | Spawn location |
| 6 | 4 | None | Plant spots | |
| 7 | 4 | None | Plant spots | |
| 8 | 2 | None | Plant spots | |
| Then it spawns these "treasure" objects: | ||||
| ID | Object | Amount | Fall method | Spawn location |
| 9 | 1 | None | Treasure spots | |
| Then it spawns these "dead end" objects: | ||||
| ID | Object | Amount | Fall method | Spawn location |
| 11 | 3 | None | Dead ends | |
| 12 | 2 | Falls from the sky | Dead ends | |
| Then it spawns 5 "gate" objects. Chances: | ||||
| ID | Object | Chance | Fall method | Spawn location |
| 10 | Gate (2,500 HP) | 100% | None | Gate spots |
- For details on how objects are spawned, and how some may fail to spawn, see here.
Sublevel 3[edit]
- Theme: Concrete
- Music: Concrete 3
- Treasures:
- Enemies:
 Fiery Blowhog × 2
 Puffy Blowhog × 1
 Volatile Dweevil × 5
 Watery Blowhog × 2
 Withering Blowhog × 2
- Obstacles:
- None
- Vegetation:
- Others:
Sublevel three is a maze of all species of the Blowhog family. Barriers make this place a pain, especially when there's a Withering Blowhog right on the other side. All of the Blowhogs can attack through the barriers, so be careful with the two earthbound types and do your best to keep the Withering Blowhogs from blowing away your Pikmin's flowers. You'll probably need flowered Pikmin for the next sublevel.
Volatile Dweevils still appear in this level, so be very careful. Try scouting across all the available terrain alone before moving on. Travel with your group while carrying the Love Sphere and the corpses, just in case. One mistake could be all it takes to ruin your chances of success. If you're lucky, a Dweevil may appear next to a Blowhog and do damage for you, making your job a little easier.
| Technical sublevel information | |||||
|---|---|---|---|---|---|
| Internal cave name | last_2 | ||||
| "Main" object maximum (?) | 10 | ||||
| "Treasure" object maximum (?) | 1 | ||||
| "Gate" object maximum (?) | 8 | ||||
| Dead end unit probability (?) | 100 | ||||
| Number of rooms (?) | 2 | ||||
| Corridor-to-room ratio (?) | 0.1 | ||||
| Escape geyser (?) | No | ||||
| Clogged hole (?) | No | ||||
| Cave units file (?) | 4_ABE_a_b_e_m_conc.txt | ||||
| Lighting file (?) | normal_light_lv2.ini | ||||
| Background (?) | None | ||||
| Cave units (?) | |||||
|
|
|
|
| |
| Dead end with item | Three-way crossing | Four-way crossing | Long corridor | Dead end | Turning corridor |
|
|
|
|
|
|
| Corridor | Room with 4 exits | Room with 4 exits | Room with 4 exits and C-shaped wall | Room with 5 exits and 2 walls | |
| Detailed object list | ||||
|---|---|---|---|---|
| The game spawns these "main" objects: | ||||
| ID | Object | Amount | Fall method | Spawn location |
| 1 | 2 | None | "Hard" enemy spots | |
| 2 | 2 | None | "Hard" enemy spots | |
| 3 | 1 | None | "Hard" enemy spots | |
| 4 | 3 | Falls from the sky | "Hard" enemy spots | |
| 5 | 2 | None | Cave unit seams | |
| Then it spawns these "decoration" objects: | ||||
| ID | Object | Amount | Fall method | Spawn location |
| 6 | 4 | None | Plant spots | |
| 7 | 4 | None | Plant spots | |
| Then it spawns these "treasure" objects: | ||||
| ID | Object | Amount | Fall method | Spawn location |
| 8 | 1 | None | Treasure spots | |
| Then it spawns these "dead end" objects: | ||||
| ID | Object | Amount | Fall method | Spawn location |
| 10 | 2 | Falls from the sky | Dead ends | |
| Then it spawns 8 "gate" objects. Chances: | ||||
| ID | Object | Chance | Fall method | Spawn location |
| 9 | Gate (2,500 HP) | 100% | None | Gate spots |
- For details on how objects are spawned, and how some may fail to spawn, see here.
Sublevel 4[edit]
- Theme: Concrete
- Music: Boss (only when combating)
- Treasures:
 Lustrous Element (inside Pileated Snagret)
- Enemies:
 Burrowing Snagret × 1
 Pileated Snagret × 1
- Obstacles:
- None
- Vegetation:
 Common Glowcap × 3
 Fiddlehead × 2
- Others:
- None
- See also: Burrowing Snagret strategy.
- See also: Pileated Snagret strategy.
Here is where you want flower Pikmin. It's the first boss return of the cave. There are two Snagrets, one Pileated Snagret and one Burrowing Snagret, and there's a sandy sinkhole in the middle of the arena that causes a huge issue when you find yourself retreating from the Pileated Snagret. Note that you do not have to kill both beasts, only the Pileated Snagret. Fight it for the Lustrous Element, but be careful not to walk into its burrowing partner. Locate both beasts if you must. You may want to use White Pikmin as a last resort.
| Technical sublevel information | |||||
|---|---|---|---|---|---|
| Internal cave name | last_2 | ||||
| "Main" object maximum (?) | 7 | ||||
| "Treasure" object maximum (?) | 0 | ||||
| "Gate" object maximum (?) | 0 | ||||
| Dead end unit probability (?) | 0 | ||||
| Number of rooms (?) | 1 | ||||
| Corridor-to-room ratio (?) | 0 | ||||
| Escape geyser (?) | No | ||||
| Clogged hole (?) | No | ||||
| Cave units file (?) | 1_MAT_manq_conc.txt | ||||
| Lighting file (?) | normal_light_lv3.ini | ||||
| Background (?) | None | ||||
| Cave units (?) | |||||
|
|
|
 |
 |
|
| Dead end with item | Three-way crossing | Four-way crossing | Turning corridor | Corridor | Long corridor |
 |
|||||
| Circular sandpit arena | |||||
| Detailed object list | ||||
|---|---|---|---|---|
| The game spawns these "main" objects: | ||||
| ID | Object | Amount | Fall method | Spawn location |
| 1 | 1 | None | "Hard" enemy spots | |
| - | Carried inside entry with ID 1 | |||
| 2 | 1 | None | "Easy" enemy spots | |
| 3 | 3 | None | Cave unit seams | |
| 4 | 2 | None | Cave unit seams | |
- For details on how objects are spawned, and how some may fail to spawn, see here.
Sublevel 5[edit]
- Theme: Concrete
- Music: Relax
- Treasures:
- None
- Enemies:
 Honeywisp × 7
 Iridescent Glint Beetle × 2
 Mamuta × 2
- Mitite (group of 10) × 0 - 7 (from Honeywisps)
 Unmarked Spectralids (group of 9) × 2
- Obstacles:
- None
- Vegetation:
 Queen Candypop Bud × 1
 Shoot (small) × 5
- Others:
- None
A treasureless rest level. There aren't any creatures here that can kill, and all four of them could even contribute to your squad. Mamutas pound your Pikmin into the ground, but give them flowers. Honeywisps and Unmarked Spectralids provide nectar or, if you're lucky, a spray. Iridescent Glint Beetles have the same results: 1st hit nectar, 2nd hit sprays.
If you have taken severe damage and feel you need to return to the surface, there's a geyser waiting for you here. There's also a Queen Candypop Bud and plenty of nectar just in case there's a couple of leaf or bud Pikmin among your flowered soldiers.
| Technical sublevel information | |||||
|---|---|---|---|---|---|
| Internal cave name | last_2 | ||||
| "Main" object maximum (?) | 14 | ||||
| "Treasure" object maximum (?) | 0 | ||||
| "Gate" object maximum (?) | 0 | ||||
| Dead end unit probability (?) | 0 | ||||
| Number of rooms (?) | 2 | ||||
| Corridor-to-room ratio (?) | 0 | ||||
| Escape geyser (?) | Yes | ||||
| Clogged hole (?) | No | ||||
| Cave units file (?) | 4_units_a_d_e_h_conc.txt | ||||
| Lighting file (?) | normal_light_lv4.ini | ||||
| Background (?) | None | ||||
| Cave units (?) | |||||
|
|
|
|
|
|
| Dead end with item | Three-way crossing | Four-way crossing | Turning corridor | Corridor | Long corridor |
|
 |
|
 |
||
| Room with 4 exits | Room with 4 exits | Room with 4 exits and C-shaped wall | Room with 2 exits and a raised edge | ||
| Detailed object list | ||||
|---|---|---|---|---|
| The game spawns these "main" objects: | ||||
| ID | Object | Amount | Fall method | Spawn location |
| 1 | 1 | None | "Hard" enemy spots | |
| 2 | 2 | None | "Hard" enemy spots | |
| 4 | 1 | None | "Easy" enemy spots | |
| 5 | 1 | None | "Easy" enemy spots | |
| 6 | 1 | None | "Easy" enemy spots | |
| 7 | 1 | None | "Easy" enemy spots | |
| Alongside it spawns 7 "main" objects. Chances: | ||||
| ID | Object | Chance | Fall method | Spawn location |
| 3 | 100% | None | "Hard" enemy spots | |
| Then it spawns these "decoration" objects: | ||||
| ID | Object | Amount | Fall method | Spawn location |
| 8 | 5 | None | Plant spots | |
- For details on how objects are spawned, and how some may fail to spawn, see here.
Sublevel 6[edit]

- Theme: Soil
- Music: Flooded Stump (exclusive to this sublevel)
- Treasures:
 Nutrient Silo (US) /
  Stringent Container (Europe/Japan)
- Enemies:
 Hermit Crawmad × 2
- Mitite (group of 10) × 0 - 2 (from eggs)
 Water Dumple × 3
 Wolpole × 6
 Wollyhop × 1
 Yellow Wollyhop × 2
- Obstacles:
- None
- Vegetation:
 Lapis Lazuli Candypop Bud × 2
- Shoot (large) × 2
- Shoot (small) × 3
- Others:
- Egg × 2
If your Blue Pikmin are low on numbers, there are some Candypop Buds here in your favor. You are going to need them if you want a safe journey across this place. Find a safe spot for your non-aquatic troops. That may involve some fighting for the territory; if not, all the better.
The enemies here prove to be chores, aside from the Wolpoles, but the creatures can be problematic if you're retreating or in a situation where you need all the room you can get without having to call off more soldiers. If you need to, Water Dumples don't take too long to kill with a leader. After collecting the Nutrient Silo (Stringent Container in the European version), get rid of the seal over the hole and jump in for your next boss fight.
This sublevel's layout only appears twice in the game, and its music is unique to this instance of the sublevel.
| Technical sublevel information | |||||
|---|---|---|---|---|---|
| Internal cave name | last_2 | ||||
| "Main" object maximum (?) | 8 | ||||
| "Treasure" object maximum (?) | 1 | ||||
| "Gate" object maximum (?) | 0 | ||||
| Dead end unit probability (?) | 0 | ||||
| Number of rooms (?) | 1 | ||||
| Corridor-to-room ratio (?) | 0 | ||||
| Escape geyser (?) | No | ||||
| Clogged hole (?) | Yes | ||||
| Cave units file (?) | 1_units_ike4_tsuchi.txt | ||||
| Lighting file (?) | normal_light_lv4.ini | ||||
| Background (?) | None | ||||
| Cave units (?) | |||||
 |
 |
 |
 |
 |
|
| Dead end with item | Three-way crossing | Four-way crossing | Turning corridor | Corridor | Long corridor |
 |
|||||
| Swamp with trunks | |||||
| Detailed object list | ||||
|---|---|---|---|---|
| The game spawns these "main" objects: | ||||
| ID | Object | Amount | Fall method | Spawn location |
| 1 | 1 | None | "Hard" enemy spots | |
| 2 | 1 | None | "Hard" enemy spots | |
| 3 | 1 | None | "Hard" enemy spots | |
| 4 | 2 | None | "Hard" enemy spots | |
| 5 | 3 | None | "Hard" enemy spots | |
| Then it spawns these "decoration" objects: | ||||
| ID | Object | Amount | Fall method | Spawn location |
| 6 | 6 | None | Plant spots | |
| 7 | 3 | None | Plant spots | |
| 8 | 2 | None | Plant spots | |
| Then it spawns these "treasure" objects: | ||||
| ID | Object | Amount | Fall method | Spawn location |
| 9 | 1 | None | Treasure spots | |
| Then it spawns these "dead end" objects: | ||||
| ID | Object | Amount | Fall method | Spawn location |
| 10 | 2 | None | Dead ends | |
| 11 | 2 | Falls from the sky | Dead ends | |
- For details on how objects are spawned, and how some may fail to spawn, see here.
Sublevel 7[edit]
- Theme: Tiles
- Music: Boss (only when combating)
- Treasures:
 Joyless Jewel (inside Ranging Bloyster)
- Enemies:
 Armored Cannon Beetle Larva (surface) × 2
 Decorated Cannon Beetle × 2
 Ranging Bloyster × 1
- Obstacles:
 Boulder × 6
- Vegetation:
- None
- Others:
- See also: Ranging Bloyster strategy.
This arena is roomy, and you'll find a Ranging Bloyster just waiting to feed. Get your Pikmin safe behind the hole or in a dead end, and defeat the Cannon Beetles with their own boulders. Otherwise, the Pikmin will be crushed to death. Then you can move to the big blob. Split into two teams, surround the beast, and alternate between leaders to get a good shot at the bulb on the monster's back. Again, you may want to feed it White Pikmin as a last resort. Soon enough, you'll get the Joyless Jewel as the prize.
The Ranging Bloyster can also be hit with a good squad of 20 Purple Pikmin on its sides and body, making it lose HP, and the strategy to split into teams more dangerous, but still effective.
| Technical sublevel information | |||||
|---|---|---|---|---|---|
| Internal cave name | last_2 | ||||
| "Main" object maximum (?) | 10 | ||||
| "Treasure" object maximum (?) | 0 | ||||
| "Gate" object maximum (?) | 5 | ||||
| Dead end unit probability (?) | 0 | ||||
| Number of rooms (?) | 1 | ||||
| Corridor-to-room ratio (?) | 0 | ||||
| Escape geyser (?) | No | ||||
| Clogged hole (?) | No | ||||
| Cave units file (?) | 1_MIYA_bunki_tile.txt | ||||
| Lighting file (?) | normal_light_lv4.ini | ||||
| Background (?) | None | ||||
| Cave units (?) | |||||
|
 |
 |
 |
|
|
| Dead end with item | Dead end with item | Three-way crossing | Four-way crossing | Turning corridor | Corridor |
 |
|||||
| Long corridor | Large square room with 5 exits | ||||
| Detailed object list | ||||
|---|---|---|---|---|
| The game spawns these "main" objects: | ||||
| ID | Object | Amount | Fall method | Spawn location |
| 2 | 2 | None | "Hard" enemy spots | |
| 3 | 2 | None | "Hard" enemy spots | |
| Alongside it spawns 6 "main" objects. Chances: | ||||
| ID | Object | Chance | Fall method | Spawn location |
| 4 | 100% | None | "Easy" enemy spots | |
| Then it spawns these "decoration" objects: | ||||
| ID | Object | Amount | Fall method | Spawn location |
| 1 | 1 | None | Plant spots | |
| - | Carried inside entry with ID 1 | |||
| Then it spawns 5 "gate" objects. Chances: | ||||
| ID | Object | Chance | Fall method | Spawn location |
| 5 | Gate (4,000 HP) | 100% | None | Gate spots |
- For details on how objects are spawned, and how some may fail to spawn, see here.
Sublevel 8[edit]
- Theme: Concrete
- Music: Relax
- Treasures:
- None
- Enemies:
- Obstacles:
- None
- Vegetation:
 Crimson Candypop Bud × 2
- Queen Candypop Bud × 1
- Shoot (small) × 5
- Others:
- None
Yet another rest level. You're more than halfway through, but you get another chance to go back to the surface here, along with Crimson Candypop Buds and a Queen Candypop Bud. If you've lost Pikmin, you can use that and the Bulbmin wandering down here. Be careful, aside from the Bulbmin, Doodlebugs may appear to endanger your soldiers. Lastly, there's a good chance to get nectar and sprays here. There's no treasure here.
| Technical sublevel information | |||||
|---|---|---|---|---|---|
| Internal cave name | last_2 | ||||
| "Main" object maximum (?) | 6 | ||||
| "Treasure" object maximum (?) | 0 | ||||
| "Gate" object maximum (?) | 0 | ||||
| Dead end unit probability (?) | 0 | ||||
| Number of rooms (?) | 3 | ||||
| Corridor-to-room ratio (?) | 0 | ||||
| Escape geyser (?) | Yes | ||||
| Clogged hole (?) | No | ||||
| Cave units file (?) | 4_units_a_d_e_h_conc.txt | ||||
| Lighting file (?) | normal_light_lv4.ini | ||||
| Background (?) | None | ||||
| Cave units (?) | |||||
|
|
|
|
|
|
| Dead end with item | Three-way crossing | Four-way crossing | Turning corridor | Corridor | Long corridor |
|
|
|
|
||
| Room with 4 exits | Room with 4 exits | Room with 4 exits and C-shaped wall | Room with 2 exits and a raised edge | ||
| Detailed object list | ||||
|---|---|---|---|---|
| The game spawns these "main" objects: | ||||
| ID | Object | Amount | Fall method | Spawn location |
| 1 | 1 | None | "Hard" enemy spots | |
| 2 | 2 | None | "Hard" enemy spots | |
| 3 | 1 | None | "Hard" enemy spots | |
| 4 | 1 | None | "Hard" enemy spots | |
| 5 | 1 | None | "Hard" enemy spots | |
| Then it spawns these "decoration" objects: | ||||
| ID | Object | Amount | Fall method | Spawn location |
| 6 | 5 | None | Plant spots | |
- For details on how objects are spawned, and how some may fail to spawn, see here.
Sublevel 9[edit]
- Theme: Tiles
- Music: Tile
- Treasures:
 Dimensional Slicer (US) /
  Patience Tester (Europe) /
  Flying Saucer (Japan) (inside Fiery Bulblax in all regions)
- Enemies:
 Dwarf Bulbear × 6
- Dwarf Orange Bulborb × 3
 Dwarf Red Bulborb × 3
 Fiery Bulblax × 1
 Hairy Bulborb × 1
 Orange Bulborb × 1
 Red Bulborb × 1
 Snow Bulborb × 3
 Spotty Bulbear × 1
- Obstacles:
- None
- Vegetation:
- None
- Others:
A Red, Hairy, and Orange Bulborb, a Spotty Bulbear with its young, and a Fiery Bulblax – in fact, every land breed of the Grub-dog family appears throughout the next 3 floors, besides the Bulbmin which were encountered the floor above. Some Breadbug mimics have also secured a very well defended habitat. The Fiery Bulblax has the Dimensional Slicer (Patience Tester in the European version), but since the rest of the bulborbs are in close proximity, it is highly likely that you will have to kill every enemy here.
A suggestion would be to knock down the gate leading to the main arena, run out with no Pikmin and hide behind a wall to attract the Spotty Bulbear's attention. While that is happening, you can switch leaders and kill the rest of the bulborbs, then leave. If the Bulbear is in an awkward position, use a spray (highly recommended, since juvenile Bulbears will be following) then leave. Though it is unlikely, it is possible for the ship to land in the main room when you enter the sublevel. This will undoubtedly lead to you having a tense start, especially if the Spotty Bulbear is near when you land. Should this happen, your best bet is to immediately spray it with an ultra-bitter spray (which you should have at least a few of from the previous sublevel) and attack it, or at least buy yourself time to think. Alternatively, reset the console in hopes you get a better layout.
If you are lucky, you can kill the Spotty Bulbear through the wall before the gate by punching, but you need to collect the corpse immediately. You can also punch the enemies on top of the sink part for a safe but long strategy. Remember to use Red Pikmin for the Fiery Bulblax. It should be noted that the wandering Spotty Bulbear can wake up the other sleeping beasts. However, as long as you and your troops are not nearby, they will simply go right back to sleep.
Another method is to break the gate, then go in with either leader, lure the Bulborbs into the hole, get out, and repeatedly punch them while they are stuck inside the hole. Remember to also kill all the Dwarfs (as carrying will be a nuisance with them) and the Fiery Bulblax. The Rocket Fist is recommended, and the Scorch Guard is necessary to punch the Fiery Bulblax.
| Technical sublevel information | |||||
|---|---|---|---|---|---|
| Internal cave name | last_2 | ||||
| "Main" object maximum (?) | 20 | ||||
| "Treasure" object maximum (?) | 0 | ||||
| "Gate" object maximum (?) | 3 | ||||
| Dead end unit probability (?) | 0 | ||||
| Number of rooms (?) | 2 | ||||
| Corridor-to-room ratio (?) | 0 | ||||
| Escape geyser (?) | No | ||||
| Clogged hole (?) | No | ||||
| Cave units file (?) | 2_units_ud_dry_tile.txt | ||||
| Lighting file (?) | normal_light_lv4.ini | ||||
| Background (?) | None | ||||
| Cave units (?) | |||||
|
|
|
|
| |
| Dead end with item | Three-way crossing | Four-way crossing | Long corridor | Dead end | Dead end |
|
|
 |
 |
||
| Turning corridor | Corridor | Room with 2 exits and 2 ramps | Room with a waterless pool | ||
| Detailed object list | ||||
|---|---|---|---|---|
| The game spawns these "main" objects: | ||||
| ID | Object | Amount | Fall method | Spawn location |
| 1 | 1 | None | "Hard" enemy spots | |
| - | Carried inside entry with ID 1 | |||
| 2 | 1 | None | "Hard" enemy spots | |
| 3 | 1 | None | "Hard" enemy spots | |
| 4 | 1 | None | "Hard" enemy spots | |
| 5 | 1 | None | "Hard" enemy spots | |
| 7 | 3 | None | "Easy" enemy spots | |
| 8 | 3 | None | "Easy" enemy spots | |
| 9 | 3 | None | "Easy" enemy spots | |
| Alongside it spawns 6 "main" objects. Chances: | ||||
| ID | Object | Chance | Fall method | Spawn location |
| 6 | 100% | None | "Hard" enemy spots | |
| Then it spawns 3 "gate" objects. Chances: | ||||
| ID | Object | Chance | Fall method | Spawn location |
| 10 | Gate (2,500 HP) | 100% | None | Gate spots |
- For details on how objects are spawned, and how some may fail to spawn, see here.
Sublevel 10[edit]
- Theme: Soil
- Music: Boss (only when combating)
- Treasures:
 Treasured Gyro Block (inside Emperor Bulblax)
- Enemies:
 Emperor Bulblax × 2
- Mitite (group of 10) × 2 (from the ground)
- Obstacles:
 Poison emitter × 3
- Vegetation:
- Common Glowcap × 7
- Others:
- None
- See also: Emperor Bulblax strategy.
Relive another boss battle as the montage of the bulborb family continues, this time with the previous game's final boss: not one, but two Emperor Bulblaxes. These two aren't nearly as big, but they're still deadly. If you're going to scout for nectar and sprays before to attack them, it's okay, but be warned that Mitites may show up.
Just like with the two Snagrets, only one of these bulblaxes holds a treasure: the Treasured Gyro Block. Purple Pikmin should be used to make the battle easier. If you have the treasure gauge, find the right Bulblax when it's blinking. Again, if you are low on purples, you can sacrifice some whites.
| Technical sublevel information | |||||
|---|---|---|---|---|---|
| Internal cave name | last_2 | ||||
| "Main" object maximum (?) | 7 | ||||
| "Treasure" object maximum (?) | 0 | ||||
| "Gate" object maximum (?) | 0 | ||||
| Dead end unit probability (?) | 100 | ||||
| Number of rooms (?) | 2 | ||||
| Corridor-to-room ratio (?) | 0 | ||||
| Escape geyser (?) | No | ||||
| Clogged hole (?) | No | ||||
| Cave units file (?) | 2_ABE_blk_cent2_tsuchi.txt | ||||
| Lighting file (?) | normal_light_lv4.ini | ||||
| Background (?) | None | ||||
| Cave units (?) | |||||
 |
|
|
|
|
|
| Dead end | Dead end with item | Three-way crossing | Four-way crossing | Turning corridor | Corridor |
 |
 |
||||
| Long corridor | Circular room with 4 exits | Room with hole in wall | |||
| Detailed object list | ||||
|---|---|---|---|---|
| The game spawns these "main" objects: | ||||
| ID | Object | Amount | Fall method | Spawn location |
| 1 | 1 | None | "Hard" enemy spots | |
| - | Carried inside entry with ID 1 | |||
| 2 | 1 | None | "Hard" enemy spots | |
| 3 | 1 | None | "Easy" enemy spots | |
| 4 | 1 | None | "Easy" enemy spots | |
| 5 | 3 | None | Cave unit seams | |
| Then it spawns these "decoration" objects: | ||||
| ID | Object | Amount | Fall method | Spawn location |
| 6 | 7 | None | Plant spots | |
- For details on how objects are spawned, and how some may fail to spawn, see here.
Sublevel 11[edit]
- Theme: Soil
- Music: Boss (only when combating)
- Treasures:
 Favorite Gyro Block (inside Empress Bulblax)
- Enemies:
 Bulborb Larva × indefinite amount (created by the Empress Bulblax)
 Empress Bulblax × 1
- Obstacles:
- Boulder × indefinite amount (created by the Empress Bulblax, when rolling)
- Vegetation:
- Common Glowcap × 6
- Others:
- See also: Empress Bulblax strategy.
The grub-dog montage reaches a climax as an Empress Bulblax is the last in the family to defeat. You start at its rear, where the babies come out. The Bulborb larvae will be an instant trouble. Keep your Pikmin away from them. They can eat your Pikmin lightning fast. Get rid of them all before meeting the Empress and going after the treasure it somehow swallowed.
You are able to petrify it, but you must spray it from the sides; attempting to spray its behind or face will not work. Attack with Purples if you can. If not, Red Pikmin may do just as well, but any Pikmin can do the job. Be careful when dealing with the beast and make sure you know what you're going to do about the offspring when they arrive, if they have time to.
Take cover when it starts to roll from side to side. The ceiling conveniently comes down very close to where you stand. A safe place is behind the hole, so find time to break down the gate. If you push all of your Pikmin against a wall, the boulders won't usually hit you. At the end of the fight, feel free to search for any nectars that were dropped by the larva. If you're having trouble trying to get to the Empress Bulblax's head, have one leader move a little when there's no Larvae and the other punch each baby. This is also a good place to add the Common Glowcap to your Piklopedia if you haven't already.
| Technical sublevel information | |||||
|---|---|---|---|---|---|
| Internal cave name | last_2 | ||||
| "Main" object maximum (?) | 1 | ||||
| "Treasure" object maximum (?) | 0 | ||||
| "Gate" object maximum (?) | 1 | ||||
| Dead end unit probability (?) | 0 | ||||
| Number of rooms (?) | 1 | ||||
| Corridor-to-room ratio (?) | 0 | ||||
| Escape geyser (?) | No | ||||
| Clogged hole (?) | No | ||||
| Cave units file (?) | 1_units_queen_c_tsuchi.txt | ||||
| Lighting file (?) | qchap_light.ini | ||||
| Background (?) | None | ||||
| Cave units (?) | |||||
|
|
|
|
|
|
| Dead end with item | Three-way crossing | Four-way crossing | Turning corridor | Corridor | Long corridor |
| Empress Bulblax arena | |||||
| Detailed object list | ||||
|---|---|---|---|---|
| The game spawns these "main" objects: | ||||
| ID | Object | Amount | Fall method | Spawn location |
| 1 | 1 | None | "Hard" enemy spots | |
| - | Carried inside entry with ID 1 | |||
| Then it spawns these "decoration" objects: | ||||
| ID | Object | Amount | Fall method | Spawn location |
| 2 | 6 | None | Plant spots | |
| Then it spawns 1 "gate" objects. Chances: | ||||
| ID | Object | Chance | Fall method | Spawn location |
| 3 | Gate (2,500 HP) | 100% | None | Gate spots |
- For details on how objects are spawned, and how some may fail to spawn, see here.
Sublevel 12[edit]
- Theme: Metal
- Music: Relax
- Treasures:
 Lost Gyro Block (inside Iridescent Glint Beetle)
- Enemies:
 Doodlebug × 1
 Iridescent Flint Beetle × 1
- Iridescent Glint Beetle × 1
- Mitite (group of 10) × 0 - 2 (from eggs)
- Obstacles:
- None
- Vegetation:
 Glowstem (green) × 3
- Glowstem (red) × 3
- Queen Candypop Bud × 1
- Others:
- Egg × 2
You had the last geyser exit four sublevels ago, and here's your last exit before moving onward to the last three sublevels of the cave. You should use Bulbmin, if you have any on the Queen Candypop Bud.
Be careful with the Doodlebug somewhere here, but feel free to attack the other two Iridescent Beetles. The Glint one has a treasure, so keep searching until you catch it. Then you can progress to the last three sublevels of the cave, treating you to a montage of the Arachnorb family.
| Technical sublevel information | |||||
|---|---|---|---|---|---|
| Internal cave name | last_2 | ||||
| "Main" object maximum (?) | 4 | ||||
| "Treasure" object maximum (?) | 0 | ||||
| "Gate" object maximum (?) | 0 | ||||
| Dead end unit probability (?) | 80 | ||||
| Number of rooms (?) | 3 | ||||
| Corridor-to-room ratio (?) | 0 | ||||
| Escape geyser (?) | Yes | ||||
| Clogged hole (?) | No | ||||
| Cave units file (?) | 2_ABE_nor1_cen2_metal.txt | ||||
| Lighting file (?) | metal_light_lv4.ini | ||||
| Background (?) | test ( | ||||
| Cave units (?) | |||||
 |
 |
 |
 |
 |
|
| Dead end with item | Three-way crossing | Four-way crossing | Turning corridor | Corridor | Long corridor |
 |
 |
||||
| Circular room with 1 exit | Circular room with 4 exits | ||||
| Detailed object list | ||||
|---|---|---|---|---|
| The game spawns these "main" objects: | ||||
| ID | Object | Amount | Fall method | Spawn location |
| 1 | 1 | None | "Hard" enemy spots | |
| - | Carried inside entry with ID 1 | |||
| 2 | 1 | None | "Hard" enemy spots | |
| 3 | 1 | None | "Hard" enemy spots | |
| 4 | 1 | None | "Hard" enemy spots | |
| Then it spawns these "decoration" objects: | ||||
| ID | Object | Amount | Fall method | Spawn location |
| 5 | 3 | None | Plant spots | |
| 6 | 3 | None | Plant spots | |
| Then it spawns these "dead end" objects: | ||||
| ID | Object | Amount | Fall method | Spawn location |
| 7 | 2 | None | Dead ends | |
- For details on how objects are spawned, and how some may fail to spawn, see here.
Sublevel 13[edit]
- Theme: Metal
- Music: Boss (only when combating)
- Treasures:
 Memorable Gyro Block (inside Man-at-Legs)
- Enemies:
 Man-at-Legs × 1
- Obstacles:
- None
- Vegetation:
- None
- Others:
- None
- See also: Man-at-Legs strategy.
The Hole of Heroes holds a few final surprises for you, as it's time to visit the Arachnorbs' dwellings.
The spider awaits in the middle of a moat of water, so take all the Blue Pikmin with you, assuming they survived sublevel six. Best of luck in this fight, and take shelter behind the metal walls and bumps littered around here. It is recommended to use both sprays to defeat this boss. Collect the Memorable Gyro Block and move on.
| Technical sublevel information | |||||
|---|---|---|---|---|---|
| Internal cave name | last_2 | ||||
| "Main" object maximum (?) | 1 | ||||
| "Treasure" object maximum (?) | 0 | ||||
| "Gate" object maximum (?) | 0 | ||||
| Dead end unit probability (?) | 0 | ||||
| Number of rooms (?) | 1 | ||||
| Corridor-to-room ratio (?) | 0 | ||||
| Escape geyser (?) | No | ||||
| Clogged hole (?) | No | ||||
| Cave units file (?) | 1_units_houdai2_metal.txt | ||||
| Lighting file (?) | metal_light_lv4.ini | ||||
| Background (?) | test ( | ||||
| Cave units (?) | |||||
|
|
|
|
|
|
| Dead end with item | Three-way crossing | Four-way crossing | Turning corridor | Corridor | Long corridor |
 |
|||||
| Man-at-Legs arena | |||||
| Detailed object list | ||||
|---|---|---|---|---|
| The game spawns these "main" objects: | ||||
| ID | Object | Amount | Fall method | Spawn location |
| 1 | 1 | None | "Hard" enemy spots | |
| - | Carried inside entry with ID 1 | |||
- For details on how objects are spawned, and how some may fail to spawn, see here.
Sublevel 14[edit]

- Theme: Soil
- Music: Boss (only when combating)
- Treasures:
 Fond Gyro Block (inside Beady Long Legs)
- Enemies:
 Anode Dweevil × 2
 Beady Long Legs × 1
 Fiery Dweevil × 3
 Hydro Dweevil × 2
 Munge Dweevil × 3
- Obstacles:
- None
- Vegetation:
- Others:
- None
- See also: Beady Long Legs strategy.
Sublevel 14 is the second-to-last level in this extensive cave, and the creatures here are obviously trying to hint at something. But regardless, deal with all of the Dweevils here before tackling the Beady Long Legs, who's the original inspiration for the boss you just battled, and the one you're about to.
It doesn't matter which type of Pikmin you use against it, but be wary of the water that lies around here. Yellow Pikmin are recommended for best results because they can be thrown high. Throwing Purple Pikmin at its feet is also effective. When and if you finally win, gather the last member of the Gyro Block family before moving onto the final battle the Hole of Heroes has to offer.
The Gyro Block may fall into the water once you and your troops have defeated the Beady Long Legs. Should this happen, you will have to retrieve it with Blue Pikmin. If you do not have enough Blue Pikmin or Bulbmin to carry it, you can potentially lure any remaining Dweevil (which will try to take it for itself like always) and try to get it onto the sand, where you and your non-Blue Pikmin can ambush it and take the treasure back.
| Technical sublevel information | |||||
|---|---|---|---|---|---|
| Internal cave name | last_2 | ||||
| "Main" object maximum (?) | 11 | ||||
| "Treasure" object maximum (?) | 0 | ||||
| "Gate" object maximum (?) | 0 | ||||
| Dead end unit probability (?) | 0 | ||||
| Number of rooms (?) | 1 | ||||
| Corridor-to-room ratio (?) | 0 | ||||
| Escape geyser (?) | No | ||||
| Clogged hole (?) | No | ||||
| Cave units file (?) | 1_units_king_tsuchi.txt | ||||
| Lighting file (?) | normal_light_lv4.ini | ||||
| Background (?) | None | ||||
| Cave units (?) | |||||
|
|
|
|
|
|
| Dead end | Three-way crossing | Four-way crossing | Turning corridor | Corridor | Long corridor |
 |
|||||
| Swamp room | |||||
| Detailed object list | ||||
|---|---|---|---|---|
| The game spawns these "main" objects: | ||||
| ID | Object | Amount | Fall method | Spawn location |
| 1 | 1 | None | "Hard" enemy spots | |
| - | Carried inside entry with ID 1 | |||
| 2 | 1 | None | "Hard" enemy spots | |
| 3 | 1 | None | "Hard" enemy spots | |
| 4 | 1 | None | "Easy" enemy spots | |
| 5 | 1 | None | "Easy" enemy spots | |
| 6 | 1 | None | "Easy" enemy spots | |
| 7 | 1 | None | "Easy" enemy spots | |
| 8 | 1 | None | "Easy" enemy spots | |
| 9 | 1 | None | "Easy" enemy spots | |
| 10 | 1 | None | "Easy" enemy spots | |
| 11 | 1 | None | "Easy" enemy spots | |
| Then it spawns these "decoration" objects: | ||||
| ID | Object | Amount | Fall method | Spawn location |
| 12 | 4 | None | Plant spots | |
| 13 | 4 | None | Plant spots | |
- For details on how objects are spawned, and how some may fail to spawn, see here.
Sublevel 15[edit]
- Theme: Concrete
- Music: Boss (only when combating)
- Treasures:
 Remembered Old Buddy (inside Raging Long Legs)
- Enemies:
 Greater Spotted Jellyfloat × 2
 Lesser Spotted Jellyfloat × 2
- Mitite (group of 10) × indefinite amount (from eggs and inside the Raging Long Legs)
 Raging Long Legs × 1
- Obstacles:
- None
- Vegetation:
- None
- Others:
- See also: Raging Long Legs strategy.
The final sublevel should be explored with caution. It is advised to take care of all the Jellyfloats before confronting the boss: a Raging Long Legs. Just stay away from the center, and give the Jellyfloats time to float over to you.
A good strategy for the boss is to use a smaller group of Pikmin, so you can avoid the Long Legs's stomping legs. It may be intimidating, but it's also a big target. Always attack the head when it roars the second time, because you have more time to attack it. The Raging Long Legs has a lot of health, and even with 20 Purple Pikmin it will survive at least one round of attacking.
However, if you attack it with about 40 Purples affected by an ultra-spicy spray, then it can die in one cycle. The most important thing is to avoid its giant feet, which can easily smash half your Pikmin squad. For this reason, it is advisable to use a smaller group of Pikmin. Your prize is the Remembered Old Buddy, which is the head of a R.O.B.
| Technical sublevel information | |||||
|---|---|---|---|---|---|
| Internal cave name | last_2 | ||||
| "Main" object maximum (?) | 1 | ||||
| "Treasure" object maximum (?) | 0 | ||||
| "Gate" object maximum (?) | 2 | ||||
| Dead end unit probability (?) | 0 | ||||
| Number of rooms (?) | 2 | ||||
| Corridor-to-room ratio (?) | 0 | ||||
| Escape geyser (?) | Yes | ||||
| Clogged hole (?) | No | ||||
| Cave units file (?) | 2_units_Oashi_d_conc.txt | ||||
| Lighting file (?) | normal_light_lv4.ini | ||||
| Background (?) | None | ||||
| Cave units (?) | |||||
|
|
|
|
|
|
| Dead end with item | Three-way crossing | Four-way crossing | Turning corridor | Corridor | Long corridor |
 |
 |
||||
| Room with 4 exits | Circular room with 1 exit | ||||
| Detailed object list | ||||
|---|---|---|---|---|
| The game spawns these "main" objects: | ||||
| ID | Object | Amount | Fall method | Spawn location |
| 1 | 1 | None | "Special" enemy spots | |
| - | Carried inside entry with ID 1 | |||
| Then it spawns these "decoration" objects: | ||||
| ID | Object | Amount | Fall method | Spawn location |
| 2 | 2 | None | Plant spots | |
| 3 | 2 | None | Plant spots | |
| Then it spawns these "dead end" objects: | ||||
| ID | Object | Amount | Fall method | Spawn location |
| 5 | 1 | None | Dead ends | |
| Then it spawns "dead end" objects in as many dead ends as it can. Chances: | ||||
| ID | Object | Chance | Fall method | Spawn location |
| 5 | 100% | None | Dead ends | |
| Then it spawns 2 "gate" objects. Chances: | ||||
| ID | Object | Chance | Fall method | Spawn location |
| 4 | Gate (2,500 HP) | 100% | None | Gate spots |
- For details on how objects are spawned, and how some may fail to spawn, see here.
Gallery[edit]
|
This article or section is in need of more images. |
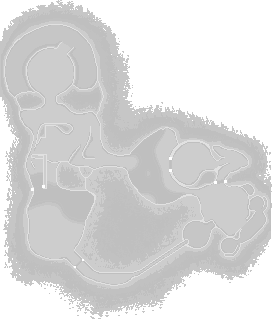
Entrance to the cave.

Trivia[edit]
- This is the longest cave in the game, with the shortest being the Emergence Cave.
- It was formerly the longest cave in the series, before the Cavern for a King in Pikmin 4.
- This is the only cave with more sublevels than treasures, excluding the Burrow of Beginnings, which contains no treasures.
Names in other languages[edit]
| Language | Name | Meaning | Notes |
|---|---|---|---|
| 百戦錬磨の穴? Hyakusenrenma no Ana |
Hole of Veterans | ||
(traditional) |
身經百戰洞穴 | ||
| Grotte des Héros | Cave of Heroes | ||
| Heldenheim | Home of Heroes | ||
| Fossa di Eroi | Grave of Heroes | "Fossa" normally means "ditch", but is often used as a crude synonym to "grave" | |
| 베테랑의 굴 Betelang-ui Gul |
Hole of Veterans | ||
| Sima de los Héroes | Chasm of the Heroes |
See also[edit]
| Wistful Wild | |||||||||
|---|---|---|---|---|---|---|---|---|---|
|
Click an object |
| ||||||||