Hint

- For hints on loading screens, see Loading screen#Tip.
Hints are a game mechanic in Pikmin 3 Deluxe that give advice on what to do in the game. Their purpose is to assist players who are not sure what to do to advance in the game's story. Hints consist of some text, some images, and in most cases, arrows on the ground pointing towards the next destination.
Mechanics[edit]

Hints are designed to guide the player towards advancing through the story. Some are about where to go next, some are about how to defeat bosses, and some are about various other things. Many hints have associated locations in a specific area that they refer to. Due to the linear structure of Pikmin 3, there is a linear progression of story hints. Only one hint can be active at a time. Each new hint will appear in response to some threshold being reached, and when another hint threshold is reached, it will replace the current hint (even if the new threshold is not the intended next hint because a sequence break was performed).
The way hints are shown depends on a setting in the pause menu, called "Hint Display". If it is on (which is the default setting), a bubble with the text "Hints" will appear in the HUD, and if it is off, this bubble will not appear. In both cases, a Hint bubble will be present in the pause menu. During gameplay, pressing ![]() will show the current hint (even if Hint Display is off). Selecting the bubble in the pause menu will also show the current hint. If a new hint becomes available, both bubbles will sparkle, and an exclamation mark icon will appear over the HUD bubble, indicating a new hint is available. Once the new hint has been viewed, the bubbles will no longer sparkle until another new hint is available.
will show the current hint (even if Hint Display is off). Selecting the bubble in the pause menu will also show the current hint. If a new hint becomes available, both bubbles will sparkle, and an exclamation mark icon will appear over the HUD bubble, indicating a new hint is available. Once the new hint has been viewed, the bubbles will no longer sparkle until another new hint is available.
When a hint is shown, the game is paused and a hint window takes up most of the screen. It contains an image, which may be a screenshot or a map, and some text below. There may be multiple pages in a hint, and if there are, these can be advanced to the right with ![]() ,
, ![]() , or right on
, or right on ![]() , and to the left with
, and to the left with ![]() ,
, ![]() , or left on
, or left on ![]() . (The face buttons or the stick can be held to quickly advance through pages in a loop, but the same does not happen for
. (The face buttons or the stick can be held to quickly advance through pages in a loop, but the same does not happen for ![]() or
or ![]() .)
.) ![]() can be pressed to close the hint window and return to gameplay (or the pause menu, if the hint was opened from there).
can be pressed to close the hint window and return to gameplay (or the pause menu, if the hint was opened from there).
Arrows[edit]

If Hint Display is on, hints will not only consist of pages of information, but of arrows on the ground. These large blue arrows will point toward that hint's associated location, forming a path in front of the player using the same waypoint system as Go Here!. Since not all hints have an associated location, not all hints have arrows. The arrows will only appear near the active leader, and up to 5 arrows can be on the ground at a time. Arrows are 3D objects and can illuminate their surroundings, but they do not have any collision. They do not appear on the radar or the KopPad camera view. After appearing, arrows will not stop pointing towards their associated location until the player reaches that location, though they will briefly disappear and reappear again after the Onion menu or KopPad (except the camera app) is closed. Arrows can be made to disappear by turning Hint Display off; after turning it back on the arrows will not reappear unless the hint is opened again.
The associated locations of hints can vary in type. For some hints, the arrows point to a certain point in 3D space, and once the player gets near enough to it, the arrows will disappear. They will not reappear unless the player walks away and opens the hint again. For some hints, the arrows point to a specific segment, and once the segment is entered, they will turn off. (Opening the hint again while in the segment will show no arrows, but opening it from another segment will point towards the destination again.) When the associated location is a fragment pile, the arrows can disappear either when the player gets close or when all the fragments have been taken from the pile. However, if fragments return to a pile (because the Pikmin carrying them were whistled) and this causes it to reappear, then the arrows immediately reappear and point towards the pile again.
Hints can sometimes have multiple associated locations. For some hints, these are in a set order, and reaching the first location will change the destination to the next location. For hints about building a bridge or turning on lights, the associated locations are the fragment piles or electrodes, and these can be visited in any order. The arrows will point toward the location closest to the player (in travel distance). When all fragments are taken from a pile or an electrode is turned on, the arrows will not point to another location unless the hint is opened again, and the Hint bubbles will not sparkle.
List[edit]
Story hints[edit]
These hints are directly related to the game's story. They are listed in the order they are intended to be seen. Some hints appear multiple times in the story and are listed in the Default hints section below. The "Area" column states the area that the trigger condition and the associated location(s) are found in, but the hint will still be the current hint if viewed in another area.
| Image | Text | Area | Trigger condition | Associated location(s) |
|---|---|---|---|---|
| Default hint, see below | Distant Tundra | Start of the game. | Initially: The can with the Yellow Pikmin.
After the throwing tutorial: The Vehemoth Phosbat arena. (Note: The arrows point past the trigger point for the cutscene that ends the Distant Tundra section of day 1, so it is not possible to get to the arena without going out of bounds.) | |

|
“Keep going. You may just encounter a rather curious creature...” | Tropical Wilds | Start Alph's section of day 1. | Initially: The first Red Pikmin Alph sees.
After the Red Pikmin runs away: The Red Pikmin in front of the Onion. |

|
“If you don't see a way forward, look for pieces to make a bridge.” | Tropical Wilds | Rescue the Red Onion. | Initially: The 2 brown fragment piles.
After picking up all fragments: None. |
| Default hint, see below | Tropical Wilds | Complete the brown bridge. | The KopPad. | |

|
“Get more Red Pikmin by harvesting pellets and creatures.”
“Use |
Tropical Wilds | Collect the KopPad. | None. |

|
“Use the power of Pikmin to push the box out of the way. Many Pikmin make light work!” | Tropical Wilds | Have at least 20 Pikmin in the field. | The cardboard box. |
| Default hint, see below | Tropical Wilds | Push the cardboard box. | The western exit of the cave. (Note: It is not possible to see if the arrows initially stop at the dirt wall before pointing to the exit of the cave.) | |

|
“Take the Pikmin out of the Onion.” | Garden of Hope | Land in the Garden of Hope on day 2. | The Red Onion. |

|
“Gather up the fragments and rebuild the bridge.” | Garden of Hope | Take at least 1 Pikmin out of the Onion. | The 2 brown fragment piles. |
| Default hint, see below | Garden of Hope | Complete the brown bridge. | Initially: None.
After seeing Brittany: The Rock Onion. | |

|
“Charge won't reach the flying creatures. Lock on with |
Garden of Hope | Seen the Medusal Slurker. | None. |

|
“Get more Rock Pikmin by harvesting pellets and creatures.”
“Throw Rock Pikmin to shatter the crystal.” |
Garden of Hope | Unlock Rock Pikmin. | None. |

|
“Shatter the crystal wall!”
“Throw Pikmin to the other shore to look for bridge fragments there.” |
Garden of Hope | Rescue Brittany. | The 2 blue fragment piles. |
| Default hint, see below | Garden of Hope | Complete the blue bridge. | The Armored Mawdad arena. | |

|
“Use Rock Pikmin to break the exoskeleton, then strike with all your might!” | Garden of Hope | Begin the Armored Mawdad boss fight. | None. |

|
“Haul the strange item over to the S.S. Drake.” | Garden of Hope | Defeat the Armored Mawdad. | None. |

|
“Done for the day? Skip ahead by selecting End Day in Options.” | Garden of Hope | Collect the Data Glutton. | None. |
| Default hint, see below | Distant Tundra | First landing in the Distant Tundra. | None. | |

|
“Try throwing Yellow Pikmin at the electrical cables.” | Distant Tundra | See Yellow Pikmin. | None. |

|
“Get more Yellow Pikmin by harvesting pellets.” | Distant Tundra | Activate the light in the Yellow Onion cave. | None. |

|
“Try to roll the iron ball.” | Distant Tundra | Have at least 20 Pikmin in the field. | The iron ball in the cave. |
| Default hint, see below | Distant Tundra | Push the iron ball in the cave. | The door to the outside. | |

|
“Find a place where you can trade Pikmin.”
“Gather up the fragments and rebuild the bridge.” |
Distant Tundra | Leave Brittany's cave. | Initially: The place for throwing Pikmin across the river.
After reaching with either leader: Alph and Brittany have different associated locations. Alph has the 2 blue fragment piles; Brittany has the 2 orange fragment piles. |

|
“Use the iron ball to smash your way through the wall.”
“There's an iron ball hidden here...” |
Distant Tundra | Complete the double bridge. | Behind the iron ball outside. |
| Default hint, see below | Distant Tundra | Push the iron ball outside. | Initially: The cave where the Vehemoth Phosbat is first seen.
After reaching the cave: None. | |

|
“Switch on the lightbulb.”
“Look around for other lightbulbs.” |
Distant Tundra | Activate the lightbulb that reveals the Vehemoth Phosbat. | The 4 electrodes in the Vehemoth Phosbat arena. |

|
“Build a bridge so you can light up the whole cave.”
“There must be bridge pieces around here somewhere.” |
Distant Tundra | The Vehemoth Phosbat does its Phosbat Pod activation cutscene. | The 2 fragment piles in the Vehemoth Phosbat arena. |

|
“Throw Pikmin when it stops to use its vacuum attack or when it's motionless on the wall.” | Distant Tundra | Activated the big lightbulb in the Vehemoth Phosbat arena. | None. |

|
“Done for the day? Skip ahead by selecting End Day in Options.” | Distant Tundra | Defeat the Vehemoth Phosbat. | None. |

|
“The Pikmin can build a bridge from the other shore.”
“There should be bridge pieces nearby.” |
Tropical Wilds | Land in the Tropical Wilds after rescuing Charlie. | The 2 brown fragment piles. |

|
“Work together as a trio and cross to the opposite shore.”
“Push down the shopping bag to reunite the three crew leaders.” |
Tropical Wilds | Complete the brown bridge. | The paper bag. |
| Default hint, see below | Tropical Wilds | Push the paper bag. | The Sandbelching Meerslug arena. | |

|
“Try digging up whatever's buried in the sand.” | Tropical Wilds | See the phone in the Sandbelching Meerslug arena. | None. |

|
“When that gargantuan creature starts breathing in, throw a Bomb Rock into its mouth!”
“Look for a Bomb Rock buried somewhere nearby.” |
Tropical Wilds | Awaken the Sandbelching Meerslug. | None. |

|
“Haul the strange item over to the S.S. Drake.” | Tropical Wilds | Defeat the Sandbelching Meerslug. | None. |

|
“Done for the day? Skip ahead by selecting End Day in Options.” | Tropical Wilds | Collect the Folded Data Glutton. | None. |
| Default hint, see below | Twilight River | First landing in the Twilight River. | None. | |

|
“Look around for bridge fragments.” | Twilight River | See the Winged Onion. | The 3 cyan fragment piles. |
| Default hint, see below | Twilight River | Complete the cyan bridge. | The Winged Onion. | |

|
“Get more Winged Pikmin by harvesting pellets and creatures.”
“Try using Winged Pikmin to pull the Flukeweeds.” |
Twilight River | Save the Winged Onion. | None. |

|
“Move the branch that's blocking the river.” | Twilight River | Have at least 10 Winged Pikmin in the field. | The space in front of the dam. |

|
“Hop on a floating leaf to reach the next map.”
“Collect bridge pieces to create a path to Olimar's signal.” “Try looking for bridge pieces.” “Toss allies onto a Bouncy Mushroom to bounce them to the opposite shore.” |
Twilight River | Lift the dam. | The 3 red fragment piles. |
| Default hint, see below | Twilight River | Complete the red bridge. | The Scornet Maestro arena. | |

|
“Lock on with “Attack the Scornets to rescue your Pikmin!” “Forge a path by fighting through the Scornets.” |
Twilight River | Awaken the Scornet Maestro. | None. |

|
“Is this Olimar? Haul him over to the S.S. Drake.” | Twilight River | Defeat the Scornet Maestro. | None. |

|
“Done for the day? Skip ahead by selecting End Day in Options.” | Twilight River | Collect the Hocotatian. | None. |

|
“Where did Olimar(?) go? Search for him!” | Garden of Hope | Forced landing in the Garden of Hope. | The broken cinder block. |
| Default hint, see below | Garden of Hope | Lift the Flukeweed with the Blue Onion. | None. | |

|
“Get more Blue Pikmin by harvesting pellets and creatures!”
“Gather up the fragments and make a path.” “There are some fragments nearby.” |
Garden of Hope | Pluck the first Blue Pikmin. | The 2 pot bridge fragment piles. |
| Default hint, see below | Garden of Hope | Complete the pot bridge. | The Quaggled Mireclops arena. | |

|
“Focus all your might on one of the creature's legs.”
“When the creature collapses, go for its weak point!” “Keep your distance from any rocks that start to move when the boss is knocked out...” |
Garden of Hope | Awaken the Quaggled Mireclops. | None. |

|
“Carry Olimar(?) back to the S.S. Drake.” | Garden of Hope | Defeat the Quaggled Mireclops. | None. |

|
“If you've done all your work for the day, skip ahead by selecting End Day from the Options menu.” | Garden of Hope | Collect Louie. | None. |
| Default hint, see below | Formidable Oak | Land in the Formidable Oak. | None. | |

|
“Rescue Olimar from the mysterious life-form!” | Formidable Oak | See Captain Olimar for the first time. | None. |

|
“Don't let the mysterious life-form grab Olimar again!”
“Whistle to rescue any Pikmin caught inside the mysterious life-form.” “Attack the mysterious life-form to free Olimar!” “If the mysterious life-form transforms, attack with the right type of Pikmin.” |
Formidable Oak | Enter the cave. | None. |

|
“Build a bridge to create a shortcut.”
“There are some bridge fragments nearby. Some are buried, so look carefully.” |
Formidable Oak | Walk through a trigger point at the entrance to the circular room near the Watery Blowhog. | The 2 red fragment piles. |
| Default hint, see below | Formidable Oak | Complete the red bridge. | The dark section of the cave. | |

|
“Gather bridge pieces to make a path.” | Formidable Oak | Walk through a trigger point just after the entrance of the dark section of the cave. | The 2 blue fragment piles. |

|
“Switch on the lightbulb to light up the cave.”
“Work together to switch on the lightbulb.” |
Formidable Oak | Complete the blue bridge. | The 3 electrodes. |

|
“Use Winged Pikmin to build a bridge that can serve as a shortcut.” | Formidable Oak | Turn on all 3 lights. | The exit of the cave. |

|
“Only Rock Pikmin can withstand those vicious thrusting attacks!”
“Smash the cores it spits out by assigning the right Pikmin for the job.” “When it's floating in the air, lock on with |
Formidable Oak | Carry Olimar out of the cave. | None. |


Default hint[edit]
If no text or image is specified for a hint, this default set will be used instead. It is shown here to save space in the main table.
| Image | Text |
|---|---|

|
“Keep moving ahead.”
“Press |

Special hints[edit]
These hints have special conditions for when they appear. They disappear immediately after being closed, and are replaced with the current story hint.
| Image | Text | Details |
|---|---|---|

|
“If you get stuck in Story mode, press “Press |
This hint is opened automatically at the start of the game, after the opening cutscenes finish. It appears even if Hint Display is turned off. After closing it, the first story hint becomes the current hint. |

|
“Lost a lot of Pikmin? Open Options, select Retry, then select Restart Day.”
“Want to restart from an earlier day? Open Options, select Retry, then select Earlier Day.” |
This hint appears whenever the player loses a lot of Pikmin, to remind them that retrying is an option. When at least 30 Pikmin have died in a day, the hint bubble will sparkle. Opening the hint window will show this hint, even if a new story hint has been reached while this hint stayed unopened. After closing this hint, the current hint will become the current story hint, and if this story hint has not been viewed, the bubble will sparkle again. |

|
“If you throw the other player, they will leave the squad. To reunite, select “You can check co-op play controls any time from Actions in the Control Guide.” |
This hint appears instantly the first time 2-player gameplay is activated in Story Mode, without the player having to press |


Gallery[edit]
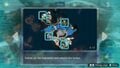
A hint page with a map.
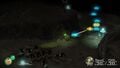
Arrows pointing past the cutscene trigger that ends Charlie's section of day 1.
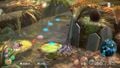
Arrows pointing down the river.
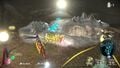
Arrows pointing down a slide.


Names in other languages[edit]
| Language | Name | Meaning |
|---|---|---|
| Tipp | Tip | |
| 공략 힌트 Gonglyag Hinteu |
Strategy Hint | |
| Pista | Hint |
See also[edit]